


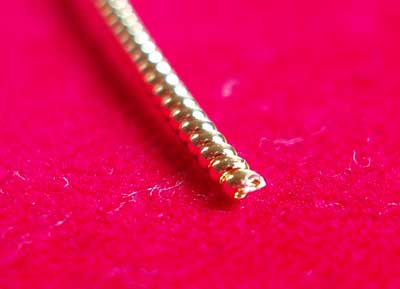
My favorite real metal thread is pearl purl. It’s a strange name, eh? Pearl purl is called “pearl purl” because it is “purl” (coiled metal without a core) and because it looks like a line of golden little pearls because of the size of its coils. I thought I’d give you a little expansion on an excerpt from my “Goldwork on Crazy Quilting” article I recently finished, to introduce you to pearl purl and show you how it’s used.
You’ve probably already caught on to the fact that I love goldwork. I think it’s such a gorgeous form of surface embroidery – it would be hard to top, actually, when considering beautiful surface embroidery techniques. In history, goldwork was reserved for the very wealthy or for ecclesiastical use. But today, as metal thread embroidery becomes very popular once again, it is an accessible technique for many stitchers, thanks to excellent instructional books that are available (you can read some of my needlework book reviews, which include several on goldwork), thanks to the fact that more specialty needlework shops are beginning to carry goldwork supplies, and thanks to the internet, which makes finding and ordering needlework supplies a lot more convenient than it used to be!
There are several different metal threads that I would classify as favorites: smooth passing thread, check purl, and pearl purl. Out of those three, if I had to narrow it down, I’d say that pearl purl is my favorite metal thread of all, for three reasons: it’s awfully pretty (!), it’s versatile, and it’s relatively quick to work with.
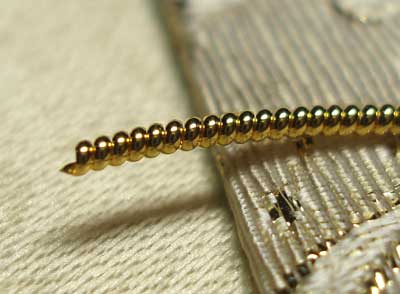
Pearl purl is made out of a thickish metal wire that is coiled like a spring. It comes in long lengths that you cut to fit whatever line or curve you’re embellishing. It’s one of the harder metal threads, but it is flexible. In its unstretched state, it takes both gentle and tight curves quite well. It also takes corners and angles well – a firm pinch with the tweezers will square off the pearl purl, or bring it to a sharp point.
If you want to practice with pearl purl, you’ll need a couple simple supplies: a length of pearl purl, couching thread (I use Kreinik gold colored silk couching thread in size 0), a small needle (size 10 crewel works well), beeswax, and small sharp scissors to use for cutting metal threads. If you are going to venture into metal thread embroidery, it’s a good idea to have at least one pair of small sharp scissors to use solely for metal threads. Real metal threads can be pretty rough on a pair of scissors, so don’t use your best embroidery scissors to play around with them, unless you don’t mind making your best embroidery scissors your metal thread scissors!
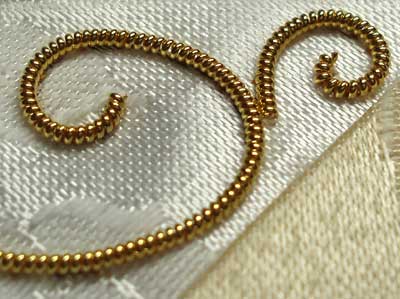
Here’s how I used pearl purl to create a simple vine-like motif.
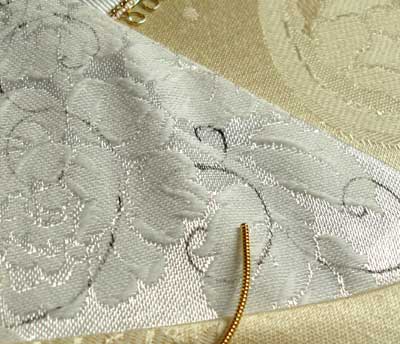
I began by drawing out a pattern on my fabric. Any line design of a flowy nature works well for practicing with pearl purl. I used a fine tipped art pen and just drew some scrolly things that fit in the corner of this block.
The ink bled a bit due to the type of fabric, but I’m using a large pearl purl (#3), so it will cover the lines just fine.
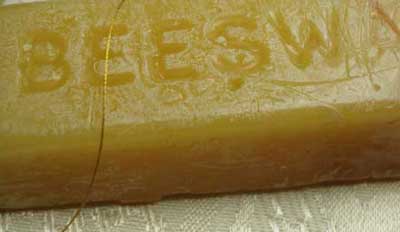
Run your couching thread over a cake of beeswax a couple times, then run it through your fingers a couple times to distribute the wax and make your thread smooth.
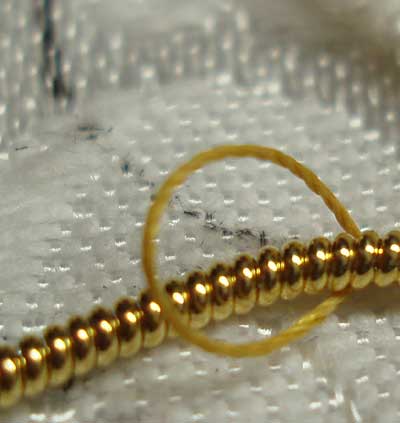
Lay your pearl purl on your vine motif to measure approximately how much you’ll need to cover the first scroll. Cut it a little longer than you think – it’s always better to have to snip off a few extra coils at the end, rather than running short!
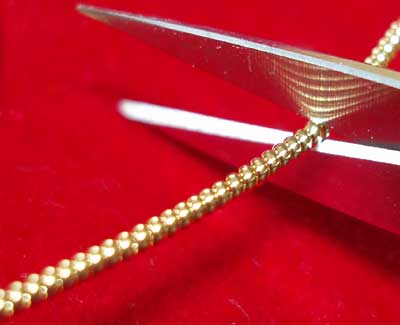
Before you cut the pearl purl, take an approximate length that you’re going to use for the whole element you’re using it on, and very, very, very gently, barely give the length a bit of a stretch by holding the two ends in the tips of your fingers, and slightly pulling on the thread with a steady, even pull. You don’t want the coils to visibly separate – you’re just pulling them a tiny bit, so that they barely start to separate. This accomplishes two things: 1. it makes the pearl purl easier to handle because it takes some of the boing out, and 2. it opens the tiniest space to make it easier for your couching thread to slip between the coils.
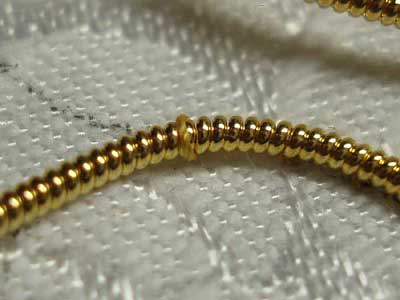
To cut the purl, snip it between two coils. In the photo above, I’m cutting a pearl purl #2, just for the sake of this demonstration. You can snip closer to the point of your scissors if you wish, but pearl purl #2 and #3 are rather tough metal – I find I need more leverage when I cut them!
You can clean the cut ends up with your scissors if you need to. Sometimes, a little shard will stick up – you want to remove anything like that, either by snipping a bit off with scissors, or by pinching the shard down with tweezers. In any case, the side of the cut on the coil gets turned down next to the fabric when you couch it, so that a full coil is showing on top.
I find it easier to begin by couching in the second coil, then couching in the first coil. Bring your needle up in your ground fabric at the beginning of the line you want to cover. Then take your needle back down over the gold, and pull through until a small loop of your couching thread remains. Sometimes, it’s easier to make the loop, then stick your gold thread into the loop. Pull down on the thread gently until it’s snug on the pearl purl.
You want the thread to rest between the coils, not on top of a coil, because you’re going to tug it down into the coils so it isn’t visible.
Give the thread a good little pull from the back. You don’t have to yank it. A quick tug will pop the thread down between the coils, where it will disappear. Usually, you’ll even hear a popping sound, but not always. I find it’s better to give a pressured pull from the back, than to really yank on the couching thread. A “tug” is better than a “yank.”
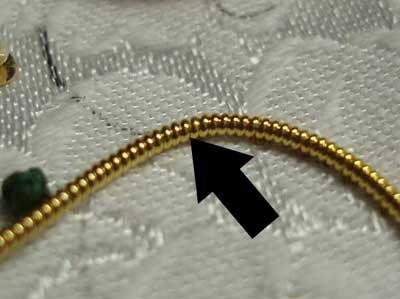
Once you couch the first and second coils of the pearl purl down onto the beginning of your line, proceed to couch the rest of the metal thread until the line is covered. Couch the thread in every third or fourth coil on straight lines or very gentle curves. As the curves become tighter, couch in at least ever other coil, so that the purl takes the curve smoothly.
As you come to the last coils to cover your line, couch in each coil for the last two or three coils. Snip any extra coils that extend beyond the line, then use tweezers to pinch down any shards, and to turn the coil (if possible – it’s not always possible) so that the least amount of the cut is visible. In fact, in the two ends showing above, the coils should have been turned better, so that the whole cut wasn’t face up!
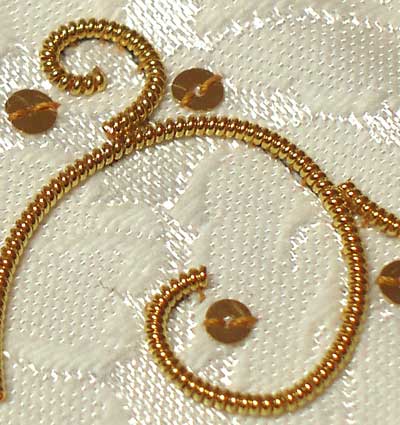
These two ends are a bit better, since the coils at the very end are complete.
Once you get your vine couched, you can embellish it however you wish! I used spangles around mine.
Pearl purl is a relatively easy type of metal thread to work with, and you can vary the look of the pearl in several different ways.
In the meantime, if you’re game to try metal threads, you can find them through specialty shops listed at the end of this article on goldwork supplies. The larger sizes of pearl purl (2 and 3) are more expensive than the finer pearl purl, because of the quantity of metal and gold used to produce them. But even if you just buy a little bit, it’ll go a pretty long way. In fact, Tanja Berlin sells sample pieces of all the goldwork threads she carries, which is a nice way to get introduced to them.
If you have any questions about pearl purl – or if anything was unclear in this little tutorial – don’t hesitate to ask!
Mary,
Thank you for this timely post. I am getting ready to work with #2 pearl purl for the first time. This explanation is extremely helpful to me.
I have been a regular reader of your site for a long time now. It is your posts that have helped me branch out into varying threads and gold’s. I am taking the EGA class on gold work.
Thanks again.
BJ
I’m glad to hear that, BJ! I’m sure you’ll enjoy the class, and I hope you find goldwork as exciting as I find it!! It’s a more tedious form of surface embroidery, but the results are worth it!
Best of luck!
Mary
Thank you for this tutorial. I have a goldwork kit, and I never had the courage to start on it (I missed the class it came with). I think with this tutorial I would be able to complete the piece, thank you!
Jane
http://www.worldembroideries.blogspot.com
I never even heard of this stuff, so thanks for cluing me in. I haven’t seen it in needlework shops, so I’m going to the link you gave.
Mary,
Im a beginner and am slowly teaching myself to embroider. I have come across a lot of different stitches that I would like to use but can’t decide what stitch would be best for which design.
Another question. Is there any kind of “backing” that is recommended behind your stitches? just to make sure things dont slip out?
thanks,
mk
Thank you Mary! This looks like something I would love to try out.
Hi, MK –
Well, for regular surface embroidery, I don’t generally use a backing fabric. Unless you’re stitching on fabric that’s super loose, and you’re using heavy thread, a backing fabric isn’t normally necessary, I find. However, with goldwork, I always line my fabric. In the project above, I used a lightweight linen as a lining. Normally, with goldwork, I use a good muslin behind my ground fabric, or a good linen (muslin is a less expensive alternative and works just as well).
As for stitches, usually that comes with practice… if you have a good stitch dictionary, they are often arranged according to types of stitches: filling stitches, line stitches, etc. If you can see the stitch first, you can probably get a good idea of what the stitch can be used for…
Hope that helps!
MC
Does the purl mark the blades of the sissors when cutting? I have jewellery making tools and wonder if the pliers I use would be suitable to cut it with.
Thank you for this post. I have never heard about purl pearl and don’t do goldwork. But I’m working more and more with wool embroidery on a felt background am am putting together a list of materials help increaase texture and interest with so much wool. Looks like this would work!
Diane
Hi, Leigh –
I haven’t had any knicks on my scissors from the metal threads. I would imagine the pliers would work fine, if they’re thin enough to get between the coils.
MC
Mary,you describe things so well!I’m waiting on some pearl purl from NZ,can’t wait!Have you done any tutorials on plain goldwork?(I’m not brill at finding things…)Thank You So Much!!charlie.
Hi, Charlie – I haven’t done any specific tutorials on goldwork, but there are several articles on here on different pieces of goldwork that I’ve done. At the end of this article, you’ll see a list of labels. One of them is “goldwork” – if you click on that link, you’ll get all the articles on here that are labeled goldwork. Some of them have useful tips and how-to’s in there, I think!
Best,
Mary
Aren’t you supposed to stretch out the pearl purl a tiny bit before couching?
Some books say to give it a gentle pull, but you’re not supposed to stretch it. You can give it a little pull – not enough to make the coils separate – and that will apparently make it easier to handle. But I don’t find it any different, really, especially when working with shorter lengths. When you cut the length off that you’re going to work with, it’s very easy to handle already. I don’t like to pull it enough that the coils start to separate….
This would explain why I haven’t found any difference when I’ve forgotten to stretch (pull) it.
Love the Church book – some *gorgeous* designs in there. Just organizing Nick to print it out for me 🙂
hi am looking for a gold metal thread that I could crochet with,
As I explore goldwork possibilities for a garment I’m making, your post on pearl purl has been really helpful! I’m not sure this is the right material for this garment, but I can hardly wait to think of another project to try it out.
Thanks,
Alanna
bonjour.merci de nous faire partager tant de belle choses
Do you have more website/contact information for:
Tanja Berlin who sells sample pieces of all the goldwork threads
I got an error message when I tried to open link.
Thanks
Diane
Hi, Diane – her website is berlinembroidery.com – I don’t know if she still carries the goldwork sampler pack.