


There are several different ways to go about transferring your hand embroidery design to your fabric so that you can stitch it up accurately. I’ve written about some of them already, which you can find listed in this article on all kinds of embroidery design transfer methods. I’ve never actually written about this particular method of design transfer because I don’t use it often. That may change – thought it takes slightly more time than tracing, it’s accurate, lasting, and easily visible.
Update, 2019: Over the years, I’ve found that the best paper to use for this method is tissue paper that you’d use for lining gift bags. It works great!
I think most embroiderers have their favorite way of transferring designs, which they probably stick to pretty regularly. Of course, the manner of transferring a pattern is going to change with choices of fabric and thread.
If you’re stitching, for example, on dark fabric, it isn’t likely that a regular pencil is going to help much for tracing the design onto the fabric. Neither would a water-soluble fabric marker.
If you’re stitching on white fabric with white threads, you can run the risk of discoloring your threads if you use too soft a pencil and too heavy a hand when tracing your design.
Prick and pounce takes a long time – and it’s a multi-step processT. Then there’s the dressmaker’s carbon method – which works ok, but what if you end up with a super messy line that you can’t cover with your stitches, and you hadn’t intended to wash the piece? Or you can’t wash the piece easily because you’re using non-color-fast overdyed specialty floss?
The options go on and on… and there are many of them.
Transferring your embroidery design using tissue paper and tacking stitches is a transfer method that works in just about any embroidery circumstance. I can’t think of any circumstance in which it wouldn’t work, really.
This is how you go using tissue paper and tacking stitches to transfer an embroidery design.
First, you need some supplies: tissue paper, a fine tipped pen, thread, a sharp needle (crewel needles or sharps are fine), and some other miscellaneous things that are nice to have on hand but not necessarily essential.
When deciding what thread to use, I suggest a regular sewing thread that’s the same color as the embroidery floss you’re using, more or less, unless you’re working white-on-white, in which case a light blue sewing thread would work. For this tutorial, I’m using green thread so you can see what I’m doing.
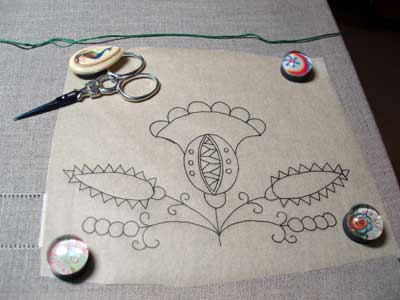
The first thing I did was trace the design I’m using onto the tissue paper. This particular tissue paper is a very lightweight yellowish-brown paper, a bit like pattern paper but slightly crisper and very sheer. I use it for everything that requires pattern tracing. You can also just use regular wrapping paper tissue for this part – one thin sheet.
Using my magnetic needleminder and a few refrigerator magnets, I positioned the tissue paper on my embroidery frame. You can also just pin it on, which, in the long run, is more secure.

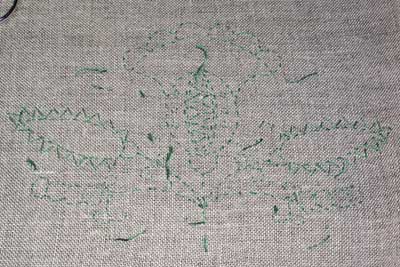
As you can see, I’m using a green thread to transfer the design. Normally, you wouldn’t do this. Since I’ll be stitching white, I would normally use white on this natural linen background. So make sure you think through the color of thread you’re going to use!
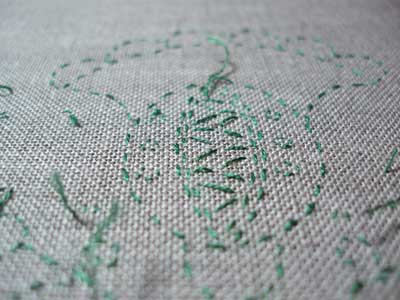
Using small regular running stitches, stitch over the entire design. The stitches can be fairly widely spaced on open, longer lines, but as you work into detailed and curvy areas, keep your stitches a little smaller and close, to make sure the details can be seen when the tissue paper is removed.
Don’t use knots in your sewing thread! Just anchor it as you would if you were basting. You want to be able to pick the design threads out easily.
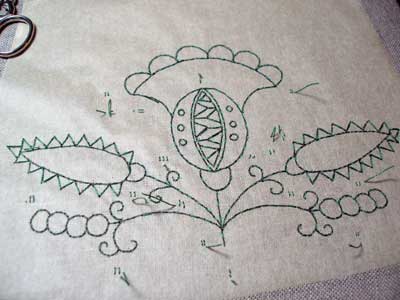
Make sure that you cover every line in the design, unless there are parts that you know you can “eye-ball” as you stitch. Those little hairy dashes in between the elements of the design are where I anchored my basting thread, by just taking two or three small straight stitches into the paper and the fabric.
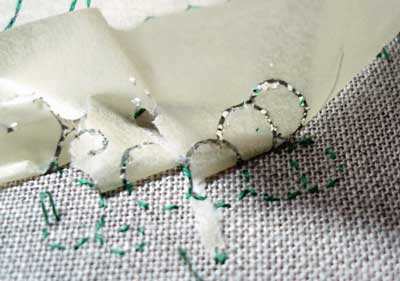
Once you’ve finished stitching, it’s time to remove the tissue paper. Gently, pull the paper up and back, away from the stitching. Don’t pull it too high in the “up” direction – I find it better just to kind of pull it back low on itself. This keeps the stitches from pulling up out of the fabric.
You can facilitate the removal of the tissue paper from the stitches by running over the stitches and paper with the eye-end of a needle, to split the paper. If you run over the whole design with the eye-end of the needle, the paper will weaken or split completely, and it’s much easier to pull the tissue off.
You’ll notice that some bits of tissue still stick in the fabric – that’s ok, you can deal with them after you’ve gotten the majority of the paper off.
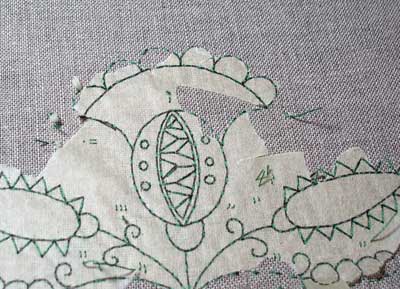
The tissue paper will be easier to remove in the larger, open spaces of the design. Still, don’t just tear and yank off! Take it easy as you remove the paper.
Once the paper’s more or less gone, take your tweezers from your tool box and pick out any remaining little shreds. Once you’re finished, you’ll have a good representation of your design on your fabric, and it won’t smudge, it won’t rub off, it won’t disappear – you can work with confidence at any pace you wish, without worrying about your embroidery design!
While you’re stitching, remove the design as you go! No residue!
Give tissue transferring a try, if you’re inclined! It’s perfect for transfering a pattern especially to dark fabric. There are plenty of ways – tracing being the easiest – to transfer a design to light fabric, but with dark fabric, we often get stuck. This method works great for dark fabrics!
What method do you use to transfer your embroidery designs? Do you see any pros and cons of trying tissue paper? Would you personally bother with this method of transfer, or not? Beginners would especially benefit from input from other embroiderers, so if you have time, drop a comment about the way you transfer your designs! Thanks!
Thank you for this help. I’ve been waffling on a project I wanted to start because I didn’t know how to get the pattern on to the fabric. Now I know, and I will probably use this method this weekend!
Jane
Mary,
I can’t tell you how much I love you for this post. I am a relative newbie and so far have done counted work with charts or surface embroidery on white muslin or linen for which I have used a pencil or washable pen to transfer. I have been contemplating moving onto colored backgrounds and musing on how to do the design transfer. You evaluation of all the methods and your clear demo of this method has saved me lots of time, error and effort. Thank you, thank you, thank you.
Thank you for posting this. It’s a very good tip. I find that using standard, cheap, printer paper works very well also. And it has the benefit that if you need to do multiples, such as slips for applique, that you can print them all off on one sheet.
(I use something like photoshop to make the duplicates, and line them up so they’ll fit in my frame/hoop)
As another tip, I baste the paper in place before doing the stitched outline. And I find that reversed chainstitch (like double chain, but just single) works beautifully through the paper.
Wonderful guidance, as always, Mary! I just published a link to this post on my blog. My readers are going to love this info! Thanks for all you do.
Denise
May I suggest the good old tough upholstery nylon thread? Comes out clean as a whistle and is sturdy enough to easily tear the paper from. Might be a problem on very lightweight or extremely fine fabric, but otherwise, that’s what I plan to use.
You can also ‘perforate’ your paper prior to pulling by pricking in the intricate areas (ah, gotta love those alliterations!).
Thanks, Mary! Great illustration! 🙂
This is the best transfer technique to use if there is a chance that you are going to change the design as you go along. Permenent outlines make this impossible.
I've found that tracing paper works well; it is easier to trace or draw the design onto, but slightly tougher to remove. I always use Coats & Clark's fine polyester thread for tacking as it is tough and doesn't ever fray.
What a pretty design, Mary!
-Christiana
My favourite method of transferring a design (if possible) is to print it on the fabric with an inkjet printer. There are limitations of size and the inability to print on really dark fabrics. However, if the fabric/design isn’t limited by these things it’s a wonderful and easy way to put a design on fabric!
I think the tissue paper method is quite good and definitely a really clean way to transfer. I was taught it in a class. If I remember correctly (it’s been a while) we lightly basted the tissue paper down first. Then we traced each motif in its actual floss or covered the tracing lines with split stitch (where appropriate) in the real floss so there was no need to remove the traced ‘lines’. Also, we didn’t trace the entire piece all at once which was interesting. We traced a section, removed the tissue paper, worked the embroidery, and then moved on to the next area. I don’t know if we did it in pieces because of time limitations, but it certainly worked.
Hi Mary,
I usually follow this prodecure. I haven’t learnt it from somewhere, but somehow this idea caught-up my mind. I do it with one difference. When I have to remove the tissue, I make the paper little bit wet, using a wet cloth or so. By doing this, the paper loses its strength little bit, and it tears off easily without distorting the threads. This method gives a very good outline especially for satin stich. And I hope it works well even for other stitches.
Hi Mary,
I happen to use the tissue transfer method often in japanese embroidery and now it’s my favorite method for motif transfer on crazy quilting as well.
I use a very fine couching thread and have found, through much trial and error, that I prefer a line of held thread stitch — I seem to get a smoother line. I find tracing paper too thick but I have found a higher grade tissue paper that comes away the cleanest. I loved Dhivya’s idea of slightly dampening the cloth. That wouldn’t work on silk but it sure would on cotton.
For designs that I have digitized, I will print out the design directly on the tissue paper by running it through my inkjet printer. I tape a piece of tissue paper to another sheet of paper and they both go through the printer with no problems. This saves the time of tracing the design and you may be grateful on something more intricate.
Thanks for the “LOVE” pdf !! and happy heart day to you! Susan
I basically use this same technique, most recently on a jacket back. I, however, used the same thread I used for the satin stitch, running it around once like you did, but then I came back and made it into an outline/running stitch. When using heavier paper, run a needle around the design to tear between stitches and the paper comes off easily without wetting it. Marjo
What a wonderful tutorial on how to do this, Mary! Thanks so much. However, I’m wondering how hard it would be to see the white thread on white fabric???
I’ve never done the tissue paper transfer, but I use a lot of paper for designs. I order from a medical supply house — the type of paper used on the examining tables. It is wonderful for tracing designs and patterns.
Also, when transferring designs onto white fabric for whitework, I usually use a fine blue pencil. The blue seems to enhance the brilliance of the white thread.
Cissie
Hey, Mary, Great post. I use this method all the time. It works great for really fine detail as well as the larger design elements. Great tip on dampening the paper. You can also score along the lines lightly with a tekobari or other laying tool. I use quilt pattern transfer paper. It comes in a beige/yellow color, is crinkly like tissue, but pulls away very cleanly instead of leaving shreddy things like tissue does. Also, after transferring you can lightly roll one of those adhesive lint rollers over to take all the tissue shreds away. For straight lines or borders, it really helps to couch the outline thread about every 3 – 5 mm which is better than a running stitch. AnneG in NC
thanks for the post. i am a beginner and have been stitching freehand. for my first pattern project i traced a simple pattern onto tracing paper. i pinned the paper to the (dark) fabric. i then split stitched the entire pattern over the paper. i removed the paper when i was done. i think this was a good beginner tool. it looks like my next step will be to set the pattern in fewer stitches as instructed. oh, and also maybe learn some new stitches!
I like this technique of transferring design. I recently bought a "silk paper" which is thinner than tracing paper or japanese paper. It would easily tear. The tracing paper I bought was thick, and expensive. I don´t feel like destroying the pattern, I will use the tracing paper now to preserve designs.
I have used tear-away stabilizer. Just trace design on the stabilizer, mark with blue wash away ink, pin in place or baste, embroider and then tear away the stabilizer. You may have to pick out a few strays, but easy to use.
would this method work for embroidery on jumpers? (embroidering on wool).
i’m a beginner, and would like to embroide VERY basic shapes (e.g a heart, a star, animal shape) onto my child’s jumpers to make them more fun for her.
Yes, I think it would! You might make it easier on yourself by using a tacking thread that matches the jumper or sweater, or that matches the color you’re stitching with. That way, you don’t necessarily have to pick out all the threads used to mark the design. Just a thought….. Good luck with it! MC
thanks Mary. Yes, i would definately use a matching sewing cotton thread to tack thru the tissue paper. I agree with your appraisal, the green thread you used was very suitable for a photo tute (so we could see where you sewed) but would not be so great for an actual project. I love how you share your “oops” moments. You’re so real, and you normalise the fact that no-one is perfect, and like everythign else in life, everyone can always learn, from someone else’s “oops” moment. I appreciate your honesty and the lovely warmth of your personality, that comes across in your blogging. It’s very nice when you are a beginner and feeling unconfident about a new skill, to be learning from a warm and friendly person like you. I really appreciate your posts Mary.
Ditto!
Mary,
Love you new site. It is so user friendly. Thank you so much for all you do.
When I want to unwind I go to Needle N Thread for some peaceful moments.
Learning is so much fun, I wish I had thought that in elementary school!
Lorraine June 4, 2010 7:36 PM
Thank you, Lorraine – I laughed at your comment! I wish my high school students would discover the same thing about learning! I’m glad you enjoy the new site – I’m still working my way around getting to know how it works, believe it or not. Fixing little things here and there – things that I hope no one else notices!
Thanks for the chuckle!
MC
Hi, I hope I can still get answers on here as the last message I can see on here was June this year.
I have just come across this after searching for hours for information.
I have been scouring the internet for a few days now as I want to start embroidery.
I would like to start with something simple like putting names onto baby bibs by hand. When I came across this Transferring an Embroidery Pattern using Tracing Paper, I was very happy as it sounds simple for me as a beginner.
There is just one question I would like to ask you, What would be the best thread and best stitch to use on baby bibs?
Fingers crossed I can still get an answer 🙂
Thanks
Hi, Jayne – For thread, I’d start with DMC stranded cotton (or Anchor, or Cosmo – one of the well-known, colorfast stranded cottons, in any case. It doesn’t have to be DMC in particular.). Stranded cotton is good because it is washable, and chances are, you’ll want to wash the baby bib. Is it a knit fabric? If so, the tacking and tissue paper might not be your very best choice, although I suppose it would work. Here’s a more recent list of different types of ways to transfer patterns, in case you haven’t seen it: https://needlenthread.wpengine.com/2010/09/beginning-embroidery-design-transfer.html
Hope that helps!
~MC
Aloha Mary, I find this so help full…I am very new to this art form and totally enjoy the way the page is designed and how user friendly everything is…
I have been wanting to start on something but didn’t know how to transfer the pattern on to the fabric…and now I know…And I totally agree with Gigi #18, on how your warmth in wanting to share and perpetuate the craft really comes through the web page here…
God Bless you!!! Danny
Hi Mary!
I have used this method quite a bit, and discovered it myself after a disappointing result with ‘Aquapaper’ which is totally unsuitable for hand embroidery. However, my method differs in that I actually embroider the final design through the paper! The type of designs are very tiny features on felt animal brooches, and I’ve found this is the best method for achieving exactly the shapes I want on a very small scale. I tend to use simple stitches like split stitch or back stitch, which I can make very small and have quite a bit of control over.
Thank you for yet another interesting, instructive and enjoyable article!
Joey
Many thanks for this. I’ve done counted cross stitch from charts for years, but I intend to embroider a unique design onto my paige boys ring cushion for my december wedding, but I had no idea how to transfer a design onto dark material. This is just perfect. Can’t wait to get on!
thanks
Thank you so much! My ultra-embroidery book did not give me this option! (I have been flinching at the thought of prick-and-pounce) This will work great for the slow-pace embroidery I will be doing! It won’t wear off, and all of the color planning will already be laid out for me! (I am intending to work with thick dark brown fabric that doesn’t like water)
Mary, I thought this to be very helpful. I had looked everywhere and nothing was explained so well (even with the green situation) I got the point and now I can go on with my project. Thanks so much
Thank you so much! I wanted to transfer a design to a dark piece of velvet and was at a total loss. I will take your method (and the tips you learned from your errors!) and give it a shot.
I have surfing. Web for how to’s for transfer on black fabric. I was happy to find these instructions. I am excited about my project plans NOW. Thank you so much. Your videos and info is what has let me to embroidery. I love your site. I don’t think I would be trying to hand sew if not for this site
I’m going to try this method. I’m taking a workshop through my local quilt guild. The workshop concerns embellishment. Prior to the workshop each participant is to have applique the pieces to the background. The entire pre-workshop part is wool. I’ve never worked with applique and then embroidery on wool. I know the wool is too dark for the light box. Thank you, thank you for a great tutorial and solution to my situation.
07/16/2014
Hello, Mary!
Well, you wrote this post over 5 years ago (which I only realized while reading the comments), and I have to say, it felt as fresh to me today as if you had just written it. Not only was this method explained very clearly (and,yes, your “oops” did help, I’m sorry!), but also, as many have said, your warm personality and good humor sparkle through — these are the magic elements that make you a wonderful teacher. Thank you very much.
I don’t know if anyone is still interested, but I believe I have something to add on the thread issue. I will try to be as UN-long-winded as possible!
First: I make/sell jewelry & I purchased two large multicolor packages of embroidery floss (low-grade, I’m sure) to use for that.
Then I saw something online about embroidered Espadrille shoes and I *really* wanted to try to do that to a pair I owned. But I am a super-duper beginner to embroidery (learned a bit when I was very young). I thought maybe I could try drawing a pattern and transferring it somehow and…well, here I am.
Anyway, the thread. There are a few kinds of beading thread that are specifically made not to shred/divide. One brand/type, called K.O. , is .15 mm, comes in 18 colors, and I think it would be perfect for the tissue transferring use discussed here: “K.O. is a strong, fray-resistant, non-stretchy thread …The fibers of the cut end stay together, making it easy to thread.Its smooth, hard surface, which has a slightly shiny finish, makes splitting with the needlepoint difficult.” That kinda makes it sound like plastic, but I think it has a nice drape and is a pleasure to work with — I use it for off-loom weaving.
Anyway, that’s my story. I’m glad to have found your blog — it made me smile on a less-than-smiley day. Not only your post, but also the people who commented — everyone obviously is here to not only help themselves, but help one another. Yay for that. Thanks again, I’ll be around!
🙂
Hi, Sarah – I’m glad the article is still useful! Thanks for the heads up on the beading thread!
Mary, I’m having trouble with the tissue splitting as I sew on the traced lines. That throws the design off. What is the solution please.
Perhaps a different type of tissue paper? Look for tissue paper that has a little body to it, I think….
What brands of tissue paper or pattern paper are working the best? Some say tracing paper or tissue paper…..some specific brand types would be most helpful. Thank you!
Would this method of tacking on to tissue paper work on hand dyed silk? I don’t want to ruin the fabric ! The suggested method was to trace pattern on dressmakers carbon, but I can’t see any lines when I tried it. Thank you!
Now I find myself in a quandary. I had ordered some grey transfer paper to transfer a design onto navy blue fabric, but this seems like a good method as well. I think I might try this if the tests with the transfer paper don’t work out. Thanks for the alternative!
I’ve recently started and I’m learning the art of needle point, embroidery and cross stitch. I’m amazed and ecstatic to have a place I can come to for such detailed information that’s helped me so much already. I couldn’t for the life of me see transferring patterns. I was puzzled by it and you’ve explained it all so well. I’ll be reading daily any and all comments are appreciated for a beginner! Thank you for all your hard work here.
Welcome aboard, Vicky!
Thank you Mary! I love your site. I made the mistake of putting knots on edges of the design when I tacked on the design on Aida fabric and they definitely got in the way when trying to blackwork patterns especially when I had to compensate. I also used Gutterman sewing thread but found the thread was getting “fluffy” while I was stitching the patterns but used the tepee brushes to clean it up.
I’m going to try again but this time I might put sewing holes on the design line on the tracing paper as my stiches were getting a bit wayward and not smooth on the lines. I was thinking about using tracing paper which is thicker. I might test it out on small shape to see what happens.
I love how this looks but and you have explained the transfer method really well, thank you.
However, I don’t understand how you stitch using the transferred sewn image. If you remove it as you go in advance of making a stitch then isn’t the guide line gone? However, if you leave it in place as you do the embroidery I can’t work that out either. If you stitch over the edge of the image then you make the design bigger than it was and if you do it inside the image then you shrink the design. If you stitch on the guide line itself, then you split the thread of the guideline making the thread impossible to remove. I would be very grateful of any response to tell me how you stitch, because the image looks great so I would like to try this method. Thank you.
If the thread matches your fabric or the thread you’re embroidering with, you can stitch right over it. If you take it out bit by bit just as you’re stitching up to it, you don’t have a line, but you have a visual of where your embroidery stitches need to be going. I try to use a thread that practically matches my ground fabric, or that matches my embroidery thread, and then I can just stitch right over it.
Hi Mary,
Just finished skimming through your article and comments section.
Would you please share with me your favorite brand of paper that you like the best when using this particular method and where you purchase it please? It would be very helpful to me as I collect my supply list for my 2021 ❄️ snowflake ornaments.
Thank you Mary,
Nadine
Hi, Nadine – lately when I’m doing this type of transfer, I just use white tissue paper, like the kind you’d purchase to use in gift wrapping. Whenever I receive a gift or order something that involves white tissue paper, I tuck it away in basket in my closet, so I have a supply of used tissue paper that works perfectly for this type of thing.
I would like a good method for transfering a design to black or dark vevet.
Prick and pounce is the most sure way, using a lighter colored powder. Here’s a tutorial: https://needlenthread.wpengine.com/2011/05/prick-pounce-embroidery-design-transfer.html You can also use a white gel pen or a white chalk pencil to mark out the line after pricking and pouncing, but I find a tiny, fine paint brush and yellow paint to be more permanent and longer lasting. It takes time and patience to do, but it’s a great way to get a good transfer.
I normally iron transfers or dress maker,s
Carbon paper. I could try a different technique.
Do you use double thread or single strand to baste? Which method did you use to anchor beginning thread?
Elizabeth
I use a single thread and I knot the thread, since it is going to be cut out anyway.
Hi Mary,
Thank you for this tutorial! I’m going to try this for my next project instead of the prick and pounce technique. Will you elaborate what you mean when you say that you remove the design as you go? Do you remove a few of the design stitches immediately before you stitch with the real thread?
Hi, Cynthia – You can remove the threads as you stitch over them. I usually try just to cover them, but if they are visible, just snip them and remove them as you stitch. Stitch first, then remove. You can also just stitch the whole thing, and then go over it carefully to see if any of the design lines are visible. Then, snip them (on the front or back, whichever is easiest) and remove with tweezers.
Can I use tracing paper instead of Aunt Martha transfer paper to iron on my transfer pattern?
If you mean for iron on transfers with the Aunt Martha pencil thing, I think you have to use the paper they sell. Regular tracing paper may also not hold up well to the heat of the iron…