


Before Easter, I was playing around with the idea of embroidered Easter eggs. Thing about it – spring colors, Easter egg decorations – a great combination for fun embroidery (and something I thought the kids would like!) Because of time constraints, I didn’t get very far, but I thought I’d show you what I threw together and how easy it can be to stitch on a stuffed anything.
The Easter egg – which actually looked more like a football at first – is made out of some wool remnants I had lying around. I cut out four marquis-shaped sections, using two colors. Taking one of each color, I sewed them together, right sides facing, then I did the same with the remaining two colors, then placed the two sewn together pieces right sides facing, and sewed those together, leaving a little turning hole in the last seam. All this was done by hand – it would go a lot faster by machine and would look a heck of a lot better! Anyway, this was just an experiment.
Next time, by the way, I’ll use six sections and hopefully the finished product won’t remind me of a kid’s stuffed football!
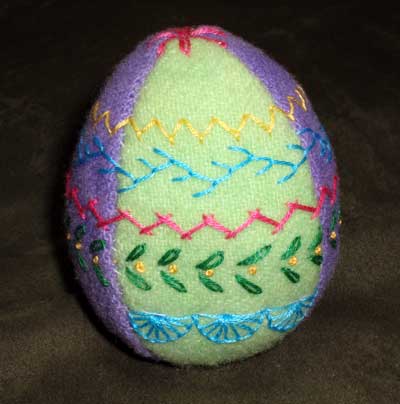
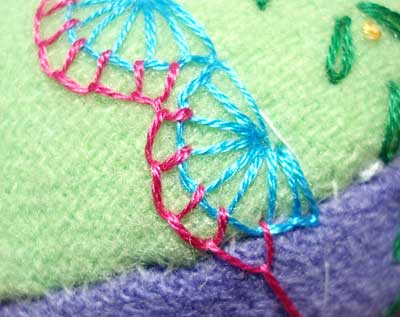
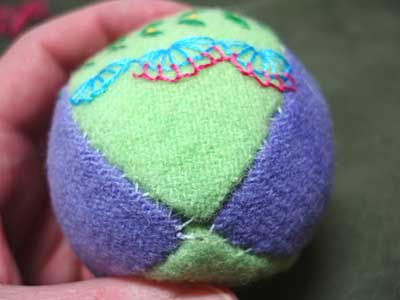
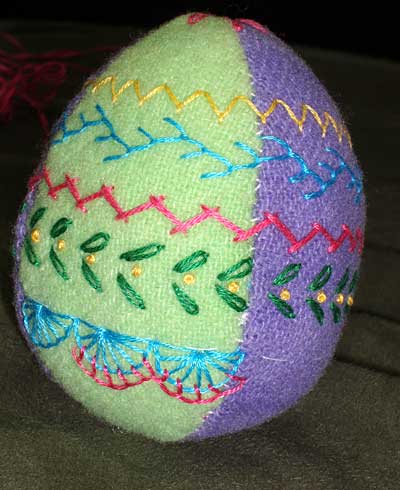
This is the egg, with a few layers of embroidery worked on it. Next time (next year?) I’ll work a few more rows and do something more elaborate with the tips. The possibilities are really endless as far as the embroidery goes – you could get really elaborate with something like this! Beads, ribbon, a variety of stitches…
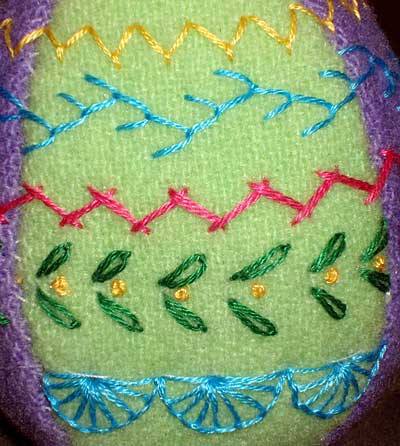
From top to bottom, I used fly stitch, double feather stitch, herringbone, daisy stitch and French knots, and buttonhole wheels.
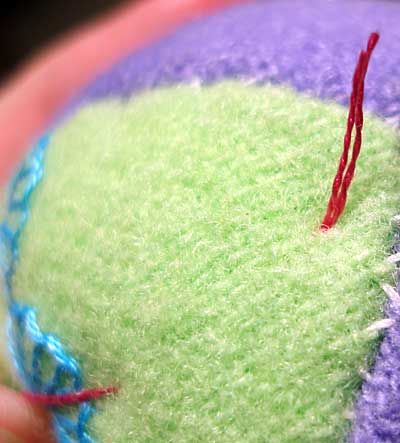
Embroidering on a stuffed figure is pretty easy, actually. You begin with a knot in the end of your thread, take the needle in some distance away from where you intend to start…
…wiggle the needle around a bit in the filling, then pull the thread through, so that the knot catches inside the filling and secures the thread.
Work your stitches in a “sewing” method – that is, taking the needle in and out of the piece in one swoop – and then, when you get to the end of your stitching, anchor the end of the stitch as you normally would….
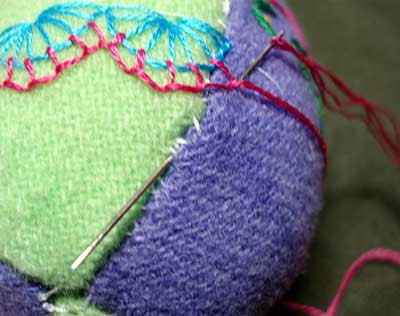
…bringing the needle either out in a seam, or out underneath a stitched area…
…and take a small securing backstitch, to anchor the thread. It’s best if this can be done in a seam, where the backstitch can’t be seen, or, again, inside some stitched area where it will be hidden.
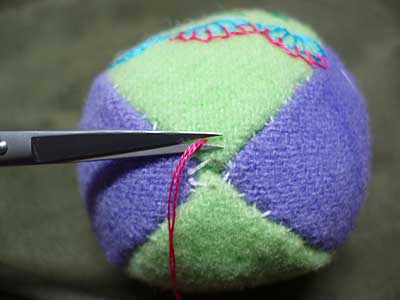
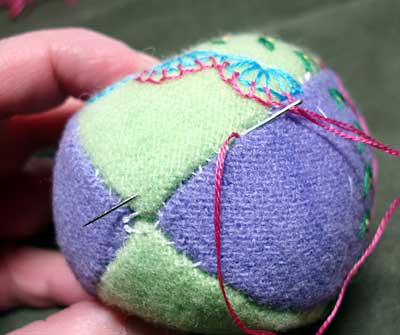
Bring your needle out of the stuffed figure anywhere, and cut the thread close to the surface, pulling a bit on the thread so that, when it’s cut, it is pulled into the inside of the stuffed thing.
See! It’s gone. Wow. Those seams are really ugly. A sewing machine will eliminate that messy look, I think!
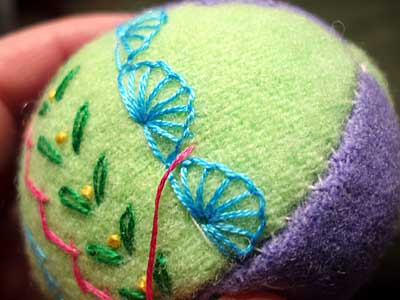
You can see here a view of the egg on a “corner.” To ensure relatively straight paths along which to embroider, I first used regular white thread and basted a running stitch line around the egg. Once the line was embroidered, I cut the white thread and pulled it out. You could probably even use something like a fabric masking tape to mark the line and then baste, to get a really straight line.
I’m pretty sure I’ll do this again, but next time, I’ll make a pattern for a six-panel egg, and I’ll use a machine to sew up the seams. I suppose any fabric would work – wool felt would probably work great!
Another option would be silks and brocades and fancy fabrics, for a dressier look. And, of course, you’re not limited to egg-shapes. You could do spheres… think Christmas ornaments and so forth. I’m contemplating a similar project for my kids’ embroidery classes this year.
So that was my stuffed egg adventure. I love the colors! But now that Easter is over, I think I’ll move on to other needle ‘n thread adventures!
Mary, this is so neat! I love the look of this egg and am surprised we don’t see them all the time! As always your stitch and color choices are lovely. They kind of remind me of embroidered pysanky eggs. Gorgeous!
Thanks to Mal above for the link to the pysanky website! As a teacher of Ukrainian embroidery (merezhka) I occasionally get enquiries from people wanting to learn how to make pysanky. I think that they are absolutely beautiful!
Mary, your embroidered eggs also set the mind on fire with all the possibilities… Thanks so much for sharing!
Mary, these are beautiful. I was looking for a non disposable Easter egg and this fits the bill extremely well as not only is it not disposable, I can use up some scraps! Many thanks for posting.
Marie
Awesome!!
Mary,
I love the stuffed Easter egg.
I’m going to play with this idea for next year for my grandson. Maybe even personalize it with his name/year on it.
You smart cookie you! Why didn’t I think of that. : )
That way he can always have one to keep to remind him of the special day.
Virginia
Ditto everyone’s comments – this is really brilliant. I love the look of it. I am less than a novice, so excuse the question if it’s stupid, but is it easier to embroider after stuffing it? Could you do the embroidery then stuff and sew, or would the stitching pull because the egg wasn’t filled yet? And, I think anybody’s handstitching wouldn’t hold up to that magnification. Thanks for sharing this great idea.
Hi, all! Thanks for your comments! It’s a fun project, and certainly something I’ll pursue again, probably with the kids this summer.
Jill! I think it’s easier to embroider something like this when it’s already stuffed, since the seams are so frequent. It’d be different if it were a larger stuffed piece, without so many seams. But it’s really VERY easy to embroider on a stuffed piece like this – you just grip it in your hand and go at it! I enjoyed the fact that I wasn’t (for a change) holding a flat piece of cloth!
Hope that helps!
I love the eggs! I can’t wait to see a pattern for them – did you use diamond-shaped pieces and curve them when sewing? I guess I could play around with it…
I love embroidering on stuffed objects – to me, it’s easier because you don’t have to worry about the hoop. 🙂 I have some small dolls I’ve done embroidery and beadwork on. I love them! If I’m going to Easter eggs, I should go ahead and start now… lol.
I know this comment is being posted very long aftr you wrote this article. DMC posted on Facebook about an easter egg contest and that how I got to this posting. I think you easter egg is great. You commented about you seams not being perfet. I do needlework finishing and I had this same problem when I started. I sovled this problem by either using 60 weight, a very small stitch and pulling the thread a little tighter or using invisable thread. I live you blog – read it all the time
Im posting this a long time after too but just wanted to say THANKS! I was trying to embroider a doll face and have never done so before. I followed your instructions and turned out great!! 🙂
Thank you so much: I started with Turkey stitch and ended with an Easter egg: your explanations are so clear – I have to get down and try some! Thank you again – Sylvia(Port Elizabeth, South Africa
Great idea and tutorial