


Aha! I bet you thought I’d given up on expanding my video library of hand embroidery stitches! I finally managed to re-video (if that’s a word) turkey work!
Turkey work, also called ghiordes knot, is an embroidery technique that creates a plush pile. It’s great for dimensional embroidery, stumpwork, and the like. I’ve seen many a bumblebee embroidered using Turkey work, as well as thistle tops and other grass / flower motifs.
The term “Turkey work” has nothing to do with the bird, by the way. It’s from Turkey, the country – it’s a rug stitch commonly used there, and the technique has been adapted into surface embroidery. This is a fun technique – not so much in the stitching, which is rather bland (more or less, just a backstitching technique, where every other stitch is left in a loop), but the trimming and fluffing is Great Fun!
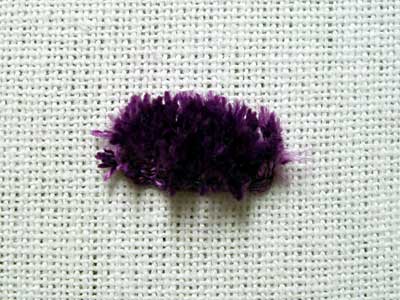
This is a clump of Turkey work from the top. It’s four rows of loops. In the video, I only stitched two rows, to show you the technique.
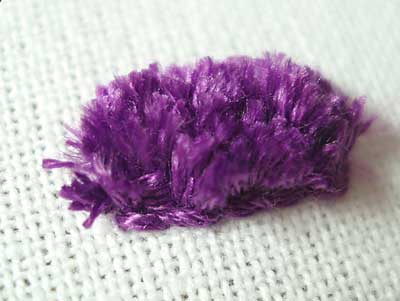
This is the pile from the side. Pretty, fluffy stuff, isn’t it? I used a whole piece – all six strands – of DMC stranded cotton. You can use any kind of thread for Turkey work, but I like stranded cotton, and as many strands as feasible, because it separates into a nice, thick carpet when fluffed.
A couple points:
1. The closer you work the rows and the smaller your “locking” stitches – and the closer together your loops are – the thicker your pile will be.
2. An eyebrow comb is a handy thing to use for fluffing, but if you don’t have one, just run your needle through it until you get the fluffy look you want.
3. In the video, I worked both rows from left to right, but you can work the rows in either direction as you return on each row. Just reverse the way the stitch goes. Once you get the hang of the movement of the stitch, you’ll be able to figure that out, no problem!
By the way, I’m back to considering whether or not I should script these videos before I actually open my mouth and start yammering…
Here’s the video:
For more hand embroidery stitch videos, check out my How-To Videos for Hand Embroidery!
Looking for inspiration & information on hand embroidery?
There are all kinds of reasons to sign up for the Needle ‘n Thread daily newsletter! Check them out and sign up today!
If you like what you see on Needle ’n Thread, if you want to be a part of keeping the website thriving (and free of annoying network advertising), why not become a patron on Patreon? Check out my Patreon page here, where I’ll occasionally add special needlework bonuses for patrons.
If you shop on Amazon, you can support Needle ’n Thread without any extra expense to you by visiting my Amazon Recommendations page here, where you’ll find books and sundries for the needleworker available on Amazon.
Mary,
Thanks for the new video. I can’t wait to use this Turkey Work idea. The look of the fluffy pile is wonderful and you explain it so clearly. Linda
Help! I seem to have gone temporarily stupid and can’t find the video.
Alice McClelland
bettytheloon@yahoo.com
Thank you Mary. It seems so easy when I see it done by someone else.
I used this video to help me with turkey work on an aquatic sampler. I would like to share a picture!
Nita Carroll
Hi Mary
I used your video to spark my recall on how to do this stitch. Thanks so much for putting it on your website.
Gratefully yours,
Naomi, Bendigo, Australia
The term "Turkey work" originally referred to a 17th century method of weaving, (not embroidery) in which fabric was made to resemble expensive Turkish carpets or "Turkey carpets". This fabric was used for table covers, pillow covers and upholstery. In Turkey work, bits of woolen yarn were knotted around weft threads by weavers. These stuck up out of the woven material and were then sheared off to a uniform height, creating a pile. Early Turkey work imitated geometric patterns found on Turkish carpets, but later the patterns were those found in English embroidery – animals, flowers, etc.
Hello. I do enjoy your instructions and demos. Is there a way I may download these instructions without showing each side of the page? I downloaded “Some notes on Satin Stitch” which came to nine (9) pages, There were three (3) pages of instructions and used(6) six pages for “scratch”. Thank you for this wonderful website, keep um’ comin!!! Pat Jay/Texas
Hi, Patricia –
I’m afraid there’s not. Even at the best of times, print features on website pages don’t generally work all that great. We tried to make it as functional as possible. You might try highlighting the text and copying and pasting it into Word or Open Office, and printing it that way. Then you could format the text larger, smaller, etc., as you wished.
Just a thought!
Best,
Mary
Mary – this is just what I was looking for! I am embroidering some of the elements on a Debbie Mumm ‘Earth Angel’ panel for a quilt pieced jacket and needed the perfect thing for a racoon tail – Thanks so much for the great tutorial
Mary,
It’s probably 40 years since I’ve done turkey work. I wanted to put eyelashes on a counted cross stitch fish for my granddaughter and couldn’t remember how and couldn’t find this stitch in any of my books. You came up on Google and your video nudged my memory perfectly. Love your site. Thanks
Hi Mary,
Just getting back into hand embroidery, (apart from Hardanger which I love and do quite a bit of),so I can honestly say I haven’t as yet done any kits. Everything I’ve re-experimented with has been drafted from pattern and then worked to re-establish long unused stitch methods and some I’ve never heard of. Most of my embroidery is done these day on machine because of nerve damage in some of my fingers, but I just felt it was time I gave it a try again. So far I’m not doing too bad.
thank you for this video. jani from srilanka
thankyou
this is amazing. Thank you so much for doing this. Your explanations and pictures are so easy to follow. Jane
My question with the turkey stitch is:
if the item is framed, won’t those stitches
mat down and not give the same effect?
Thanks, I enjoyed your tutorial.
Cheryl
Hi, Cheryl – with any embroidery, if you decide to frame it under glass, the glass normally shouldn’t be against the embroidery. With dimensional stitches, it’s necessary either to use enough layers of matting (if you use matting) to provide enough space for the stitches, or to use spacers in the frame to lift the class away from the work. Hope that helps! – MC
Hola Maria, primero que todo gracias por compartir tan lindos conocimientos en verdad que su trabajo es muy hermoso, apenas estoy tratando de aprender, pero se que lo lograre porque sus enseñas son muy claras. Que Dios la bendiga
thank you so much! this is the only video that makes sense to me how to stitch turkey work. you are a great teacher!
hi. the video for the turkey work isn’t working. I loved using this for another project. Can you see if this could be fixed?
MaryAlice
Mary-
It’s working again. 🙂 These videos are amazing. They are so much more helpful than any book. thank you for making them and making them available!
-MaryAlice
Great video! Thank you. ; )
Love love your yammerig!!!
THANK YOU for the great tutorial on Turkey Work. I though the project I’m working on was for semi-beginners, which I’m not. But this one had stumped me and YOU provided exactly what I needed. Muchas gracias!
I think you do a great job and it is so helpful to be able to see how to do the stitch.
I would rather you just chat away naturally it is great that way. Thanks so much for what you give.
regards
Joy…..
Muito lindo o seu atrabalho.
Thank you for this fantastic video. Your instructions are perfect. Please just keep it natural.
I am so glad you did the turkey work video. I didn’t now what it was called and I find you somewhat describe it with the same terminology I was using to find it which was “a cut fluffy embroidery stitch.” Thank you so much. I want to use this to make a fluffy bunny tail on an applique I’ve put on my new grandson’s quilt.
Nancy
Hello and thanks for posting these tutorials. I’m looking to do I guess what might be called freestyle needlework. I’ve drawn a composition and am looking to execute it in embroidery and applique. (My mom taught me basic cross stitch as a kid and I utilize a lot of hand stitching in my profession, but I am more or less a novice when it comes to making needlework.) I’ve been doing some studies to render one part of the composition in a cut loop, combed out pile stitch and your tutorials on Turkey work, velvet stitch have been really helpful. I found the velvet stitch gives a slightly more saturated color effect than the Turkey work line for line, but it gives a squarer shape and I’m trying to make a curvilinear shape. Know any tips for bending velvet stitch to my will (without seeing those base knots)? In the end I may combine the stitches, who knows. Also–I suppose this goes for either stitch–any tips on trimming pile evenly or into a specific shape? Thanks!
Hi, Sandra – you may find that working Ghiordes knot – or any of the piled stitches – with a heavier, plied thread will hide the base structure better. So, for example, the whole six plies of regular floss. In any case, it sounds like it’s just a matter of practicing and testing different approaches until you get what you’re looking for. As far as trimming, I trim viewing from the side, so I can see the shape of the pile.
Mary, I have tried the Turkey Work stitch a few times and made a mess because I didn’t understand what I was trying to do — until NOW! Thank you so much for your videos. I can’t wait to use this stitch!
I hope you don’t start scripting your videos. I love your natural speaking – it makes me feel like you’re sitting next to me at the kitchen table, showing me a stitch technique.
Thanks for showing how to make turkey work! I am going to embroider a squirrel and had no idea how to make a fluffy tail. I hope it works! Philo
Hello, thank you very much for showing this great idea, maybe we could use it to creat dandelions:)
Thank you!
I have been wanting to embroider a buffalo for awhile now, but wanted it to be shaggy and could not figure out how. This is the exact stitch I have been looking for for ages!
Please don’t change your ad-lib style of commentating your videos, I find it so much more interesting as I watch your tutorials. I have also found so much information on your website that I haven’t really made an effort to find other websites. Thank you for your help toward beginner and advanced needle workers. Also, about how long will it be before I can also bring my needle up exactly where I want it – just kidding, I know practice will make better if not perfect.
Thank heavens for sharing your many skills with those of us who want to learn.
Thank you for these videos! When I do the Turkey Stitch on canvas do I go hole to hole-up in one hole and down the next to make the loop and do the locking stitch in the same holes? I haven’t done needlepoint since the 70’s and it was all wool yarn then.
Thank you!
Ruth
Hi, Ruth – Yes, you’d have to go up in one hole, down in the other, for the stitch to work. Hope that helps!
I am doing wool embroidery and using a lot of new stitches it would be good to have emails about them
Ruby
Hi Mary:
Would this stitch work well on clothing, and if so, do you have any advice for the best results? The item would only be washed in cold and line dried (black denim). I’d like to use the Turkey work for the head of a dandelion, which would have seeds blowing away from it that would morph into something else…..I haven’t decided what the something will be yet. If you can save me from doing something stupid before I do it (which would be REALLY nice for a change), I would be very grateful.
Thanks again for all the amazing, awesome and wonderful things on this site. I’ve learned so much in the last few days and had a lot of fun doing it.
Hi, Cora – While the stitch would work on clothing, I really don’t know if it would be the best choice in the long run because I haven’t used the stitch that way. Over time with laundering, I think the fibers on the cut and combed threads would probably “fuzz away,” even if line dried. You know, to be certain, would it be possible for you to do a test run? Cut a small piece of scrap denim, stitch an area, and put the piece through the laundry a couple times when doing other wash, just to see? I’d hate for you to go to the work, to have it wear out.
Just discovered something about the looped Turkey stitch—-if you pull the loop all the way through, you have a much easier way (for me) to do a French knot stitch!
Are you still listening to this page? Maybe you’re checking it while you’re staying home due to the corona virus. It is 2/27/20 and while I am staying at home I have picked up the long term project of mine, a crazy patch quilt made of my daughter’s old jeans and t shirts. I’ve googled how to make a fluffy embroidery stitch (had no idea I’d get anything) and you are number one!!! I find what you have said and shown very helpful. I do have a question though. I am embroidering a dandelion flower gone to seed. The fluffy white seeds all around and flying away. So the question is, how do you adjust these directions to be a single stitch for a single fluffy seed? Rather than a whole line for a cluster, I need just single fluffs.
You’d have to stitch it kind of like a hitch knot onto the fabric, so you’d need, I think, more like 1.5 stitches to get the “hitch” to work. I think if you experiment with it, you’ll see what I mean. You’ll cut the thread to end the stitch on both ends (the beginning and end of the stitch) when the thread is on the front of the fabric, like it’s coming up for another loop. Try it!
Hello Mary and lovely to be back here again ! Thank you 🙂
Just what I was going to be looking for and is right here on your page !
The Turkey work ~ I hope everyone is well and enjoying some oeace and happiness ~
Much love to all xxx
Clear instructions, easy to follow. Thank you!
I absolutely love the fuzzy flower you made on today’s email! So pretty and effective against the backdrop of the other stitching! Thanks for the inspiration, Juli
Thanks so much for this awesome tutorial! I was looking for a technique to make “fur” on a Santa Hat…this will surely do the trick!!