


Now that you’ve had some experience with various shapes and stitch directions in long and short stitch shading, it’s time to move on to elements that are used often in needle painting. In this sampler, we look at four elements that are commonly shaded in embroidery – botanical samples. We’re going to stitch three types of leaves and a very simple flower. Lesson Six in this series of Long and Short Stitch Shading lessons focuses on a simple leaf shape. It is not the most realistic looking leaf in the world, but with a little shading, it’ll end up looking pretty good!
If you are just joining us in these Long & Short Stitch Shading lessons (also known as needle painting, thread painting, silk shading, and so forth), you can find the rest of the lessons in the index in the right column under “Editor’s Floss.” We’ve been working through a small sampler of various elements that we’re shading with long and short stitch – a technique that sometimes intimidates embroiderers, but that becomes easier and easier once you understand the basic concepts, and – of course! – once you practice the technique a little bit!
So here we go, on to the next element – the simple leaf at the top center of the sampler.
For this lesson, you will need the following materials:
1. The project in a hoop or frame, with element five (the top leaf) centered in the hoop
2. #9 or #10 crewel needles
3. Small, sharp embroidery scissors
4. DMC stranded cotton in the following colors: Greens – 3011 (dark), 3012 (medium), and 3013 (light); and burgundy 814.
For the basic stitching technique for long and short stitch, refer to the long and short stitch videos included in Lesson Two.
All stitching is worked with one strand (from the six) of regular DMC 6-stranded embroidery floss, with the exception of the stem, which is worked in two strands.
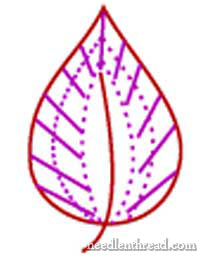
For stitch directions, mark your leaf with a pencil. The purple solid lines in the diagram above illustrate the direction of your stitching, while the dotted lines can be penciled in to mark the areas of color change.
When stitch a natural object like a leaf or flower petal, the stitch direction follows the natural direction of growth. The stitches angle towards the “growth point” of the element. In a leaf, that is the center base of the leaf towards the stem.
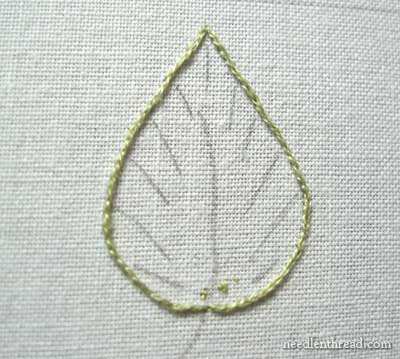
Split stitch around the leaf in the lightest green, 3013.
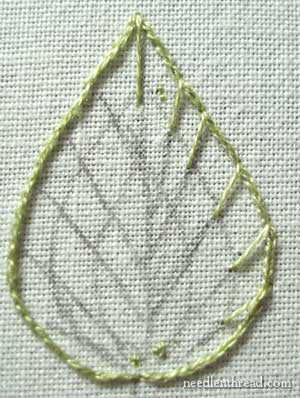
As we did in the boxes of Lesson Two and the triangles of Lesson Three, stitch in some directional stitches using light green (3013). These stitches will be about a quarter of an inch long, more or less, and will act as “long” stitches. They can extend slightly beyond your first “color area” marked on the leaf. (My pencil markings on the leaf above are a mess – but they’ll be covered up, thank goodness!)
Begin the long and short stitching in the middle of the side of the leaf, and work to the base. Return to the middle and stitch to the tip. I left the base (down by the stem) blank, and filled it in last, after finishing the rest of the leaf. You will see this as the lesson progresses.
Stagger your stitches, long and short, as explained in previous lessons, and do your best to follow the stitch direction lines.
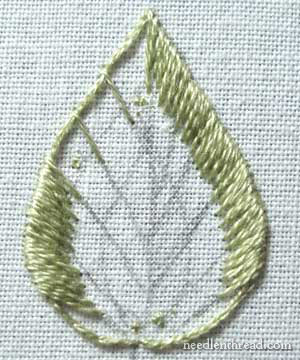
After stitching one side of the leaf in light green (3013), move to the other side, and stitch the other side in the same manner. When stitching at the tip of the leaf especially, the stitch direction will change drastically in a very little space. Tuck in little hidden stitches as necessary to neatly fill the area, without over-crowding the tip.
The light green (3013) is complete.
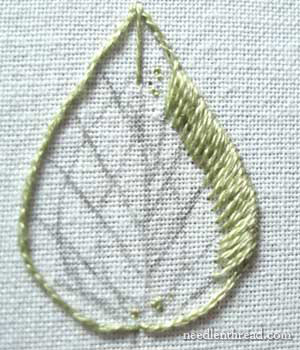
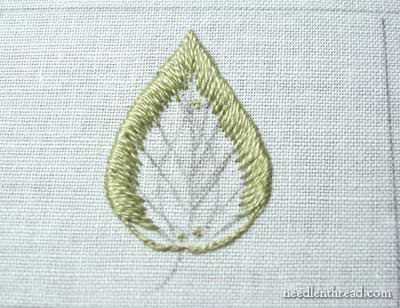
Thread your needle with the medium green (3012), and, beginning in the middle of the side of the leaf, work the next layer of long and short stitches down to the base, and then go back to the center and stitch up to the tip. As you get to the tip, manipulate your stitches as best as possible to give good coverage, but don’t crowd your stitches into the tip. You will be using fewer stitches as you work towards the center area of the leaf. Stitch both sides of the leaf in the same manner, filling the second layer with the medium green.
Once the medium green is completed, switch to the darkest green, 3011.
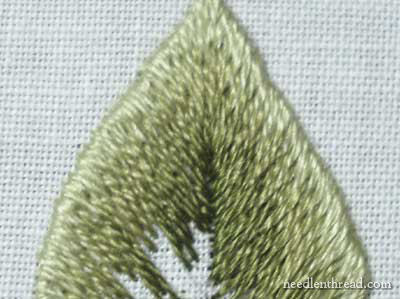
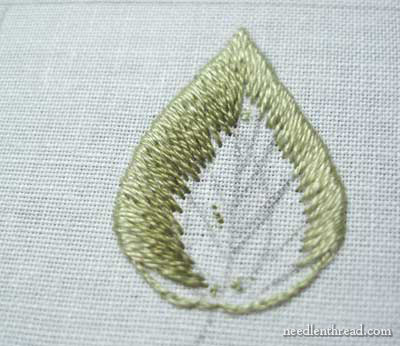
Begin in the mddle and work up to the tip, bringing your stitches to the center vein line on the leaf. On each side of the leaf, your stitches will meet at the center, forming a line down the center of the leaf.
Stretch your stitches to the center line where possible – up towards the top of the leaf, this will be easy, as the distance to the center line is not as far. As you work down the leaf (you can see this in the photo above), your long stitches may be too long if they are to meet the center line. This is ok. Don’t take them all the way to the center line – you can go back and fill in one more layer of the dark green, to complete the filling process.
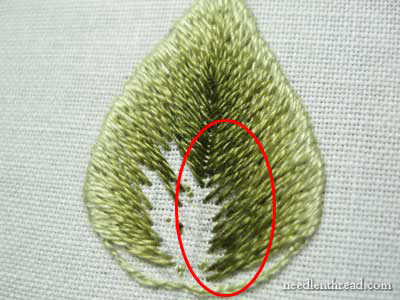
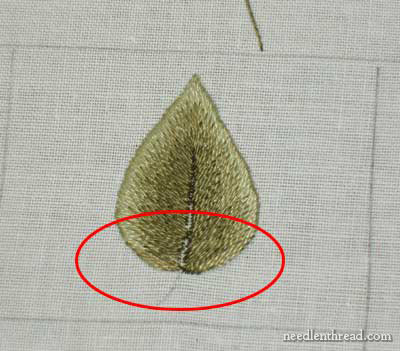
You can see in the circled area that my dark green did not stretch all the way to the central line. After working this area, I went back and filled in with another layer of dark green.
As you fill in at the base of the leaf with the dark green, take the stitches over the split stitch line where the stem meets th
e base, as necessary.
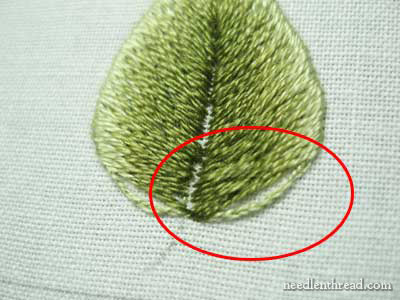
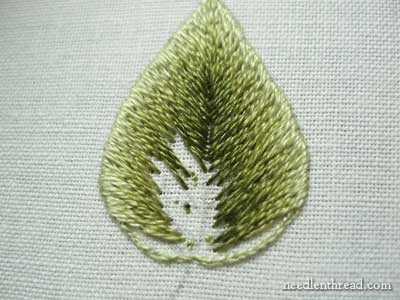
You will notice here that I have still got one area at the base of the leaf (on both sides) that is not filled in.
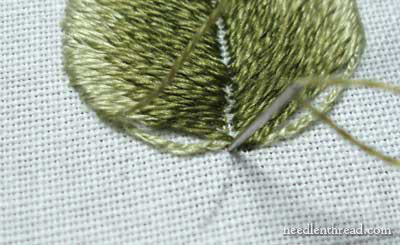
At this point, instead of long and short stitch, I will use long straight stitches (satin stitch) to cover the rest of the base of the leaf. I worked these stitches in medium green (3012).
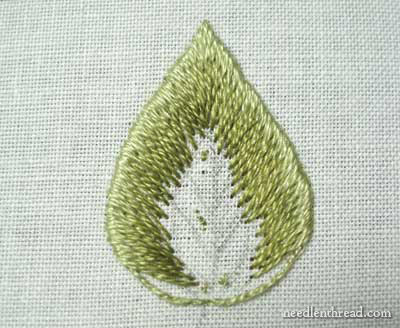
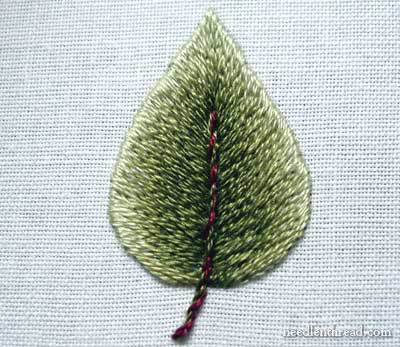
This is the leaf, completely filled in.
There are a couple little “trouble” spots, but I didn’t let them worry me. The first is that area on the center line. You can see the white fabric there where the stitches don’t quite meet, and you can see one area where the stitches in the center do meet. We will stitch a stem over this, so it will not be noticeable and is not worth correcting. Also, at the base, the satin stitches seem more obvious, as they are not shaded. Once the stem is in, however, they will be less noticeable.
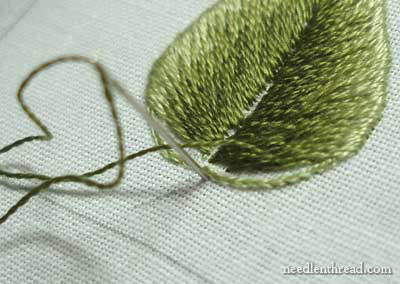
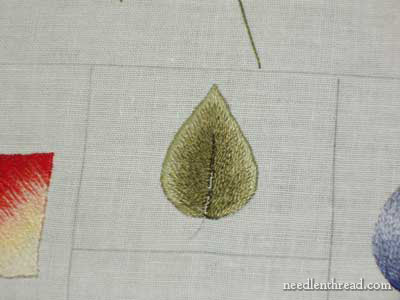
For the stem, take one strand of dark green (3011) and one strand of burgundy (814) and thread both strands together in your needle. You do not need to arrange them in any special way – just thread them both in.
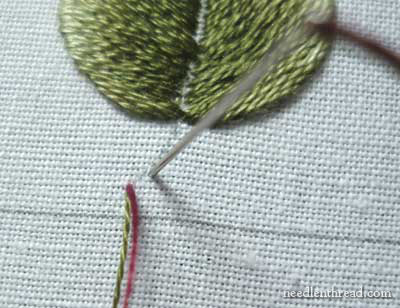
Beginning at the base of the stem (the end of the stem line, farthest away from the leaf), using stem stitch, work your way to the tip of the stem area on the leaf. End your stem line about 1/2″ – 3/4″ below the tip of the leaf. If you are unsure of how to work the stem stitch, check out my stem stitch video tutorial.
Congratulations! You have completed Element Five and now you’re ready to move on to Element Six – another leaf, but slightly more complicated than this one.
If you’d like a PDF of this lesson so that you may print it out, here ’tis:
Lesson Six: a Simple Leaf (PDF)
Good luck and have fun with it! (And don’t hesitate to leave a comment below if you have any questions!)
Ah – now we see directional lines going in two totally different directions. It's just me that needs them on something simple like a rectangle then! *grin*
Directional lines! I am never really game to draw on my embroidery like this. I think I should! Seeing yours makes things so much clearer!
Beautiful work Mary and what a lesson fo rall of us to be fortunate enough to take with you.
Thank-you for sharing your love of stitching. I just love you work you are a perfectionist and it shows.
Linda in Canada
Thank you so much!
Your lesson is a good idea,everything is quite clear to understand!
Ksenia in Russia
Your blog is absolutely splendid ! Thanks a lot for sharing so much !
Mariezanne (French)
this is the best hand embroidery site I have found so far. all details a very clear and precise with lots of description. Congrats!!!!!
Beautiful work. I love your tutorials.
¡¡¡¡¡Gracias!!!!!.
Estuve buscando información acerca de cómo hacer puntadas de relleno y su página me dió los datos que requiero. Está muy bien explicada, muy clara la exposición.
Le agradezco su esmero y dedicación para beneficiar a las personas a quienes nos interesa aprender a bordar.
Saludos desde Campeche, México.
Por favor no esta en español?
Beautiful and effective lesson. Thanks
GRACIAS–
Muy bien explicado.Me interesa aprender detalles de bordado.Soy de Argentina
GRACIAS
you are wonderful i learned more from you in two hours on thread painting then i did from a book
Linda folha, gostei do seu trabalho, nos ensina passo a passo. Obrigada. Gostaria de acompanhar seus trabalhos, como faço. Esse site que pede pra ser preenchido eu não entendi.
Esplendida esta class. Much as gracias. Soy de San Jose en Costa Rica.
ES MARAVILLOSA ESTA CLASE A MI ME APASIONA EL BORDADO Y EL RESULTADO DE EFECTO PINTURA QUE SE LOGRA CON LOS COLORES DE ESTAS MADEJAS. FELICIDADES Y AGRADECIMIENTO POR SU GRAN AYUDA.
Good lesson. Very well,explained and very good illustrations.
Good lesson. Very well,explained and very good illustrations.
I could see the drawings on the leaf and I understood the directions from reading them and looking at the pictures. Good lesson. I enjoyed it and learned from it!
Mary, I love the new website. Easy to navigate and so interesting. You are so generous allowing the pdf downloads etc. Thankyou so much. Hooe you received my email about the Monogram books I wanted to buy.
Regards Ada
Hi, Ada! Glad you like the new website and the Kaleidoscope! I just sent a reply to your email! Thanks a bunch!
I want to thank you warmely for all you have done for us.
God bless you my dear you are the best.
Thank you and best Regards.
Fathia Fathi
I can’t thank you enough for these truly excellent tutorials!! I am teaching myself embroidery and these are invaluable to me! That you offer them free of charge for anyone to use is so generous of you.
Many, many thanks.
I am just seeing these tutorials today on long and short stitch I have watched a couple for far and plan to look at them all relating to this stitch. I have embroidered on and off for years and always seemed to struggle with this stitch. The instructions and videos are so helpful.
One question with each row do you go between the previous threads or split stitch them?
Thanks again.
Split them. Some directions in some books say to come up between the previous stitches, but you’ll actually a much smoother and well blended finish, if you come up and split the stitches of the previous rows.
Thank you so much for that info Mary. I believe that will be the key to flatter and more refined stitches.
This is something I would like to try, can you tell me what kind of material is used for this leaf pattern.
Thank you
Oh i have just found your lessons on long ad short stitches, what a treasure you are.. love them… hugs for the PDF’s as well, now all i have to do is start.. im excited.. thank you so much for your wonderful insite directions instructions and patterns..
How did i every start anything without reading your articles first… hgus again
Hi, Ruth – I’m glad you enjoy them and I hope you find them useful! 🙂
Complimenti tutto bellissimo
Beautiful…cogent…very well explained..tutorial..Madam Corbett…you are the ultimate in hand embroidery in this world
amei as aulas, revendo e aprendendo