


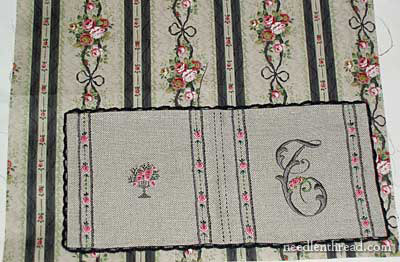
I’ve (finally!) finished the first in the series of French Maid Needlebook kits by Access Commodities. This kit is the one called “Nichole” and it features a monogram and fancy stripes that match the reproduction fabric that lines the inside of the needlebook. I’m excited to show you the finished needlebook – I like it a lot, and, of course, it’s always great to see a project completely through to the end!
There are heaps of things I like about these embroidery kits from Access Commodities. In previous articles showing the progress on this particular needlebook, I’ve mentioned the supplies especially – good linen, nice lining fabric, beautiful threads. Other aspects worthy of mentioning about this kit: the detailed instructions are easy to follow and clear, the finishing touches on the needlebook are nice, and …. well, this is a big deal for me…. it came out the way it was supposed to!
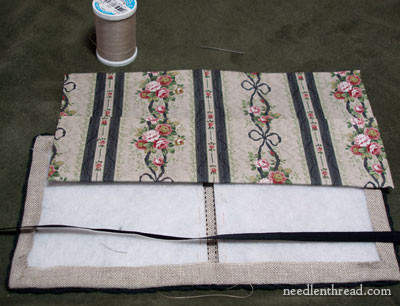
Once I finished the outside of the needlebook, it was time to prepare the lining so that it could be sewn in. All the work on the needlebook is completely done by hand, by the way – there’s no need of a sewing machine for the finishing. I was glad of that. Believe it or not, I don’t have a sewing machine. I’d like a sewing machine. I have my eyes on a particular sewing machine (a Bernina!), but I don’t actually have my own machine. The fact that I didn’t have to high-ho-hither myself to my sister’s house to use her machine was a huge plus for me!
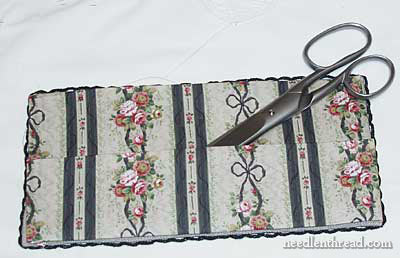
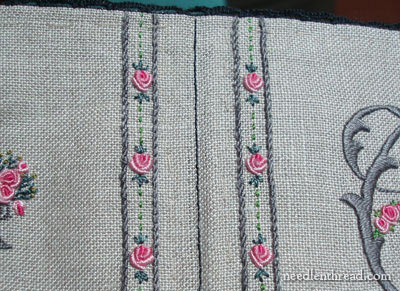
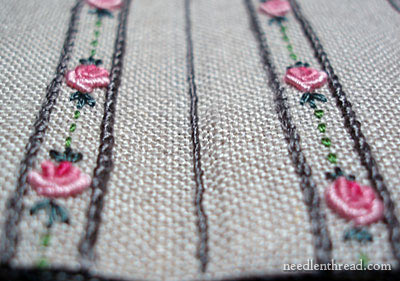
Anyway, I thought the shot above really captured the coordination of the lining and the design on the needlebook.
The lining has a pocket in it. It’s created by a simple fold, and it works out really well! Clever design, I thought. By the way, this obviously isn’t a step-by-step tutorial on finishing a needlebook! The step-by-step instructions are available in each kit in this series.
I almost forgot the ties. That would’ve been a pleasant disaster. The ribbon for the ties is black. At first I was a little unsure of this color choice, thinking that a pink ribbon would be a lot prettier and would match the flowers. But the black looks terrific with the black needle lace around the edge, and pink doesn’t look so great – I tried it!

I tacked the ribbon rather sloppily with backstitch. I almost took it out again, thinking it really should be neater. But it’s going inside the lining, and no one will ever see it. So I left it!
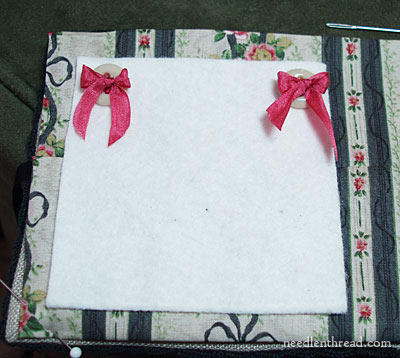
Before sewing the lining in, I attached the felt, using the buttons and pink ribbon. Actually, I also used a bit of pink floss and sewed the buttons on first with the floss, then tied on the bows. That way, if the bows every come undone (or I get tired of them!), the buttons will still be secure.
Once the lining was in, I still had the spine to worry about. This was the last step. Through all the layers, down the middle of the spine of the needlebook, a line is supposed to be sewn in such a way that it looks decent on both the outside of the needlebook and the inside. I was faced with a dilemma: to use a natural colored sewing thread that matched the outside of the needlebook would’ve been really simple – but on the inside of the needlebook, one of the grey stripes on the fabric was lined up exactly with the spine. Darn. A natural colored thread would show up against the grey stripe. So first I tried the grey floss (Soie d’Alger) that came with the kit, but it looked pretty bad! Then, I decided to backstitch down the spine in black, using the Soie Perlee that came with the kit. On the outside of the needlebook, I ended up with a backstitch line, and on the inside, I ended up with a stem stitch.
I didn’t much like the black backstitch line on the outside.
So I whipped the backstitching with the grey Soie d’Alger that came with the kit. I liked that better.
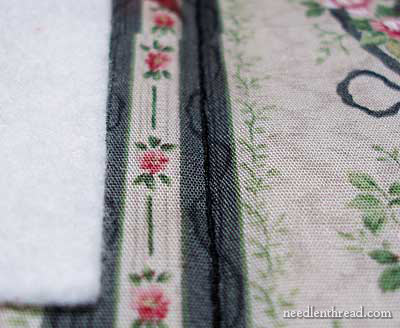
The black line on the inside of the needlebook is not very noticeable, which is nice.
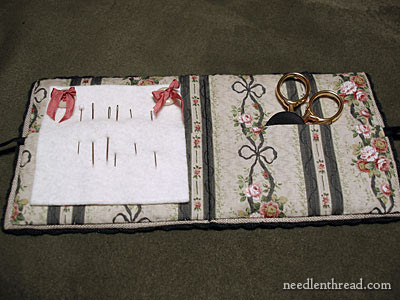
The line down the spine serves as well to separate the long pocket inside the needlebook. The pocket can hold small scissors (in a sheath), or maybe flat bobbins of threads, or even more needles on cards.
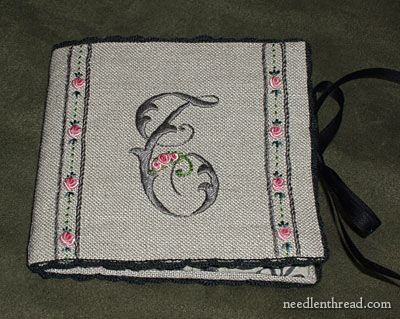
Here’s the needlebook, closed, from the front….
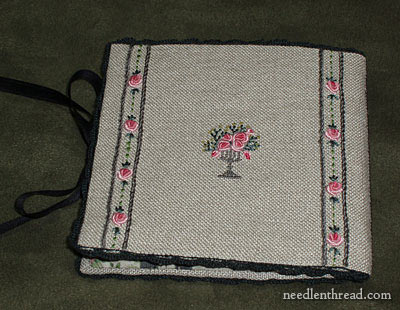
… and the needlebook, closed, from the back.
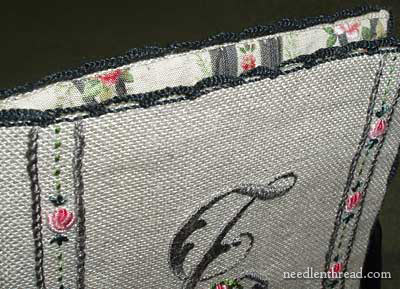
And here’s a little detail of the needlelace around the outside edge!
I really enjoyed making this needlebook and I’m looking forward to starting the next one in the series soon! You can see the progress of this project at the following links:
Nichole Needlebook Kit Unboxed – kit contents
Setting Up the Needlebook Project
Satin Stitching on the Monogram – troubleshooting
The Monogram
The Front of the Needlebook
The Back of the Needlebook
Working with Linen Thread
If you’re interested in purchasing this needlebook kit, I ordered mine from The Mad Samplar, and it looks as if they have them in stock right now, which is nice. If you want to see what’s in the kit, you might want to take a look at my first post on this project, Nichole Needlebook Kit Unboxed.
Whew. One project done. I didn’t quite meet my Christmas deadline,
but I came pretty close! Now, onto the next project! See you tomorrow!
Mary, this is absolutely gorgeous! I know that I will take forever to even bring myself close to finishing anything like this! Congratulations! 🙂
Divya
Your needle book is really beautiful. Can't wait to see the next one.
By the way, if you're still taking suggestions for next years projects, I would also love to do a small stumpwork project. I've looked at all the projects I could find online and I didn't find the instructions all that helpful. I know you could make it more understandable for me.
So pretty and very striking and sophisticated looking. Great job.
Really nice needlebook Mary!
Mary, would you let your readers know about my new website? It is called http://www.Luxxee.org and allows for free posting or full page ads. Check it out if you'd like. It is for craft people.
G'day Mary,
What a darling, precious needlebook.
Glad of the finishing instructions and pics so clear. I find needlebooks and pincushions good sellers for our annual Embroidery Guild sales table. Am always at a bit of a loss tho with final assembling and attractive finishings. Thanks for help there.
Bye for now, Kath
Very pretty! I think I need a needlebook! How convenient that I just finished a project. 🙂 Thanks for showing us so many photos of your work and the steps.
Enjoyed the snowy picture of your house. I'm driving across KS & OK today. My kids are hoping to see some fresh snowfall tomorrow.
Just beautiful! and I love the material for the lining.
thanks for sharing and providing another 'tutorial'
It has come out very well 🙂
I simply love the finished needlebook. It is exquisite.
Your result is terrific ! I love it.