


I’m on a crewel kick, if you hadn’t noticed (and the crewel puns are probably getting pretty old!)
But as life would have it, one interruption after another has prevented me from setting up the Crewel Rooster.
I suppose I could be really unsociable and mean and lock all the doors and put a “Go Away” sign out – but that would hardly be very holiday-spirited, now, would it? (Forgive me a crewel chuckle… while I go post the sign….)
Recent e-mails and comments on previous posts have raised a few questions that I want to address here, and I also want to show you how I set up these little crewel “smalls” that I’ve been working on lately. They’ve turned out to be great little embroidery projects that are quick to work.
We’ll start with setting up a crewel embroidery project on a stretcher bar frame. Now, what I’m doing here really holds true for practically any embroidery project set up on stretcher bars. I’ll try to elaborate as I go along and explain any differences.
What you see here is one of the smalls from Tristan Brooks Designs. I wrote about Tristan Brooks Designs at length recently, so I won’t go into explaining what these are – you can read about them on the previous post.
But what you want to note here is that the ground fabric for the crewel work in these little kits is actually a regular weave linen. That is, the threads that form the fabric are horizontal and vertical threads, perpendicular to each other. I believe it’s Strathaven linen that comes in the kits, and it’s a nice, solid plain-weave linen.
The linen requires a lining fabric behind it, to support the stitches used in crewel work and the weight of the thread. When you’re cross-stitching with linen, you wouldn’t put a lining fabric behind it. After all, you’re working in holes naturally formed by the intersections of the threads in the fabric.
But with surface embroidery, the stitches don’t necessarily conform to the holes in the fabric, and so you end up splitting the linen threads as you stitch, and stitching in the holes. A lining fabric helps you maintain smooth edges and curves. So, behind the linen here is a piece of regular cotton muslin (aka calico).
The point of this is to let you know that, although I will definitely be working on linen twill in my upcoming rooster project (more on the subject of linen twill later!), crewel embroidery can be done on a plain-weave linen. Just make sure you line it with a piece of muslin.
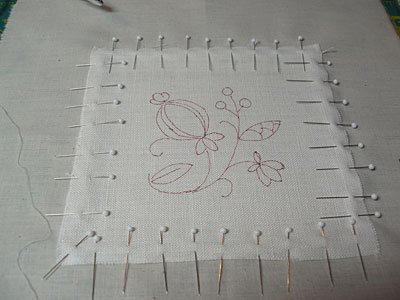
What you see in the photo above is the muslin in the background, with the linen placed over it. The grain of the linen and the grain of the muslin need to match! Make sure you line up your lining fabric when lining any piece of embroidery with the grain of the ground fabric. If one of the fabrics is off – if the fabric grains don’t match – you risk your embroidery puckering.
Actually, it’s not just a risk – it’s definite! Imagine having your linen “square” – the grain of the fabric running perfectly horizontal and vertical on your work table – but putting behind it a piece of muslin on the bias. The muslin will be stretchy, because it’s turned on the bias! This will create puckers.
So line up your two fabrics on the grain, and pin them all the way around.

Double up some sewing thread, and stitch your linen ground fabric to the muslin lining, using a herringbone stitch.
Now, a little bit about this: on these little projects that I’m working on here, a close running stitch around the inside of the linen (though the linen and the muslin) will work fine. And it’s a lot faster than working a herringbone stitch. But if you’re working a bigger project that will be framed up for a while, stick with the herringbone stitch!
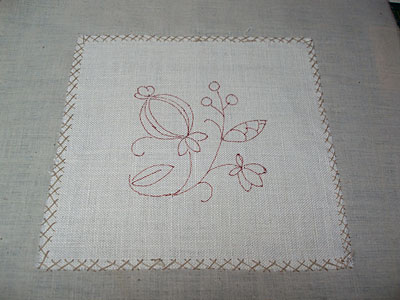
Once you’ve stitched all around the edges of the linen, you’re good to go.
It works out well for me that the muslin is much larger than the linen square, because I don’t have a frame small enough to accommodate just the linen. If you’re working on a larger frame than the size of your ground fabric, make sure you cut your muslin large enough to fit your frame. In these circumstances, you’d actually be pinning the muslin to stretcher bar frames, rather than the linen.
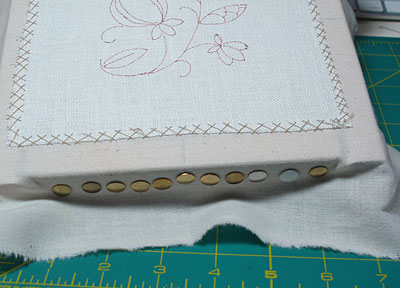
For crewel work, your fabric must be drum tight. You have three options for achieving this: a hoop, a stretcher bar frame, or a slate frame.
If you don’t have the latter two options available, then use a hoop. I have my druthers about hoops! Previously, I’ve presented an argument for good embroidery hoops, and I’ve also talked about binding an embroidery hoop.
You might want to read both of those articles, if the question of hoops is confusing to you. At the same time, though, if you’re just starting out and you don’t want to invest yet in supplies, and you have a regular “Susan Bates” plastic hoop that you use, by all means, use it. Just don’t leave your fabric in it when you aren’t stitching! They are more prone to catch dirt than other types of hoops, because of the little “lip” on the inside ring.
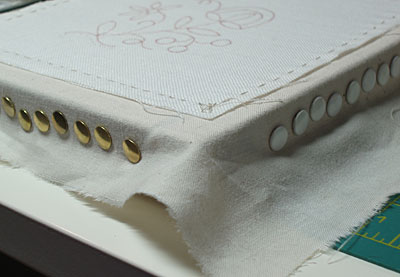
Stretcher bars are sold at specialty needlework shops. You can find them as well at Michael’s in the needlework aisle, but the ones sold there are made of a hard wood and are unfinished, so it’s difficult to push the tacks in them, and they’re splintery, which is never quite comfy on the hands. The stretcher bars that I love to use – and I don’t use any others anymore – are Evertite stretcher bars.
This is also a topic I’ve already discussed here on Needle ‘n Thread, so you might want to read my previous review of these stretcher bars if you don’t know anything about them. I just love them! I’ve slowly invested in practically every size, and I use them All The Time. (I should have stock in that company – I plug them a lot, too… but we aren’t affiliated!)
Slate frames are a little more complicated and a little harder to come by, but not as impossible to come by as they were three or four years ago! I use a slate frame (I have two, a medium and a large size) for larger pieces that will be set up for a long time. It is true that slate frames are the best when it comes to providing consistent, drum-tight, adjustable tension for your embroidery projects. But they are sometimes a pain to set up (you can see my previous tutorial on dressing a slate frame), and for smaller projects, I find the Evertite stretcher bars a better choice all around.
The 8″ Evertite stretcher bars work perfectly for these crewel smalls, and I’ll be using a set of 10″ Evertite stretcher bars for the rooster.
The review of the Evertite frame is really more of a tutorial on how to set one up, so if you don’t know how to set up stretcher bar frames, you might want to take a look at that article, too.
Now, if the house is quiet today – if no company stops in – then I’m setting up that rooster! Keep your fingers crossed for me!
(Actually, really – what would life be without friends and family stopping in?! I’ll get the rooster set up eventually!)
More on crewel work later, with a bit of information on threads and so forth.
Crewel work, by the way, is really just surface embroidery worked (normally) in wool threads. You don’t have to limit yourself to wools, and if you want to join along and try out a bunch of stitches typical of crewel work but you don’t have wool, don’t worry about it! Use what you have on hand!
Enjoy the weekend, everyone!!
Mary, thank you for the valuable information on the best frames to use and how to work each one. Well, in my embroidery box I found one similar to your slate frame have canvas on the side rollers, and bars across the bottom and wooden screw heads with screws going into the side bars to keep it very tight. The poor thing has had a very long piece of cross stitch aida cloth with unfinished backstitch of row houses for way too many years. I think I will dismantle that project and try these frames out on something new and exciting, like the rooster or a small crewel design from your blog. I enjoyed so much learning how to frame up the fabric on this treasure piece I have. Happy New Year to you. Beverly
Mary, Mary, Mary,
Must you be so crewel? You see, I love stitching. But I've actually done very few projects in my life time. And I'm busy with my knitting projects these days, and I have promised a hiatus on purchasing supplies. Clearly, if I must stitch, it will have to be embroidery with DMC cotton floss as it is all I have on hand…..sigh. If your crewel instructions weren't so darned appealing, I could turn on my heel and refuse to watch anymore, as it is sweet torture…. One of these days, Mary, one of these days, I will succumb and try a project………..(but in the meantime, couldn't you make it a little less interesting?)
WendyBee
I feel tempted to stitch along… hmmm…. perhaps resizing the pattern smaller … let's see ! 🙂
Thanks for all the info and for the comfort of knowing that it is okay to just use what we have on hand to give
crewel embroidery a try !
Hi Mary,
Thanks for the detailed instructions to set up the crewel work project.
Glad to see that your crewel kick is ongoing because for your readers it is a fabulous opportunity to learn new styles of embroidery. I was glad to read that you could use other threads. We do get 2, 3, 4 and double Knit wool in India in hanks but these are used for Knitting and crochet work. So can I use these?
Hi, All –
Thanks for your comments!
Beverly, it sounds as if you have a scroll frame there – to make it work for crewel, you'll have to lace the sides. Basically, you'd lace them just the same way as you would a slate frame. You'll want that tension from the sides to keep the piece taut!
Sorry, Wendy! 🙂
Jayashree, I think you'd be better off using a cotton embroidery floss. Traditionally, crewel is worked in wool, but wool that is made for crochet and knitting is spun differently. Passing it through the fabric will wear it down very quickly! Often, manufacturers will take a yarn made for crochet or knitting and just "resize" it for needlework, but it is not needlework thread, and the results show this. It's a pain in the neck to work with, it pills up from passing through the fabric, and it doesn't look nice when embroidered with. So I'd just stick with whatever threads you have that are made for embroidery, personally.
I hope that helps! Thanks again for your comments!
MC
Hi, Bambina! Oh, do join in! It'd be cute on one of your quilts! At first I thought the design would be a bit large (and therefore, take too long!), so I planned to resize it by reducing it about 10%, but I went ahead with it the size it is, and once I started stitching, I was glad I did. It leaves more room for detail!
MC
Thanks once again for all the great info, Mary! I so look forward to reading your blog every day and only wish I had more time to devote to the embroidery I've come to love! I did some crewel work years ago (20+!) when you could still buy nice kits from companies such as Sunset, gosh, I hope I've remembered that name correctly! Anyway, I was going to ask what type of frame/hoop, etc., you used on small projects such as Tristan Brooks's Smalls. And it would never have occurred to me that the linen would need a lining fabric! So, thanks again for all the great info!
Judy in OKC
Thanks a lot for these explainations. Oh Evertite bars ! They look so great ! How could I resist ??
Oh Mary! I've already had my eyes on this post but with my little girls around me so I've closed the pc… and I knew you had written something about… sorry.
I'll try to follow you with a thiner linen and DMC floss – let us see if I manage to finish what I have to do next days
Thanks, this was so helpful! I was wondering why linen TWILL was so important.
Hello,
Years ago I attended a friend’s home crewel party and bought a kit with 4 pictures and the stretcher bars for each. The kits, 4 different floral pictures, had everything I needed, and I loved working on the pictures. I don’t know anything about the linen and things you talk about above! Do you know where I can purchase kits that come with everything?
Thank you,
Dianne Jackson