


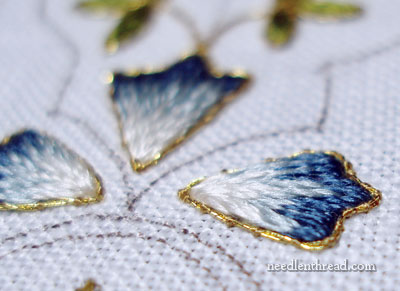
I’ve been working with the Elizabethan twist on the Floral Glove project. Elizabethan twist is a very fine goldwork thread – it’s actually two very fine goldwork threads, twisted lightly together. It’s lightweight and tiny stuff, and, couched along the outside of the a little embroidered element, it makes a nice outline.
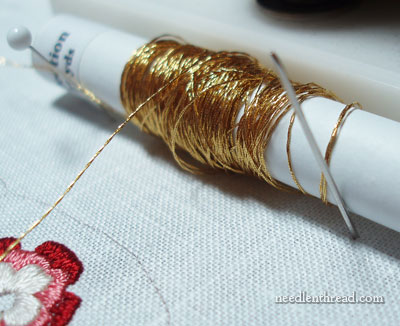
The kit came with several yards of Elizabethan twist. When working with this thread on small elements, it’s best not to cut it, but to work from the full length. When working with the full length of any fine goldwork thread that is being couched to the surface of the fabric, I like the thread to be on something, not just loosely wound up. The obvious reason is that a loosely wound goldwork thread that is not wound onto something can become a pain in the neck to keep in order.
In Japanese embroidery, couched gold thread is wound on spools called “koma.” These sit on the fabric and the gold thread is wound off them as it is couched to the fabric. When I couch smooth passing thread in a large area (like the outline of my Agnus Dei project), I usually fold the whole length of thread I’ll be using in half (since it is often couched in pairs), then wind it from the fold onto a spare spool so I can pull the thread off the spool as I go. This makes it really easy to keep the passing thread in order. The spool sits fairly easily on the fabric, as passing thread has a little weight to it when a lot of it is wound onto one spool.
The first thing I did before beginning to work with the Elizabethan twist was take it out of the little bag it came in, where it was wound in a tidy ring, and wind it onto something. I happened to have an empty spool from my Blackwork Fish project, so I just used that. I wound on the Elizabethan twist, and then started to couch around the various elements on the glove project.
The difficulty was that the spool of twist was very light, so it wouldn’t stay in one place.
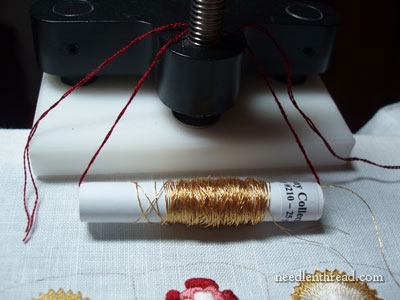
To rectify the situation and keep the spool in place while I was stitching, I rigged it. I had a little length of floss in my needlework box, so I ran it through the spool, tied it in a loop, and slipped the loop over the top of the bolt on my Needlework System 4 stand. This worked ok.

Another option that worked just as well (because the spool of thread is so light) was to stick pins or needles into the fabric and rest the spool against them.
I only had one pin in my needlebook, but I had plenty of needles, so on one side, I stuck a pin, and on the other side, I stuck a needle. The spool rested against the two and stayed where I wanted it to stay.
Before working with Elizabethan twist, try spooling it and rigging it. You don’t need any fancy equipment – just use what you have lying about in your workbox. With metal threads, I wouldn’t wind them around a card or anything flat, though, because you don’t want then to kink. A leftover round spool from sewing thread or other embroidery thread works great. The heavier the spool, though, the more stable your “rigging” must be to keep the spool where you want it in your workspace. A pin and a needle stuck in the fabric probably wouldn’t hold a regular sewing thread spool very well, but they work fine for this light cardboard spool.
Have you ever rigged up your needlework space to make your stitching easier? Any tips for the rest of us? Leave a comment and let us know!
Hi, I know that Tricia is able to get very unusual threads for her kits, and so wondered if you knew where this fine gold thread might be purchased? It looks like something that I would like to try.
You can find Elizabethan twist at Hedgehog Handworks and at Berlin Embroidery.
HI Mary,
That’s a great idea.Thnx for ur idea.
Wow — that’s two strands coming off that spool? That is fine.
I treated myself to a pair of Koma not very long ago, but never thought of folding it in half and winding it like that. I really like that, seems it would be easier to handle one than two.
Before I bought the Koma I always used either old spools or just a strip of paper or cardboard rolled up. The nice thing about the Koma is that with the flat edges on the top, it tends to roll less.
If I’m working on a large piece, I tend to have a number of items “tucked away” on the edges — needles with the next (or last) color, chart if it’s counted, sometimes scissors pinned through one of the fingers… Long quilting pins (with the big yellow head) are good for that.
Hmm, I’ve saved a few empty Kreinik spools. Now I know why.
My stitching corner includes a good floor lamp w/magnifier attachment, and a scrapbooking cart – great for keeping small tools handy. Also a stitching block, for my favorite scissors and laying tools.
Have also started keeping tools in a little zipper case, so I can grab-and-go to a stitching group with confidence that I have what I need.
If you don’t have an empty spool, roll your own ‘tube’ from light weight card (or heavy weight paper. Cut a long strip 3 to 4 inches wide and roll it length wise and fasten with sticky tape. You need enough rotations for it to hold its shape well.
When you are not using the Elizabethan twist secure the end so that it stays neatly wound on your tude and also to prevent it from untwisting.
Hi,
i’ve been reading your newsletter and enjoying it all. You do marvelous work. I do have a question about the goldwork. do you have problems with the threads splitting apart and becoming a mess? I’ve only used gold filament once and hated it.
Thanks, all – good tips!!
Robin – I think gold filament works best when it’s twisted around another thread. With real metal threads, though, they don’t really split apart, but if you’re using them to stitch through the fabric (like you might do with a very fine passing thread or something similar), they can fray at the eye of the needle. Using a Japanese needle helps reduce this. I don’t stitch through the fabric much with them, though – I generally use them for couching, and they hold up great.
Kandy – it’s actually one thread. Elizabethan twist is one thread made out of two twisted together. So it’s not doubled coming off the spool – it’s just the one thread. It is very fine stuff. But with passing thread, I fold it, so I can couch it in pairs. Yep, it works well! Thing is, if you’re filling a large space, you have to fold a very looooong piece of passing thread. I usually fold 20 yards into 10 for large spaces and wind it on a fairly large spool.
Kreinik spools are great for winding up finer sized passing threads, as are Trebizond spools, Soie Perlee spools – any of the spooled Au Ver a Soie threads – and (one of my faves) machine embroidery thread spools.
I’d like to find a source for the cardboard tubes that Pipers silk is wound on (like the one in the photos above). They’d be great for winding up extra embroidery threads that are no longer in a skein. I prefer round spools to cards!
Hi Mary!
Part engineer, part embroiderer!
Great tip for “difficult” thread. I can’t wait to get in to gold work.
Kathy
I keep my ‘pick up and go’ kit in a small, CLEAR, make-up purse so that I can easily see exactly what is there and what I need to get out.
I use chip clips (the kind that are like oversize clothes pins) to clip my chart sections to my frame.
Also, I cut up old, very clean, white t-shirts into strips and use them to cover the edges of the frame so that I don’t get dirt or grease on the edges of the fabric – or catch things on the tacks.
Thanks for the great tip for winding gold threads. I have just started signed up for a gold work class… So something that I will be able to use right away.
I have made a roll of felt to hold my metal threads in goldwork. An advantage of felt is that you can pin the roll to your work to control it.
Yep, Joan – rooling and spigging! I think it is a term. (Ok, maybe not….) I actually typed it that way, and then went back to correct it, and though – no, it works. Rooling and spigging. Why not?
Susan – the felt is a great idea! I never thought of that – and handy, because you’d only have to pin one end, and if you pinned vertically, then you can just pull the off downwards. Hmmmm. Good idea, I will just have to try that!! Thanks!
Rooling and spigging? What? 16th Century embroidery terms? An hour later someone asked me what I was smiling about. Embroidering is so much fun!
They say that necessity is the mother of invention and obviously this is one of those occasions!
I have done Canvaswork and Japanese Embroidery (which I’ve been addicted to for the last 3 years), and have to say that the Jap Embr technique, using Koma, works so nicely. Even when I did my first goldwork, I could see it looked good compared to even ‘fancy’ goldwork that I’d seen on magazine covers and such, and I’m not really that great of a stitcher. Make sure you keep the metal ‘tight’, i.e., keep it ‘twisted’, and keep it on whatever spool you decide to use. A rolled up bundle of felt can do the trick. I am glad you are passing this on, it will only help those out there who do goldwork. Great blog – thanks again!
I use small lengths of bamboo to wind onto – I’ve a choice of green ones (garden stakes), or bamboo pens from my calligraphy box. Nice and light.
I also use goldwork threads straight off the spool (two spools at a time, usually, to minimise cutting and waste), and I keep them in a draw-string bag while I’m working. I can hook this on a handy bit of my embroidery frame as I work, reposition it easily, and only pull out as much thread as I need in one go, so it doesn’t tangle. It works for me!
PS. Love the new site!
For several years, I made Christmas cards out of cross stitched designs on perforated paper. Since the graph was so small, I found it easiest to pin the paper onto my pant leg by my knee or left upper arm sleeve so that I didn’t have to constantly pick it up to check the pattern.
Wow, you got a lot of good feedback about this post. I want to thank you for always knowing where to find the supplies that you talk about. I want to try everything, but usually don’t have any idea where to begin looking for it. Thanks a bunch. Love your blog.