


I’ve been wanting to do this for a looooong time. Almost a year ago, I wrote about using watercolor pencils to transfer embroidery designs. After writing the post, in which I wished for the Ultimate Embroidery Transfer Implement, a reader (Jean, thank you!) sent me an e-mail suggesting that I try the Paper Mate Flair ultra fine felt tip marker in green. Now, the Papermate Flair is not an “embroidery transfer pen.” It is simply a fine tipped marker with a quick-drying water based ink. But I was curious about it – Jean said that she uses the green ultra-fine Flair for all her embroidery transfers and it washes out every time. So…. I purchased a set of the pens in a variety of colors and over the weekend, I finally began The Experiment.
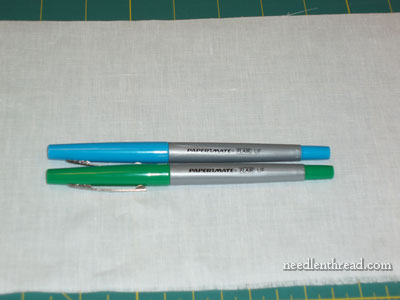
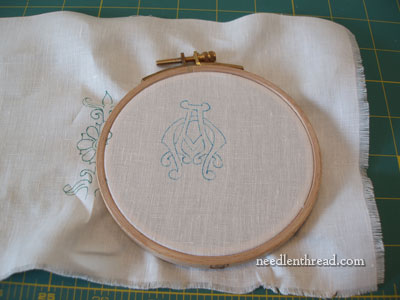
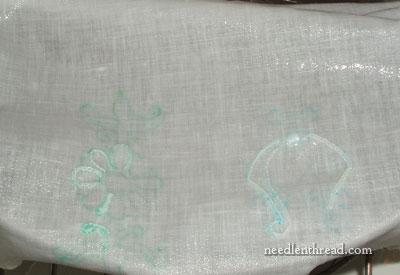
Since I’m getting ready to work on a white-on-white embroidery project, I decided I’d really put these pens to the test by drawing on white linen and stitching with white thread. Jean said, in her e-mail, that the green works best for transferring designs, but since I’m doing whitework, I thought I’d try the light blue, too. With whitework, I prefer to use blue as a transfer color. If the color doesn’t disappear all the way, blue seems to “soak” into the white and make it appear brighter. (This is, of course, assuming that the blue disappears at least most of the way!) Another point that Jean mentioned in her e-mail is that the pens work well on natural fabrics (cotton, linen), but not so well on blends (poly-cotton, for example), on which they tend to bleed.
The first thing I did was make sure that the linen was exactly in the same state that it would be when I stitched the whitework project. Many linens on the market (though not all) have sizing added to them, so it’s always a good idea to rinse your linen well. I’ll be using a fine Belgian linen that is perfect for church embroidery. It is not Legacy linen (which is usually my linen of choice), because I’m out of Legacy’s ecclesiastical linen. This Belgian linen that I’m using is very nice, though – it has a smooth hand and is not slubby at all. It isn’t as evenly woven as Legacy’s ecclesiastical linen, but it’s still a very fine, tight weave. I don’t know if it has sizing in it, but just in case, I wanted to rinse it well and also shrink it. I used an alternating hot-cold rinse, three times, and then rolled the piece up in a towel, pressed the excess water out, and then ironed the linen dry.
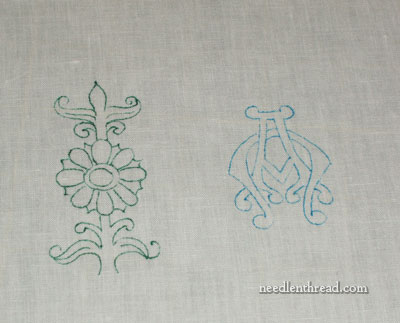
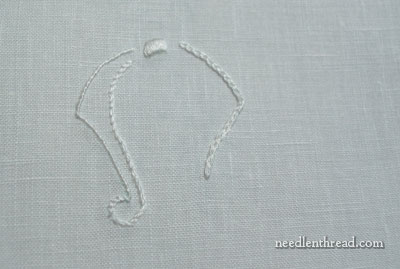
The next step was to draw on the linen. I drew out two small designs, one with the green Flair and the other with the light blue Flair.
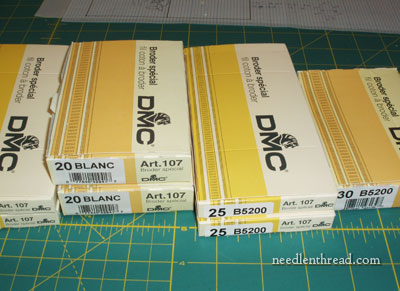
Then I took out my white coton a broder and decided on thread size. I love this thread for whitework, and I think it looks magnificent on church linens.
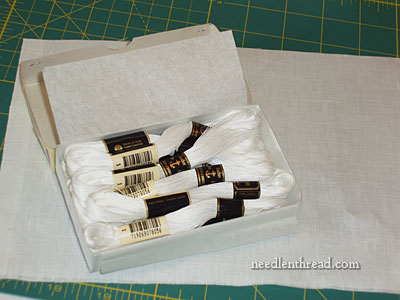
All the coton a broder I have is made by DMC, with the exception of the #40 (smallest size), which is made by Anchor. I love the #40, but I decided to use #30, just to keep the threads all the same type (DMC), though I don’t really think it matters.
I hooped up the first design. My intention was actually to stitch the designs completely, but after a gazillion weekend interruptions, that didn’t exactly happen!
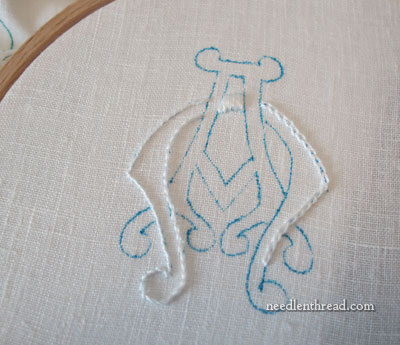
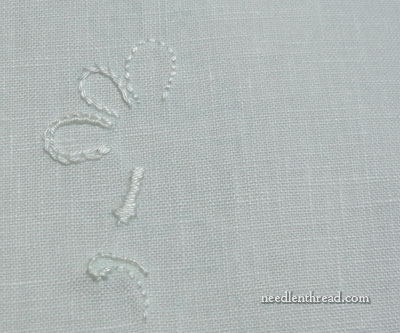
Instead of stitching the whole design, I stitched just a few parts, using different stitches – whipped backstitch, stem stitch, chain stitch, and a wee bit of satin stitch.
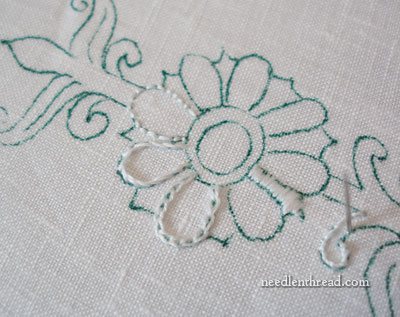
On the green design, I quickly did the same thing, and admittedly, I didn’t pay much attention to the actual stitching. My point was to just get some stitches into the fabric. I was dying to see whether or not this ink would wash out.

So there are both designs with a little bit of white stitching on them. Think about it: If this works, what could be better? The lines are fine and dark – so easy to see. The pens are easy to trace with. And if the colors rinse out of the fabric and out of the white thread, well! What more could I want?
My hopes at this point were soaring high!
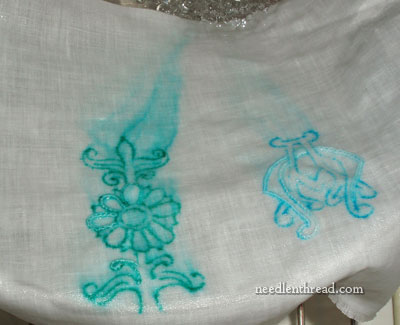
I began by running the piece under cold water for a good five to ten minutes. The ink immediately started running in streams of color when the water hit it. Now, I don’t know about you – but a sight like this is enough to make me weak in the knees and momentarily nauseous. Oh gosh. Imagine if you had just put in about 20 hours or more of stitching on a beautiful project, and then you started to rinse, and this is what you saw! Wouldn’t you just panic??!
Persistence, though, is the key.
After running cold water on the fabric for a while, the majority of the ink eventually ran off, and this is what the piece looked like. A lot of the ink was gone, but not enough to be satisfactory.
With a little more rinsing, things were looking much better!
At this point, it was time to leave the fabric in the water to soak for a while. Jean says she leaves her work in for 30 – 45 minutes. Mine stayed in for about 10 minutes of soaking. It could have stayed in there longer, but I was eager to inspect.
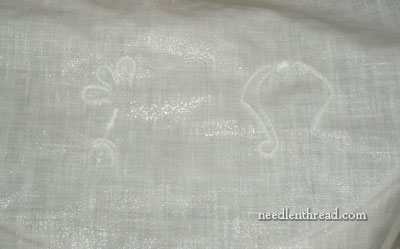
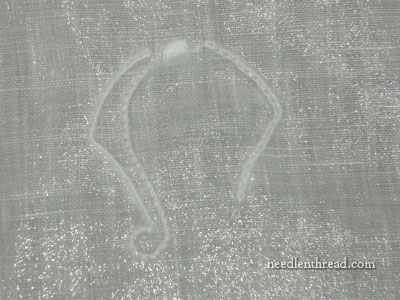
I took the linen out of the bowl of water, rolled it in a towel, squeezed off the excess water, and ironed the piece dry. And this is the result on the green side. You can see the faintest of lines – and these probably would have disappeared with a longer soaking.
This is the blue design. Again, some very, very faint (lighter even than the green) lines are barely visible in a couple places that weren’t stitched over. But what I love, really, is the fact that there is no color residue around the stitches at all.
Was the experiment successful? For the extent of the experiment, yes, I would say it was.
Would I use this method to transfer an embroidery design? Maybe – but only on certain types of projects. Projects that get stitched quickly, that don’t involve a lot of investment in expensive materials, time, and so forth. A simple flour sack towel with cotton floss, that can be stitched up in a week? Sure. An embroidery project in silk or wool on linen that will take several months and a large investment? No.
Though I haven’t tested this product over time, I have heard from others who have. It seems that the ink, if left for a long time on a project, becomes more and more difficult to remove.
So what about you? Have you ever used Paper Mate Flairs to transfer a needlework design? Is it something you’d do, or would you be too afraid to take the risk? Do you think I should stick with a regular dressmaker’s transfer pencil for my upcoming project, or a regular embroidery transfer pen? Is it silly of me to risk using these on a long-term embroidery project? I’d love to hear your view! Leave a comment and let me know what you think!
Sometimes when I have ironed on a transfer and it is faint in some parts I have gone over it with a fine line marker in black. I used black as I think at the time I was using about 3 strands of thread for the transfer and with time, handling and washing nothing of the black marker was shown. I used the black with an extreme light hand. Maybe a HB pencil could be used to fill in spaces of a transfer but only with a VERY sharp point.
I’d be wary of using them for a long-term project personally, unless Jean confirms that she’s done so and it worked! I hardly ever do anything that needs a design transferred but when I do I use a Vanish washable fabric marker. Not too helpful for you though, because I’ve never done a big project where I’ve needed to leave it in for long. It’s fine tipped and washes out in seconds when it’s only been on a few days (you can even just dab it out with a sponge on fine fabric), but I’ve never left it in fabric for any length of time.
Good morning Mary,
To answer your question about the Papermate Flair, I have used them but mostly on quilting and I like the clean lines of the pens but I think I would give it a try…a bit ssscray after hours of work on a project. Good Luck Mary I am anxious to see the results.
France
Really useful one.
Great idea.
Thanks for sharing dear.
viji
I haven’t actually started embroidering yet… too many irons in the fire! But, after reading your post, I’m going shopping for some pens so that when I have time, I’ll be ready to go! Thanks for sharing your experiment!
I would make some time-lapse stitchings … each on a small piece of fabric.
Let’s say: recipe-card size fabric – or a size that could be used as a sampler when all pieces pass the test.
It would be devastating to me if I did a complete piece and then the dye wouldn’t come out of fabric and/or threads.
Oh my! You are certainly more brave than I! And I consider myself fearless!! My stomach knotted up when I looked at all that ink running while rinsed…and can only imagine the panic you must have felt. But, in the end…the results so speak for themselves. I’ll be interested in knowing how they do after a long stitching period. (Guess I’m still scared) 🙂
Does the Paper Mate Flair come in other colors? Say you were doing a predominantly red or orange embroidery, could you match the pen color? Your designs were very nice, by the way!
Anne
OMG! I nearly had a heart attack with the first picture too. It ran quite a lot, but I guess with that ink it is also a sign that it is all washing away. What an amazing ink to just soak out! Quite often I take months stitching something. I wonder if it would wash out then…
Mary,
That would have made me panic to.WOW.Because of this sort of thing,I don’t try new things a lot. Just sometimes.
Sherry 🙂
Hi Mary,
You are brave! That photo of the ink running everywhere is a nightmare photo for any embroiderer.I’m so glad you wrote about these pens and I’ll try but I will be watching this space to see how they do on long term projects. Thanks for doing the experiment for us!
Kathy
I think you should experiment with ink that has been on there longer…like a year.
I quess I don’t understand why you would run the risk of the ink not washing out, if there is already a satisfactory product on the market.
Hi, All –
Thanks for your comments! I’ll try the Crayola markers, too, I think – I’ve heard they work well, but haven’t tried them myself. Thanks, Patty!
Sharon, I traced those! The linen is fine enough (and the drawing dark enough) that I didn’t need a lightbox or window.
Anne – I wouldn’t launch right into using them on fine things until the “time” factor is tested….
Jeanne – I’ve heard of people doing that, but I have no idea how it works. I don’t have a laser printer, so I can’t try it. I know several people who use bubble jet printers for good results – with and without “Bubble Jet Set,” a solution that apparently makes the ink set. But I don’t have a printer that can run a piece through straight, and for some reason, I just can’t bring myself to run fabric through the one printer I do have. Also, most of the pieces I work on are oversized – rarely do I stitch on anything that’s smaller than 8.5×11, since I usually cut my pieces of fabric (even for small projects) about 10×10, so that they fit on my stretcher bars. So I haven’t really gone the printer route. Without the setting solution, I’d be afraid that the printer ink would run.
Kathy – Well, the thing is, I’ve not found a completely satisfactory transfer pen. For “good” embroidery projects (church linens, etc.) I don’t like to use the air or water soluble transfer pens on the market. They don’t always disappear completely, they have been known to re-appear, and I had a bad experience with one brand on white linen, so I’m a bit wary of those. The dressmaker’s blue transfer pencil is “ok”, but it also leaves a faint residue that is difficult to remove. Over time, it fades away, but I’ve never had it completely fade, and it always leaves a residue around the base of the stitches. Iron-on solutions don’t give me enough immediate control of the design, and they aren’t guaranteed to be removable. Pencils are great when working with color – a hard lead, sharp pencil is my favorite tool for transferring on something that’s going to be stitched in color. But for whitework, the pencil greys up the threads, and though it washes out somewhat, the stitching always still looks somewhat grey to me after using a pencil. The Bohin chalk pencils work ok, with a light hand, but the lines are very light, and they aren’t super-sharp. To me, the ultimate transfer pen would be a very fine tipped pen that leaves an easy-to-see dark line that’s very precise and fine, and that rinses entirely away without a trace, leaving fabric and threads pristine. That’s what I’m after. And these pens might just do it…. I will test them over a little bit of time to see how they hold up! Also, I’ll soak the linen a bit longer after the initial ink removal. I’m also thinking the final soaking would be a good place for Orvus to step into the picture. So that’s my “testing plan” in days to come. Thanks for asking a very good question!
Thanks for the question!
this is a great topic since I am trying to decide how I want to transfer a design. I usually use a thin pencil but I am also a window tracer, no light box, so I need something that will “erase” out if I make a mistake on the tracing. I am wondering about printing the design off the computer on regular paper from a laser printer and then trying to iron the design on to the fabric? Anyone tried that?
This is a true gift to me. The transfer method is a dilemma always and I have purificators and lavabos waiting. Thanks for your experiment and your reader’s suggestion.
Thanks Mary. This is a great tip. I would also suggest putting a Shout color catcher in the water when rinsing. It may help soak up the ink. I use them all the time. Also, just curious…do you just draw your design free-hand or trace somehow?
Hi Mary
I use Crayola brand “guaranteed washable” markers with wild abandon and no fear. They are readily available in a variety of colors and tip sizes. I’ve never had any problems. I did try an off (cheaper) brand that left a huge mess all over my hands and fabric. It did wash out but it taught me a lesson.
I, like some of the comments was terrified of seeing the ink running all over the fabric. If I were using dark threads on the project then I might use the pen, that way if if didn’t totally wash out the color of the thread would hide it a bit. However, white on white and then a long term project on top of that I don’t believe I would be brave enough to do it.
Sorry – I missed a few…
Anne – Yes, the paper mate pens come in other colors. Jean mentioned that the other colors don’t remove as well, so I haven’t tried them.
Marny, good idea on the test project “controls” – I may try that!
Thanks!
Mary This was so timely, you have no idea. I am about to embark on the needlework journey of a liftime. My only child is getting married and I am makoing a very elaborately beaded ballgown for her. This project will take months to complete. I am so honored to do this and I know my skills are sufficient, but marking on that silk organza is scaring me to death. I have used the blue wash out markers before for small things, but sometimes the mark is too heavy. Pencil seems to smudge so I don’t want that. I don’t think the method you are talking about will work because I hope not to have to wet it after the beading. I thought about the silver quilting pencil, but I haven’t tried it. Some have suggested tracing paper, but I am afraid the tracing paper may rub off. Any suggestions? If tracing paper is uased what brand? Some of it seems to disappear too easily. I need HELP.
KDROWELL – well, I don’t know what to tell you. There are lots of methods for transferring designs. I would imagine that, with silk organza, you could use a very fine tear-away stabilizer or some sort, maybe. The stabilizer would give some stabilization to the organza while you’re stitching on it. But, actually, I really don’t know what to recommend for that scale of work on silk organza. Maybe some other readers will have a suggestion? Another option is to contact a professional embroidery “house” – like Hand & Lock in the UK, or the Royal School of Needlework, or something like that, and ask for a recommendation. You want to find someone who has hand stitched an extensive project on silk organza, so that they know what will work over the long haul….
I do embroidery samples for an online designer and I tried a fine pt marker for transferring but didn’t like the blobs and running. When I am finished with a piece, I don’t wash it, I send it on and I didn’t think that it would be very professional to send it in that manner. I use a #7 mechanical pencil and it works well as long as I don’t rub my hand over the work too often until I get some of the design stitched. I know that I would never take the chance of it not washing out after an extended period of time on the fabric. I would cry if it didn’t come out.
Mary: About 15 years ago I was in an applique class and the teacher told us about this method of transferring a design. We used only the green Flair pen (I still have some of them!). The only problem I noticed with applique was that sometimes the green ink got on my hands as I appliqued. But it always washed out.
Thanks for doing the experiment on our behalf, Mary. Like many, I too am looking for a washable transfer pencil. However, in the mean time I have been tracing the design onto ordinary tracing paper; placing the paper on the fabric and using a running st. to stitch through the paper and the fabric to transfer the design. After all the lines have been stitched the paper is removed. It is a lengthy process but one I have been using and one I would suggest for fabrics that can’t be washed and are very delicate.
Incidentally, I use Oxyclean to remove stubborn pencil marks on washable fabrics without damaging them.
Love your blog and check it out daily. Thanks!
KDROWELL: regarding your silk organza…check out garyclarkedesigns.com. He also wrote a book called ‘Embroidery Illusions’ where he works specifically on silk organza. Gorgeous stuff. I cannot remember off top of head what he uses to transfer patterns but I am sure he has answer.
Good luck. I would be paralyzed to point of intertia were I in your shoes! (Please post pics of the gown when done. You know all of us embroidery fans would love to see!)
I personally would not use the flair pens. Even though they do wash out, it seems like an awful lot of trouble. Maybe you were lucky this time but I can see where it may not work and it’s alot of wear and tear on the fabric and thread. I would stick to dressmaker or quilting pens.
Hi, Phyllis – Thanks for your input! With the exception of the water-soluble / air-soluble pens, the Flair pen so far is the one (tracing-type) transfer method I’ve tried that hasn’t required any wear and tear on the fabric. (I’m not a fan of the air / water soluble transfer pens – I’ve had the ink re-appear, and I’ve also had it yellow the fabric.) With the Flair, I didn’t have to scrub the fabric at all, whereas with the dressmaker pencils, I’ve had to scrub out areas that I didn’t stitch over to get all the blue out. With the Flair, all I did was run it under water, and then lay it in a bowl to soak. I thought the results were very good. I’m not certain that I’ll actually use the Flair, and I wouldn’t use it on anything that I couldn’t soak thoroughly (wool, etc.).
Donna – thanks for helping out with the question about the silk organza! Good recommendation!
Paula – the tracing paper method is great for a sure-fire way to transfer a pattern without worrying at all about transfer marks. The only draw back is that it’s time-intensive, but peace of mind is worth it!!
Linda – thanks for the heads up on your applique class, and letting me know that it does get on one’s hands. I didn’t experience that, because of the way I was holding my work, but I can see how it could be a big bother, so I’m ever-so-glad you told me!
Oooh, that’s a bit scary. As an entrenched whiteworker, I don’t think I’d be game to use those pens! Methinks I will stick to my HB pencil with a light touch.
But the thing that REALLY got me about your post is all your coton a broders! We can’t get Anchor coton a broder here in Australia anymore because the Anchor distributor doesn’t think it is worthwhile to bring them into the country. And with DMC getting rid of their No 12 size, I have just been crying ever since! Oh, I am so jealous… sigh…
You are a brave woman! I don’t think I would have tried this but it’s good to know it will work. My question tho’ would be – what happens with it a number of years down the road. Would any residue end up discoloring the finished piece? I know that’s something you can’t answer, but wanted to mention it anyway. I know it’s a technique I will keep in mind for future not-too-long-term projects I might do.
I used the Flair pens long ago (five to ten years ago), the green one was recommended then, too. I used it for a whitework project, rather densely stitched. Not all the ink came out of the satin stitch areas but it lent a nice tint to the design so I was okay with it–it was a sample I used for a nametag to try the technique.
I did choose to use the green Flair, with a much lighter pressure, for my final design, which took several weeks to do. I had to soak it a very long time but it did all come out.
I tend to prefer a brown permanent pigma pen with a very fine point to trace my designs. I also have been using a .5 mechanical pencil with a nonwaxy blue led (recommended by my Japanese embroidery teacher–Pentel high-polymer, found at Dick Blick). So far I’ve mostly used it to draw in stitch guildelines within a shape but plan to give it a try with a full design soon.
Thanks so much for doing this experiment, Mary. I too have tried many different methods, and I’m still not totally happy with any that I’ve tried – everything from lead pencil, to wash out markers, transfer papers and even fine permanent markers for work I know will totally cover the penmarks.
Please let us know how your next experiment with this pen goes.
Thanks again.
Mary Thank you for your comments and Donna I am goint to check out that website. I will post some pictures along the way.
Mary that looks awfully cumbersome and tedious, requiring of course, a fabric that is washable. It does beg ANOTHER QUESTION for me though that I’d truly like some help with. How can I get patterns on to a very dark fabric? Sure would appreciate any advice with this problem…thanks again….Judy in Pittsburgh
Hi, Judy – I’d use a white Bohin ceramic lead pencil on dark fabrics. Well, white or yellow. They draw a fairly fine line and if you’re covering it enough, then it’ll work out great. Yes, you’re right – this Flair pen transfer thing would only work on a fabric that is washable.
Marjorie, thanks for the story. I’m actually determined to give the light blue a go on the whitework project I’m going to do. I’m confident it’s going to work. Since I posted this article, I’ve received e-mail from four expert stitchers who have all asserted that it does work. So I’ll give it a go, and I’ll let everyone know if it’s a success or not… I’ll look up the Pentel mechanical pencil with the blue lead – thanks for that!
Mary Anne – that’s one of my questions: if the piece isn’t stitched immediately, will the ink remove as easily? As far as residue goes, though, I’m not worried about it showing up over time, if the piece has been thoroughly rinsed.
One stitcher I heard from left a piece for quite a while (four years!) with the design on it, drawn with the green Paper Mate Flair, and she said that when she finally finished it, the pen washed out completely. It was a whitework design, and it left no residue. The project was from an EGA cutwork class, and the instructor recommended the Flair for transferring the design. So that is very encouraging….
I can’t wait to get started on my project – I’ll be working on the set-up all day tomorrow! I’ll keep you posted!
I’ve had good luck with Japanese Akashiya Sai Watercolor Brush Pens – especially with the light colors like yellow, blush pink, and pale green. They wash out better than the Flair or Crayola pens, and their light reactive ink fades over time, just in case any vestiges remain. I wouldn’t recommend them though for folk who want to ink wide areas and then use a hand-held tambor frame. The moisture from the stitcher’s hands on the round frame will blot the lines. Best used with a larger frame and frame holder or stand, with minimal hand-on-inked-design contact -k.
Very good idea !
I usually use a transfert pen. I never dared trying something else. Thanks for the tip.
I am interested in the DMC thread that was selected for the project. Do you know where this can be purchased? I would prefer in the U.S.A. but would consider other countries. thanks
Hi, Lois – You can try Lacis (www.lacis.org) for the coton a broder. They used to carry the whole range of sizes, but now they only carry a few. Still, it’s worth checking!
For delicate, white fabrics … I draw on Stabilizer … either wash out or permanent … AND … I use my computer to reverse the image because I place the pen ink on the back side/wrong side of the Stabilizer … that way the ink doesn’t touch the fabric … and any residue is “hidden” on the back side of the project. I also wear white, cotton gloves when doing really important projects … I keep several pairs ready … it’s easy to wash each pair, after each session by just keeping them on my hands … I go to the sink and put liquid soap into my palm and wash my hands with the gloves on and then take them off and let them dry on a white cotton towel reserved for this … the clothes dryer can have residue from fabric softeners or “stuff” that comes off of clothes (or pockets)!
Thank you for sharing this experience! I use fine pens similar to those you showed. And I was a bit scared of the moment when I would rinse my piece, thinking of the little ink flood in your photographs. I found a pen which is soluble so easily that it took me seconds to wash it away. So there is no danger for white fabrics any more!
I tried out the Flair Pens, all I could find were the Bold Color package. The green and yellow worked well. http://eternal-arts-n-crafts.blogspot.com/2010/08/paper-mate-flair-pen-review.html
Well………Its wonderful blog post..very informetive i enjoy the reading…..specially the gren one is….beautiful….!!!!!!
I used to use plain blue pens, and spray V05 hairspray on them and wash them. But hairspray is not the same as it used to be, and neither is ink. It’s a problem – I’ve tried a lot of pens without finding a really satisfactory one.
Thank you so much for doing all this experimenting for the rest of us; I just rush into things, assuming and hoping they’ll work out. I too have been so unhappy with Sulky Transfer pens… too many splotches… so am in your debt for researching other methods.
I’ve had very good success with a finely sharpened pure graphite art pencil. Over time it has always washed out (4-5 months for example for a project I keep putting aside) But, again, I am doing work on washable fabrics. However, that was white embroidery on white fabrics; cotton on cotton. I absolutely would love a better option since the pencil isn’t as precise or as dark as I often need.
i have used the blue Dritz Mark B Gone pen for transferring. The marks have been left on white linen for several weeks. (I was working on linen church pieces). When I finished the embroidery, I sprayed the designs with some Simple Green, and washed them in hot water. The marks were completely gone at the end of the wash cycle (to my relief!) If you are going to do work relatively quickly, the purple Mark B Gone disappears on its own in a pretty short time.
I’m a quilt maker. I use them all the time and they wash out every time- green flair felt tip pens. I buy them by the pack of 12.