


Have you ever experienced the elation of finishing your embroidery on a project, then suddenly realized that you’re really only half-way finished? That’s the case with the hand embroidered pall I’m working on. When last we visited the project, I was filling in the letters with stem stitch, and I still had quite a way to go on the other little elements in the embroidery. Now, I’ve finished with the embroidery, but I’ve still got the assembly process to face, as well as adding lace to the edge.
Overall, I like the way the embroidered design came out – I hope you do, too!
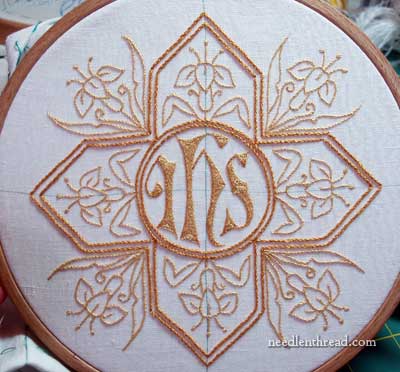
It is certainly not “fancy stitching” here! The whole piece is worked in stem stitch, a stitch that is versatile and pretty, but very easy to work. It is certainly not a “showy” stitch – it’s plain and simple. And sometimes, simple is good.
I especially like the contrast between the darker gold, in two strands of Soie d’Alger, and the lighter gold in one strand. It added a little more interest to the finished piece.
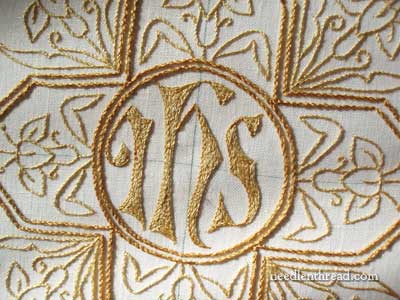
And I think the stem stitch filling on the letters worked out pretty well, too.
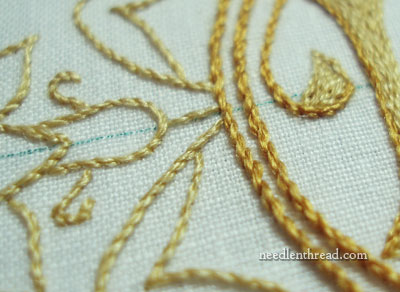
In the photo above, you can see a couple problems. One is the fuzzies on the “H” – I picked out some threads and didn’t clean that up as much as I should have. The camera caught it, which is good, and now that problem is fixed. But there’s another glitch…. it’s on the “S” – do you see it?
On the S, there’s a little irregularity in the middle of the letter. This is where I filled in a different direction. I was hoping to achieve a “nice” diamond shaped filled spot, that was slightly noticeable. Well, it is noticeable, but I don’t like it. I stitched in a different direction, filling in the remaining space between the stem stitched lines. But it made a kind of bump in the middle – or at least, it looks like a bump. The change in direction is noticeable because of the way the light reflects on the thread. Also, there’s a shadow formed at the edge of the diamond shape, where the threads go down into the fabric. This is typical of silk. You can often get a very nice shaded look on the edge of silk stitching (the same thing applies with mercerized cotton, but I don’t think it’s as noticeable), simply by padding the edge to make the edge a bit sharper. The light reflects on the higher stitches, and the edge forms a shadow, giving the overall effect of a slightly darker color at the edge.
And that’s all well and fine – it’s great on the edge. I don’t like the effect in the middle of the letter. But… I decided not to go over it or pick it out. For one thing, I’m out of time. For another, surely it won’t be as noticeable to others as it is to me. Another point: my dad has always said, “Don’t go over it, you’ll make it worse” in any art project or cooking project I’ve ever messed up on. And he’s right! I think picking this out could make it worse.
I once had a “mentor” – a little old nun who did lots of ecclesiastical embroidery – who used to say that I should always have one mistake in my needlework, as it helps keep us humble. Frankly, I always thought that was more of an excuse than anything else. But you know, as much as I balk at the idea of leaving this mistake, she is right in a way. Nothing is perfect. And hand-made items do have flaws.
My goodness. I’m only half-way finished. What if the Humility Mistakes on this item are supposed to come further down the road? Hah!
And that brings me back to the beginning of this article – the embroidery on the pall is only the first part. Now it needs to be constructed, and I need to do the lace on the outside.
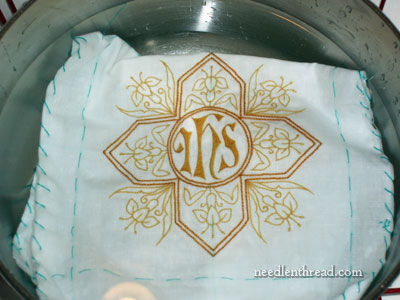
I’ve set the piece to soaking, and will sew it up later today. The lace on the outside is more difficult than it sounds. Sewing on lace is not, itself, a very difficult task. The lace on a pall, though, is sewn not in the seam, but by hand around the very outside rim of the pall, so that it looks as if it’s in the seam, but it isn’t. There are only three seams around the square, so that’s one reason for this. The other reason is that the lace may need to be removed in the future, for cleaning. If it is sewn into the seams, the whole pall would have to be taken apart. This way, the lace can be taken off and then sewn carefully back on.
So that’s where I am. I’ll show you the whole finished piece before the week is out!
G’day Mary,
That’s interesting about the lace.
The whole embroided design is really, really beautiful, and, I’ve learnt a lot from this project.
Thank you and Cheers, Kath
It is a bit dispiriting to realise that the stitching was only the fun part…
Still, I think it is looking good. In spite of (maybe because of) the Humility Mistakes!
Hi Mary, lovely work. I may try this myself closer to Christmas and the summer holidays, but I would need to discuss this with my parish priest, I dont want to go making something like this and then not be able to use it in church.
Re: Your mentor. She is right, nothing is perfect and as the Amish would say, only God is perfect. This is why the Amish women always make an intentional mistake in their quilts, especially those for their own homes.
I read your article with interest. Sheesh! There always seems to be one more thing that I need to learn….
The purpose of soaking the finished pall, is that to remove any traces of the pattern underneath the finished work? If, so, what temp of water do you use?
Also, do you then hang dry the pall? Do you iron it with a covering to protect the threads or do you iron it from the reverse side?
These are finishing touchs that I am really not very knowledgable in where it comes to embroidery.
What type of lace are you attaching? I generally find it best to whipstitch the lace to the finished edge (the “front” edge of the seam) with right sides together using a fine, strong sewing thread. Presencia cotton 60/3 is my current favorite. The whipstitches don’t have to be extremely close together, so removing the lace later isn’t terribly traumatic.
Here in New Mexico it is said that there must be one mistake in every piece to “let the evil spirits out.” I don’t know if that comes from the indians or the mexicans. However, I have no trouble with observing the rule and so far no evil spirits at my house – I think!
Hi Mary,
The pall is a beautiful piece of stitching and I loved the contrast of the dark and light gold silks from the beginning. The pall is understated but exquisite.
I am waiting to see how the lace will be attached.
First, I think the embroidery is beautiful and simple in this case, to me, is elegant. Not to mention that it can be more difficult than something complex since mistakes tend to be more noticeable. In your pall though, I think it looks intentional.
I also agree with the comments above and your mentor regarding mistakes. And I also think that invariably we probably all have at least one small error or item we feel we could have done better in every item we make. But those errors or “could be betters” are part of what differentiates hand-made items from machine-made things. It’s part of what makes them unique and irreplaceable even if it’s an item from a kit. It’s part of our “mark” on the thing we make. I don’t think it’s a way to allow ourselves to get out of fixing it – at least for the majority : )
Very nifty. I like the variation of how it looks even thought it’s all the same stitch.
Hi, Mary,
From Hubpages.com comes this:
The “Spirit String”
Many, if not all, Navajo rug makers still follow an interesting tradition. They make sure that something known as a “Spirit String” is part of the completed rug. A great deal of time and effort goes into making a handmade rug and the Navajo believe that part of their spirit or soul can get trapped in a rug while it is being woven on the loom. So, a small bit of yarn is purposely left sticking out slightly from the surface of the rug. This “spirit string” allows the rug-maker’s spirit or soul to have a way to be released from the rug.
Also, the Navajo feel that humans are not perfect and cannot be on the same level as God, who they see as perfection. To show that they do not see themselves as perfect as God, Navajo artisans will deliberately add some bit of imperfection to whatever they create. On a rug, it is the bit of yarn sticking out. On beaded handiwork, one of the beads is out of place or in the wrong order. These little imperfections are done on purpose, but are not usually noticeable. For many of us, this purposeful flaw adds to the charm of the item.
Hi Mary,
I need some advice on how to achive a 3d effect on a sitched banner/flag, the only way I could think of was to satin stitch it. But I don’t know if that would give the desired effect, your help and anyone else who would have some advice wopuld be appreciated!
Thanks so much!
Jillian
I should have mentioned that it is waving in the wind and I was going to satin stitch it in red and a red/pink to try to get that 3d effect.
Hi, all! Thanks for your comments! I have a “funny” follow up story on the pall – a slight disaster happened with it, but I’ll blog about it and the recovery process a bit later! YIKES. For now, just know that the look of the pall has completely changed in the last three hours!
Jillian – I think the flag needs to be shaped as if it’s rippling, and then, in the areas that would be in the “valleys” of the ripples, you’ll want to work the darker colors of reds, and in the areas that are waving out (the “hills” of the ripple) you’d work the lighter colors. I’d think long and short stitch shading, worked in the direction of the stripes, would probably work better than satin stitch. I’ve got a long and short stitch shading tutorial on here – you might check out the section on stitching ribbons. Here’s a link: https://needlenthread.wpengine.com/2009/08/long-and-short-stitch-lesson-5-shaded.html You wouldn’t necessarily be shading to a point, but you would be shading around flowing curves. Hope that helps!
Good Gracious Mary, this “funny” follow up story on the pall sounds more “funny oh oh” than “funny ha ha”! What the heck have you done woman?
Awaiting the details of the ‘YIKES’ with trepidition and intrigue.
Dear mary,
would you please find out before you tell us about orvis tomorrow if it is ecologically friendly or has any petroleum products in it?
thanks,
terri sue
Your Pall is beautiful. Yes I have also had some nuns lecture me on being humble. I can see the mistake you are talking about in the s but if I could do half as good I would be happy.
Mary,
Love your daily tales!! But I have to show my dumbness — why is it you were soaking the pall in the first place?
Hello Mary,
What color numbers of Soie d’Alger did you use? I like the colors you chose, but looking to buy some online it’s so hard to see the actual tone. I think I’d trust your judgement. Thanks!
Deanna
Hi, Deanna – Well, it’s been quite a while since I worked that project. Normally, I list the colors I use in the various posts on the project, but I just went back through them, and although I have a photo of the threads in one of them, as luck would have it, none of them have the complete color number on them, and I didn’t list the colors in the text anywhere. I’ll have to dive through my supplies and look for them. I’ll let you know if I come up with any numbers! ~MC
Golly, thanks so much, Mary. Sorry to put you through that trouble, but I think it will sure be worth it (at least for me, and those who are wannabes 🙂
Again, thanks. God reward you.