


For those interested in following the Spot Sampler that I’m currently developing with my Needle Arts Class, I’ll be publishing a Spot Sampler Series over the next several weeks. If you are interested in developing your own “learning sampler,” you’re welcome to stitch along at your own pace, using these mini-tutorials as they develop.
Keep in mind that there are plenty of other ways of working your own sampler. Here, I’m simply outlining how I’ve been developing mine. These are just loose ideas that you can adapt and alter to fit your own style!
First, you’ll want to decide what you want to learn or practice with your sampler, and whether you want the sampler to be something that you can display or whether you simply want a doodle cloth for future reference.
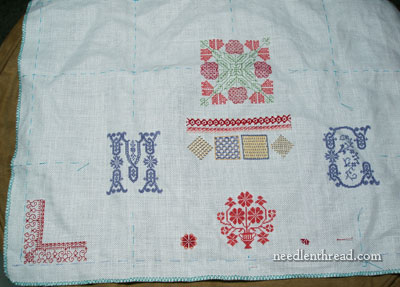
For the samplers we’re developing in my high school Needle Arts class, I want the students to work both counted and surface techniques on it, and I want it to be something they can proudly display.
You might decide for your sampler, though, that you want to concentrate only on surface stitches, or only on counted techniques, or even on stumpwork or dimensional stitches – or a combination of everything! This is up to you! But your decision will affect your choice in ground fabrics.
Choosing the Ground Fabric
If you are planning to combine surface and counted techniques, then you’re going to need a fabric that is an even-weave (or very close to it!) and that will support free-style surface stitches that don’t rely on the grid of the fabric. For the latter point, you’re going to want a fabric that will allow the needle to pass through the threads of the fabric, not just between them. Look for an even-weave linen that has plump threads that “fill” the whole weave. You don’t want to see gaps between the threads, and you don’t want the threads to be super-skinny or too irregular.
For my sampler, I’m using Legacy’s Round Yarn linen. (Update 2017: This particular linen is no longer available in the US, but you can substitute any good 25-30 count linen). It is approximately 25 threads per inch, so counted cross stitches over one thread of fabric are not too small, but they are small enough that the overall finished cross-stitch motif does not look pixelated. The threads of the linen fill up the weave – they are nice and plump – and they will support surface stitches. Occasionally, yes, there are some irregularities, but this is part of the look of linen.
Determining the Size of the Sampler
You can determine whatever finished size you wish for your sampler. My fabric is approximately 18″ square, with an inch all around basted off for the edge, so the finished size of the sampler fits within about a 16″ square. I suggest giving more than an inch extra all around for finishing – I’d go with 1.5″ or 2″ all around if you’re planning on a sampler that can be framed.
So, a little math: If you want a sampler that is 18″ square when finished, you’ll need a 22″ square piece of fabric, to allow for 2 inches on every side. If you want a smaller sampler (16″ square, for example), you’ll want a 20″ square piece of ground fabric.
You could just throw caution to the wind and use whatever size piece of fabric you might have on hand – it’s up to you! But if you want something formal and square and of a specific size, then I suggest measuring.
If you order a “fat quarter” of the Round Yarn linen, which is 71″ wide, you’ll end up with enough fabric for 2 decent-sized samplers. Once cut in half, you’ll have approximately an 18″ x 18″ square, and if you take off an inch off all around for a finishing allowance, your sampler would end up approximately 16″ x 16″ (which is what mine is).
When you cut your fabric, make sure you cut it with the weave. That is, make sure you are cutting down the line between two threads of fabric on both the vertical and horizontal cuts. To make this easier, you can always remove one thread of the fabric, leaving a bigger gap to guide your cutting line. I always find this a bit time consuming and a bother, though, so I just cut carefully with the weave.
Neaten the Fabric Edges
The next thing I did with my sampler after selecting ground fabric and cutting it was to neaten the edges on the sewing machine. You can use a zig-zag stitch around the edge of the fabric to help keep it from fraying as you work.
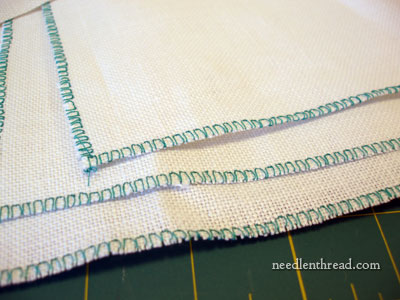
If you don’t have a machine, you can whip-stitch the edge of the fabric by hand. Because you’ll be handling the fabric quite a bit, I suggest neatening the edge. It’ll save a lot of grief from shredded edges in the long-run.
Layout the Sampler
Then, I basted some layout lines on the fabric. This isn’t 100% necessary. You can go totally random and just plop the stitched elements down wherever you want! But if you want a certain amount of organization and balance, layout lines are nice to have.
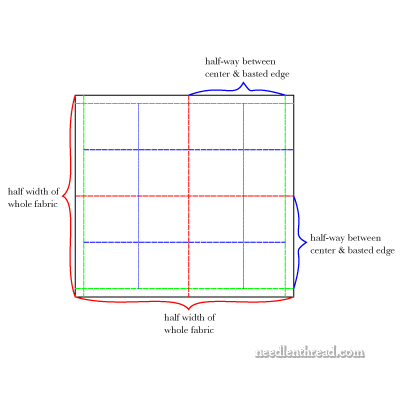
The green lines in the image above represent the finishing allowance around the sampler. Measure off about 1.5″ (or 2″ depending on how much you allowed when you cut your fabric) on all four sides, and baste straight lines following the weave of the fabric. You don’t have to count your basting stitches or anything like that – if you use the “sewing method” of stitching (bringing your needle down and up in the fabric in one movement, rather than poking it down, pulling it through, poking it up and pulling it through), the basting will go very quickly.
The red lines in the diagram represent the exact center of the fabric. Fold the fabric in half, matching the outside corners and edges, and pinch the halfway mark so that there’s a visible crease. Then baste up from the crease, through the center of the fabric. Do this horizontally and vertically.
The blue lines in the diagram represent the center of each quarter of the stitching area. Measure from the basted edge lines (the green lines) to the red lines (the center of the fabric) and baste straight lines through the middle of the quarters, horizontally and vertically.
Once you’ve set up your fabric this way, you have four distinct sections in which you can center things (or not) and that will give your finished sampler and organized and balanced look.
Of course, you can ignore ALL of the above, and just go for it on a piece of fabric!
Here’s a PDF of the diagram above, with explanations on the layout of the fabric, if you’re interested:
Developing a Spot Sampler: Layout Pattern (PDF)
The next step in the Developing a Spot Sampler series is the selection of threads and colors for the sampler, which we’ll discuss later in the week.
If you have any questions, comments, ideas, suggestions, criticisms, or what-have-you, feel free to leave a comment below!
I think I will join you on this as a side project to my Coleshill Collection Charlotte kit that I am working on just now.
I found an old plain linen tray cloth in a charity shop a while back and I think I will use it as my material for a stitch doodle/sampler to pactise new stitches.
Thread…think I’ll use some DMC embroidery floss that I have quite a few colours in:-)
Take care,
Alison.
G’day Mary,
Am enjoying the spot sampler progress and all the info and ins and outs of it.
Thanks too for the ‘M’ monogram. Tucked it in with the others. I can imagine them having a party when each one arrives! You’re doing a good job steadily fitting them in between everything else.
Hope all goes well with you and yours. I’m only just getting over the chest infection. 5 wks and 4 different types of antibiotics! Phew. Not such a nice way to loose a little weight but nothing compared to my poor sister-in-law with the leukaemia. And there are many worse off than her too. It’s good to look inside our hearts and smile, at the precious things we have on file.
Just part of a bit of poem I wrote recently after seeing a photo of a friend hugging her toddler daughter, on another friends photographic blog. Don’t feel you have to leave it this in.
Most precious things in life are free,
A mother’s hug, a father’s knee.
Kid’s eyes that don’t forget to grin
When things are sort of in a spin.
A delightful laugh from little miss,
When greetings are more jam than kiss.
And he with wet dog all entwined,
Comes to the table to be dined.
Amazed and comically forlorn,
Says dog “shoulda had a wetsuit on”.
So look inside your heart and smile,
At the precious things you have on file.
Cheers, Kath.
I’ve been saving a flour sack towel to practice stitching, as a returnee to surface embroidery. Your template will be perfect to organize my work. Hmmm…but now you’ve got me interested in doing some counted cross stitch….
Love your site and blog! Thank you.
I’m having problems with my blog you can now find me here http://www.linentwill.blogspot.com/
Alison.
You are a wonderful teacher and always take the trouble to explain each step. I will be stitching along. Thanks Mary.
Mary, when I opened your newsletter today, I was so pleased. Even though I have done embroidery most of my life, I never learned some of the nice stitches you use. Doing the sampler is a perfect way to learn! I’m with you every step of the way! Mary Ann
Mary,
Currently working on your awesome Long and Short Stitch Lessons. If I had another pair of hands I would do the Spot Sampler.
In the mean time I’ll read the posts and try to soak in all the helpful information.
As a newcomer to embroidery, I was wondering if you have suggestions about fabric types. Forgive me if I missed this on your website, but I searched and didn’t see fabrics mentioned.
Hi, Shannon – That’s coming up! While you’re waiting, though, check under the heading “Fabric” on the Tips & Techniques page – there are a couple articles there, I think. Thanks! ~MC
Hi Mary,
I have a lot of Aieda cloth, can I use the 22 count for this spot sampler. I just found your site and i love it. I will be followimg this project but being left handed will need to figure the different way to do most of the stitches.It’s all backwards for me.
Thanks.
Hi, Mary Jane – You sure can use Aida. I’m all for using what’s on hand! Yvette Stanton has a wonderful left-handed stitch dictionary. It’s definitely worth the investment – I use it in my class for the left-handed students, and it makes things so much easier for them. You can find it in the States at Nordic Needle. Just a thought….
~MC
Hello !
Here you have a newcomer from France. I have lots of projects waiting to be finished, but I like the idea of your spot sampler, so I’m joining, if you don’t mind !
I do lots of embroidery, cross stitch, petit point, some drawn thread, well I like to learn new techniques, but don’t always find a project to make with each one of these techniques…so mixing them up on one piece of Dublin seems to be a great idea….
I just had a first grand daughter, so this will be for her, and start with a “Z” (her name is Zélie)…
Thank you for your tips and tricks and your useful and intersting site !
Françoise
Hello, Françoise! Thanks for your note, and welcome to Needle ‘n Thread. I hope you enjoy working the sampler! It’s a lot of fun. Congratulations on your first grand daughter! Zélie is a beautiful name!
I just wanted to thank you for this beautiful site. Embroidery is new for me but I am really delighted for the opportunities it brings.
This page is not only -didactically speaking- great, but is is also pleasant and heartworming, so I wanted to thank you for that, and at the same time to ask where I could find some coton a broder thread that I could not see in the DMC page.
Thanks again!
What is a “Spot Sampler”……?
Hi, Zoe – A spot sampler is a sampler made up of different spots or areas of embroidery, as opposed to lines of embroidery. Instead of working the straight lines found in many samplers, small motifs, often worked in different techniques, are scattered around the fabric.
I have a shirt that I wear around the house. It’s a bit big on me so I decided to begin my embroidery adventure using this shirt as my test palette. It’s a button down oxford shirt. It’s getting prettier every day.
That’s a great idea! How fun!!
I’m currently using an older pair of jeans (that I still wear! ) to practice surface stitches, applique, Japanese “hole patching”… I love them!!