


What better way to start the New Year, than by cleaning up something I’ve been wanting to clean up for a while! I’ve updated the stem stitch video tutorial in my collection of How-To Videos here on Needle ‘n Thread.
Now, why the eagerness to update this video? To put it frankly, because I just love the stem stitch! And the previous video, though a lot shorter and probably a lot easier to watch, didn’t do the stem stitch justice. It also didn’t instruct on some of the finer points of getting stem stitch right.
On the new stem stitch video, the viewer has the opportunity to see how the stem stitch is worked from four directions, without moving your work. If you’re working on a frame, or for some reason, you aren’t able to turn your work as you stitch, then it’s useful to know where the working thread should be in relation to the needle, to maintain the correct look of the stem stitch.
Another useful point demonstrated in the new stem stitch video is how to work a sharp corner with the stem stitch. Often, the stem stitch is worked on leaves, vines, or outlines that turn in sharp points. I’ll show you how to begin a new line with sharp turns, instead of working the stitch around the corner.
Additionally, the new stem stitch video demonstrates how to finish a line of stem stitch in such a way that the thickness of the line is maintained to the end. You see, if you want your line to be consistently the same thickness to the end, the last stitch on your line of stem stitch should actually be a lot shorter than the rest of the stitches in the line.
In the article for the stem stitch video, I’ve included information for working with Z-twisted threads. While most commonly used embroidery threads are S-twisted (DMC, Anchor, and other cotton flosses, as well as wools and many silks on the market), there are some threads out there (some silks and most rayons used in Brazilian Embroidery, for example) that are Z-twisted, which require a different approach to the stem stitch. This point won’t apply to most stitchers, but it’s good information to have if you are branching out into other fibers beyond cotton.
Finally, I’ve included some information about stem stitch for left-handed stitchers, and in the video, I address the direction that the left-handed stitcher would take when using stem stitch.

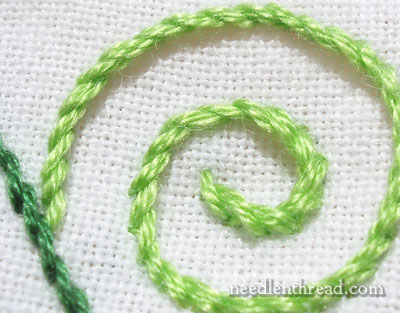
Stem stitch is an incredibly versatile stitch, and this is one of the reasons I love it so much! Not only does it make pretty lines with its rope-like finish, but it also makes a beautiful filling stitch. You can fill an area of stitching quite easily with stem stitch, by working lines of stem stitch close to each other within the place to be filled. You can even trade out strands of color in order to shade your filled area, and achieve a beautiful and gradual shading with stem stitch. For example, in the leaf above, the filling has been worked in three shades of green, using three strands of floss for stitching. On the approach to the shade change, I switched out one strand of three for the next shade, then two strands, then finally worked with the full three strands. By mixing the shades, the color change is gradual and effective. You can read more about controlling the color change in stem stitch in this post on teaching color control to my Needle Arts Class students.
So there’s my update on stem stitch – I hope you find it helpful!
I’ll see you again on Monday, with the winner for the end-of-the-year give-away (if you haven’t signed up yet, don’t forget!), and coming up next week, I’ll show you some progress on my new project! I can’t wait!
Happy New Year!
This is a timely post for me Mary…I am stitching the Jane Turner reproduction sampler, and there is the figure of a woman wearing a dress that is supposed to be stitched in detached buttonhole…I am thinking of doing it in stem to achieve a neater look. I really like that you can shade easily with stem stitch, as her dress is 3-4 shades of each colour.
Is Soie d`alger an S twist, or a Z twist thread?
Well, that’s good to know because I just finished a remarkably unsuccessful attempt involving rayon and stem stitch.
Yesterday I left the comment asking, “How could you improve on perfection?” Reffering to the fact you were making changes to your newsletter/blog. Well, now I see and THANK YOU! I am a left handed stitcher and so appreciate seeing things from my side of the hoop.
Debbie
Thanks a lot for this complete tutorial Mary.
Best wishes for 2011
Cheers
Elena
Hi, All! Thanks for your comments and questions!
MJ – Soie d’Alger is S-twisted.
Hannah! OOOoooooh. Rayon is a real bear to stitch with. Did you write me an e-mail about that? I haven’t had a chance to make it through all my e-mail in the last couple days (sorry!) But just in case – this is the thing: with rayon, you should use a rather tightly-woven fabric, to help hold on to the threads. You’ll also want to make sure the needle you’re using is relatively fine – you don’t want holes in the fabric that are larger than the thread. So if you’re using one strand of rayon, you’ll probably want to use a #10 or higher needle.
Debbie – I’m glad the tutorial helps out!
Cheers, Elena!
~MC
Mary,
I was thrilled to read that you had redone the stem stitch tutorial, with tips on turning corners, and finishing a line, as I’m currently working on a project that is almost exclusively stem stitch.
And a BIG THANK YOU for adding information for we left-handed stitchers – it is so appreciated!
Sharon in France
In my most recent piece, I was doing a lot of stem stitch, some of these issues came up for me.
I’m so happy to see a video on them! 🙂
I won’t watch it yet tho – it’s 4am and I haven’t had any where near enough coffee yet!
Mary,
I too really enjoy using stem stitch as a “filler” stitch in embroidery. Most of the time I’ve used it in “color block” sorts of applications, but it worked so well for your leaves that I’m inspired to do it for shading as well. I went back to your Color Control article and read again how you do shading by switching out the shades progressively (loved the mathematical formula for same, as I’m a retired math teacher!). I’ll have to give it a try for my next shaded project as I’m not always very pleased with my “long/short” shadings of things. Some objects that I would be shading are rather small and wouldn’t require a full length of thread before I’d want the shading to start. I’m imagining how I would switch out the strands before coming to the end of a length of thread…. pulling one strand to the back with a separate needle or crochet hook and then adding in one strand of lighter or darker shade in from the back by first weaving it in to a few stitches on the back before lifting it forward to join the others and trimming it to the same length?? Anyways… thanks loads for the tip about shading using stem stitches.
Tess
Dear Marymentor:
Thanks so much for this one ! ! My stem stitches have “never” looked right and I couldn’t figure out why ! You’re always right on the button ! ….Judy in Pittsburgh
Mary,
No, I had not emailed you about it. Just a lucky coincidence! I spent several days last week learning that rayon is a bear to stitch with. I was trying to use it on my dancer project (http://enbrouderie.wordpress.com/2010/12/31/balinese-legong-dancer/) but for the moment I’ve switched back to regular floss. I’m glad to know it’s a general principle of stitching and not just me.
G’day Mary,
Really glad of this info and video. The leaves are so lovely and am really pleased about the shading info. Thanks.
Cheers, Kath
All the videos are very helpful. However, there is not a video on your website for the satin stitch or stem stitch. Could you post these two videos.
I don’t know what I would do without your other videos, you make all look so simple and the instructions given are perfectly done.
Thank you so much.