


One technique that I plan to use on the embroidery project I’m working on now is a kind of “basketweave” stitching, using gold threads. The concept is pretty much the same as working with any smooth passing thread – the threads are couched, and they are couched in a bricking pattern, so that on each row of couching stitches holding the passing thread, each stitch falls between two stitches on the previous row. You can see this concept of bricking your stitches in this article about smooth passing thread.
The difference, though, when you want to achieve that woven basketweave look, is what you use to pad your stitches. To achieve a basketweave look with the gold threads, you need some bumps to couch the threads over. Let me show you what I mean!
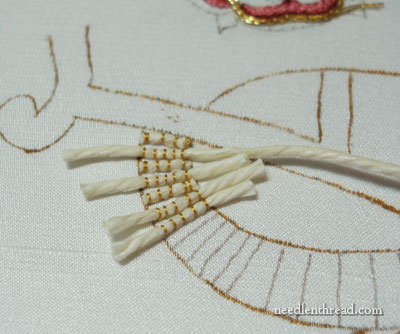
Instead of using a flat felt to pad the gold threads that I’ll be couching down along this curve, I’m using small “rolls” of cotton yarn that have been heavily waxed, with beeswax. If you want to try this technique, you’ll need a cotton yarn in ivory or yellow. Yellow works well behind the gold, but ivory is ok here, because it’s the background color of the piece – you might try matching your background color, but if you can’t, use a golden yellow if you’re couching gold metal threads over it.
Cut a longer length of yarn, and run it through a cake of beeswax several times, until it’s good and waxy. After running the yarn through the beeswax a few times, run it through your fingers several times to work the wax into the yarn. The end result will be a stiffened, waxy yarn, which will be used to make these little “logs” across the area that I’m going to cover with gold.
Why wax the yarn? There are three practical reasons, that I can see (there may be other reasons that aren’t so obvious, but these are the ones that make sense to me): 1. The beeswax protects the yarn from the gold thread; 2. It tames fuzziness, so you don’t get any fuzz interfering with the gold; and 3. It makes the yarn firm, so that your threads don’t sink into it irregularly.
You can see in the photo above that I sewed over the yarn logs with a gold-colored sewing thread, the same silk thread I use to couch down my metal threads. It’s rather a finicky task, to sew down tiny yarn logs that are about 3/8″ – 1/2″ long, so I sewed down the yarn while it was still connected to the longer piece, then cut the piece off, leaving an overhang, and finally, when all the pieces were of yarn were couched down, I went back and trimmed them flush with the width of the design.
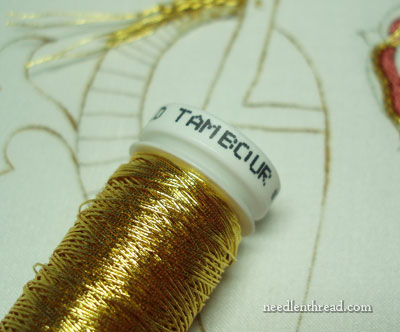
Instead of using gold passing thread, I’m going to use gold tambour thread, which is available at needlework shops that carry real metal threads. If your shop doesn’t carry it, and you really want to try using it, ask for it – they can probably special order it for you. It’s imported into the US by Access Commodities.
The main difference between tambour thread and passing thread is the flexibility of the thread. The tambour thread is not as stiff as passing thread, and this works out well, because I want the thread to pull down between those bumps I just put on the fabric. Since the bumps are close together (I want a lot of texture in this basketweave area), the metal thread really needs to bend into the area between the yarn logs.
By the way, “yarn logs” is not a technical term. If you happen to show up in a goldwork class somewhere and start talking about “yarn logs” expecting your instructor to know what you’re talking about, you might get a funny look! I have no idea if there’s a precise technical term for these little bits of cotton yarn padding, but they look like yarn logs, so that’s what I call them!
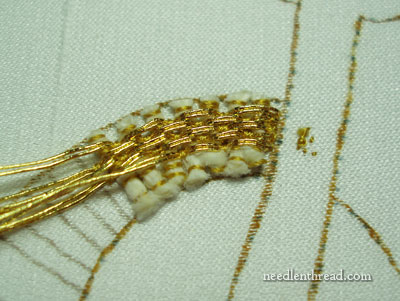
So this is the effect I want to achieve, and you can see why I’m calling it basketweave stitching (another term which may not be Technically Correct, but which fits the look of the thing!).
This is what I did: I took a single length of tambour thread and folded it in half. Starting in the middle of the log strip (where the design begins), I sewed down the tambour thread, couching it at the tip of the folded area. Then I took another couching stitch over the double threads, to hold them together. With the first set of double threads, I skipped the first two logs, couching the gold thread after the second log, and continuing down the logs, couching after every two logs. Then I started over at the top with a new pair of gold threads, started it the same way, and then couched that pair after the first log, and then after every two logs thereafter. The order of work was the middle thread running down the center of the log strip, then I moved to one side of that middle pair of gold threads, and couched another pair, then I moved to the other side of the middle pair, and couched another pair, always making sure that I was alternating where the couching took place in the adjacent row.

Aha! The sun came out – and it makes all the difference when photographing gold threads, if you really want to see them sparkle!
So that’s my little test area for this basketweave technique. I really like the look that results from this technique, don’t you?
One of the main reasons that I always work up a test sample in the same thread on the same fabric I’ll be using, is that through testing, I can see what I need to adjust in my approach before stitching on the Real Project. For example, thanks to having worked a test sample first, I’ve discovered several things I will do differently on the Real Project:
1. The yarn logs will not extend right up to the edge of the design. I want them to fall a little short, because I plan to work a different thread around the outside edge of this area, and I don’t want the lettering to look fattened – I want the outline to be right on the line of the design.
2. The logs will be spaced a little farther apart, though not much farther apart – just a hair difference. I like the tight textured look this gives, but I don’t want it to be too tight on the inside curve.
3. I’ll use a different silk thread to couch the metal thread – most likely, Tire silk, 100 wt. It’s a very fine thread, not visible against this gold at all.
Incidentally, if you’re not into goldwork, you can use the same technique working with regular embroidery threads. Perle cottons or silks, for example, make a great “basketweave” look when stitched this way. All you need to do is make up some yarn logs, and couch the perle cotton or silk in pairs, just like I did with the metal thread. It looks really nice – try it!
G’day Mary,
This appeals to me greatly. I’m not into goldwork in a practicle sense but am always very interested in any of your posts on it. The technique in this post has my fingers itching. Useful for other types of threads too. I suppose it would nearly come into Casalguidi stitch/Italian embroidery work. I’ve done just a little of that and liked that element of it. Stem stitch run horozontally along a ‘log’ over pre-stitched, evenly spaced threads around the ‘log’ untill it’s fully covered.
This gold basketweave is very expressive. Each ‘log’ is bound up individually, but then needs to depend on the bringing together and unifying of them all to make its beautiful statement. I like it.
Cheers, Kath
PS, getting the hang of your ask and share forum, finding my way about and bravely (Haha) joining in a little. It’s worth it already.
Mary, you make me do things I never wanted to do before. 😉
Oh Mary! I’ve wanted to know how to do this for the longest time, and only yesterday was trying to find out how to do it.
Brilliant! Serendipitous! Thankyou!
Hi Mary, I do like this technique very much. The stitch we call basket weave in Japanese embroidery is worked in a different way. We do use this technique, exactly the same except we couch several rows over the same pair of ‘logs’, then do the same number of rows over the alternating pair of ‘logs’. It is called box couching.
We also make the logs in a slightly different way that allows the ends to tapper (I call the ‘logs’ sausages, also not a technical term). Your logs are a lot closer than mine were for the box couching but I like the tight texture in your sample especially for the basket weave.
When I read basketweave and saw the heavy waxed threads, I was thinking basketweave pattern where you see threads going in 2 directions (like warp & weft threads) and wondering “how is that going to get to basketweave?”. Now all is clear!
In old sewing books, it’s often recommended to iron your thread after waxing it. Not that I ever do that, mind you. Would ironing this waxed yarn work better than rubbing it in, or would it flatten it too much? Although I suppose you could roll it round again.
Beautiful!
This looks really cool. I wonder, what do you do with your test spots If they look pretty? Maybe you should create a test spot sampler type thing so that your pretty test spots don’t go to waste lol.
Is the gold thread really expensive?
Since joining I have really gained a whole new appreciation for viewing handwork. I have do many new things that I wan’t to try!!! I wish I had more hands lol.
I keep looking through your older posts and the only word that keeps coming to mind is… Wow.
You make everything come to life and seem so do-able!
Sorry for sounding so gushy. I have just been having so much fun here. As a housewife and mom of little kids, this is the only interest I have that is just for me. My only hobby and thing I get to enjoy all by myself.
I stitch late at night when the family sleeps. The only time I have just for me.
Thank you so much for keeping us included!
Your friend,
Mindi hammerstone
Love it-love it-love it!! It is genius! I love your “waxed yarn logs” – you’ve just invented a new stumpwork and embroidery staple. I will try to use it somehow, someway! (will send pics when I do)!
Cool! There is a similar “LeSage” technique and we used cotton clothesline for our “logs”.
Marry
It’s too brilliant and fabulous
Hi Mary
I am a bit of a blog virgin, so am not sure if I have completed the boxes above correctly. This is my second item, I have just written an essay and on submitting hadnt filled in the mail box and all my text disapeared :0(
I have looked at your site a number of times, it is one of the best if not the best blogs on the web for embroidery, i dont know how you find the time, i beleive you have a full time job as well.
Anyway I thought I would give you a few more ideas on the basketweave front which you may already know.
Instead of just using a double row, try using 2 double rows, this makes the basket weave alot more prominent.
Secondly for a different effect try couching down between every row of string, this can be more effective of your rows of string are slightly fanned instead of perfectly vertical.
Hope this helps
TTFN
Sarah