


The following article is by Anne Gomes, who generously offered to write up some tips on using flat silk to share with you. (Thank you, Anne!) If you’ve ever worked with Japanese silk thread, you know that it can be quite difficult to get used to! Anne’s tips will come in handy if you ever want to venture into the world of flat silk threads. The tips are great for working with any flat (untwisted) filament silk, whether Japanese silk or not!
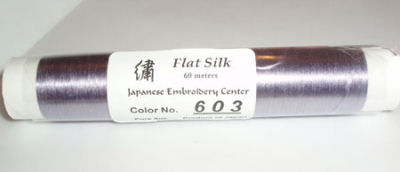
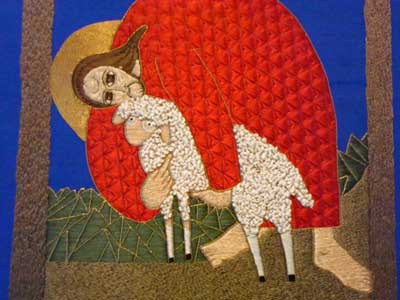
This is what Japanese silk looks like on the spool. I’m also going to include a few pictures of Anne’s work throughout the article (from previous articles here on Needle ‘n Thread). Before launching into Anne’s article, here are a few links on the subject of silk threads that you may find informative and interesting:
Silk Silk and More Silk Thread: A Primer by Sabrina de la Bere (PDF)
Flat Silk and Twisted Silk from Flat Silk (on Needle ‘n Thread)
One Thread Fits All (on Threads Across the Web)
Comparing Flat Silks for Hand Embroidery (on Needle ‘n Thread)
Above are articles about silk threads, history, uses and types and include photos of individual threads as well as stitched samples. I’ll try not to repeat those details.
I prefer to concentrate on handling and twisting flat silk. Flat silk is made of individual strands or suga, each from a single silkworm cocoon. Japanese flat silks come in two weights that I am aware of, 12 suga and 16 suga. They require approximately the same skill and effort to control, although 16 suga threads cover a little quicker. The result of careful control and application of flat silk is a really shiny embroidery.
First, and most important, in handling these silks is control. Control is essential in every step of successful embroidery with flat silk. Each suga is subject to breakage, snarling and snagging on everything, including fingernails and rough spots on hands. It is possible, though to learn control and embroider successfully.
Prepare your hands. I like to use Burt’s Bees almond milk cream to protect my hands. But, I don’t put it on before I embroider. I put it on several times a day, and in the evening. Before stitching, every time, though, you must wash your hands. Silk absorbs oils and creams, so will discolor and show the oily patch, which you definitely do not want. Use cream or lotion but make sure to wash your hands before sitting down at the frame.
I guess you might be able to use flat with a hoop, but I never have. I almost always use a Japanese frame for silk embroidery where you want the fabric drum tight. A slate frame works just as well. This is so you can use both hands, one above and one below the frame (left hand below for JE). This is the only way to keep the flat silk under control and flat.
When we cut threads, we don’t just reel off a thread and cut it. Again, control is essential. So, in JE we use an awl placed in one of the holes across the frame from the stitcher on the right hand side of the frame.
You wrap the thread around the awl, keeping the free tail taut. Match the free tail with the thread on the reel, hold them both taut, using the right hand, make a half-hitch around the awl, keep both lengths of thread taut and cut the thread to about a 12” to 16” length. You use a shorter length for threads called Old Flat Silk and 16 suga thread. That means more knots and endings, but the thread is taut, smooth and flat. Start with just 2 threads. We often combine up to 4 threads, flat or twisted, and even more for special effects. But, start with two threads.
To keep these two threads really flat, they must start out flat. First, one instructor showed me how to straighten and untangle the suga by stroking the thread, either individually or two or more together. Take one or both of the strands lightly in your right hand, close to the awl, with the strands laying across right your palm. Rapidly run the strand over your hands, switching from right to left hand, without holding on, just running the threads from awl to the end. Don’t let the threads fall, just alternate hands quickly from the awl outward to the end. If you are doing it right, you will begin to see the suga separate.
Now, take one strand and thread into a needle. I always use Japanese hand made needles for flat silks. They have a large, round eye as you can see in Mary’s picture above. I usually use an H6 or H7 for 1 strand of thread and thread with a needle threader just to make it easier. For JE we make a small knot at the end and I usually do that when using flat silk.
Take one small stitch the size of a pinhead, using the tekobari, inside the area that will be covered by embroidery, but hopefully, will not be in the way of any other stitch placement.
Now, come up where you want to begin your first stitch. Before placing the stitch, look carefully at the thread. You need light that will let you see if the suga are completely straight, not twisted in the needle. Now, place the needle and grasp it under the frame with your left hand. With your tekobari pick up the loop on top of the frame and, keeping the thread taut, draw the thread through the fabric. When the thread on top of the fabric is about 2 inches long, stroke with the tekobari from the fabric where the thread comes out, towards where it goes down, about twice. Keep it taut, making sure the suga are parallel, pull all the way through the fabric. Place the tekobari carefully on top of the stitch to hold it in place and bring the needle up in the next stitch location. Put the tekobari down carefully (it is very sharp and can snag threads), take the needle in your right hand and start to pull the thread up. Keep the thread taut under the fabric with your left hand. I use my middle or 4th finger to control the underneath thread. Pull the threaded needle straight out of the fabric until taut and start the process again.
[A tekobari is similar to a laying tool. You’re welcome to take a peek at my how-to video for using a laying tool, if you’re curious to see how these types of tools can be helpful to the embroiderer, whether working with flat silks or cotton floss!]
Main points to consider when using flat silk:
Check your hands
Secure thread to awl for control
Use the right needle
Use the right length of thread
Control from above the fabric and below
Check to make sure suga are not twisted, but parallel
Control both directions of stitching
Reasons to use Japanese silk thread:
First, it is splitable. In other words, you can separate the suga in order to use from just a couple of suga to ½ or ¾ of a strand of silk.
You can use those smaller threads for shading, smaller areas, such as in flower centers, accents and for soft shading.
You can twist the strands together to make a thicker thread, for different effects.
Thanks, Anne, for the tips on using flat silk! It’s not an easy thread to work with, so I always admire those who produce such beautiful embroidery with gorgeous flat silk!
Is it possible to see a photo of the awl wrapped with thread?
Where does one purchase flat silk.
Thank you for this great post! What BEAUTIFUL works of art!! I am wondering if Anne could share how she did the face on the Theotokos (Mary) icon. I am attempting to do something similar in cotton thread. I am interested in what stitch she used on the face? Did she use a simple color palette with a few colors? Thank you for this inspiring post!!
Wonderful as always!
But – Try as I might, I can’t visualize the part about tying the thread to the awl. I need a visual!
G’day there Mary and Anne, Am very grateful for this post. I’ve never tried flat silk embroidery but always look into it if come across items concering it. It’s facinating. Thanks for all the really good ignorance busting info.
Cheers, Kath.
I am trying to teach myself Japanese embroidery from books. Your video was useful, thank you.