


I’ve been tacking a lot of felt padding for goldwork lately. I thought I’d be a lot farther along two projects that involve felt padding, but hey… at least there’s some progress going on! (I feel as if I say that a bit too much – becoming an excuse, perhaps?)
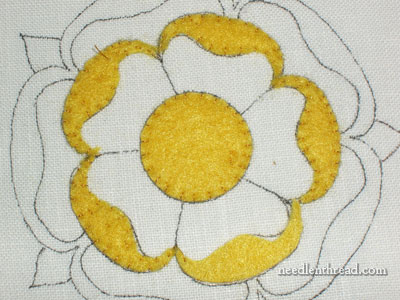
This is the piece I showed you the other day, when I pounced the design onto the felt and cut the pieces out without drawing in lines.
I’ve got one more inside petal to fix into place, then I can tack on the outside petal turn-overs.
When you tack a felt piece onto your ground fabric, it’s best to work from the outside in. That is, bring your needle up on the design line and take it down into the felt. Don’t come up in the felt and go down over the edge of the felt into the ground. Why not? Because you can “tweak” the placement of your felt better, if you come up in the ground fabric, right on your design line, and then go down into the felt. You can “pull” the felt towards the line and manipulate it better to fill up the area you’re padding.
This particular rose continues to crack me up.
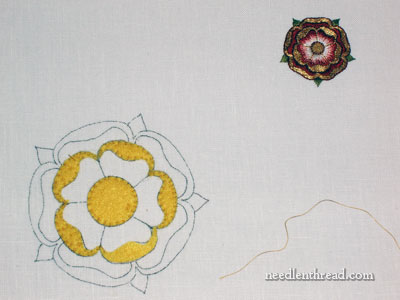
See, in the scheme of Things Large in this world, I realize it isn’t all that large. But every time I sit down to work on it, it seems Mammoth! And all because of that little rose floating above.
Perspective is everything!
Later this week, I’ll show you a little progress on the other goldwork project that’s going on out in the G’storkio (the workroom has been dubbed, thanks to Teri! ). It, at least, has some gold on it!
Hi Mary! I’m working on your rose in 3″, and yep, it’s HUGE 🙂 I have the silk done and am working on couching passing threads now. I used a light pink color scheme with a little bit of gold for the outlining, but mainly am using silver on the petal edges. The center will be silver check and I might use some gimp as an outline for the center if it looks right. I’m hoping to get it finished this weekend but in reality a week would be a good estimate. I’ll send you a photo when I’m done!
Mary, what does G’storkio mean?
Hi, Karen – Well, the other day when I was discussing my workroom (the link goes to that article), I was explaining it was a garage-gone-workroom/studio, but I hadn’t really come up with a name for it. In one of the comments, a reader suggested “G’storkio” – which seems to cover all three of them! ~MC
This is exactly what I am looking for!! However, I do have a question. How did you do the outline of the flower? Did you just draw it with a pencil or did you stitch it?
Hi, Michelle – right now it’s only drawn on. I haven’t started stitching on it yet…. shortly, though! 🙂 I hope!