


When you use the right product in a given process you can be assured of a better final product.
Last week, when we spoke about packaging of supplies and looking for needlework tools outside the Needlework Industry Proper, we were looking at buying charcoal powder to use as pounce for transferring embroidery designs.
Today, I’m going to continue in the same line, talking about another type of product that is suitable for embroidery design transfers. At the same time, I’ll answer some questions that came up after last week’s article on charcoal.
I guess what I’m trying to do here is two-fold: 1. to encourage you to look for the needlework tools you need outside of the normal needlework channels, either because they might be overpriced when bought with a “needlework” label or because they might just be impossible to find in the needlework industry of today; 2. to encourage you to at least try a form of embroidery design transfer that may seem to be inconvenient, but in fact, is most gratifying because it is so accurate and because it is a “satisfying” part of the whole embroidery process.
That being said, prick & pounce is a process you have to get used to. But once you get used to it, you may actually end up preferring prick & pounce to any other form of design transfer. The more you do it, the easier it is and the faster you can accomplish your transfer.
On to the product.
When I want to transfer a design onto dark fabric, I need to use a light pounce powder. It used to be that cuttlebone was the favored “white” pounce powder (it’s not actually white-white, it’s kind of speckled and off white, depending on the cuttlebone used). But cuttlebone is difficult to find ground up to a very fine pounce. You could do it yourself, but then you’d have to find a source for cleaned cuttlebone that hasn’t been treated or fortified for bird consumption (some are, some aren’t), or that isn’t so expensive because it’s been marked up for the pet supply industry. Trust me, I’ve gone this route – it’s a pain in the neck!
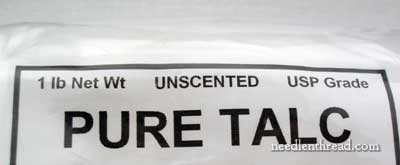
So, today, what can you use that’s fairly readily available? I use talc. Pure talc. No oils, no additives – just pure talc.
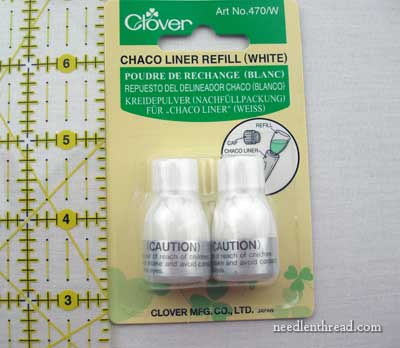
A couple weeks ago, I was having a conversation about this whole embroidery design transfer question with a friend, and the subject of Clover’s “chaco” products came up. I had not used any of the “chaco” products from Clover, so I betook myself to a local seamstress (who also teaches sewing classes, sells sewing supplies, and so forth) to see if she had any on hand. In fact, she did. She loves the chaco transfer wheels and she sells them and the refills.
I forthwith bought the refills, which you can see in the photo above. The ruler is there so that you can see the actual size of the little bottles. You get two of these bottles for around $4.00. The total quantity of “chaco” inside both little jars together is 0.196 oz.
What is “chaco”?
It is pure talc and “cosmetic powder,” which is a tiny bit of additive that gives chaco a subtle almost-reflective quality. Slightly shimmery stuff.
But, down deep, all it really is, is talc. That’s the majority of its contents. That’s why it goes on and it brushes off smoothly and easily. It’s just cosmetic grade talc.
Pure USP grade talc can be bought in bulk, in 1 pound bags, for around $5 or $6.
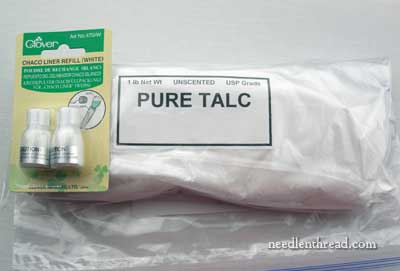
For the embroiderer who wants to transfer designs onto darker fabrics with talc, it makes more sense to have a larger quantity on hand. After all, you have to dip into the powder it with a pounce pad of some sort, you have to work the powder into the pad a bit – and so 0.196 oz isn’t going to get you far.
For the clothes maker and the sewing enthusiast, I can almost understand paying for the small refills for the chaco wheels (almost). The refills are convenient, the stuff isn’t normally used in larger quantities at any one time – so basically, if we buy the refills, we are paying for convenience and packaging.
But the embroiderer who wants to make use of talc in bulk for design transfer definitely needs to go a different route! Look for pure USP grade talc, instead! You can find it through folks who supply it for scuba divers, and also through fountain pen specialists, because it’s used when replacing the sac on a fountain pen.
Questions about Prick & Pounce Transferring
Is it messy?
It can be messy if you’re not careful, but with proper care, there’s very little mess or no mess at all. I should probably clarify that when I took the photo that’s found at the beginning of the charcoal article – with the speckles of pounce outside the container – I actually speckled that on purpose. That being said, yes, occasionally, you’ll get some speckles about the place, but it comes off with a quick wipe of a towel. This is what I do when I transfer a design: I clear off my workspace, lay out a cotton towel towel, upon which I set my pounce supplies. When I’m finished, I put the tool and powders back in their box, wipe off my workspace with the towel (though it’s not always necessary), and then I use the towel to wipe down my patterns, which then go into an envelope. The patterns won’t be perfectly clean, but they’re ready for the next time I want to use them. Then I step outside to shake out the towel, and if it needs it, I throw it in the wash. Sometimes, a good shaking is all it needs, and it goes back into the box with the pounce supplies.
As far as the stuff getting on your hands, smearing on your fabric and so forth, you just have to be careful. Realize what you’re doing, and take things slowly and carefully. If I get pounce on my fingers, I wipe them on a corner of the towel. It comes right off, and it doesn’t stain. I am always quite careful about the fabric that isn’t covered by my pattern – but even if you do get a little pounce on it, a good flick or so after you’re finished with your transfer will usually remove any residue.
Why is this method better than tracing?
It’s more accurate. When you trace, even with a light table, it’s often quite difficult to see the pattern. How many times have you traced a design on linen, and as you’re tracing, your eyes start playing tricks? The weave of the linen looks darker here, for example, so you confuse it with the design line. Or you just can’t see the line well because of the weight of the fabric. Prick & pounce can be used with any fabric and produce an accurate transfer.
This isn’t to say I never trace – I do when all the circumstances are right (the fabric is light enough, the design is bolder and simpler, etc.). But prick & pounce works under any circumstances, on any fabric, without having to strain to see what you’re tracing. It’s like playing dot-to-dot. The design is all laid out for you and you just connect the dots.
Transfer is Important!
So, this was a long and rambling post about product and process, to achieve a decent final product. Your embroidery project begins with your design transfer. Transferring the design is perhaps the most important step in preparing a surface embroidery project. If the design transfer isn’t right, then chances are, your end product will not be right, either. It’s worth taking time and care over the transfer of the design.
Now that I’ve put you to sleep, I should warn you that I’m going to show you some science experiments on this whole subject in the near future. I’ve got my Bunsen burner, my white lab coat, my safety goggles, and my Mad Scientist Personality all laid out and ready to go – so look out!
Hi Mary,
Our guild is planning a play/experiment evening with different methods of transferring designs, so this series is VERY helpful! I haven’t located the charcoal yet, but DH and I will be shopping… we love a challenge. Now I have to find the talc too.
We are planning on setting up prick and pounce stations (I guess we need a light and a dark), a light table for tracing, iron-on, carbon paper, and ink-jet. Any other suggestions?
Jane
Hi, Jane! Well, you could try (for redwork, quilt-square-type surface embroidery, towels, and so forth) Transfer – Eze or Solvy’s printable, water-soluble transfer paper stuff (called Sticky Solvy). There’s also that mesh stuff that Clover sells (haven’t tried it – looks a bit too basic, maybe good for bold patterns but it doesn’t look like it would do well for fine detailed patterns… but I will try it some day!). There’s also water soluble markers (with water-based ink) that aren’t exactly “needlework” items – like the Flair pens. I’ve got an article on those here: https://needlenthread.wpengine.com/2010/07/transfer-embroidery-designs.html But I suppose that would fall under tracing? I haven’t found the powdered charcoal at craft / hobby stores that have art sections (like Hobby Lobby & Michael’s), but you might find it at a true “artist’s supply store” that caters just to art. I ordered mine online through Blick’s art materials. The talc can be found in bulk on eBay – just search “pure talc” or you can go straight to this guy: http://myworld.ebay.com/dave4868/ It’s less than $6 / pound, but the shipping is about the same, so you end up paying just over $11 for a pound, if you purchase just one pound at a time. If all you’re doing is testing, though, you might go for a smaller size – I think he also sells 8 oz. But then, he also sells 5 lbs, 10, 15…. so it just depends on how much you want! That’s a LOT of talc! You can probably find other suppliers online, too, if you hunt around, and maybe for less. Bath and Beauty supply places might carry it, but remember to look for pure talc – unscented, no oils or additives, etc. Some people admittedly do use baby powder, but it has oil in it, so I wouldn’t personally use it. Sounds like a fun experiment! Good luck with it! ~MC
This is the most definitive explanation of the “Prick and Pounce Method” I have read. It removes some of the dread about the transfer process. Thanks Mary!!
Kudos to you.
Jana Krumrey
Thanks, Jana!!
Hi Mary– I’m preparing to do my first prick & pounce transfer — gathering my materials, drawing my design, selecting my ground fabric– so I could not be more excited that you are reviewing prick & pounce for us — All the tips you suggest are so helpful and detailed and get me to think about embroidery and the entire process in new ways. Plus — your blog posts are so much fun — it’s always a joy to read them!
Thank you!
Hi,
While eager to try out Prink’n’Pounce, I usually use Clover Chalk Paper – simply dressmaker’s chalk transfer paper – 5 or 6 sheets in varying colours. Pin faceside down over material, then put tracing on top, and go over tracing and voila! I use an embossing tool to do the tracing.
I find that I get good clear lines if I use even pressure – getting the pressure just right is the hardest thing. Clover also sells it’s own “tracer pointer”.
Short of prick n pounce, I really recommend this product 🙂 (No, no affiliations)
Hi Mary,
Will the prick and pounce method work on velvet?
Thank you.
Hi, R – yes, it works on velvet! The difficulty is the right stuff for connecting the dots. I use paint, although Bohin’s ceramic lead pencils do work well on velvet for the initial drawing…. but they can smudge off very, very easily. So, for me, it’s usually paint for actually drawing the lines in. ~MC
Thank You for explaining prick & pounce method.
It’s my favourite because is so traditional.I used to use a graphite from soft pencil like 8B. I tried to use charcoal but it wasn’t fine enough, maybe I’ll try again, but with lighter pressure.
I don’t have the same problems with white as I do with the blue. I use a Chalk Powder Marker made by Dritz that I picked up at my local JoAnn’s. I don’t remember the price, but what I like is that it comes in a fabric bag and can be used straight out of the package. I’ve not purchased from this site, but here is a picture of the product:
http://www.dritz.com/brands/showcase/details.php?ITEM_NUM=3184
I bought my prick and pounce kit from Sarah Humfrey. She sells it through Etsy and Royal School of Needlework. There was no price difference between the two sites. In the kit came a partially finished pattern that a person can practice pricking. The results after the prick and pounce were so crisp. There was a post on this website to use a nail buffer to smooth the back of the pattern. This made a tremendous improvement on the clarity of the dots. Prick and pouncing is now the way I transfer a pattern.
As a pharmacist at a long established family drug store I helped my self to the box of charcoal that had been around for years. I knew that the English use cuttlebone for the white but I really didn’t need it at that time. After my mother died I inherited her sewing machine cabinet and chair. Low and behold when I openned the drawer in the chair there was the Sears receipt from 1952 and a cuttlebone. I’m 70 and the last time we had a parakeet I was probably 14. I grabbed my mortar and pestle and ground it to a fine powder. Now I had white, black and I made gray.
Hi Mary,
Thank you for highlighting this transfer method! I think it is terribly underused and underappreciated. I use it for all my embroideries and find it quick, efficient and accurate.
I used to trace my final designs onto tracing paper for pricking. Not all that long ago I realized I can print my final design right onto the tracing paper and save myself a lot of time. 🙂 I love it when that happens.
Keep up the great work on the blog. I look forward to reading your posts.
It’s so true about the repackaging of items into tiny bits and jacking up the price for needlework and sewing items. Another “chalk” item I just thought of – you can buy bottles of blue chalk for re-filling plumb lines (the ones with the retractable string). I wonder what it’s made of and if it would work as well. It’s definitely has more color than the sewing talc.
Mary
Is there something you can put into the talc to use it on light fabrics? Or do you have to use the charcoal also? Thank you for all you do for the embroidetry world. I read every one of your post and often go back to them when I can’t remember what you said about a certain product Again Thank you so much.
Hi, Karol – Yes, actually, there is… charcoal! 🙂 I’ll be showing that a little bit later – how to mix up a grey pounce, and I’m also working on other light colors. ~MC
I saw pouncing for quilt design transfers on Youtube as well, tapping the pounce pad hard before you start in a holder, then swiping the pad across the pattern, so the talc doesn’t “bleed” under the holes.
Brilliant – and a baby talc with lavender smells nice too!
G’day Mary, YAAWWWNN! NOT. Not even a wink of sleepiness. Of great interest, thank you.
The science experiments sound interesting. Was the absence of a flame thrower an oversight or are you really going to do something legal? Sorry, I’ve been reading too many of Calvin and Hobbs escapades!
Cheers, Kath
Thank you, for the great tutorial!
What is the answer to iron off pounce powder?
I have heard that it is corn starch is that true?
Hello 🙂
Is there a difference between the talc you recommend & baby powder? As I understand it, baby powder pretty much is just talc, would that work?
Baby powder can have oils, fragrances, and so forth in it. Talc is just straight talc. You can use corn starch in a pinch, but you should definitely make sure it’s all removed from the finished project.
A very belated question, Mary: what are the risks of using treated cuttlebone? For safety reasons I can’t have powdered talc in the air in my home, and can’t find any cuttlebone that isn’t treated for animal consumption. I’ve considered corn starch, but am not sure how to remove it afterwards!
I wonder if rock climbing chalk would also work?