


The vermicelli goldwork on the Medallion Project is finished!!
To celebrate, I’m going to show you the back of the embroidery, because, for some reason, people like seeing the back of other people’s embroidery. I’ve never quite understood why, but if that’s what you want….!
First you have to look at the front. It’s much more attractive.
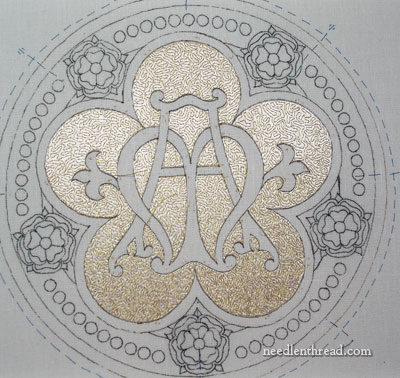
There’s the front. I’m not sure why I didn’t end those two gold threads that are sticking out before I took the photo, but alas. I didn’t.
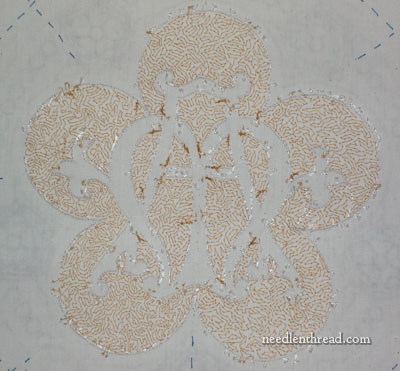
This is what the back looks like. All those dark bits are where the gold threads are begun or ended. You can see how to secure the gold threads on the back in this tutorial on ending couched goldwork threads.
Notice that you don’t see much silk – just around the outline of the design. You can find out why this is by reading this tutorial on laying flat silk threads in a surface satin stitch.
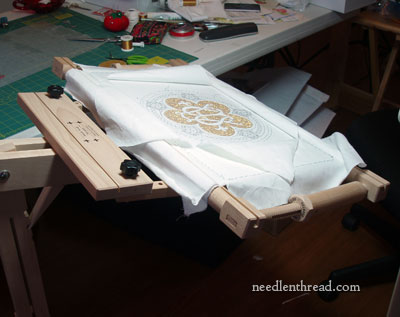
To give you some perspective on size, you can see the my stitching set-up here, and all my surrounding mess!
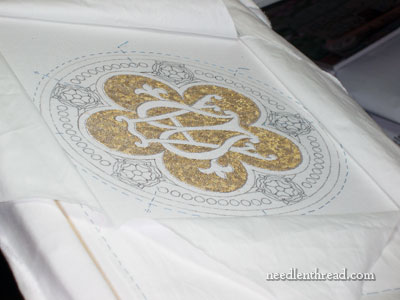
And a little closer in from this angle gives a sense of the monogram design and the gold background.
And so, the background is finished! You are welcome to jump up and down in Exuberant Joy and Elation with me!
And now it’s time to move on to the monogram.
I received quite a few questions in the last couple days about this project. I’m looking forward to answering all your questions soon – but I’m not near a computer this weekend (makes you wonder how I’m doing this, doesn’t it?). I’ll get to your questions at the first of the week!
In the meantime, if you want to follow this project step-by-step, you can visit this collection of articles about the Medallion project, which are all arranged in chronological order.
Have a jolly weekend – see you Monday!
If you’d like access to all the tips and techniques discussed in the Medallion Project, including complete step-by-step coverage of the Tudor-Style Rose, conveniently collected in one document, interlinked, referenced, and indexed, why not add the Marian Medallion Project e-book to your library? It’s packed full of all kinds of embroidery tips for undertaking a project like this, all in a convenient electronic format for easy searching.
G’day Mary,
I’m jumping, I’m jumping!
Jumping
up and
down in
Exuberant
Joy and Elation!
All that jumping has scrambled my senses…umm…but I think a hearty congratulations is in order here.
Yes, definitely, and it’s beautiful Mary, VERY beautiful.
Cheers, Kath.
Oh my gosh! That is incredibly beautiful. Are you still using a blue for the monogram? I loved that color.
Happy New Year!
Melissa Bird – January 14, 2012 8:56 am
Will you remove my first comment? It has a spelling error in it.
It’s looking beautiful Mary. I’ll do a Snoopy happy dance for you.
I do like looking at the back of other people’s work, and my own as well. My grandmother used to say that the back of the work should look as good as the front–not the same, but it should be neat, without big knots that interfere with mounting the piece, all threads properly laid, etc. to me, he back is every bit as lovely as the front, because that’s where you see all the technical details that show the skill of the art
Gorgeous, Mary! I really appreciate seeing the back…it really helps knowing how something is “supposed to look”…not sure I could ever achieve such a nice looking back, but at least I know it can be done! Congratulations on finishing that portion; can’t wait to see the rest.
Dear Mary
Beautiful! and I also think the back is just as nice so neat and tidy I wish mine would look like the picture above. I can’t wait to see the finished design are you going to stitch the tudor rose in red and gold and the monogram in blue as before? If so it will look beautiful against the white and gold above.
Regards Anita Simmance
It looks amazing Mary!!
Well done! Beautiful!
Thanks for sharing a photo of the back. It does really help to see how things should look on both sides. Just looking at the front is only half the story. The back shows the other half.
It’s like looking at the insides of a high end couture garment, and learning the techniques that set a designer gown apart from an “off the rack” dress. It’s all in the details.
Have a great weekend away.
Consider me jumping up and down! It looks fantastic. Excellent work, Mary! I’m looking forward to the continuation of the project.
Your work is so lovely. I don’t have the patience for this kind of embroidery.
Thanks for sharing.
Oh, it’s lovely! (What church will it be worn in?)
Speaking for myself, I like to see embroidery backs because it makes the piece more “real,” especially when viewing photos on the Web.
I am always amazed at how neat the back of an embroidered piece is of an expert embroiderer’s work. Between the two sides there is a direct correlation of quality. Thanks Mary. These peeks have helped many of us as we struggle to improve our work. Jana
Hej Mary! piękne jest to!Gratuluję
Polska.:)
I can’t believe how much this glows in the photos and can only begin to imagine what it looks like in person – beautiful!!
Absolutely fabulous! I’m having a GREAT time following your adventures on this incredible piece. There’s nothing like watching a Master at work. Priceless. Encouraging. Daunting. Inspiring. FUN. Thank you for sharing all of this.
Stunning! I look forward to seeing the rest take shape.
It’s just beautiful, Mary! It looks so lush and rich! I can imagine how good you feel having it done and turn out so well. Happy dances are indeed called for here.
My mom always insisted in seeing the back of any stitchery. She said, “The front doesn’t tell the story.” The back of your work is as well done as the front. I can’t wait to see the next step.
It’s just stunning. And your backs are always so neat (all things considered)!
Hi Mary,
once again another beautiful piece of art… You are inspiring… Thank you for sharing
PBWY,
Jennifer G.
WOOHOO!!!! Virtual trampolining here!!!This piece is going to be marvelous, and a prime example of ‘opus americanum’. I just made the term up, but it is truly going to be worthy of a title- and this was the first one that comes to mind. Thank you so much for bringing us along on the journey.
OOOOoooooh!! LOVELY. Just perfect!!
Standing ovation but no jumping here (my physiotherapist would object on me jumping too cheerfully…)Your couching work is absolutely breathtaking and it brightens my day. My former sewing-teacher was totally obsessed with back sides. She could joyfully demand that you started something all over again, just because that tiny little piece of thread was not neat enough (sigh). She used to say, in French : faire et défaire c’est toujours travailler (means : making and unmaking, it still is proper work). Now my present embroidery teacher goes crazy when asked to show the back side of her embroideries. She thinks asking her to look at it is the worst thing you could do, because she finds it a very rude question. And she really doesn’t understand why people are so eager on seeing something that’s going to be hidden. But still, we the students dare to ask. It’s very useful to improve our technique and learn how to start and finish things properly. So thank you so much for allowing us to get a glimpse on this highly valuable and didactical picture !
Wooooooooow I like it very much >>> your works are so neat , clean and creative …. Thanks for your efforts and guides …