


Working the background of the Medallion project in this vermicelli goldwork technique, I don’t actually have to end the goldwork threads too often. I start and stop the thread only once in any given space, always either at a corner of the space, or somewhere along the edge.
When using couched goldwork threads, it’s really very easy to end off the thread. Let me show you how it’s done.
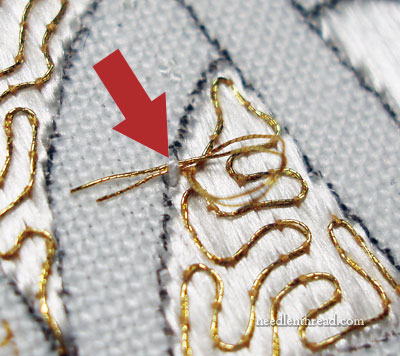
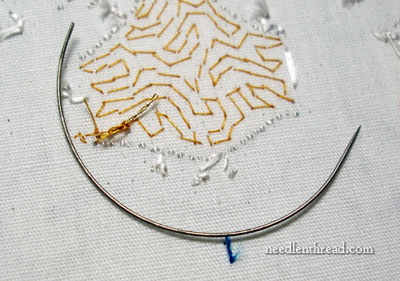
When you arrive at the stopping point for your couched thread (in this case, the gold Elizabethan twist), take your last couching stitch over the goldwork thread right in front of the spot you want to “plunge” the thread to the back of the fabric. Do not end your couching thread yet – you’ll use it to secure the goldwork threads on the back. Clip the metal thread so that there’s about an inch of extra metal thread. This tail will be pulled to the back of the fabric.
I like to use a plunging lasso to sink the ends of goldwork threads and take them to the back of the work. This is just a loop of cotton string in a needle. I’ve already posted a tutorial on how to make a plunging lasso, so if you’re unsure of what it is, feel free to take a look at that tutorial.
In the photo above, the red arrow points to the tip of the loop of the plunging lasso, right before it yanks the tail of gold thread through to the back of the fabric.
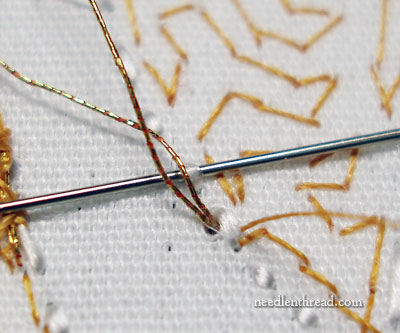
On the back of the fabric, you now have the tail (or tails) of your goldwork thread. Using the rest of your couching thread (that’s the silk used to couch the goldwork threads), take your needle underneath the back of the stitches on the wrong side of the fabric, near the goldwork tail.
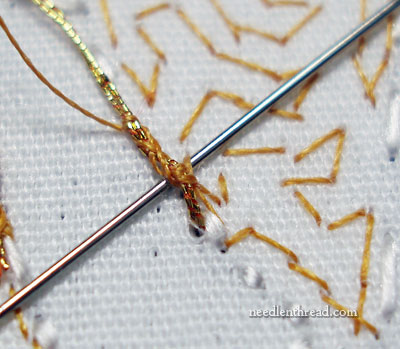
Stitch over the goldwork thread a number of times (three or more), anchoring the goldwork thread to the back of the fabric by passing under the backs of stitches in the general area. I cover up about 3/8″ – 1/2″ of the goldwork thread with stitches, wrapping the couching thread around and around the goldwork thread, always passing under the backs of stitches, so that the goldwork thread is secured.
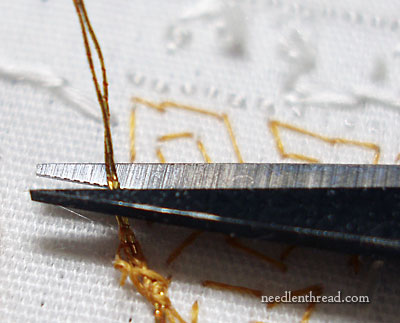
Then grab your scissors and clip off any remaining gold thread that hasn’t been secured.
Some folks like to use a curved needle when securing goldwork threads on the back of the fabric. Personally, I find it easier to use a straight needle, but if you are having difficulty with a straight needle, you might give a curved one a try. There are various sizes of curved needles for this type of task. Since the threads used in this project are fairly fine, it’s difficult to squeeze the larger quilting sized curved needles underneath them, so, when I do use a curved needle, I use John James’s curved beading needle. It’s much finer than the standard curved needles found in the quilting sections at sewing stores.
That, then, is how you end couched goldwork threads. It really is that simple!
If you’re interested in following the progress of the Medallion project from start to finish, feel free to check out the Medallion project index, where you’ll find all the articles relating to the project listed chronologically.
Up later this week on Needle ‘n Thread: a sneak peek at some exciting needlework-related stuff on Needle ‘n Thread for 2012, along with my last book review for 2011, stitchery updates and some thread, a look at a floor stand, and golly, who knows what else?
Don’t forget to take time for your stitching, even if life is a bit hectic – it’ll keep you sane! See you tomorrow!
Oh my, the plunging lasso is brilliant. I’ve only done a wee bit of goldwork and always forced a big needle through the work when I plunged, to fit the threads, an then had to kind of massage the background fabric back into shape!
On curved needles for working fine to medium threads…
Surgical Tapered 1/2 or 3/4-round Suture Needles. They are awesome! you can also get several different configurations, but NEVER get anything marked ‘cutting’!
Nicely shot, as always….jealousy runs rampant over your photos! 🙂