


Much like the Elizabethan Twist goldwork thread that meanders over the flat silk on the background on my Medallion project, this morning’s article is a bit of a long and winding journey.
To start with, I’ll show you an intermediate step in the journey, and then go back and talk a little bit about how I got there.
Leaving my workroom the other night, long after the sun had set and the chill had crept under the doors, I turned around in the dim light afforded by the last lamp in the room, and saw from afar the progress I had made in the day’s stitching. I had my camera in my hand and snapped a quick photo.
Light is a funny thing. Without the direct glare of my stitching lamp over my work – with just the warm glow of one solitary lamp and the far-away wimpy flash of a point-and-shoot camera – the goldwork on the background of the Medallion looked the way I think it will finally look, when all is said and done. It looks…
… gold.
Depending on the angle at which this piece is viewed, the goldwork looks decidedly different, but overall, when viewed from afar, it is a warm, rich, gold that is rather pleasing. And this is exactly what I wanted.

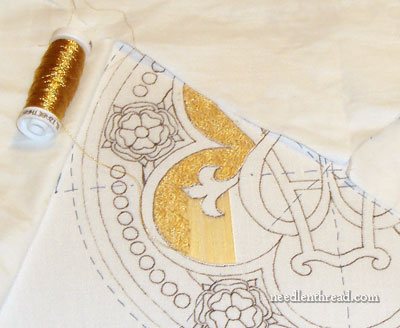
The Elizabethan twist that I’m using is a fine thread. It’s two plies – two tiny gold wires loosely twisted together. It is perfect for this “vermicelli” work.
About the whole question of that name vermicelli, this technique is called so because it resembles vermicelli (the stuff you eat). It is also sometimes referred to as “cornelli couching” – yes, just like the cake decorating technique (called “cornelli lace”) that involves squiggly lines of icing. How many embroidery techniques can you think of that are so closely associated with food? And here’s one that’s associated with two types of distinctly different foodstuffs. Nifty, isn’t it?
Some goldwork books today refer to this technique as vermicelli. Some designers (Alison Cole, for example, who designed a couple goldwork ornaments that involve the technique) call it cornelli couching. In very old embroidery books (church embroidery books, mainly – Lucy Mackrille’s Church Embroidery and Church Vestments, for example), couching the thin gold wire over the laid silk is referred to as Italian Stitch, whether it is couched in straight or meandering lines.
Vermicelli work, cornelli couching, Italian stitch – whatever it is called, the idea is the same: working a continuous thread of gold (or other stuff) that meanders about and twists and turns. For the embroidery to look really nice, ideally the spacing between the formed lines should be kept as consistent as possible. The couched thread (in this case, the 2% gold Elizabethan twist) should never turn into itself or overlap. The thread just goes… and goes… and goes. And the result?
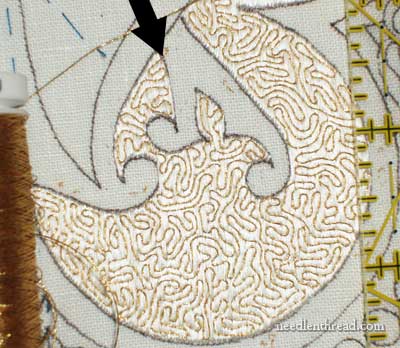
Well, the result is somewhat game-like. If you want to have a bit of “fun,” begin at the black arrow, where the gold thread starts, and follow the thread through the whole area. It’s not really a maze – you won’t run into any blockage anywhere. It’s more like an on-going, meandering path.
If you want an equal amount of fun (I really know how to have fun, don’t I?), turn the work over and do the same thing with the couching thread on the back of the work. You can see that the couching stitches follow the same path as the gold.
This type of couching is easy, in a way. Seriously! It is, after all, only couching. There is nothing complex about the stitch itself. But it is time consuming and it does require looking ahead. There’s no pattern to follow, but you need to know where you are going, so that you don’t back yourself into a corner. If you do accidentally end up stuck in a confused situation where you can’t reasonably turn your thread and get back out into the open to continue your meanderings, it’s best to get stuck at the edge somewhere. Otherwise, if you’re in the middle of your flat silk background somewhere, you’d have to sink the end of the gold thread into the flat silk. It’s better to sink the threads on the very edge of the flat silk area.
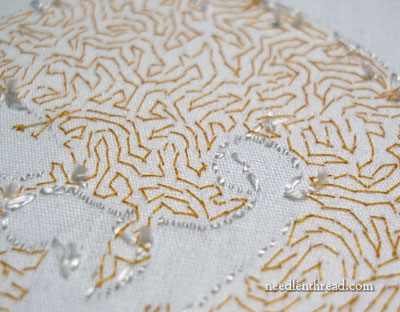
To put the size of the area in perspective, I’ve set a ruler next to the embroidery. You can see we aren’t talking about a “huge” area here, but it’s sizable enough that it takes a good length of gold thread to fill this area with the gold vermicelli. I am working straight off the spool, and will only end the thread when I have filled all connected spaces in the background. Where the rest of the design cuts off the background, I will end the thread.
Let’s chat materials.
Threads
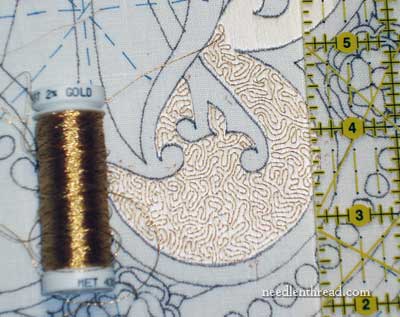
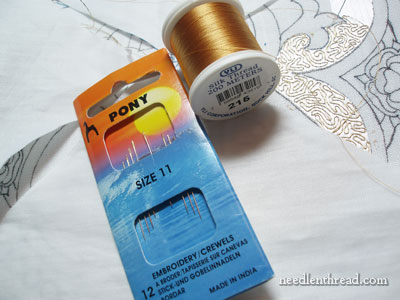
Besides the Soie Ovale (the flat silk of which I spoke previously) and the Elizabethan twist, I’m using YLI’s silk sewing thread, 100 wt, in color 215, which is a perfect match for this gold. It is important that, on this type of work where we’re using good materials and sinking a lot of time and money into the piece, silk thread is used. Why? It’s not just that I don’t like polyester threads for embroidery work, but polyester threads are simply not the same quality as silk. Polyester thread is more abrasive than silk. Silk is a natural “fit” with the natural fibers already being used (the linen ground, the flat silk). Why introduce a chemical plastic into the mix? And what effect, over time, will that thread have on the other materials? I’m not qualified to make any scientific statements, but the fact that silk has withstood the test of time – centuries and centuries of time! – in this type of application is good enough for me to know with confidence that it is a good choice for this type of work. Besides, two hundred meters of thread will last a long time, and the price difference between this type of silk thread and a similar sized polyester is just not that great.
Needles
I’m using size a #11 crewel needle for the couching and a #10 crewel needle for laying the flat silk threads.
Crewel (a.k.a. “embroidery”) needles in size 11 and 12 are often difficult to come by. Richard Hemming makes a size 11 crewel needle, and John James makes a size 12 (but the latter is apparently only available in bulk). Wendy Schoen used to carry #12 crewel, but not the #11. I am not certain what company makes her needles. I may speak a bit more about needles later – I’ve run into a few points (!) that are worth mentioning, but they deserve their own spotlight.
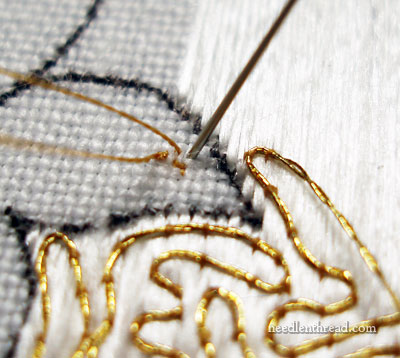
The couching thread is waxed with 100% beeswax. After using different kinds of beeswax for this type of stitching, I’ve discovered that 100% beeswax that’s sold in chunks is great. The chunks can be bricks, disks, or pretty little decorative molded beeswax. The stuff that’s sold encased in little plastic disks for “ease of use” is flaky. I prefer the former chunks of beeswax to the latter flaky stuff in plastic disks. My gauges for choosing beeswax are smell and color. If it has that warm, comforting beeswax smell, and if it has that warm, deep beeswax color (as opposed to light yellow), then it’s generally a good beeswax.
Unlike the gold thread, the couching thread is not never-ending. It has to be cut to manageable lengths, which means that beginning and ending the couching thread happens quite often. The trick to doing so without carrying a long thread across the back of the fabric is to begin and end the couching thread near the edge of the flat silk, using a few tiny stab stitches in the linen ground that isn’t yet covered by stitchery.
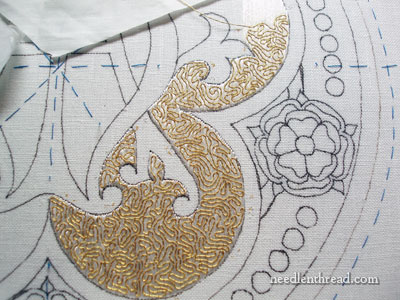
The progress looks a bit hairy in this picture, doesn’t it? And this brings us back to the idea that the work looks different, depending on the angle from which it is viewed.
There are about 20 hours of work in this so far, including stitching, set up and peripherals. It doesn’t look like a lot of progress, but I’m quite satisfied with it. I’m looking forward to forging on.
Well, we meandered together long and far today! But now that we’ve covered the nitty gritty information, the next time we look in on this project, we can just look at progress.
I’ve indexed all the articles focusing on the Medallion Project here, if you’re interested in perusing them.
And as always, if you have any questions, comments, or suggestions, feel free to have your say below!
Enjoy your weekend!
If you’d like access to all the tips and techniques discussed in the Medallion Project, including complete step-by-step coverage of the Tudor-Style Rose, conveniently collected in one document, interlinked, referenced, and indexed, why not add the Marian Medallion Project e-book to your library? It’s packed full of all kinds of embroidery tips for undertaking a project like this, all in a convenient electronic format for easy searching.
This completely blows me away!!!!!! Beautiful!!!
Amazing detail! I just love watching your progress on this. I bought the A-Z Goldwork a few years ago…didn’t really know why at the time, other than thinking maybe one day I would try to teach myself. You have really made me want to get that book out, re-read and try something (simple) in the very near future. Just have to get through this hectic holiday time so I could devote my full attention to learning! Thank you so much for sharing this beautiful project.
It’s gorgeous.
Since you are suggesting the YLI 215 color for gold work, do you have a favorite YLI color for the silver work?
I am going to place an order for the YLI 215 you suggested, and maybe I can share the shippong cost of I order the color for the silver too.
By the way great article and information.
Hi, Alessandra – I’m not familiar with the whole line of YLI 100, so I don’t know off hand what color would look best. I would imagine their most muted or soft grey would work, but I don’t have a color card. I’ll see what I can look up, but you’d be able to guess as well as I can! If I come up with something, I’ll let you know. ~MC
Looks great to me! I haven’t tried goldwork yet but its on my list of to do’s. I’m watching very closely every time you do goldwork. One of these days I will take that step, but until I do I’ll keep watching and admiring your work. I would like to stitch something for my church as well, which is another reason to watch!!!!!!!!!
Cathy
Okay, question…Is there a particular reason you didn’t finish the laid silk, there, before you started vermicelli-ing all over the place?
It looks INCREDIBLE. Just…wow!
So are all your couching stitches parallel to the run of the silk, then?
Hi, Pam – I suppose there are a few reasons that the laid silk you see there isn’t finished: 1. variety is the spice of life. After doing the laid silk for a while, it’s nice to switch to some couching; 2. I think it’s a good idea to couch down the laid silk when it starts to become “abundant” and there’s plenty of room for the couching – better safe than sorry. The laid silk is vulnerable until it’s held down with something; 3. I wanted to take pictures of the goldwork so I could write this article…. so I had to get a decent amount of the gold done.
NO – the gold couched threads are definitely not parallel to the run of the silk. On the contrary, it’s either perpendicular or at least at some angle to the direction of the laid silk threads, except in a few cases where running the gold parallel to the silk was absolutely essential in order to turn the gold. In those areas where it has to be parallel, you have to couch slightly differently, to catch down more of the silk, so that the gold doesn’t sink between the laid threads. It’s much easier to couch the gold always at some angle to the laid silk, rather than running parallel with it. Now, the couching stitches themselves end up parallel to the silk, but only if the gold is running exactly perpendicular to the silk. Get it?
🙂 Good questions!
Re; your discussion of vermicelli (Italian for little worms) as cornelli couching. It rang a bell!
Cornely machines were made from the late 19th century, to fasten decorative braids onto clothing in a wriggly pattern, with a chain stitch. The Original company to manufacture these was Cornely, in France, and Singer also made them in the early 20th century.
I hope this will be of interest to your readers.
Hi, Gwendoline – YES! I had a whole paragraph in there about the Cornely machine when I originally wrote today’s article, but the article was already long, so I edited that part out. I found it very interesting indeed! Thanks for mentioning it! ~MC
Today I started by its index … and began to read the first post … and I must confess that I am breathless with his medallion … and really do not think you were wrong in wanting to change your frame … extamente I would do the same thing … we have to do what we think is right and always the best we can … and I would expect no less from you … Your work is fantastic background fill … thank you very much and all the tips you give us … Always have border cross stitch embroidery and Brazilian Embroidery since 2007 and now I have ventured into other types of embroidery because of their site, I would enjoy and thank …
Your work is beautiful and the blogging is inspiring. How do you know what products to use for your projects? Do you makeT samples first or experiment? How do you create (if you do so) samples of your work before making such beautiful works? Thank you for sharing with us. Romaine
You must have the patience and eye sight of a saint. Thanks for all of the great information as well as the inspiration I get from your writing and photos.
Wow – words can not describe the beauty of this project. I wait with great anticipation each and every day to see more progress. I have finally started my very first ecclesiastical hand embroidery project. (I’ve done quite a few with machine embroidery, but have not ventured into hand embroidery yet.) My humble project will be nothing compared to this, but one has to start somewhere. The goldwork couching is rather fun! Between your blog and the A to Z goldwork book, it’s not as scary as I thought.
I could never have started this venture without the guidance and tips gleaned from your site. Thank you so much for sharing and all of the encouragement.
Wonderful! I’m efnjoying every word and picture! thank you.
Well that looks amazing! Your meandering gold thread is perfectly spaced and you make it look effortless. So beautiful.
Oh Mary! This project is just beautiful and the vermicilli is mind bogglingly beautiful – so fine and that is my passion – this fine work like needle painting which I have becone such a fan of due to the course I did with Trish Burr this year so I am following this fine work with huge interest. I am always so amazed how much you get done and working too. I am ‘retired’ and just cannot find the time to do the amount that you do. Also many thanks for the books you review – I always take a keen interest in that and have tried to get the 2nd AtoZ stitches – out of stock at Amazon but have ordered anyway – can’t wait. Have a great weekend and look forward to the next episode! Well done.
Mary;
the following site will give much info on YLI threads plus a color chart can be downloaded.
http://www.roserushbrooke.com/yli-silk-thread-1.html
This will give you the color chart that one wishes.
Jane
Georgia Gal
Thanks, Jane, for the YLI information!
Lauri – The couching of the gold thread in this wiggly manner is vermicelli. So I’m using the spooled silk (YLI) to couch down the metal thread (Elizabethan twist). That is the “vermicelli” technique. It’s not really a “stitch” – the only stitch involved is couching stitch. I’m doing it on top of the flat silk, which has not been couched on at all. The way I’m putting the flat silk on is called laid work. The vermicelli technique can be done on any background, including just a plain ground fabric.
Pam – very nice of you. As I mentioned in the article, though, this type of work is not too difficult. Don’t underestimate yourself! You can practice the technique by couching a regular thread – say a DMC metallic or something like that – on a plain ground fabric, for decorative effect. You’ll find it definitely isn’t hard!
Suzette – I think it would be difficult to try to follow a pattern. The thread sort of “dictates” what direction you go in, anyway. After so many twists and turns, the thread eventually twists in such a way that it’s easier for it to go in one direction over the other. You could always practice the technique on a plain ground fabric, using something like a DMC metallic, and once you get the hang of looking ahead, then do it with the better threads.
Thanks for your comments, everyone!
MC
Mary:
I forgot to mention that YLI site has a great tutorial on YLI threads.
Mary it’s stunning! Thanks for posting the link to the Archives pdfs. There’s some great stuff in there that can be used for secular projects. Must say I can’t imagine doing vermicelli on the fly as it appears that you are doing. Could/should a beginner draft it out ahead of time on transparent paper, then use that pattern to check the progress of the line of stitching? Something, anything to help chart a path? As to thread, I like the YLI silk myself but was surprised that the Royal School uses poly for their goldwork classes–referring to the Day ones, not the Degree Programme. Clearly there are two sides to the thread issue because silk has failed over time. Their opinion is that the poly will last longer but hey, let’s check back in a few hundred years & see what the conservators say then!
Hi Mary,
I love to watch your progress on this beautiful work of art…never in my wildest dreams could I hope to achieve this level of work. How many years did it take to reach this level and what drew you to this type of work?
Looking at your embroidery only makes me want to improve my skills and make something really special, if only for myself to admire:)
I look forward to more installments in the future…
Hi, Mary, Your work is beautiful! I was reading the comments and your responses, and I need some clarification, please. Do the vermicelli stitches (the Elizabethan twist)couch the laid silk and then, in turn, the YLI silk sewing thread couches the vermicelli? Thank you.
Stunning!
Do you use one hand on top and the other hand underneath your work as you stitch? I have done this sometimes. I put my dominant (right) hand on the bottom and the left hand on the top, so I can see where it is putting the needle. Needless to say, my work is nothing on the scale of what you are doing.
Just simply amazing and gorgeous!!! Can’t wait to see it all finished. 🙂
Did I miss how you made those thread tags?
Hi, Catherine, I’m afraid I’m reading this question out of context – I can’t see what thread tags you’re referring to. If you can clarify or post a link, that would be great! Thanks!