


In the Medallion Project that I’ve been working on, the background is stitched in flat silk that is held down by a meandering gold thread in a technique called “vermicelli.”
Today, I’d like to show you how I lay the flat silk, and explain why it’s useful to change the direction of filling an area while doing so. For the most part, I don’t change the direction of stitching, but instead I turn my frame 180 degrees. We’ll look at laying flat silk threads, and then how to fill an irregular shape, changing the direction of the filling process along the way.
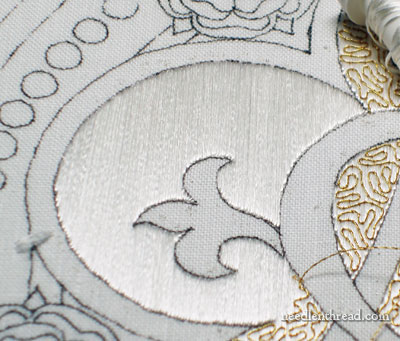
First, it’s useful to understand how flat silk is stitched to fill a large area. While the silk above may look as if it’s been satin stitched, in fact, it isn’t. This smooth flat silk filling is accomplished by using a technique called “laying” the threads, or “laid work.” This technique can be used in all types of embroidery, so whether or not you’re working with flat silk doesn’t really matter – you can do this with any type of thread, as long as the resulting long stitches are somehow secured, by couching some type of thread over the top of the stitches.

The diagram above (from my satin stitch dot tutorial!) demonstrates how to “lay” threads for laid work. The red lines represent the straight long stitches on the front of the fabric. Coming up at A, you take a long stitch and go down at B. Now, this is where the difference between “laid work” and satin stitch is seen: instead of bringing your needle back to the front of the fabric next to A, you hop sideways to C, right next to B, bring the needle and thread to the front of the fabric, and then take the stitch down at D, which is right next to A. This minimizes the thread on the back of the fabric – there are no long stitches on the back, only on the front.
So that’s the method of stitching.
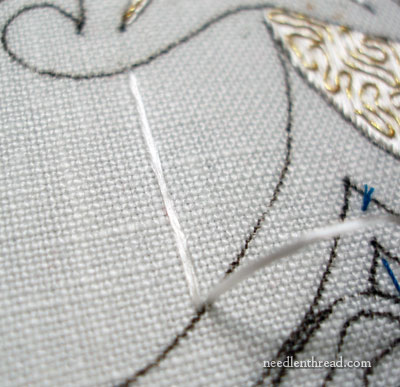
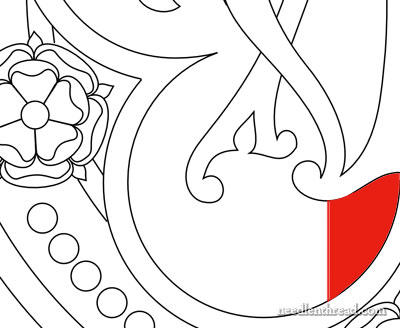
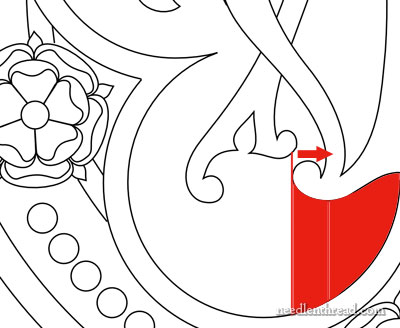
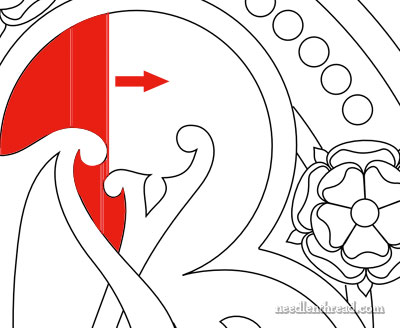
To begin filling an area, I start away from the edge of the area and set in my first long stitch. Starting away from the edge helps establish the correct angle of the stitch.
By looking at the red line in the photo above, you can see that the angle of the stitch is parallel to the weave of the fabric. It is straight up-and-down. All the silk stitches used to fill the background of the Medallion are completely vertical.
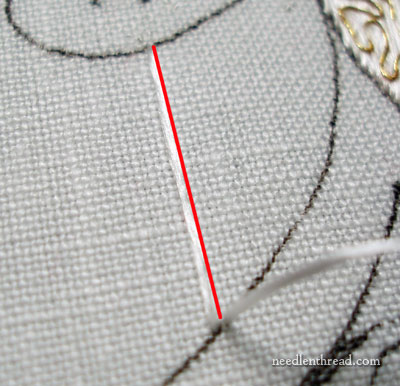
From the point of this first stitch, represented by the red line in the diagram above, I am going to fill the rest of that little area to the right of the red line.
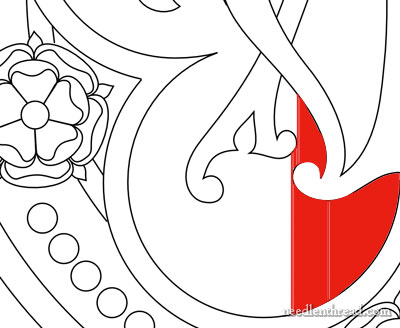
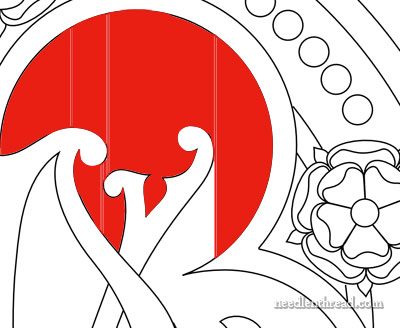
Once that area is filled, I’m going to move back to the beginning of the area (where the initial red line was), and fill to the left. BUT…. (there’s always a but!)…
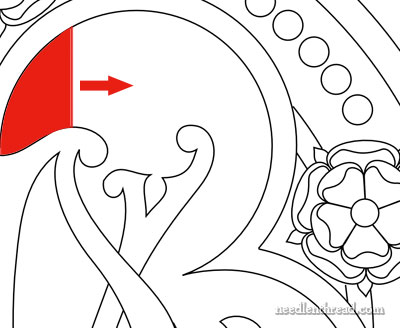
… at this point, I turned my frame 180 degrees, so that technically, I’m still stitching from left to right.
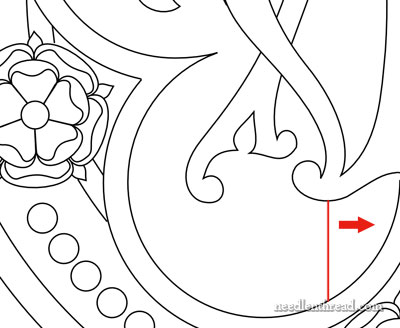
It may seem rather a pain to do that, but to accommodate holding my laying tool in my left hand (the tip of which is pointing to the right, as indicated by the red arrow), it makes more sense to fill from left to right. Turning the frame ensures that the tip of my laying tool does not come into contact with previous stitches.
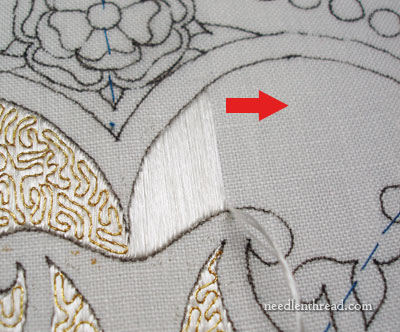
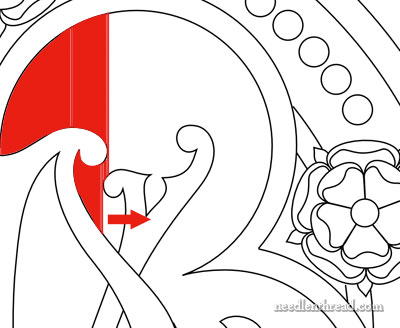
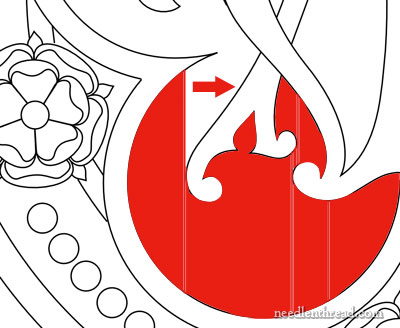
I filled from left to right, to this point in the pattern.
Now I have to fill this little area in the background, and so from this point, I turn the frame again 180 degrees, so that the design is now upright, and I continue stitching from left to right, to fill that small irregular shape of the background.
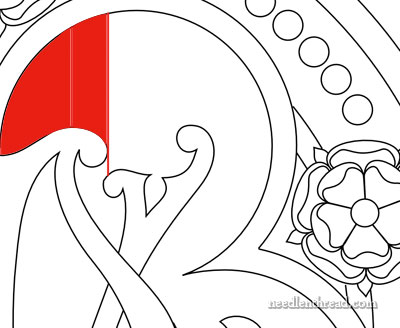
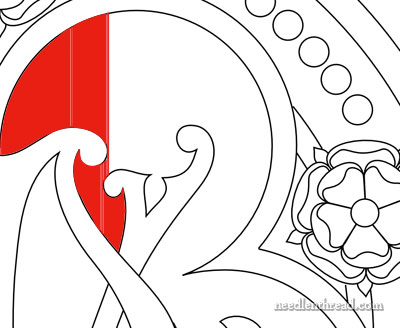
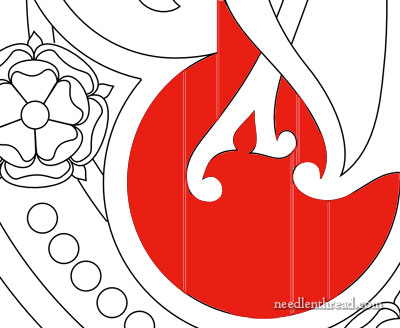
When I arrived at this point of the filling, it was time to turn the work 180 degrees again
Now I can fill the remainder of that shape from left to right, too.
While it may sound as if I’m rotating my frame around every few stitches, each of those areas, though small, takes a bit of time to stitch!
Now that this little area is filled, I can go back to the larger part of the background that still needs to be filled.
I’m still filling from left to right, so I don’t need to turn my frame again at this point.
Once this much of the filling is finished, it’s time to turn the frame 180 degrees again (so that the design is upright).
Then, working again from left to right, this area is filled…
And now, instead of rotating the frame and continuing with the filling, it’s a good time to stop and start couching on some gold.

I find it easier to work a smaller section of flat silk and then couch it over with the gold, rather than filling all the silk in the whole background first, and then working all the gold. Not only does alternating silk and gold provide a bit of variety in stitching, but it also secures the silk right away, rather than leaving it exposed to snagging.
Here’s a shot of progress to this point, taken from farther away. The gold really gleams!
Even though it looks like a lot of work, this type of stitching is not really difficult. It is a little repetitive and it is definitely time consuming, but it isn’t hard. My favorite part of stitching in these techniques – laid silk threads and vermicelli goldwork – is the easy rhythm that develops during the process. Both techniques do require attention, but they don’t require any difficult manipulation of complex stitches, so the frustration factor is very low, but the satisfaction factor is pretty high!
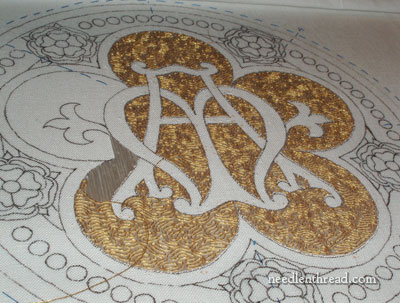
Now it’s time to get the background completely finished, so we can move on to the center monogram!
If you’d like to see this project develop step by step, you’ll find all the articles relating to it listed in order on the Project Index for the Marian Medallion.
If you’d like access to all the tips and techniques discussed in the Medallion Project, including complete step-by-step coverage of the Tudor-Style Rose, conveniently collected in one document, interlinked, referenced, and indexed, why not add the Marian Medallion Project e-book to your library? It’s packed full of all kinds of embroidery tips for undertaking a project like this, all in a convenient electronic format for easy searching.
That is looking pretty incredible!
Wow, Mary. I just love a flat silk foundation, wether laid or satin stitched. I know that it has to be held but sometimes I wish that it could just be left as is – a shiney, perfect layer of silk.
Having said that, I also love the vermicelli holding and the distant shot that looks so golden is A-MAZ-ING!
Wow! That started off seeming so complicated and then, thanks to your detailed and step-by-step commentary I ‘got it’ – a very useful tip!
It’s looking fabulous now all that gold’s down!
🙂
G’day Mary,
BONK! Back to the ‘reel’ world.
Kinda nice I guess, to get back to our normal, interesting, intriguing, attention arresting normality after all the excitement!
This is an absorbing post Mary. And so thoughtfully put together, obviously with ease of following it in mind. It’s good. Thank you.
Cheers, Kath.
That is so beautiful. I think it is one of the prettiest things you’ve made! Absolutely LOVE the “from a distance” effect of gold vermicelli on silver silk. Can it get any prettier?! Thank you for sharing.
Thanks for your comments on the Medallion Project, ladies!
Kath – yes, it is “back to reality”! But not for too long….! 🙂
Carol-Anne – The silk foundation is incredible when it’s left bare! There’s nothing like that perfectly smooth silk. I really wanted to see if it was possible to satin stitch even part of this design – like the monogram. But there are too many areas on the monogram where the length of the satin stitch could end up being problematic, especially when it comes to storing the vestment once its finished. They get rubbed against and stuff like that, so long satin stitches are always in danger. But *sigh* there’s nothing like satin stitch, is there?!
Laura – Thanks!! I’m glad you like it! I like seeing the piece from a distance, too, and from every angle. From some angles, depending on the light, you’ll get very different effects. The whole project is quite a journey. I only wish I could travel a little faster!
Anne – good to hear! That’s what I was shooting for in the article – clarity and simplicity. It’s not hard technique at all!
Thanks, Kirsten!
~MC
Mary, it’s beautiful! That long shot really shows the gold. Can’t wait to see the rest!
Wow, that final photo just about took my breath away! I wasn’t expecting that! What a contrast to the close up stitches! It’s stunning.
That is absolutely beautiful! A Masterwork! Can’t wait to see it finished….
Mary, you give the most wonderful instructions! I have been wondering how you were going to fill in some of those odd shaped places. Thank you so much for the great diagrams. I think the hardest thing for me would be creating the vermicelli pattern. I know that you reviewed it, but I still think it would be very difficult to meander with the thread, but still keep it relatively consistent looking. Yours is beautiful.
I really enjoy your posts! Your presentation is great! What could seem so complicated comes across as possible by watching how you explain the process. Since I create period costumes, I have always been interested in embroidery work and have done it more as a hobby. Watching your demonstrations with the silkwork and goldwork has encouraged me to try my hand at this and apply it to my costumes. Thank you for sharing your enthusiasm for embroidery with all of us!
Sue L.
Wow, so stunning!!!! So delicate and so bold! Just wow.
What sort of vestment is it going on, a chasuble, a processional banner, a frontal? I too am amazed at the meandering pattern you’ve seemingly so easily done–managing it appears not to back yourself too tightly into a corner too often! I am really looking forward to seeing the final product take shape.
Well that’s amazing! I can totally see how you could do this with other threads as well. If this was done with DMC embroidery thread, say, on a garment – how do you think the washing would go? Would it have to be carefully hand washed? I’d hate to go to all that work and ruin it all after wearing once 🙁
Hi, Karen – Sure, it could be done with regular stranded floss like DMC. You just have to make sure you couch over it with something (even if it’s more DMC). I think it would hold up to laundering, as much as any floss does. After a while, it would probably fade a bit, if regularly laundered, but the stitches should stay in place if they’re couched down at close enough intervals.
Hi, Joshua – it’s the medallion on the back of a chasuble. Honestly, you’d be surprised how easy the vermicelli work is. The Elizabethan twist I’m using is a perfect balance of stiff yet flexible, so it’s very simple to guide the thread into place!
Thanks, Heather!
Thanks Sue – again, not complicated at all! Glad the post helps clarify
Hi, Pauline – if you do the vermicelli work with a flexible enough wire, it’s pretty easy to keep it consistent. It would be a lot harder with a looser or softer thread, but the wire helps with the consistency.
Lana – I can’t wait either! 🙂
And Wendy and Suztats – thanks!
~MC
The medallion is looking gorgeous. Thanks for such valuable info about the sequence of doing laid stitches in complicated designs. Laura, Va Beach
Really beautiful!
And when reading your instruction I thought that makes sense, but I don’t think I would have thought of it myself.
Thank you!
I also find that turning the frame like this keeps my working hand from brushing over the flat silk–it stays much nicer if it’s not touched too much. I love the way it changes so dramatically depending on the angle of viewing! It’s gorgeous.
Hi Mary,
That was an illuminating post. Problems like filling irregular shapes efficiently and beautifully keep me awake at night thinking. So you’ve contributed to my peace of mind significantly.
One thing I still wonder is why satin stitch is recommended over laid stitch when couching will not be done. Does satin stitch wear better? Or is it that because the thread always crosses the shape in the same direction, adjacent threads nest into each other better? Or do you get better coverage?
What are your thoughts?
Thanks,
Jen
Mary, This is absolutely stunning! Thanks for sharing this project and all that you do!
Absolutely beautiful! I can’t wait to see what you have in mind for the rest of the piece.
Wow- this is really stunning. I can’t wait to see more. Amazing and beautiful.
When I laid eyes on the final shot my thoughts were “Wow! That’s incredible!” It looks beautiful.
It is looking gorgeous!
What an excellent tutorial, Mary! I learned so much from it and especially like the advice on how to sequence the laying of the silk. I tend to get discombobulated when I have to figure out how to do satin stitches in complicated areas like that. Now it’s all clear to me–thanks!
It makes perfect sense. Thank you! You are “so good”! The technique (vermicelli) has given me some inspiration — this is not something I often “use” in my work……
I was wondering if the silk thread gets ended and restarted each time you rotate your frame, or if the silk is brought across the back to where you’ll be picking up again?
Hi, Jon – No, I only restart threads when I’m out of thread. If I need to move across to the other side of the stitching area to start a stitch, I take little tiny stab stitches across an area that will be covered, so that there are no long stitches across the back that could loosen up or get snagged. ~MC
Dear Mary
Thank you so much for your time in putting together such a fabulous resource.
I’m finishing a UFO stitched on silk using the tutor’s own beautiful hand-dyed rayon threads.
We were told to keep a needle-width distance between each stitch, to keep the stitches flat while not over-filling the petals/leaves.
The embroidery is worked straight across (from the apex of each petal/leaf) to the opposite edge (as per your diagram).
It is easier to not “overfill” the bird in the design than the petals/leaves.
On the bird, by leaving a needle-width gives a light/airy – almost see-through – effect, especially on its wings, with the pale silk background. Very pretty.
Thank you for reviving my enthusiasm again!!
Kind regards
Catherine K.
That is beautiful-I can’t wait to see it all the way done!
And I learned a fun new technique-thanks!
Simply STUNNING! Ahh I daydream that I can ever do any stitches as beautifully as you. By the way I stopped by a local stitching store here and mentioned I was learning from your videos online and the woman was condescending about learning from an “online source”. I found myself immediately letting her know that maybe other internet sources aren’t that good, I honestly can’t say because since I found your blog, I hardly look at anything else! And I dare say your work AND your tutorials are INCREDIBLE! I showed her a picture of my monogram that I am doing from your template and she was stunned that I had learned those stitches from YOU online! Ha! I felt vindicated for you and me both! LOL
What a cool tutorial, you make it seem so easy! The stitching is gorgeous!
The medallion is looking wonderful.
Is there a reason that you stitch until you need to turn the frame and then stitch the “other direction”? Instead of stitching all the parts that you can stitch, then turn the frame and do the rest? Is it too easy to get the various sections done at a bit of a different angle? Or mostly due to doing the couching as you go?
Hi, Gail – I like to fill completely in one sweep across, so that I don’t have to go back to any smaller sections. So it makes more sense to me to just turn the frame and keep going. Besides, the less I have to “cross back” over any area, where my hand may rub or something may go amiss, the better. Other than that, though, there isn’t any hard and fast rule that says it has to be done that way! ~MC
Dear Mary
Such beautiful stitching and a stunning design, thanks for the tutorial I will keep Vermicelli technique in mind when I’m up to the this level of stitching. So beautiful.
I’m going to attempt the pomegranate goldwork project my niece is getting married in July so I am planning a cushion for the couple with the pomegranate as the centre piece. So I am following your tutorials Mary on the project which are so explicit.
Regards Anita Simmance
What I find so unexpected is the wonderful texture created by the combination of the vermicelli and flat silk. Far more than a sum of the parts, it looks almost ‘hammered’ or galvanized…I hope this is not just an artifact of the photos, because I like it. I am looking forward to the contrast that the letter forms will show. Are you going to use the same stitch as the trial run piece?
Hi, Elisabeth – Yes, I see what you mean. No, it’s not really just an effect of the photo. It all depends on the angle from which you’re viewing the piece. No, I’ve changed stitches for the monogram! More on that coming up! ~MC
Brilliant tutorial on laid stitching – thanks so much, Mary 🙂
The medallion is beautiful!
Thank mary for this lesson, it ‘s very beautiful and so delicate ! J like very much
Hi Mary,
This was a great explanation and it answered any questions about how to do this, but it did leave me with one question. What’s a laying too? And how do you use it? Everything you have explained is done with needle and thread, I’m assuming, and had you not mentioned it when explaining turning your work, I wouldn’t even have thought of the question.
I haven’t done anything that requires this kind of stitching (yet) but Mary, it is so beautiful that I really want to try. I guess it will take a heap of practice before I get anywhere near your standard.
The effect of the gold vermicelli over the silk is wonderful. It looks like hammered metal. I would love to see it in the flesh, so to speak.
Hi Mary,
I wanted to commend you on such magnificent and stunning artistry.Since finding your website 2 days ago I could not help myself from logging on more often that I imagined!
I learnt to embroider a number of years ago and with your detailed commentary and beautiful pictures I’m certain to develop this long lost hobby 🙂
I repinned this from someone else forever ago and am finally reading this tutorial. THANK YOU. This is unbelievably helpful!