


Whipping two adjacent rows of chain stitch produces a wide line with a rope-like center. This is a fun technique for creating a textured line, and it only takes a little imagination to see how you can incorporate this into your surface embroidery.
I can see it worked up into a caterpillar! I think it would also make an interesting and elegant off-white / white combination for textured whitework embroidery. I’m sure you can come up with many more possibilities!
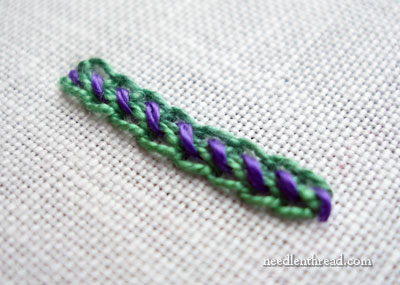
This is the line we’re going to achieve. You can see the wide, almost ruffled base of the stitched area formed by the outer edges of the chain stitch, and, running down the center, there’s a little rope that sits up on top of that base.
In this sample, I’m working with a #12 cotton perle in the green and a #8 cotton perle in the purple. There’s no reason for the two different sizes – and any size thread will work for this technique.
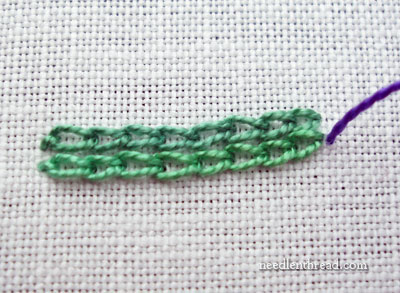
Start with two rows of chain stitch, adjacent to each other, with the chain stitches in both rows aligned. Bring the working thread that you’re going to whip the chain stitches with to the front of the fabric, next to the lower row. In this demonstration, I’m using purple because it shows up against the green and you can see the stitch clearly. But you don’t have to use contrasting threads – you can use the same color threads, depending on the look you want.
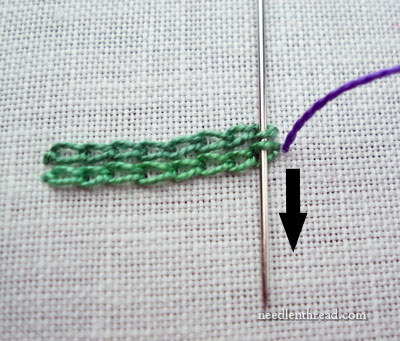
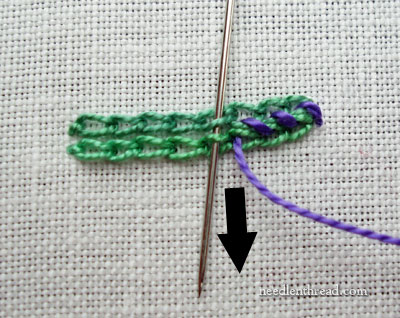
Take the needle underneath the inside halves of the chain stitches in both rows of chain stitch. You’ll only pass under half of each chain stitch – the lower half in the top row and the upper half in the bottom row. Don’t pick up any fabric.
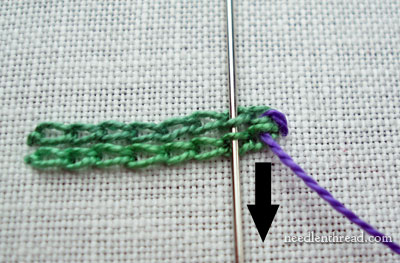
Continue down the whole line of chain stitches, picking up the inside halves of the chain stitches, and always passing the needle through the chain stitches from the same direction. You can see the arrow pointing down in both of the pictures above, to show you that I’m always taking the needle down from the top when I pick up the inside halves of the chain stitches.
As you work down the two lines of chain stitch, you’ll see the rope developing in the middle.
When you get to the end of your line, take the needle to the back of the fabric at the end of the line, between the end of the two rows of chain stitch.
This is a fun little stitch to play with! Give it a try, to see what you can do with it! And then report back with all your ideas!
If you have any stitches or ideas you’d like to see worked out, why not leave a note below in the comment section, and I’ll try to accommodate your request!
I really love this. It bothers me so bad when I have a too wide space for a line stitch type and too narrow for a filling stitch. How great!! Thanks Mary, again!!
Thanks, Mary. I love this stitch. I’ve whipped stitched a single row of chain, but never a double. Love it!
Hi Mary,
Did you invent this stitch? It is really a
useful stitch for me – to combine with quilting
and applique, as it is 3D and will be noticed.
I can see it as handles for little baskets –
or vines with appliqued leaves.
Thank you for making my work more interesting –
You are sooooooooo generous!!
Jane
Hi, Jane… No, I don’t think I invented it. I haven’t seen it anywhere else, but the two elements that make up the whole composite have been around for a while! It’s a fun application of chain stitch and a whipped embroidery stitch, I think.
Cute idea, for basket handles – especially with spring coming up!
I see the caterpillar in that stitch! I’ll add it to my stitch journal to keep track of it to try someday.
Mary –
I love this stitch – can’t wait to try it out! How clever – the finished look belies its simplicity. Thanks so much for sharing it. And safe travels to you this week 🙂
Tomi Jane
Hi Marymentor:
Thank heaven we’re almost finished with Feb. Never has been my favorite month. In re this submission of yours, again, you continue to amaze me …. how doing an “obvious little thing” can create such a new and exciting look ! ! I always always read your blog daily. You’re the bestest kid !..Hugs…Judy in Pittsburgh.
🙂 thanks, Judy!
I love this stitch! I think it would look great with the cream/white and taupe color. Have you written a book? I would love one. I can actually understand what you are explaining. Thank you for such a great website to come to. You can’t find classes in our area so we really depend on a virtual classroom.
No, no book yet, Donna! Maybe some day, but right now I have a few other things up my proverbial sleeve!
Yes, I want to play with this stitch on white work and see what develops!
MC
Thank you Mary, I really like this.
I’ve used this technique as a joining stitch on a needlebook and a stuffed animal. When doing it as a joining stitches, the instructions called for whipping the outer two stitches rather than the inner two, but it would work either way. Wrapping the inner two makes it more decorative, I think.
But it would make a good caterpiller as well. I might try it with a chenille or boucle thread to give it some fuzziness.
Carol S.
Chenille is a good idea!
I’ve used whipped back stitch for joining, but never chained. Interesting idea! I think it would be hard to keep the chain stitches aligned… But that may be why the outer halves are whipped – I don’t think the alignment would matter as much. I’ll have to try it!
Thanks, Carol!
i like this stitch…interesting way and a different stitch
I enjoy all your tutorials so much. I cannot begin to tell you how many hours I’ve spend reading your blog. Awsome!
I have had some trouble with the chain stitch and reading this post I found you other post about making round/curved chain stitch. This solved my problem within 30 seconds – Great!
Your blog is a fountain of knowledge, so thorough and elaborated – a true heaven for a beginner like my self.
Thank you!
Thank you, Rosa! I’m glad you find Needle ‘n Thread helpful” 🙂
Good Morning, Mary….This is really good looking and so easy! Love it and I love the green and purple combo. Must be a spring caterpiller! Can you tell I am tired of winter here in the Pacific Northwest? LOL! –Libby
Ahhh… Don’t worry, Libby! Spring will eventually get there! We’ve not had much winter, so I can’t complain! Glad you like the stitch!
I have done chain stitch in many different ways. This is one I have not tried. It’s on my list. Thanks. Neat!
What fun! And this looks like a good stitch to try a curved needle on, too.
Hi Mary: Hope your trip to Alabama is fun and restful. Thanks for demonstrating this stitch. I am often looking for a good solid outline and stick and this one fits the bill perfectly.
Thanks, Gail!
I love when you can use embroidery instead of applied trim (braids) on clothes and things and this stitch falls into that category. (Small scale for those doll makers out there!) One nice thing about the whip stitch is that it isn’t hard on the embroidery thread (since it doesn’t travel through the fabric) so chenille threads be an interesting choice, as well. Thanks for the continued inspiration, education, and fun!!
Thank you for this fun and easy stitch. I will definitly be using it.
Thanks Mary! Yet another easy seam treatment for a CQ (crazy quilt) beginner. What a great way to practice making uniform chains while getting fancier results! It’s also a great substitute for couching gimp or braid trims because there’s a broader range of colors. Whipped chain is great for textural motifs–tree bark, cacti, etc. Must give this a try with a variegated perle. Hmmm.
Mary, just found this site few days ago and have been in awe with the monogram you’ve been posting about. But todays post really impressed me. You taught a new stitch! I have renewed desire to use embroidery in more of my craft items. You are an amazing and inspiring person. Thank you for taking your time to post these helpful tips and ideas. I eagerly wait for your daily posts
It’s really beautiful, and the explanation perfect! Thanks a lot. Have a NICE WEEK.
Hi MARY, I love this stitches. It’s the answer to my butterfly that I am making. I tried rick rack to crochet but this is soooo pretty thank you Mary. blessing to you.
Mary,
A really great demonstration, as usual. You also get a great effect if you turn around and whip back to the beginning.
margb
la puntada esta muy practica. gracias
This is a brilliant idea! For bugs in general! Butterfly bodies (tapering at each end), definitely capterpillars..! Thankyou 🙂
In passing thread, too.
Could you please show us how to whip together two rows of backstitching. This is to put a box or biscornu together.
Thank you so much
This looks wonderful Mary, I am always searching for and trying out my own combinations of textural stitches. I like the idea of whipping this with chenille, but I always get in such a mess with chenille. Are there any tricks of the trade I should know about? Other people even manage to sew with it through the needle.
If possible could you give us some pointers on using chenille in different ways please?
I didn’t know you were going away – must have missed something vital. Have a wonderful time and come back ready to answer some of our clever and not-so-clever questions.
Great stitch – I am embroidering a garden tote and a couple of caterpillars are now in order. Thanks!
lovely ….u have great ideas..really great…i will really try this
Mary, I meant to say yesterday- Edith John has this in her Creative Stitches and calls it Crossed Chain
margb
Oh, I really like this one! Thanks for sharing it.
This looks so cool. I’ll have to think of something to try it on.
I LOVED THIS STITCH
I just love your web site. I could spend days on it. I am left handed, & find it hard to learn from other people, but this is just perfect for me. I also love the videos.
I love chain stitch, so simple and effective – but this takes it to another level. Great filler stitch!