


One of the greatest aspects of hand embroidery is the unbelievable variety and sheer quantity of hand embroidery stitches and techniques out there.
Think about it: could you ever really get bored with hand embroidery? There’s just too much variety and too many possibilities to get bored with it, don’t you think? (Or is that just me? Ok. I admit to a slight obsession with this whole needle & thread thing…)
Lately, I’ve been having fun playing around with some of the stitches and techniques that are a bit off the Familiarly Trodden Embroidery Path. Feel free to jump on board and play around with these stitches, too. They’re really fun!
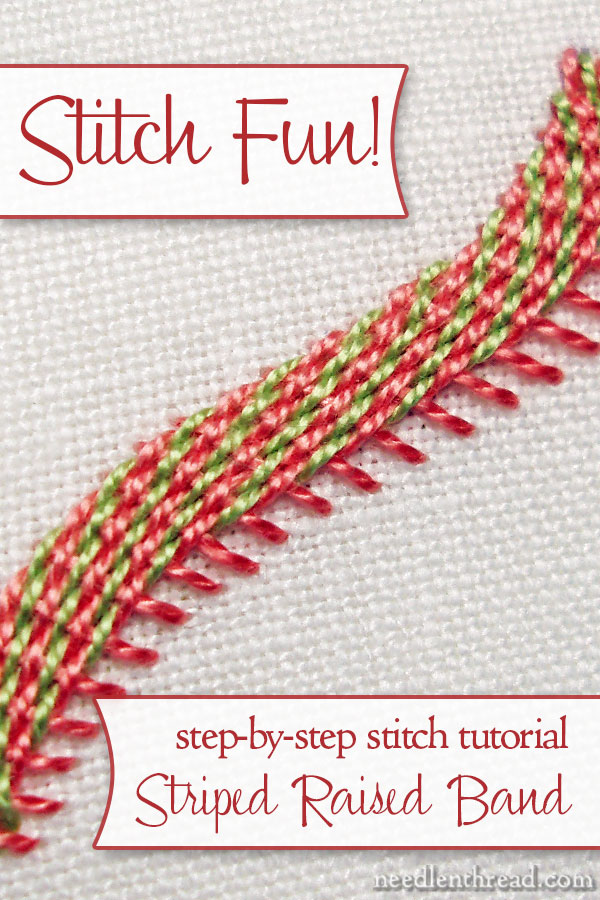
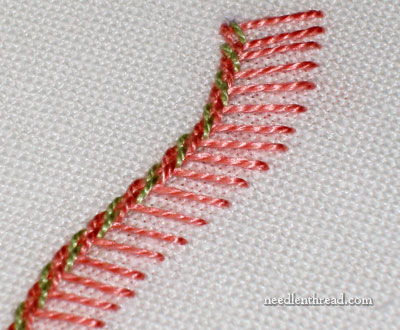
Following up on Casalguidi stitch and the raised stem stitch band, for today’s Stitch Play, I’m going to show you how to create a raised band that’s diagonally striped. It looks like this, give or take the little hairy tendrils on the right:
I like these raised band stitching techniques. They’re fun to play with, they’re not too taxing to do, and they create a neat dimensional and textural effect. I hope you can find ways to incorporate them into your own stitching! Just a hint while you’re playing with them: The threads you choose can create a complete different look or feel to the stitches, so play around with your threads, too. Mixing them up would be a good exercise in the texture and performance of threads.
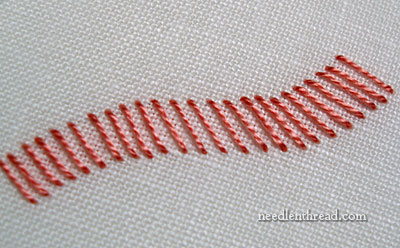
To begin this diagonally striped band of stitches, you’ll need a foundation to work on, just like the foundation used for raised stem stitch. You can work this technique over curves or straight lines (gently curves work better). If you want an equal “fill” over the width of the band, your foundation stitches should be worked between two parallel lines, with the foundation stitches all equal length.
For the sake of this sample, I stitched a slightly waved foundation between two imaginary parallel lines that weren’t parallel after all. You can draw your lines on the fabric – if you do, just make sure that the length of your foundation stitches (the “bars” seen in the photo above) pass slightly over your drawn lines, so that the lines are completely covered once the stitching is finished.
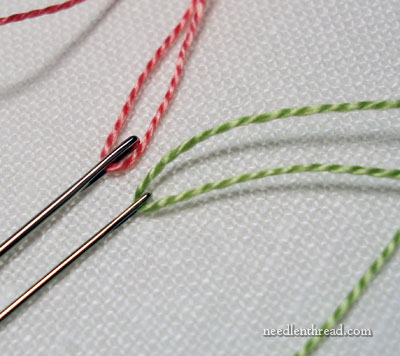
Select a second color of thread, besides the color used for the foundation stitches. I’m using perle cotton #8 in this demonstration, but any thread will do. I like the texture that more tightly twisted threads (like perle cotton) provide, but other threads (or a mixture of threads) could be interesting, too. If you use regular cotton floss, the effects will be more visible if you use several strands (or the whole bunch of six strands).
Thread up both colors in two different needles. Because the rest of this technique is simply a weaving technique, passing over and under the foundation stitches, you might prefer to use a tapestry needle. The blunt tip of the tapestry needle is best for weaving techniques like this.

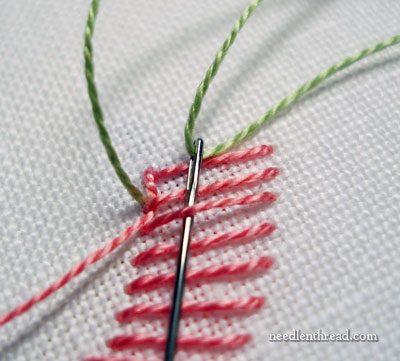
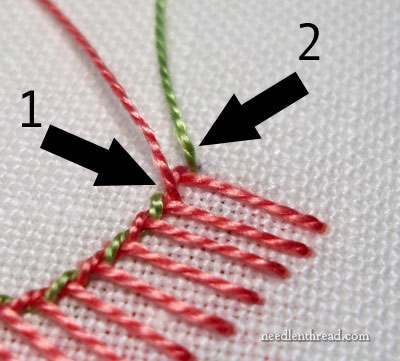
Bring color #1 up just above the left end of the first foundation stitch, and bring color #2 up just above the left end of the second foundation stitch. This is the starting position for each row, although the color placement will alternate with each row.
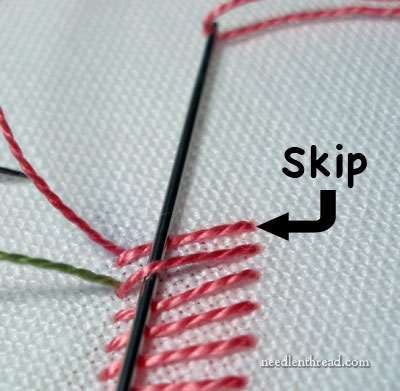
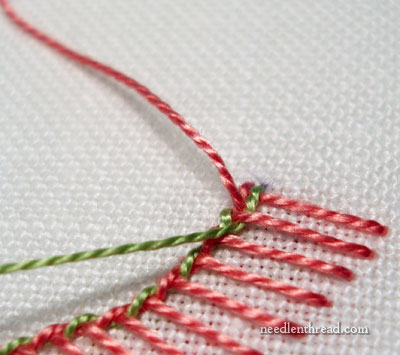
Skipping the first foundation stitch, take your Color #1 needle under the second foundation stitch and pull through, pulling over to the left. You don’t pick up any fabric here – this whole technique is worked over the foundation stitches, and not into the fabric.
You can see in the photo above that I’ve pulled Color #1 thread through, and then off to the left to get it out of the way.
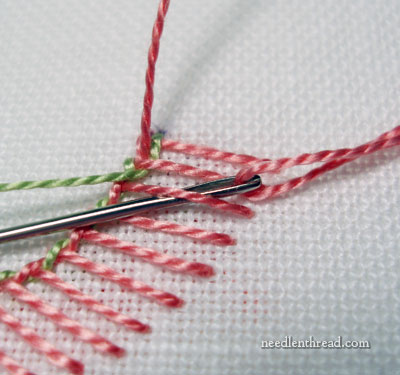
Now, take Color #2 needle under the next foundation stitch down, and pull it through and off to the left.
That’s the whole technique. Essentially, you’re just weaving over and under the foundation stitches and the previous thread, holding it to the left. Continue down the foundation stitches in this manner, until you reach the end.
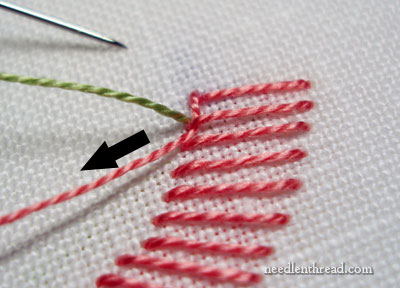
When you get to the end of your foundation stitches, take the one that’s supposed to pass over the last foundation stitch over it, and into the fabric.
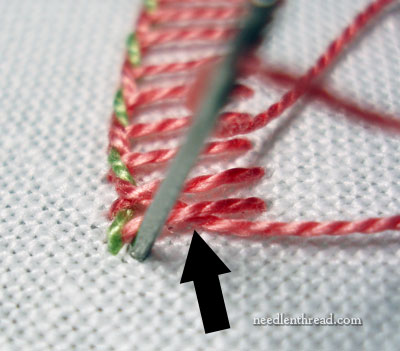
Then take the one that’s supposed to pass under the last foundation stitch (the arrow points to it passing under the foundation stitch) into the fabric right under the foundation stitch.
Pass your working threads back to the beginning position, by running them under the back of the foundation stitches on the back of the fabric. Make sure you have enough working thread in both colors to complete a whole line of “weaving” so that you don’t have to end and begin again with a new thread. If you don’t have enough thread to pass all the way down your foundation stitches again, then now’s the time to end your thread and start a new one.
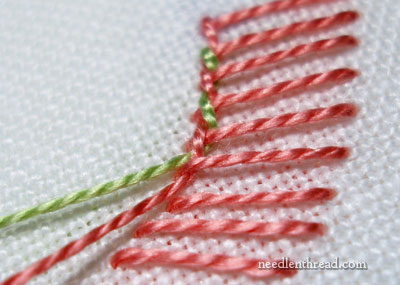
Bring the two colors to the front, in the same positions as before, but this time, Color #2 should be above the first foundation stitch, and Color #1 should be above the second foundation stitch. This alternating of colors creates the diagonal stripes.
Work down the foundation stitches again, in the same manner, pulling your stitches to the left, to “pack” the foundation.
Remember to alternate the threads and always pass under the next foundation stitch.
After the second row, you’ll see the diagonal stripes beginning to develop!
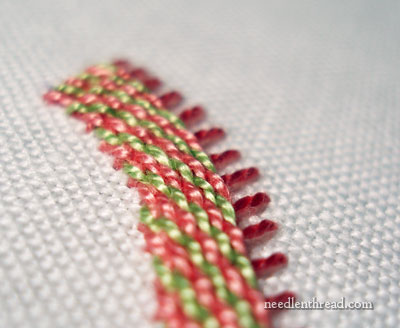
Keep going until you’ve filled up your foundation stitches, or at least as much of them as you want to fill.
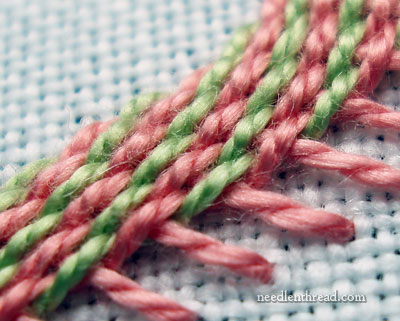
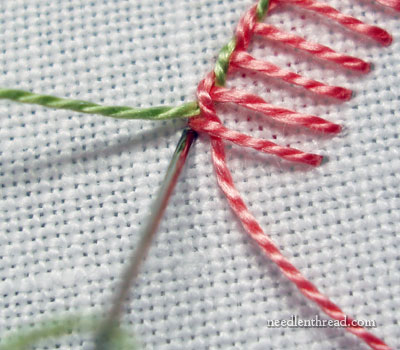
Looking at the stitches up close, you can see the “weaving” pattern more clearly.
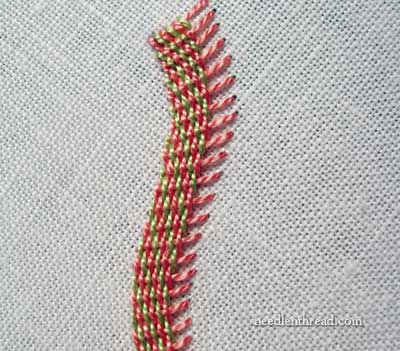
when you step away from the band a little bit, you can see not only the diagonal stripes, but also the texture created by the horizontal “bumps” of the foundation stitches.
Now, my question: how would you employ this technique in an embroidery project? Free style surface samplers of various stitches and techniques are a simple enough way to use the technique, but what about actually incorporating the technique into a design? When I asked my niece, she said, “I’d stitch a snowman and that would be the scarf.” What about you? Any ideas?
Stitch Play is a new series on Needle ‘n Thread, in which we explore different stitches, techniques, and combinations in photo tutorials. If you have a stitch or technique you’d like to see worked out in Stitch Play, feel free to leave a comment below and let me know! I’ll see if I can work something up for you!
Ooh! With that twill effect, the entire body of old weaving patterns is what jumps to my mind…then again, just setting up those foundation ‘warp’ lines enables one to create any weavable pattern out there – with as many colors as wanted! WOW! I just never thought about using the old darning and weaving techniques as a surface treatment…Thanks Mary, for waking up these old brain cells!
Sometimes I daydream about designing a crewel piece that would translate the fantasy flora of traditional designs to our American Midwest. I think this technique in a green and yellow-green wave might nicely suggest a far off field of corn or beans. Thanks, Mary.
Hi Mary. What a great idea. Just beautiful!
Thanks for sharing your ideas
how about as a fence (with two very close shades of brown)?
Done in shades of brown, it would make a lovely basket.
Mary: Good morning. What a neat idea. I can see this in differing shades of blue for a river or the ocean. Also, gold and silver thread in a small element would look incredibly stunning.
Best regards Sandra
I just had to laugh when I got to the end of your post today. I am in the process of setting up a project for a winter decoration that includes a cabin in the woods complete with snowman. As I looked at the photos of this stitch it kept popping in my head that it would look great on the scarf of my snowman. Guess your niece and I think alike.
I know the foundation stitches are supposed to be parallel, but I think this would look very pretty as the border of a large round medallion. I wonder if the circle was big enough, could this be done in a circle as a border? The foundation stitches wouldn’t be perfectly parallel, but they wouldn’t have to fan out very far if the circle were large. What do you think, Mary?
Absolutely – these raised bar stitch techniques work well around circles, as long as the fanning isn’t too far apart at the top. You just have to go gradual on them. But even then (for example, on small circles) it does work. For the striped ones, I think you’d need to make sure there is an odd number of spokes, to keep the stripes going with breaking in the design. Maybe I’ll play with that to see what happens!
Ohmygosh, Mary! What will you think of next! This is amazing and beautiful. And, you explain it so well, as usual. Thank you!
Hi Mary,
I have a fish pattern I’ve been wanting to work up but I can’t find or think up a stitch that looks like fish scales. Any ideas?
This set of stitches would make a really cool basket. We would need to play around a bit but I bet it would look perfect.
Wow, what a neat stitch. Now I need to find a place to use it!!!
I love this stitch! Mary, may I ask where you got that 2 color twisted thread? I would love to order some. Thanks for your reply.
Hi, Judy – its two different colors of #8 perle cotton. Lots of companies make #8 perle cotton: DMC, Anchor, Finca, Presencia, and plenty of smaller businesses. You’ll just need two nice colors that work well together. – MC
I am thinking of Iris leaves in two shades of green. For the person about fish scales what about a closed buttonhole for each scale?
reminds me of baskets and tree stems. I always wonder why we have to begin the new rows from the starting side. Cant we do it backwards so there wont be any threads behind? I was just wondering. Can anyone come up with a way?
What a beautiful tutorial. Thank you so much for presenting such a clearly detailed guide for working this stitch.
Love your Stitch Play posts! Thanks!
G’day there Mary,
Filling for Crewel designs.
Thanks for beaut post.
Cheers, Kath
PS- On an outer edge, the ‘hairy tendrils’ would very nicely complete a component of a Crewel design. Kath
Maybe it’s the colors you used but it reminds me of Christmas Ribbon Candy. Just gorgeous. I think it would be lovely to fill in an Egyptian style necklace/headdress border if you were embroidering an Egyptian figure. If you just fill in the two sides and leave the inside undone it would look like railroad tracks. I like the snowman scarf and baskets mentioned already.
…..and looking at it I see the basket weave we do in decorating a cake……so I see it being done on a small basket. (Also….a tweed coat, or how about rolling grass?)
Oh Mary, I love this stitch. I immediately could see a fat, stumpworked caterpillar in different colors…..I’m going to have to definitely give this a go!
Enjoy you so much. Thanks for all your sharing!
This is a lovely stitch & I agree with Carol. It would make a great caterpillar. That’s the first thing I thought of to use it for, altho the basket idea is great, too. Needlework is so much fun & there is always so much to learn & so many things to do.
Mary, quit cleaning your studio and start writing a book. You are fantastic. Your book would be equal to if not better than anything else that has been published.
Love, love, love your work.
Louise B.
I’m with Louise!!! 🙂 Write a book!
Carol
Dear Mary
Thanks Mary love the stitch play blogs I am planning to stitch one of the ecclesiastical patterns in the ebook from your web site I wonder if you could use it on a the leaves or the fleur da lys have to play around with with stitch and see.
Regards Anita Simmance
Love you tutorials. I am new to hand embrodiery and they have been such a big help.
Can’t wait to try this new stitch.
Thank you for sharing your tutorials with us. Jennifer
This stitch is just amazing. Thanks so much for sharing.
I can see this as a tree trunk – two grey browns on a finer thread darker broun for foundation stitches – ambitious but possible
That’s fantastic. Thanks for the wonderful explanation.
Mary, you’ve shown some cool stitch tricks on a daily basis but this one, for me, is the coolest ever!! I will be playing with this one soon!! I love texture and stitching! Thanks for all the stitching hints, helps and tricks you do a GREAT job! Cyndi
I would use this as a seam treatment for a piece of crazy quilting. Using it as shown, I would perhaps add a seed bead at the end of each of the ‘tendrils’.
OH, This is sooo neat!!! I can see it as a basket handle!!! Thanks sooo much for the great idea!!! I’ll be that you could make more designs with the weaving threads too. Wow! does this get me thinking!!!!
Elaine
gracias. me parece muy bonita la tecnica de casalguide. la pondre en practica. saludos
Dear Mary,
I know I’ve been embroidering longer than you have. There is no way you are old enough to have been doing it as long as I. It’s now been 50 years since my mother sat me down with my first needle and thread and hooped fabric with a stamped x-stitch kitten head. Except for threading the needle and making the knots (gasp) at the end of my floss I did it all by myself. I was four years old. I had graduated beyond stamped x-stitch way before my sixth birthday. I am at my most comfortable with a needle in my fingers. Your stitch play has been one of the best things that has happened to me in a long time. I played with stitches late grade school through junior high and then I thought I needed to get serious for some reason. This was the early seventies when people were embroidering everything. I was SO critical. I looked on my stitching as art. THEY didn’t even seperate their floss. THEY used six strands. THEIR stitches were so big. I like to think I have matured over the years and with that came mellowing, and my critical side just left pointing at myself. But I forgot how to play. I haven’t played with my stitching for over 35 years. Mary you have given that back to me. To get out a piece of cloth and just doodle one of your stitch play stitches. I did not do your The Quick Brown Fox Jumps Over The Lazy Dog when you were doing it. Quite frankly at the time I found it a bit frivolous.
(I have really mellowed the past couple of years). Now I am rethinking it. What fun it would be especially incorperating some of these new stitches into the capital letters. This one would be a dandy. Well, I would want to use all of the ones you have put up. I’m going to have to go through my archives or maybe it would be easier to go through your archives and refresh my memory on the stitches you used at the time. My advise to the rest of you is do not become so involved in an art form that you lose the joy. Mary practices this daily. You can tell by the way her blog reads. She has never lost the joy of stitching. I don’t believe she ever will.
Hello, Terri Sue
I have been thinking a lot about your post. My mom paints & puts her pictures in juried art shows. She is always after me to sign my embroidery pieces and cannot understand why I won’t.
Embroidery gives me so much, and I do it because I love to do it. It keeps my hands and mind busy, especially so I don’t get bored when we are traveling. It provides a creative outlet. It provides a way to give away handmade gifts. I am making each of my grandkids a hand-embroidered baby blanket. It has spurred me to look at the world more closely in order to mimic lighting and shadowing effects, which in turn has given me a fuller appreciation of artists and their work. I look more closely at patterns in the strangest places to see if they can be duplicated with a needle. One of my favorite patterns came from a restaurant napkin!
When I view the output of most modern “textile artists,” it is usually with much disappointment. Yet there is some beautiful gold work and oriental hand work to be seen and marveled at. Many of the old pieces are unsigned, and the work stands on its own as a testament to needlework skill, without having to put a name to it. (Check out the textile embroideries on the Univ. of Neb. at Lincoln website.)
And has Mary has shown, there is always something new to be learned and played with.
Here’s to the joy of stitching!
Terri Sue,
Though I started stitching later, with iron-on horoscope images, many home-made images were created in my youth. The local 4-H club let me join to be able to present still life items at the local fair. That was a profitable adventure annually through my teens. Blue jean repairs, with as much crewel needlework as possible, had been a source of cash in my early 20’s and then I married and settled down. When my husband died a year ago I was a mess until recently, when Mary Corbert’s Needle ‘N Thread caught my eye. Finally there is a bit of self-made happiness in every day that I let myself stitch. Knowing fifty stitches is worth nothing if they are not used. With this new source of information something new is always out there waiting to be learned. Now old jeans are sought out to stitch on and give away. Mary’s details keep me trying different things, as do the replys others have shared in this website’s files. Thank you for writing, and thank Mary for motivating me into action. Beulah
Hello, Beulah –
The idea of stitching on jeans has given me ideas. I have a pair with embroidery on the waist band and a rip on one leg. I couldn’t bring myself to get rid of them because the embroidery is so pretty. You’ve given me the idea of adding embroidery to the leg.
What thread and what size needle do you use?
Miss Helen,
Use any threads you have laying around. A strong needle with a large eye is necessary for aging eyesight. When there are no more fuzzy, soft, or unique threads available I use one or two (very rarely three) strands of DMC floss. Less thread allows for more intricate details, more thread covers an area quicker.
It is helpful to have experience working without a hoop as they need to be moved alot in my jean embroidery sessions. Maintaining proper tension is a key, and experience is a wonderful teacher. Anything can be pulled or cut out if it looks wrong. In the end you get a more cheerful pair of jeans. Our world needs more cherr.
Dear Beulah,
Thank you for your very thoughtful reply.
Helen
This stitch looks very beautiful. I think, this can be used to embellish the sleeves and neckline of a blouse.
Mary, this diagonally striped raised band stitch is incredible. Right away I thought of all the fabulous kits and designs that Di Niekerk has available and even the one I already have – The Fallen Fence with stump work and all kinds of things. This stitch would really be fabulous in almost all of her designs. It would just bring life to so many things – baskets, pottery, shrubs, – I’m sure the list would be endless. What an excciting, creative stitch to add and the colors are yummy. Pauline Eikel
I definitely agree with you about embroidery never getting boring. This stitch play example proves it. Just with this technique alone and considering the variety of threads and fibers to choose from you could vary the look of this technique many times over.
I love the look this technique offers as well as the possibilites. Thanks for sharing.
I love the look of hand appliqué’ on quilts, but find the thin fabric pieces needed for stems and such too tedious. Now I can envision a woven stem in complimentary colors for each flower stem – stunning! Thanks for the Stitch Play, I’m really enjoying your ideas!
I also thought of a caterpillar, but what really jumped out for me was turned “horizontally” it would make a great “skirt” for a Mexican, Polishe, etc. dancer.
I have tried this stitch play with knotted cretan stitch . Though it does not look so lovely like yours, this is just to let you know that I am in love with this stitch play series. Thanks for this tutorial. I have posted the photo here.
http://hobbysewing.blogspot.in/2012/06/tast-22-knotted-cretan-stitch.html
Love the weaving design – I think I could use it in a basket design holding flowers or on a fence. Even on a flared skirt with someone dancing as this may give an impression of movement…. has to be practiced to see if this would work!! Thanks Mary.
Eu amo esse site ,é maravilhoso ,visito sempre ,sou apaixonada por pintura de agulha ,quero aprender,Parabens pelo site ,td aqui é lindo !!
I think this would be great as a fence in an outdoor or rural scene. If you use shades of brown, it would look like a wooden fence. If done in shades of white and light blue it would look like a white pickett fence. You would just leave the foundation stitches bare at the top, then fashion a triangle on those stitches and you have our pickett top. Also done in shades of gray or silver it would look like a chain link fence.
J’aime tout particulièrement Stitch Fun! Lattice Filling – Griffin Stitch.
Merci à toi pour toute cette beauté.
Bonne Année 2013.
Simply stunning, thank you for showing me how to do it.
Very interesting techniq. Would love to try it.
U r very great nice thanku so so much
Dear Mary,
I learnt many stitches from your website.I ordered one of your book through online but every seller is saying that they dont have the stock.how can i get it?
The stitches you create are wonderful.
Hi, Veena – All my books are only available in e-book form, as downloadable PDF’s, here: http://shop.needlenthread.com Hope that helps!
Very curvy that I love
Desde hace mucho tiempo quería dejarle un comentario, aunque sea en español, sus clases de bordado son “sensacionales”, muy bien explicadas y cada día aprendo más… créame que hacia mucho tiempo que no intentaba volver a bordar, pero desde que leo está página estoy volviendo a mis trabajos atrasados y espero llevarlos a buen término con tan bonitas puntadas…. Gracias
Thank you, Rosa! I am very happy to hear that you are returning to embroidery!! I am sure you will create beautiful embroidery!
Hi Mary
I have just come across another way of stitching knots, it’s from japanese embroidery and it’s called the round knot technique. There is a video but it doesn’t show the whole technique. I wonder if you could help.
The video can be found here:- https://www.youtube.com/watch?v=opuROpfqofc
Kindest regards
Michele
It’s a somewhat fussy way of making the equivalent of a French knot with one wrap. The thread is hitched around itself once (you don’t see that action outside the video) and then the knot slides down to the fabric as the thread is pulled through, by keeping tension on the thread with two fingers spread apart, so that the thread doesn’t hitch too tightly around itself (which would prohibit the knot from sliding down the fabric surface). Then, to keep the “roundness” of it, they use the tip of the needle or a laying tool to hold the shape as the knot is situated.
This stitch makes me think of the back ridge of a seahorse.
Mary, your workmanship is beautiful and always stunning.