


Earlier this week, we looked at one way to create isolated French knots (or colonial knots, incidentally) without carrying threads across the back of the fabric.
Today, I’ll show you two other methods I use to begin isolated French knots (depending on the thread I’m using), and one method to secure practically any isolated knot after it’s made. Keep in mind that this is how I do it – this doesn’t mean there aren’t other (and probably better!) ways to start and end isolated French knots. But for those of you who don’t know how, if you try the methods suggested here, I think you’ll discover they both work.
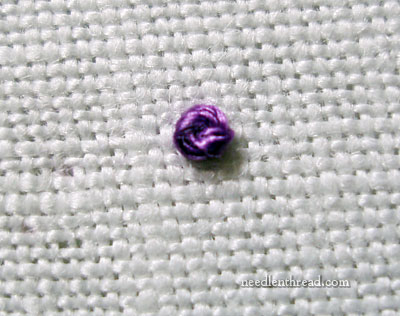
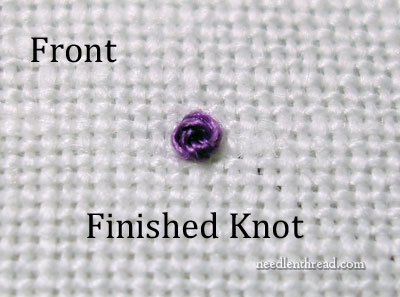
So this is what we’re going to create – a French knot (or colonial knot) that stands alone on the fabric, without any trailing threads behind the fabric.
Beginning the Thread for the French Knot
Let’s look at two different ways to start the thread for the French knot securely. The difference in the two ways depends on the type of thread you’re using and the number of strands in your needle.
Using an Even Number of Strands of Floss
When using regular stranded cotton floss, if you are stitching with two strands of floss (or any even number – four strands or six strands), you can begin your thread the following way. This is actually a common way to start a thread for cross stitch without using a knot. So it’s the same idea, if already know how to do that.
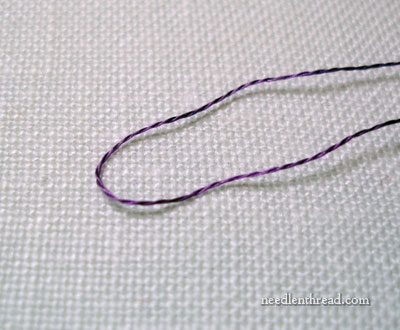
If you’re working with two strands of cotton floss (and by cotton floss, I mean stranded cotton, like regular DMC or Anchor floss), start with just one strand and fold it in half. The photo above shows you what I mean – there’s only one strand of thread there, and it’s been folded in half.
If you’re using four strands or six, you can do the same thing – separate out two or three strands (respectively) and fold those in half, to make four or six strands.
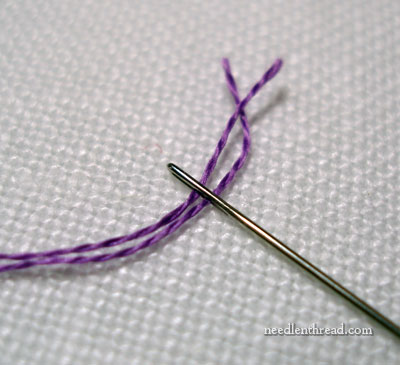
Thread the needle with the cut ends of the floss. This leaves the “fold” on the tail end of the floss.
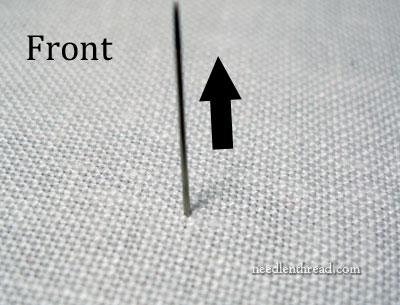
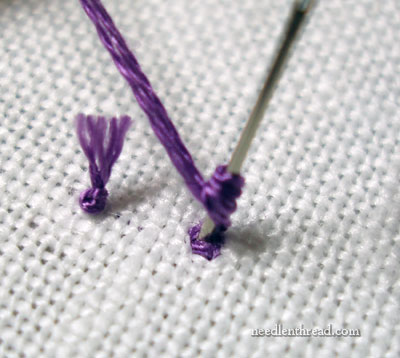
Bring your needle up into the front of the fabric, and pull your working almost all the way through – but not quite all the way through.
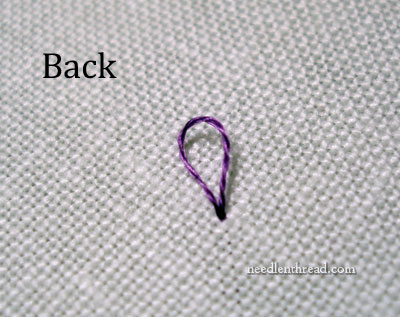
Stop pulling when you’ve formed a little loop on the back of the fabric.
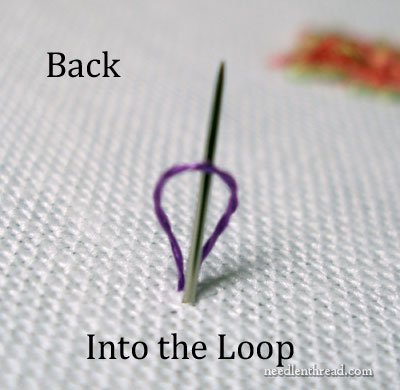
Take your needle down through the front of the fabric right next to where you entered the fabric (over just one or two threads of fabric, depending on what type of fabric you’re using) and emerge on the back of the fabric, taking the needle inside that loop as if you’re going to form a chain stitch.
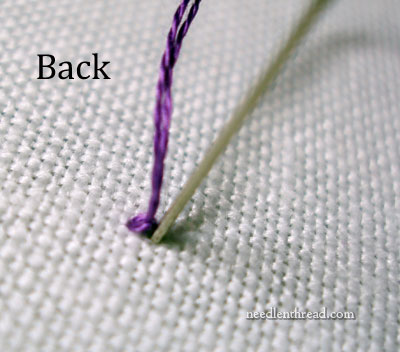
In fact, that’s exactly what you’re forming – a tiny chain stitch on the back of your fabric. Take your needle down into the back of the fabric over the edge of the loop, and right next to your stitch on the front of the fabric, so that, when you pull through….
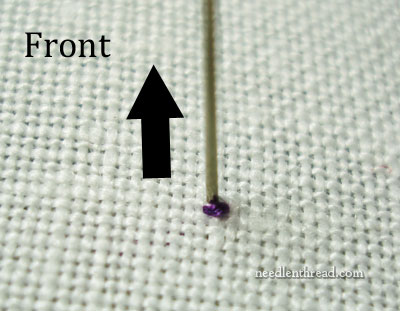
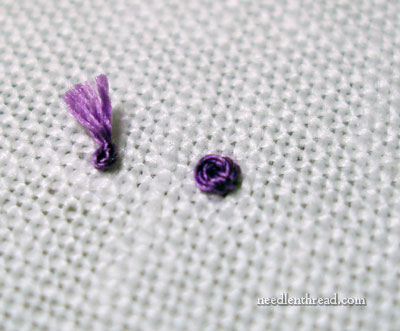
… you emerge on the front right next to the little straight stitch that has formed there. It should just be a tiny little stitch, like this one.
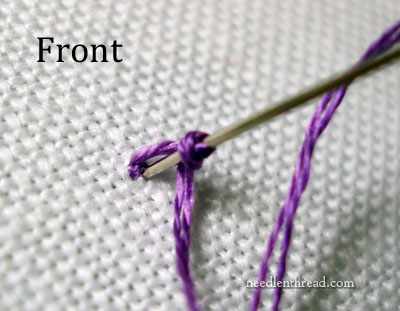
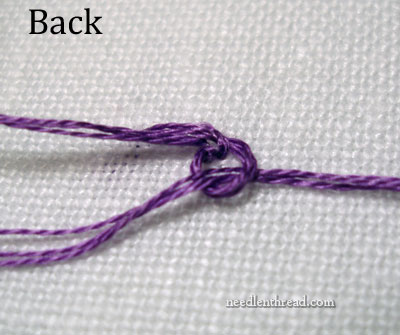
Now make your French knot over that little stitch.
When you finish pulling the knot through, you will have a perfect French knot which still needs to be secured on the back, so that the thread can be cut. We’ll look at that after we look at another way of starting the thread.
Starting with Any Type of Thread
This method of starting the thread works with any type of thread, though it’s a little tougher to do with a very heavy perle cotton, and it creates more build-up than the other methods we’ve already discussed.
Begin with a waste knot on the end of your thread, taking your needle down into the front of the fabric, then coming up near the waste knot and pulling your thread through.
On the front of the fabric, work three tiny stitches in a tiny triangle. These are tiny stab stitches, and they should only cross over about one thread of fabric, unless you’re stitching on muslin, where they might cross over two threads of fabric. They should be Very Small, and they should all work into each other, so the ends of each stitch are touching.
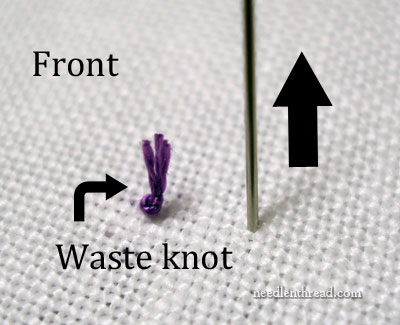
Once you’ve made a little triangle of stab stitches, make your French knot, taking your needle down into the middle of the stab stitches. You can see why this would be a little more difficult with a heavier thread like a perle cotton #5 or #3. Pulling the needle and working thread into the middle of the triangle will be a little tougher if you’re using a large needle and thick thread. Still, even in such cases, this does work. And you can make your triangle slightly larger when working with heavier perle cottons, because the knot itself will be slightly larger.
When you finish pulling your French knot through, you’ll have your knot situated on top of your triangle of stitches (which can’t be seen), and close at hand, you’ll have a waste knot. You can cut that off now, or save it until a little later when you finish the thread on the back.
Ending the Thread for an Isolated French Knot
This method of ending the thread works for either of the starting methods above.
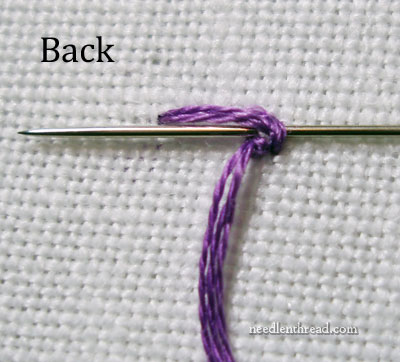
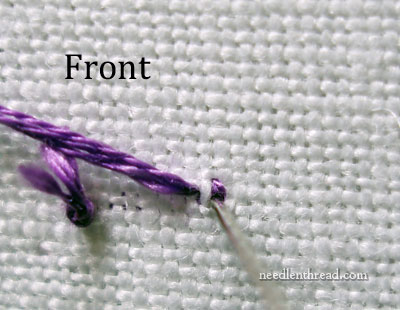
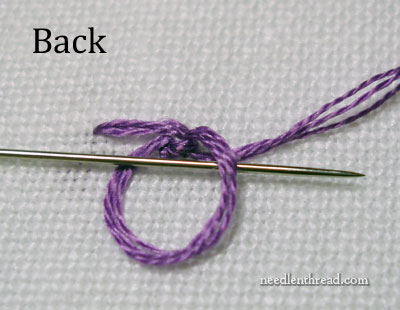
Pass your needle under the stitches created on the back when you made the little triangle of stab stitches, or, in the case of the “chain stitch” method described, pass your needle under the chain stitch.
Pull your thread through almost all the way, until you have a small loop of thread left.
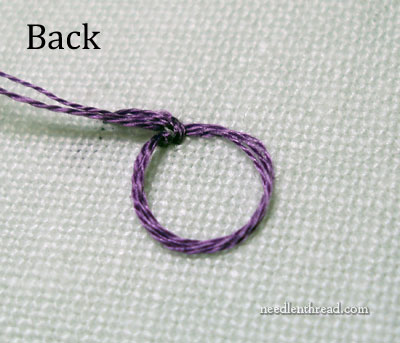
Pass your working thread through the loop, and pull the loop tight around the working thread. Continue to pull the thread through the tightened loop until…
… you have a second loop on your thread. Pass through the front of this loop…
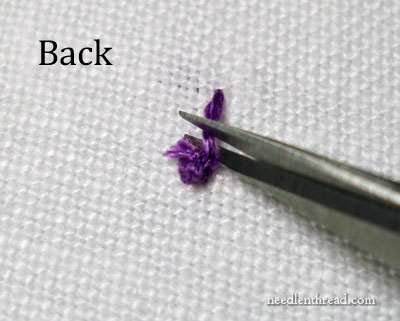
… pulling the loop tight and the working thread all the way through it.
Trim all the threads.
On the front of the fabric, you now have an isolated French knot, without any tails. The knot is secure and will hold up just fine.
And that’s the end of knotty subjects for a while!
Tomorrow, I’ll show you what I’ve been playing with lately. See you then!
Mary, thanks for these tips. Very helpful discussion. I’ve been enjoying both the stitch play and stitch glitch series. Thanks again!
Thank you, thank you, thank you for the tips for isolated knots!
This is wonderful, Thank You!
I do have a couple of questions –
1. I’ve watched other videos of french knots, and sometimes the thread was wound the other way from what you do. Does it make a difference, or does it matter more on what type of thread (which way the twist is) you are using?
2. One thing I do differently (wrongly?) is after doing the wrap, I put the needle back through the fabric to the left of where I came up, not the right as you show (I stitch right handed). Is this part of the reason my french knots look bad so often? I think that was cheap kit instructions on french knots.
Hi, Gail –
I’ve seen books with the needle placed in front of the thread before wrapping and behind the thread before wrapping. In the current video here on the site, I’ve got the needle in front of the thread. Habitually, I put it behind the thread. In fact, if you want to get Super Duper technical, it would make a big difference if you were doing a much larger stitch (for example, the direction of the wraps in a bullion knot makes a difference in the outcome of the knot, depending on the type of thread you use). But with French knot, the knots are so small that the difference in the twist of the thread and the way it either twists further or untwists during the wraps is not really noticeable. But technically, yes, there is a difference. Is it a noticeable difference? I’d say no. You’d have to really scrutinize the knot and the individual plies of thread to see the difference, since French knots are small.
I put the needle down anywhere around the thread, really, depending on where I want my knot placed, where my needle was in relation to the thread when I started wrapping, and so forth. Sometimes, this can add another half a twist to the knot, but again, not that noticeable of a difference. So to me, it doesn’t really matter so much where I’m putting the needle, except insofar as it makes a difference in where the knot finishes up and how it is situated when pulled through. Of course, it does matter that the needle is not going down in the same hole the thread come out of… but other than that… the rest depends on where I want the knot, where the needle was pointed when I started the wraps, etc.
Do keep in mind that this is all my approach. It is quite likely (in fact, it’s pretty certain!) that there are professional stitchers, instructors, and so forth out there who have more rigid rules on accomplishing the French knot. I just don’t go in for a rigid approach on these things – as long as the stitch is the stitch, and it comes out well, then I’m happy.
Hope that helps a bit!
~MC
Hi Mary,
I have a question about the first method. How long do you cut the ‘chain stitch type’ piece of thread? Does this method waste a lot of thread? I don’t want to misunderstand the instructions. It seems as though I am only working with the ‘middle’ of the thread and the ‘ends’ (that are threaded through the needle together) just get cut off and discarded? Is this right?
This subject has been an issue for me as most of my embroidery gets frequent, heavy use (kitchen towels, baby clothes, totes, etc…) I have been unable to find a neat and tidy solution… until now! Thank You!!
Sandi (Happy Stitcher in Florida)
These are great helps! Thank you! Now if I could just master tbe art of french knots …
Thank you Thank you Thank you Thank you… tails on isolated French knots has always been a mystery to me and a big frustration to see on a finished piece… thank you for sharing your methods and I will be using them very soon!
Hi Mary, I’m still a bit confused as to the ending of the back on this stitch. Is there a video on the process? I saw your french knot video, but this isolated finish(and very neat looking type) is not covered covered.
Thanks for the clear instructions. Very interesting.
I was delighted to see your tip for starting a know that uses the same technique as starting cross-stitch. I just started using that technique am it is a wonderful way to keep the back of work neat.
I found myself in a real slump and, despite the desire to needle, everything I started was unsatisfactory, so I began a cross-stitch sampler and came across this process. It’s so dependable that I wondered what other applications it could be used for. Now I know at least one more!
Thanks,
Doreen
Hi Mary, Thank you for the details on the knotty subject. It seems so easy when you ‘splain how to do stiching!
This is such a great instruction; perfect for putting that single dot over the letter ‘i’ in embroidered text. THANK YOU!
Dear Mary
Thank you so much on your knot how to start and end single French Knots, very useful and I’ve really enjoyed the discussion on French Vs Colonial Knots, keep up the good work really appreciate it.
Regards Anita Simmance
Thanks for the tip Mary, this will be usefull !
Cheers
Mary. Can this method of starting and ending isolated French Knots, be used on isolated Algerian Eyelets? I have an entire row of them in a cross stitch band sampler. I ask because I have had a couple of them come out . I guess I would have to use the waste knot method, as I am stitching with one strand of silk . This tutorial on knots and all the particulars, has been very useful. Though I don’t do embroidery, but cross stitch instead, I still have learned many useful things from your daily blog. I read it every day. I just received my first Inspirations magazine today! Wow, I may have to learn surface embroidery after all, though I love cross stitch. I ordered Angel Pavement, after I saw that you and your niece were stitching it! It is very beautiful, pretty English colors!
Hi! I had a “happy accident” & I found your web site! Although I am not a sewer (I have actually taped, stapled, and glued things to avoid sewing!), I did cross-stitch many years ago. I am a long-time fan of the artistry of embroidery. Your French Knot instructions are phenomenal. Your step-by-step guided instructions with photos make simple a task I thought was impossible! Thanks for a great site – I will be revisiting often!
I have the chance to make isolated french knots and I found the info straight away on Needle n Thread. Thanks for helping me out Mary.
When I mess up my French knots, I can end up with a knot in my thread. Do you have any pointers as to how to remove it?
Barb
Hi, Barb – The only thing for it is to meticulously untie the knot. That’s why I always suggest two things, to avoid knots: 1. going nice and slow as you pull the thread through. Knots generally happen in the working thread as it’s moving and if you pull slowly enough, you’ll catch the knot before it become too tedious to untie – or you’ll catch it before it even happens; 2. Make sure you’re not going down in the same hole when you form the French knot in the first place. If you go down in the same hole, there’s a chance you’ll pull the knot through, which, in turn, forms a knot on the working thread.
Hi,
Thank you for the instructions on isolated French knots part 2. Do you think you could do a video about doing the French knot with chain stitch. Having trouble with the last steps of making two loops at the back. Hasn’t ended up turning out like yours.
Then when I do cut the thread at the end I’m left with two new pieces of thread. Is that right?
Yes. They’ll be tiny – you’ll want to snip as close to the hitch knot as possible.
Could you use a pin stitch to start? I’m a cross stitcher and embroider, and that’s how I start my stitches when using only 1 strand for cross stitching (for 2 I use the front loop method).
Yes – any anchor stitches work as long as they are covered.