


While playing around with silk gimp the other day, I was struck with the inspiration to embroider this tree.
Now, trees may seem like fairly mundane, unimportant things, but can you imagine life on this earth without trees? Trees may be common, but they are, at the same time, essential, and in art, throughout history, the tree has enjoyed an important representative role, symbolizing many different things across cultures.
Trees show up in hand embroidery in practically every era and every culture, in some respect or another. Therefore, I didn’t feel too odd about branching out with the silk gimp the other day and embroidering a tree.
Today, I’ll show you how I worked the trunk and branches, and while meandering through the topic, I’ll talk a bit about the silk gimp used for the tree (making some clarifications about the thread, what it is, and its pending availability), and a bit about how you can adapt the process covered here to other materials. Ready?
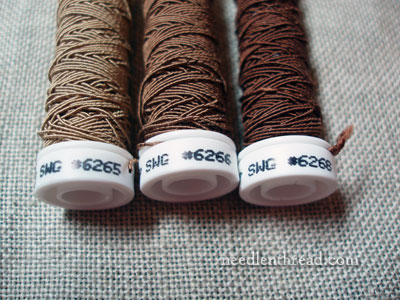
These are the threads I used for the body of the tree. This is the silk gimp I wrote about the other day. After a flurry of e-mail and commentary about where to find the thread, I thought I should clarify that point, briefly.
This silk gimp was re-created for the Cabinet of Curiosities class that Tricia Nguyen is running at Thistle Threads. The thread is made in small batches, and because it came about specifically for that class, it’s not available right now for purchase. The lucky ducks participating in the Cabinet class have first dibs on it (you’re in for a treat!). But hopefully, in the near-ish future, we’ll see it trickle out to the general market and become available for the rest of us. Wait and hope! The only reason I have this little bit is because I was given some “seconds” to try out.
But even if you don’t have silk gimp, you can use other threads to achieve tree-like results. You don’t need silk gimp to embroider a tree. The resulting tree will look different, but it will still be a tree!
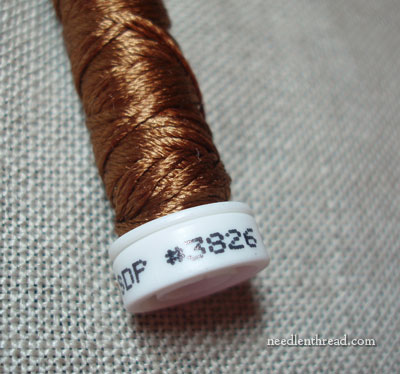
To couch the silk gimp, I used Soie de Paris in different colors of brown, light, medium, and dark. This was the “medium” brown I used. I just selected a brown that looked close enough, because, after all, there all kinds of shades of color in the trunk of a tree, and I didn’t feel the need to be too precise.
We’ll talk about substitutions as we go. Let’s get on with making the tree!
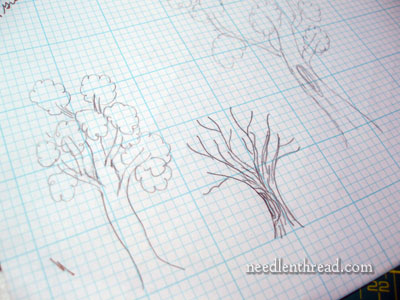
First, decide what your tree is going to look like. I just used some nearby graph paper and sketched up some tree-ish shapes. They aren’t the most attractive things in the world – but they don’t have to be. Your body of your tree doesn’t need to be perfect, symmetrical (anything but that!) or absolutely exact. It just needs to be tree-ish.
I didn’t bother transferring from any pre-drawn design. After doodling trees on paper for a bit, I just drew a basic shape straight onto the fabric. I’m using Strathaven linen here, in a natural color.
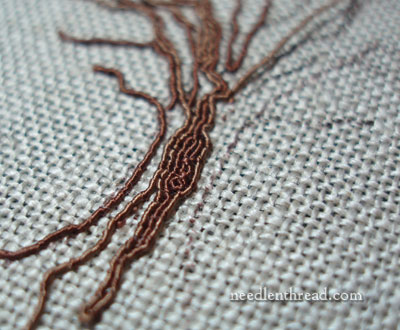
Filling the tree’s body in with couched silk gimp was easy. After all, couching is a very simple technique!
There was no set rule I followed on filling the tree trunk and branches, but to keep a continuous flow from trunk to branch at least in some areas of the tree, I started in various places at the base and worked up the trunk and up the branches in one piece of thread. Once I had the primary “paths” of the tree on the fabric, I went in and filled in between them, alternating the colors of the gimp here and there.
In the center of the tree, where you see the darkish blob, I took the path of the gimp around and over itself to make that center “knot” in the bark.
The upshot is this: you can be pretty free and random in your stitching!
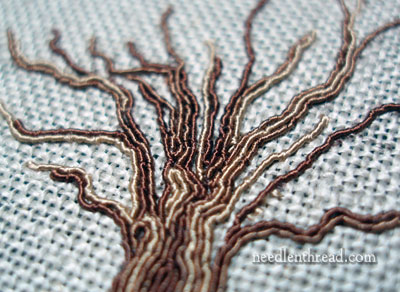
For the top of the tree where the branches fill out, I just filled away, adding a twig here, a branch there, and allowing some of the branches to bump into others and occasionally to cross over them. Symmetry is out the window here – very rarely do you see symmetrical trees in nature – so don’t bother trying to make one side perfectly even with the other. Just “eye-ball” it as you go, to make sure it looks passable as the body of a tree!
And, of course, the leaves will hide a multitude of errors, so if you find yourself thinking that a branch looks All Wrong, don’t sweat it! Chances are, you can cover it up with leaves.
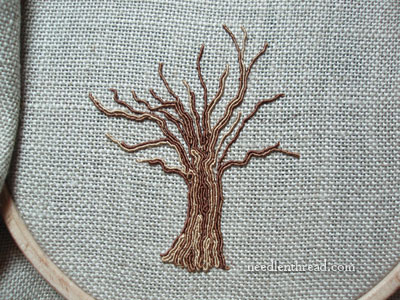
Here’s my trunk almost finished. From this point I added a few more twiggy things on the right, and I filled out the trunk a little bit as well.
The tree is 2.5″ tall, from the base of the trunk to the highest tip on the tree, so it is not large at all. Tomorrow, when we look at adding leaves, I’ll show you some pictures that will give you the scale of the tree, and talk about thread choices and scale.
Substituting Other Embroidery Threads & Stitches
If you’re using different threads for your tree, you can still couch them, or you can use various stitches to fill in the trunk and branches. Stem stitch would work great for creating lines of color and can be “thinned out” as you reach the tips of the branches. Chain stitch would work really well, too, and it would give the “bark” a bit of texture.
Crewel wool (such as Fine D’Aubusson or Appleton) or even regular cotton floss would look great stitched in stem stitch or chain stitch.
You could also try couching a thicker silk, like Trebizond, for a good effect. And you can even get Really Adventurous and combine thread types! You could couch wool threads with silk, or silk threads with wool. You could work in some “veins” of cotton floss among wool. How about some mossy patches on one side of the tree trunk, using tiny French knots out of cotton, on a trunk of wool or silk?
So there are plenty of options for stitching the trunk and branches of the tree. If you have a stash of threads, go foraging and see what colors and threads you have on hand that would fill the bill. Then work with them to see what you can come up with!
Tomorrow, we’ll look at the leaves!
Have any questions, comments, or suggestions? Feel free to leave a comment below!
G’Day Mary,
Spot on, thanks. (Making up for yest!) Cheers, Kath
LOL! I liked your article yesterday, Kath! 🙂 I love good memories… MC
Mary, I just LOVED the tree you have created. It looks sooooo pretty.
I can see it with a top of cast on branches like in Brazilian Embroidery.
What a treat! A great way to get our thought running.
Thank you for giving us, every day, how to grow and be creative with embroidery.
Esther
Thanks, Esther – I’m glad you like the tree! It puts me in the mood to do one for every season… unfortunately, I’m short on time at the moment! But who knows – when the first snow fall comes, I might just have to do a snowy tree! ~MC
Thank you for telling us about the silk gimp. I have been looking for that type of thread for over a year now, with the hope that I might make actual gimp trim with it.
Please, beg Thistle Threads to make this available. There are just so many things that might be created with such a wonderful style of thread.
Many thanks, a faithful lurker,
Natalie in KY
Pipers Silk has a large range (104 different colours) of Silk Gimp, It is an English company. I am not too sure if it is the one you have been using for your tree Mary, but for anyone who wants them they should check it out
Hi, Lois – I’m not sure it’s quite the same stuff, but just in case, I have ordered some of every size Pipers makes and will try it out! ~MC
My search led to Pipers Silks. I bought a three colors of silk gimp in several different sizes. Adventure!
Hi Mary,
I really like your little tree and I love that thread. I hope it becomes readily available too. I embroidered a tree with an owl in it a little while ago using most of what you’ve mentioned above. It’s got couching, stem stitch, chain stitch and more. It’s bigger at 4.5 inches. My style of embroidery is very different than yours, but you can see it here.
http://inlovewiththreads.wordpress.com/2012/03/19/look-what-i-won/
I’m making another one for my mother. I should get back to work on that!
Heather,
I checked out your tree and owl. Love it! Just moved to the country. The owls are getting very hooty this time of year and I have them on my mind. Your use of different threads, yarns and ribbon lends the most excellent texture to your tree. It’s an old tree–all rough and gnarly, deep in the forest.
It’s already so beautiful! Congratulations.
This looks really nice. May have to try it. Btw, twisted silk, 4 <1 or even 6< 1 works really well. I usually do random long and short with it.
I love the texture of this effect! Have you seen the new embroidery designs from Purl Soho? They have a really interesting bark effect as well: http://www.purlbee.com/the-purl-bee/2012/9/18/new-4-seasons-of-embroidery-from-purl-soho-egg-press.html
That’s neat, Jessica! Though I’m not quite sure a pattern would be necessary! But they are really cute! – MC
I love this Mary…looks like the actual bark and makes the trunk POP!
It’s beautiful. I almost want to stop cross stitching for a while and embroider.
Reading the above posts, and following the links, I thought the woodgrain-stamped tree was a great idea. I may try that.
I was wondering if you had tried the DMC Memory Thread? There is only one brown, but the dark ecru and the olive, or one of the new colors would work as a tree.
Oh Mary there is nothing better than lots of different threads rough and smooth tree trunks and twisting branches!The silk gimp looks fabulous. Looking forward to how you get on with the pipers silks. I use their very fine silk as Helen Stevens uses.I dont know if you have noticed but men seem to like embroidered trees??!! Thank you so much for all your thoughts ,ideas and inspiration I get so much from your emails.
Too cute! I dint realize how small the project was until I saw your finger in the picture. Now, really! There is never too much Mary. So bring on the 2,000 words or more.
The tree is gorgeous. Your ideas for the unusual fibers are inspiring. Thank you.
You are an artist ! Keep the ideas, and the patterns, and all the new floss and the tools we need to create, keep them coming please. Enjoyable website. Thank you.
Dear Mary
There was a “comment” yesterday from a lady regarding silk gimp. She was right, you can buy silk gimp in three sizes, fine, medium and thick, from Piper’s silks in the UK.
It comes in lots of colours and costs about £3.00 per reel. Hope that helps if anyone is trying to purchase some.
Would those leaves be called “impressionist” in art lingo? They are the coolest! About the silk-wrapped purl, does it tend to ravel much on the cut ends? I’m assuming you have to cut the bits so that both ends are the same direction and will be toward the fabric when you sew them down. I’ll take a closer look. This is new to me as well as the silk gimp. Thanks for the education.
Hi, Suzannity – If you use nice sharp, little scissors and make a clean cut, it doesn’t fray (or at least, not enough to be a problem). There can be some “microscopic” fraying going on, and if you don’t make a clean cut – if you cut on too much of an angle, for example – you might get some fraying. But if you make a clean cut and sew the stuff down, it’s just fine! ~MC
At closer inspection, I think I see ends of the coils sticking out. Not much if any raveling. Good deal. Less work. More random fun. I wonder why the silk doesn’t unwind off the wire.
Hi Mary, I’m lovin’ the tree. I love even more the fact that when you demonstrate a technique, I find it’s so easy for me to pick up! BTW, Bloppy? 😀
Beautiful, just beautiful work- like all you do.
The tree is lovely Mary, and thanks for showing the scale; I imagined the tree to be larger. It’s so helpful that you not only demonstrate what you can do with the threads you use, but also what size projects they would work best on – a fine service you offer!
Mary, I have found that even though I can not open your videos on my p.c. , I am able to view them on my I Pad. My daughter tells me that it the difference between a Microsoft and an Apple product. Well I am very new at stitching, albeit a very mature adult and I am so happy to have your site to go to daily to learn from.
I just discovered your site and I love it!!!
Glad you enjoy it, Debbie! Welcome aboard!
Thanks for giving us free advice
Thank you thank you thank you 1 million times. Thank you!
I have been trying to make a cherry blossom tree, and I’ve tried several times and I cannot get the hang of the bark. This is a beautiful stitch. Thank you for teaching me. I love all of your work.
Thank you for having these instructions, they were helpful; as I’m making a “all season” tree for the first time… it gave me a direction that I was looking for!!