


Yesterday, we looked at embroidering a tree trunk, and today, I’d like to show you how I added leaves to my silk gimp tree. I would’ve included all the information in one article, but holy cow! I was up to 2,000 words, and I figured no one needs that much of me in one day!
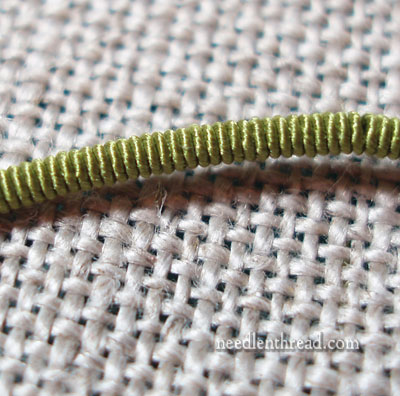
For the leaves, I used silk-wrapped purl. This is the silk wrapped purl up close. It’s made from a copper wire wrapped with filament silk and then coiled into this tiny spring. To use it, the silk wrapped purl is cut and sewn on, through the coil, like a bead would be.
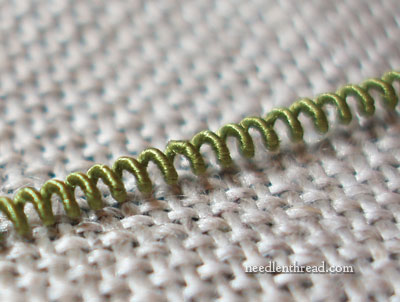
I decided to stretch the silk wrapped purl and use it that way. Once you stretch this stuff, it doesn’t return to its former shape, but, because of the nature of copper wire, you actually can do quite a bit of shaping with it. For my leaves, I didn’t do any shaping.
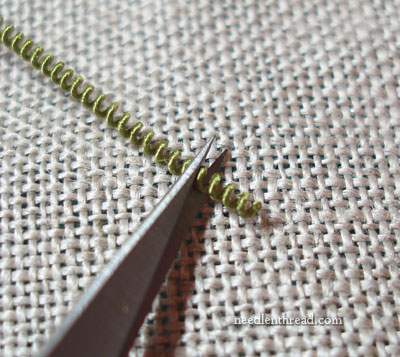
I cut small lengths of the silk wrapped purl…
… in light green, dark green, and rust, and placed them all on a little tray, ready to sew onto the tree.
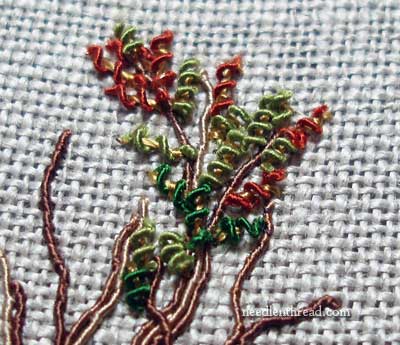
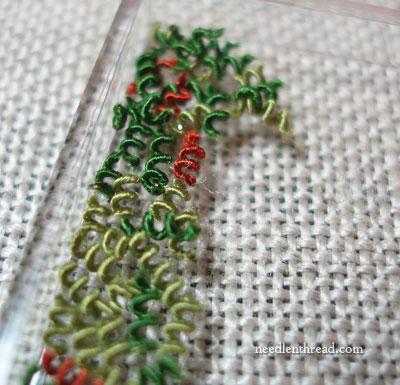
Then, using the gold-colored Soie de Paris mentioned yesterday, I sewed the little coils onto the tree branches, very randomly, keeping the rust towards the outer tips of the branches, filling in with the light and dark green, and sometimes covering the branches and sometimes leaving them exposed.
The reason I used the gold-colored Soie de Paris is because I wanted touches of gold peeking through the rust and greens, to give the tree more of an autumnal look. I think it worked pretty well! If you’re substituting threads and stitches (mentioned below), you can always use a variety of colors of threads (and shades) for the leaves.
You can see that the open coils create a very light, speckled effect for the leaves, rather than a heavy, dense leafy filling. This works well for an autumn tree.
Fill up the tree randomly and lightly at first, working in just a few stitches, then stepping back to see if you should add more. It’s always better to go lightly at first with this kind of filling, and then to fill in here and there if needed.
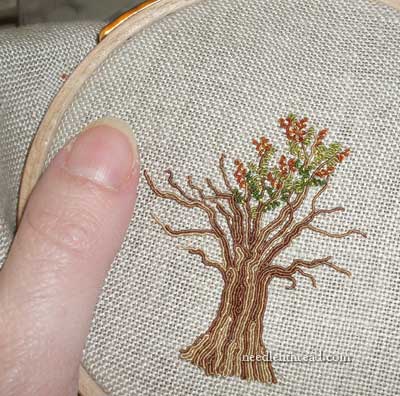
The Scale of the Tree
Here, you can see the tree right next to my thumb. It’s only 2.5″ high at its peak, so it’s pretty small! The size of your tree may help determine the threads and techniques you want to use on your tree.
If you are embroidering a large tree, for example, you might stick with crewel wool for the trunk, because it will fill the space a lot faster and the texture of the wool will contribute to the tree-ness of your tree. If your tree is large, you’ll also have more room to play with different stitches for the leafy areas, and the threads you use for the leaves can be a combination of heavy and fine.
If your tree is small, you might try finer threads for the leaves. Heavy threads in a small space can look a bit bloppy and they lose their distinction.
By the size of my tree, you can see the silk gimp I’m using is, in fact, pretty fine stuff! Don’t confuse this thread with other gimp available on the market that’s thick and stiff. This gimp, because it’s made specifically for hand embroidery, is very fine indeed, and the silk core makes it extremely supple. Gimps with cotton or viscose cores are not generally this fine, and they don’t move or handle the same way.
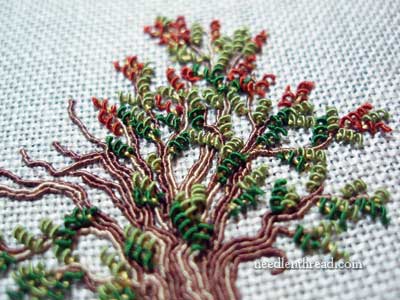
The rest of the tree is just a matter of filling up – going lightly at first, and then going back and filling in a little here and there, wherever I thought a leaf would improve the look of the tree.
Remember to stitch a few leaves on the “front” of the trunk, up high, before the branches proper begin. This will help give your tree a more natural look.
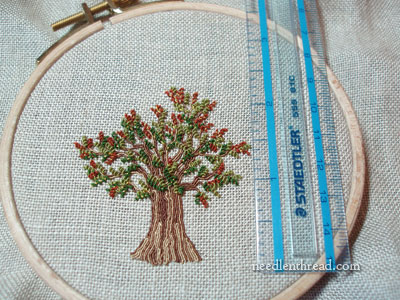
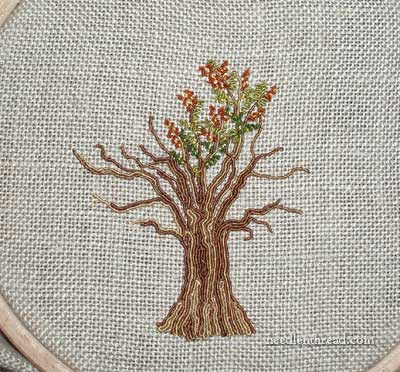
And there’s the finished tree, with a ruler for size reference.
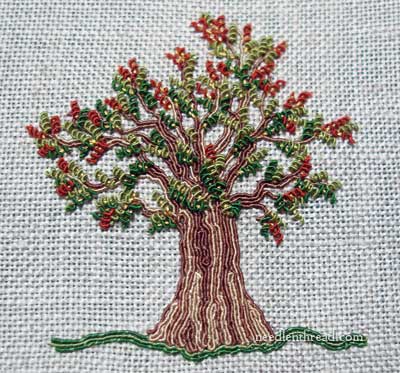
Finally, I added a bit of green at the base of the tree to “ground” it. After all, a tree floating in space looks a lot like… a tree floating in space.
Substitutions for Leaves
If you don’t have silk wrapped purl, you can substitute regular embroidery stitches for your leaves. You can use detached chain stitch (daisy stitch), French knots, drizzle stitch, or even small bullion knots – or, for interest and texture, try a combination.
So, go to it!! Embroider your own autumn tree! Substitute what you have on hand, work in a relatively random way, try combining threads and stitches, and see what you can come up with!
Have any questions, comments, or suggestions? Feel free to leave a comment below!
G’day there Mary,
That’s pretty neat. I don’t know what I was expecting but that took me by surprise. Shouldn’t have. After all, it is Needle ‘n Thread!
So, Spring could just have some blossomy colours of them things on it eh.
All good. Thanks Mary, cheers,, Kath.
Ah, yes! For spring, add some creamy whites and pinks, for example, if you want a blossoming tree. If you just want a leafy tree, add maybe a brighter, lighter green, and more leaves, to make it a little more lush!
Needless to say, if you want a winter tree, you can just skip the leaves!
Last night, in a magazine…girlfriend was unsure of what she should wear to go out with boyfriend. When he arrived she asked him if what she had on was okay for the evening. Brown long pants and a green shirt. “Yes, it’s nice, just like a tree”. She changed!
Sigh. Mary, you’re my hero. God bless you for being so generous with information.
Please take a look at this wild rose embroidered in long n short stitich. http://jezebellesinning.blogspot.in/2012/10/wild-rose-embroidered.html
Your feedback is welcome.
Love,
Natasha
Hi, Natasha – The rose looks wonderful! Is this your first needlepainting adventure? If so, you’re doing great – keep at it! I know a lot of people who use magnification with long and short stitch (i.e. a magnifier / light combo) even though they don’t normally use magnification for other stitching. So, in addition to light, you might think of magnification, because eye strain at the end of the day can definitely take a toll on the peepers! ~MC
That tree is sweet!
Is the silk wrap somehow glued to the purl? I’m guessing it is at least a tiny bit or it would come undone when you cut it for the leaves? I guess I have the same question for all wrapped threads like the silk purl and gimp – if not glued to the core, how do you keep them from unwrapping during storage? And what about during stitching?
Hi, Gail – No, it’s not. The silk is twisted onto the wire, and it holds there. You can pull it off, if you really wanted to unravel it, but if you use nice sharp scissors and make a clean cut of the purl, it doesn’t unravel or fray. As far as the threads staying on their cores, that’s the whole “engineering” side of creating threads, I suppose. They’re twisted in just the right way to keep them together. With the gimp, you do have to handle it correctly because you can run into some problems stitching with it (not usually when you’re couching, though). So, that’s why, when I wrote about the gimp last week, I mentioned not using the ‘sewing’ method of stitching, because it can cause the outer layer to bunch. But in storage, the silk wrapped purl is just in a little box and it doesn’t come undone, and the gimp is wound on spools, and it doesn’t come undone. They’re neat threads!!
Mary – That is one FINE tree! Love it! Thanks for the step-by-step.
Oh that is beautiful.I can definatly see that in one of the squares on my sampler. All I need now is to order the threads needed.
Absolutely amazing. Thanks for showing us that.
Dear Mary
Beautiful!!! and thanks so much for showing and sharing with us over the last 2 days how you embroidered the tree. It’s amazing what you can do with thread I’ve never seen a tree embroidered before, I love the silk wrapped purl you have given lots of ideas ???????? you never fail to inspire me.
Regards Anita Simmance
Mary this is awesome! Can’t you just see this done on a fall jacket? If you could enlarge the design, (as in make it larger), you could put that on the back of the jacket! Thank you for sharing this with us. I can see a shopping trip in my future! LOL
Mary,
The little tree is great. A row of them in seasonal order would be nice framed. I have to get some of those lovely threads. They are textural and I love texture.
I love the use of wrapped purle for the leaves. I would have never thought of using it that way. It’s beautiful! Thanks.
Thanks for sharing this process, Mary! I love the texture the gimp brings, and the sparse purl leaves are beautiful for autumn.
This was great. Thanks for the explaination below of why gimp doesn’t unwind. I had the same question. My next question is where do you find it? I’ve never seen it!
neat idea and looks really lovely. x
Hi Mary,
Thanks for the good info. and creative ideas …. I don’t know how you manage to do it all …
I am interested in buying gimp. The two sources that you mentioned do not have it / yet have it. Where did you get yours? From England? Is it antique?
I just love the addition of the pumpkin.
Eva
Wow – not only is there silk gimp but there’s silk wrapped purl? Two more things to add to my wish list.
Hi Mary,
I’m a complete newbie to embroidery and have been doing a small sample project to try out different stitching techniques. I’ve been using the internet to look up types of stiches, bad idea! the pictures just made the techniques look sooooo complicated but my long and strenuous search for the perfect description of stitching is finally over, i have just come across this website and i just need to tell you that you are a saviour! Your ‘how to’ videos are so helpful and i have enjoyed looking through some projects you have posted. The embroidered tree is AMAZING!!!!!!!
You are my new role model! Most teenagers who are the same age as me think embroidery is some sort of old fashion boring thing but it is a really relaxing form of art and when done well it looks amazing. This website has renewed my confidence in doing embroidery and when i tell people i do embroidery, i will say it with pride 😉
I have one question; what sort of stitch would you use to embroider a sort of cartoonish flower like this ➡
sorry, the flower didn’t come up but it’s about 1cm in diameter and every thing i’ve tried makes it loose it’s shape and look wierd.
Mary, this project is beautiful! And your photography is excellent.
I’m trying to design a large tapastery about 6ft tall by 4ft wide. I want to do an oak tree the base having my husband and my name in tit. The branches having our children’s name, the leaves our grand children. My hope is one of my descendants will pick up where I leave off. It will hopefully become a family heirloom. Any help would be appreciated.
Just want to say Thank you so very much for all you share. Mw
Love your tree. Thanks fran
Could you recommend a good site for buying the silk wrapped purl?
Thank you
Try Thistle Threads – right now, though, I think she’s only shipping every 8 weeks or something like that. Another option is Needle in a Haystack. If they don’t have it in stock, they can special order it for you.
Absolutely brilliant!
Thank you for such an understandable and informative tutorial. I read about embroidery to relax before bed, and this will certainly make my dreams prettier! That tree looks like the start of an enchanted forest.