


One of my favorite aspects of Needle ‘n Thread is that I can bounce ideas off all of you, and I can always count on your good advice! Many creative minds are better than just one, and you all are The Best of the Best when it comes to giving good input!
And so, after reading through your thoughts the last time we discussed this Hungarian redwork design, I did indeed re-vamp the design to add some kind of sensible completion to the blocky ends of the table runner layout. Like some of you, I didn’t mind the straight ends (and they certainly would make fabric finishing much easier), but I like the scalloped ends better.
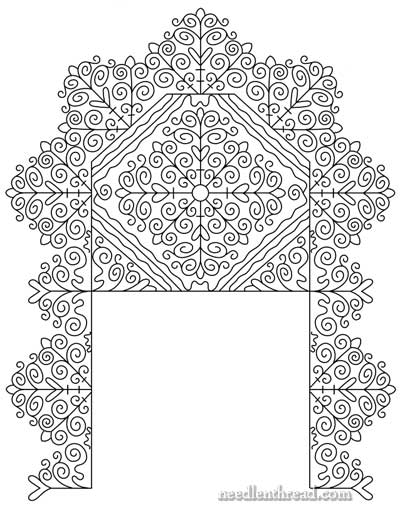
I wanted to keep, as much as possible, the integrity of the original design. My goal is not really to add anything different to Lilly’s original drawing. At the same time, I want to keep the bulk of the drawing intact, without eliminating anything major from the design.
It made sense to me, then, to work with the repeats on the edge, and to arrange them into a “scallop” design around each end of the whole layout.
Changes in the Embroidery Pattern
I made one small elimination in the design, though. It’s not enough to mess up the “integrity” of Lilly’s original design. Here’s what I did and why:
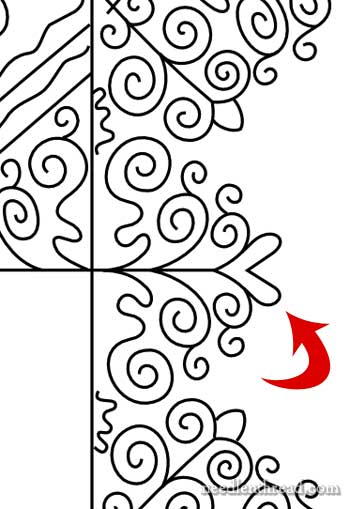
Above, the red arrow points to the smaller “scallop” element. In the original, the straight line up the middle of this element passed through this heart shape, which was capped by a small rounded peak, also split by the center line. I shortened the center line to the base of the heart shape, and removed the little peak above the shape. You can compare this change to the original shown in this article, if you like.
My reasoning for changing this element? I like the fact that the peaks of alternating scallops down the side are different – they don’t all end with the same little bump shape – and I like the little heart. It fits the folky nature of this type of embroidery.
Enlarging the Embroidery Design
Pictured below, the whole design looks small and delicate, doesn’t it? But imagine it enlarged, so that the width of the design is 16″ from the widest points. That’s how large the design will be for the runner.
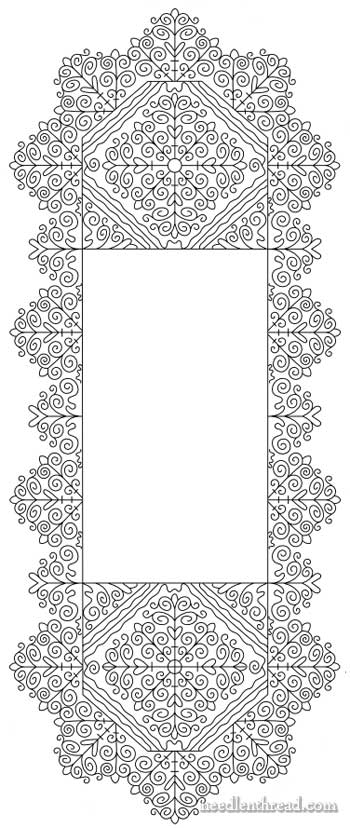
With the design area 16″ wide, the length of the whole embroidered area becomes approximately 40″. The finished runner will be 18″ by 42″, which means my fabric needs to be at least 22″ x 46″, giving me an excess of 2″ all around the finished size of the linen.
I’m thinking about angling the cut of the ends, to follow the shape of the runner, but this is a decision that can be made later. If you look at the PDF pattern provided at the end of the article, you’ll see what I mean. There are red lines marking a possible shaped end. Feel free to share your thoughts on that! Should the linen be finished with straight ends, or shaped ends?
Embroidery Stitches & Threads
When enlarging a design this much, the whole design takes on a different look. It’s not quite as “lacy,” for example – the pattern becomes bold, the individual elements have more space around them and each line is itself much larger, too.
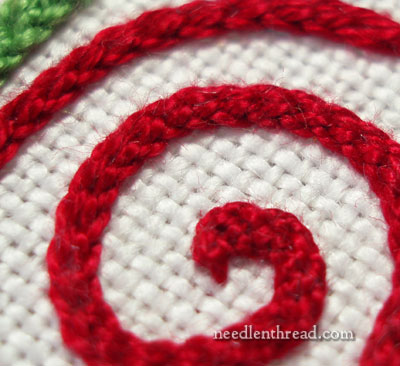
This overall enlargement of the design works out well, considering the types of threads I’m considering for the stitching, and the main stitch I want to use. The Hungarian braided chain stitch is a textured, chunky stitch, especially when worked in perle cotton, as shown above. I think it’s a beautiful stitch when worked with a twisted thread, and I want to use it for the majority of the lines in the runner. If I use perle cotton, it has to be size 8 or 12, though, to fit the design lines. I’ll test both.
On the other hand, I may use floche or coton a broder. Whichever thread becomes the choice, though, it must absolutely be “wash fast.” That is, the dye on the thread must be fixed. Table linens should always have the ability to be laundered.
Before beginning on the project proper, I’ll do some thread testing, to be certain of thread size and type, and then I’ll put the sample through some washing tests, to make sure that laundering won’t be a problem. I’ll share those tests with you in days to come.
Other Decisions to Make
Besides deciding on thread, a decision must be made on the ground fabric. Originally, I was thinking red-on-white, but now I’m considering going with a natural colored linen, possible Strathaven linen. My thread choice will also influence this, so I’ll be sampling with the threads on both the white Alba Maxima and the natural Strathaven.
Finally, before stitching can actually begin, the fabric has to be cut and set up with layout markings, and then the design has to be transferred. How I will transfer the design is another Big Decision to make. I’m going to do some testing in that area, too!
Proper Prior Planning
You can see that, when it comes to tackling your own embroidery project that’s not pre-planned by someone else, there are many little steps and decisions to make before you actually start stitching. It’s true that some of these decisions can be made in a flash – you conceive a design, and boom-o! You know exactly what you want to do with it and how you want to do it.
But this isn’t always the case. Proper Prior Planning can prevent a sad end result or a major waste of time and materials. It’s good to take your time to plan! During the planning stage, keep your mind open to alternatives and don’t get too eager to rush in. Enjoy the approach – it’s an important part of the process!
New Design PDF
Here’s a PDF of my altered design, if you want it:
Hungarian Redwork Table Runner (PDF)
More later!
Looking for inspiration & information on hand embroidery?
There are all kinds of reasons to sign up for the Needle ‘n Thread daily newsletter! Check them out and sign up today!
Wow, that was in-depth! Can’t help but feel that I am going to learn a ton from following you through this; and what a pretty pattern to learn from!
Really looking forward to hearing more about this.
Proper Prior Preparation Prevents Poor Performance. That is a post it note at our computer workstation at home. Works in all areas of life! The Hungarian Redwork Project looks like fun. I’ll be watching this one from the sidelines while enjoying a cup of coffee or tea with you :D.
Oh yes, the 6 p’s! It’s rather a saying in my house – though my brother would add a 7th… but it is very nice, so I won’t repeat it! 🙂
G’day Mary,
You’re the clever lady eh. That’s perfect. It’s hard to know what I prefer about the ends. I’d have to see it finished, or at least with some completed, I think to really know. At this stage I kinda think the shaped end might crowd the design a bit but…? Whatever, I was excited to see this worked out like this. Thanks for sharing. Cheers, Kath.
Yes, yes! I love this version. Thank you for the pattern, Mary. I wish I had the time to make it along with you. It’s so tempting! But, I’ve got to exercise SOME willpower, LOL, and use my time to work on the many things already in progress. Looking forward to the play by play.
Mary: I have two concerns about this project:
1. I know you love linen as your background fabric, but I’m afraid you’re going to have a problem ironing this piece after washing it. My experience with linen fabric is that it wrinkles badly during washing, and the dense thick stitching may hinder pressing – be sure to test your ability to effectively iron it smooth after you stitch a section.
2. Consider removing the little isolated squiggles that occur along the line bordering the central white rectangle – they look like inch-worms going up your design. I think the overall look will not be affected by removing them.
LOL! I agree, Janet – I actually intended to take those little squiggles out of the design. They end up crowding that stitched area too much. If I end up using a finer thread (like coton a broder #25 or floche) it wouldn’t be so bad, but any heavier than those, and it gets really tight in there. Still debating on the thread – will have test samples up later in the week!
Concerning the linen, I’ve always had very good luck with linen. As a fabric for embroidery, it has never failed me, even with highly textured embroidery that has to be ironed. I have a little trick with smaller table linens like this. If they are ironed when still damp, of course, the wrinkles come right out. But better than that, if you have a large mirror in your house, clean the mirror. Then wash the linen (I always hand wash, but it could even be washed in a machine – but it helps not to put it through the final spin cycle), remove it promptly and lay it flat in a towel, cover it with another towel, and gently press out the excess water (don’t squeeze – just push on the towels). Then, smooth the linen onto the mirror and “block” it by pulling it out and straightening it, stretching it into the shape you want it in, when it dries. Let it dry completely, stuck to the mirror. When it’s dry, peel it off. Works a charm!
If it has to be ironed, iron it upside down, on a very padded surface, while damp. Again, this assumes the threads have been tested for wash fastness – heat and steam can sometimes cause threads to run that wouldn’t otherwise run – but if the dye is good and fixed, ironing damp linen upside down on a very padded surface (I use a stack of flour sack towels covered with a piece of soft flannel) works really well.
~MC
I always hated ‘wasting’ the time in pre-planning a project, but i have realized that it’s very important to the outcome.
I think the linen should be finished with shaped ends as that would show off the pattern more than a straight one, IMHO.
I’m looking forward to following along as you create this. Thank you.
Two things: 1. Liking the angled ends, and proportionate appearance; however, it does somewhat emphasise the revised scalloped ends -adding weight or heaviness – like a doily.
2. In keeping with the original happy spritely look – and, I haven’t read all of the previous discussions;
I would like to see if inserting the “heart feature” in lieu of repeating the condensed work would make a difference; it feels like it might allow for the use of the angled-end while retaining and perhaps even emphasizing the joyful appearance of the original design. But, the only way to know would be to play around some more.
A final thought: While imagining retaining the straight edge at the ends – I see the condensed doily look remains somewhat dormant, and an edge or fringe or trim might just add a note of playfulness – that could support and help to balance the entire piece.
Hi, Charlotte – Yes, I thought about retaining the straight edges and added a decorative finish along the hem of the straight edge – maybe something involving a little needle lace scallop, or perhaps a fringe, though as a rule, I don’t like fringe on table linens, only because it tends to look messy on the table. Tassels, maybe? Something to think about!
I really like the scallops on the ends, and I’ll vote for having the finished runner follow the angles on the ends. Thank you for the new design.
And I like your explanation of your planning. Somehow, I think many of us who haven’t done any designing have the idea that designers just get an idea, sit down and stitch it out and it matches their vision on the first try. I know I did anyway. It’s posts like this that make me realize there’s some serious thought, work and sometimes re-work that go into such lovely results.
Oh yes, this I like very much. There’s a nice ebb and flow to the pattern with the slightly undulating edge to the design. And I do like the way the ends are finished off now. Since they’re not extremely extended into long points, I think you can go blunt or tapered to points.
I was in the same dilemma with redwork and fabric choice. I’m doing a redwork alphabet that I’ll turn each into a block and make a quilt from them. I first thought white would be crisp looking. But who wants a “crisp” quilt? Then I tried muslin and it just looked wrinkled and dirty. I finally found a fabric with body, fairly smooth texture and just the slightest creamy color to it. Unfortunately I can’t think of the name of it now. But it will work very well and I’m excited. So I vote for something slightly off white to go with the warmth of the red.
Have you considered leaving only the diamond on the inside, removing the triangle areas outside the 4 formation lines and adding a “knob” at the lower diamond points? Or maybe adding an additional triangle to “finish” the corner areas making the inside diamond shaped instead of rectangular? Just an idea.
Hi, Mary – Your work, your creativity, your designs, your thoughts – all are such an inspiration to me, every day, when I read your blog.
A practical question – can you share what drawing program you use to create your designs? Or any drawing program suggestions for someone who would like to start playing around on the computer with the very thing she usually uses just pencil and paper for?
Many thanks!
Oh, much better! I really prefer this design and your changes, and appreciate the conversation you had with Janet Noble below about removing the squiggles and ironing techniques. I hope to make this table runner along with you, albeit in a less expensive thread due to finances, and I look forward to your thread testing especially in color-fastness. I need to review your posts on thread choices so I can make the best choice I can- you weren’t kidding that the planning stage is more important than it seems! Thanks for sharing!
What a delightful insight into your planning. For what it is worth here is my two cents.
I would chose a linen that is a winter white as I sometimes think red and white in their pure colors can be a bit harsh looking unless they well be viewed from a distance. I might even consider a slight candle glow color for the linen or even something with a hint of gray, depending on the setting it was to be used.
As for finishing: The pattern is bold, beautiful, and almost lacy. Because you have chosen a raised braided chain stitch I think it will give the feeling of lace almost floating on a linen ground. I would keep the linen finishing as simple as possible with straight sides and perhaps a > shape on the ends so as not to take anything away from the prominent red color and feeling of the raised stitches.
Like they say, “ask ten people a question and you will get 10 answers”. It will be fun to see how others would work this pattern!
For me, the angeled edges compliment the contour of the design and finish it off nicely. I can visualize a tatted edging design all around the runner. Like I would ever have time to complete the tatting! I do plan, however, to make the runner. What a lovely project. Thank you, Mary.
I think that finishing the piece along the red markings would only enhance your work, Mary. I am looking forward to seeing you progress!
Hi Mary: I’m not an embroiderer, but I think your new pattern would look better if you removed the two interior rectangles (in from the little circle) at each end of the blank space (so that the interior parts of the ends of the runner would essentially be a triangle). Then the ends would not seem too overpowering. The 2 little squiggles at the ‘ends’ of the demarcating line would also disappear, but not a big problem.
I have one more question: the center block that’s blank – is there actually going to be a red line of stitching marking off the block or is that just there for designing purposes? Having the line there looks a bit hard, angular compared to the design. But if it isn’t there, you’ll have a lot of loose squiggle ends hanging loose in the center.
Hi Mary, I think the removal of the small lines to make a small heart on alternate scallops is a good one.
Marian (NZ)
encuentro el diseño con muy buena textura…la puntada igual ..me encantaria seguir sus pasos
si en otro color,,,me encanta el lino ,,quiero algo discreto pero con clase
gracias Mary por tomar en cuenta nuestra opinion,,es magico contar con bordadoras de diferentes partes ,,todas con un mismo fin
un gran abrazo
Sharing your process with us is a wonderful gift. Thank you!
Oh, goodness!
Now I want to do it. I have some linen that will work for it too, some really high count linen and I ordered some trebizon silk in scarlet that would look amazing with this. I may have to just do one of the panels and make it into a pillow or just frame it. Gosh, so many ideas! And I am in grad school, so most of the time I don’t have the time to put them into practice. 🙁
I think I like the scalloped edges much better than the previous one. I am looking forward to following this project. It’s always so much fun to see how you turn out these marvelous creations. It’s inspiring.
Hi, Vivian – glad you like it. I think Trebizond will be too heavy for the design, though, unless you are couching it, though it might work with some finer line stitches, backstitch or stem stitch. Also, if you are planning on a table linen, silk thread might not be a good idea, because of the necessity to launder. Just some thoughts… MC
To help with your decision, how about a paper template? At 18×42, will you be looking at the entire piece? By laying it on your table & stepping back, the scale should answer the question. This is one of the reasons I have not made a runner for my own table–70″ plus 3-20″ leaves!
………..um trabajo hermoso me gusta el color llama la atencion saludoos MARY
WOW, that is an amazing pattern and one I want, though not sure when I will have enough nerve to tackle it. How in the world will we actually transfer it to our fabric? I’m totally ignorant about those types of details. Thanks