


Yesterday, we looked at a piece of ecclesiastical goldwork embroidery that I’m deconstructing and photographing along the way.
Today, I’ll tell you my reasoning behind why I’m taking this piece of embroidery apart, and we’ll start the deconstruction process together. Follow along with me here to see what these grapes are made of and how they’re made, and what it’s like to take a piece of goldwork like this apart!

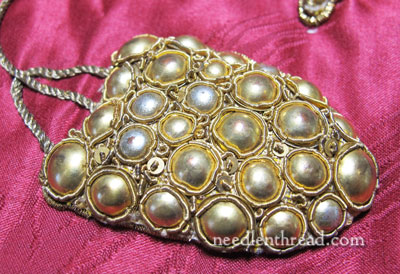
This is the bunch of grapes that we’ll be concentrating on.
Why Deconstruct this Embroidery?
Before we start disassembling the grapes, I suppose I should offer my “apologia” (as in, defense of conduct) for what some may consider a heinous crime against needlework. Here is my reasoning:
1. This piece is no longer capable of its original use.
2. It is not the best example (or even close to the best example) in its category, and therefore it is doubtful that it would ever find a home in any museum. It could sit on my shelf forever, untouched, but then what?
3. If every single textile in the world were saved and stored because it shouldn’t be taken apart, many questions about how they were made, by whom, and with what materials would never be answered. Besides, there wouldn’t be storage space enough to keep them all, or museums that could afford to house them.
4. Greater value will come from the piece in what I can learn about it while deconstructing it, than would come from the piece if it were simply stored or displayed on my wall.
5. Even William Morris and his wife spent much time on their trips abroad “snipping apart embroideries” to see how they were made. “Afterwards we studied old pieces and by unpicking etc. we learnt much, but it was uphill work, fascinating but only carried through by his enormous energy and perseverance” (from a letter of Jane Morris to their daughter May Morris). They knew the value of taking apart old pieces of embroidery to learn from them. That’s what I propose to do here.
Of course, I’m always open to arguments against the process, but those are my reasons, for what they’re worth. This is not to say I encourage you to disassemble every piece of old embroidery that comes your way (on the contrary!), but in this particular situation, I think there is good reason to take apart this piece.
Deconstructing the Goldwork Grapes Slip
First, let’s take a look at the grapes up close.
How about a little closer, so you can really see the details?
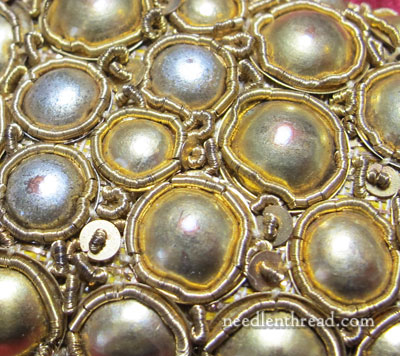
You can see that the grapes are metal and domed, that they are surrounded by purl (those worm-looking gold threads) and that there are a few spangles scattered amongst them.
If we turn the whole piece over, we see the threads on the back that connect the whole bunch of grapes to the ground fabric. These aren’t threads used to do the embroidery, but rather threads used to appliqué the grapes to the ground fabric.
So the first step is snipping these threads so that the whole slip (embroidered appliqué piece) can be removed.

Once the threads are snipped, the bunch of grapes can be gently pried up from the fabric, and any stubborn appliqué threads can be snipped from underneath the bunch of grapes on the front side of the piece.
The line of metal thread you see lying loose here was used to outline the bunch of grapes. We’ll talk more about it farther down the road, when we discuss the assembly of the whole embroidered piece and some theories about it.
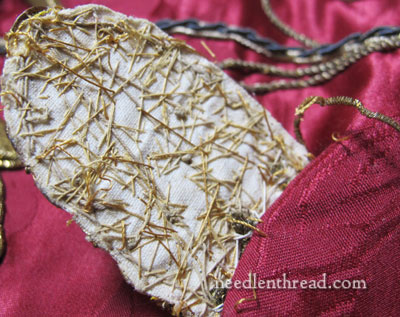
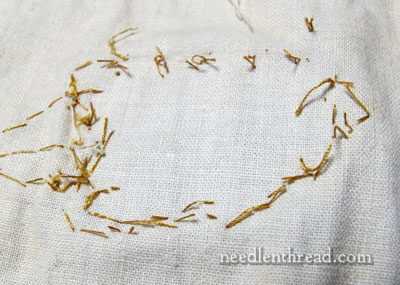
Once all the tacking threads around the grape bunch are snipped, we can turn it back and see the underside of the embroidery work. There are several various weights of thread here. The heavier ones were used to fix the grapes in place, with finer ones used for sewing on the purls and the spangles.
The back fabric here is a fine, high thread count linen. The back is as hard as a board, and the threads are not quite brittle to the breaking point, but more brittle than if they had simply been coated with wax. The back of the piece was obviously coated with some kind of glue, which hardened the fabric and also stiffened the threads. My guess is a wheat or rice starch glue, or something similar.
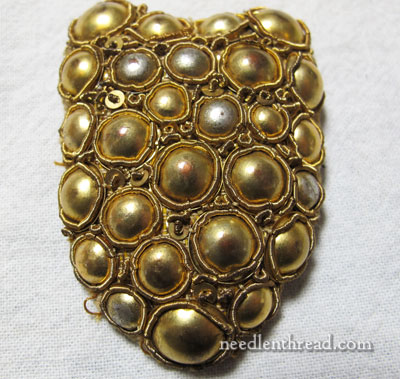
Here is the bunch of grapes, removed from the ground fabric. It is about 3″ high and 2″ wide.

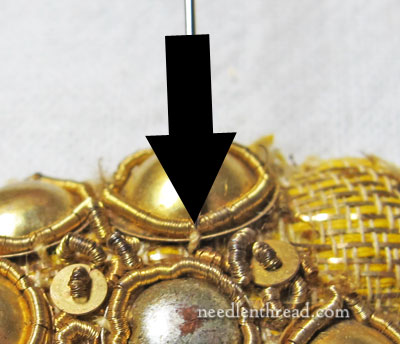
You’ll notice up close that the purls around the “domes” are crimped or dented in four place around each dome. Each of these dents marks the spot where the dome is sewn onto the foundation. By snipping the thread right under the crimp in the purl, we can easily disconnect each dome from the fabric.
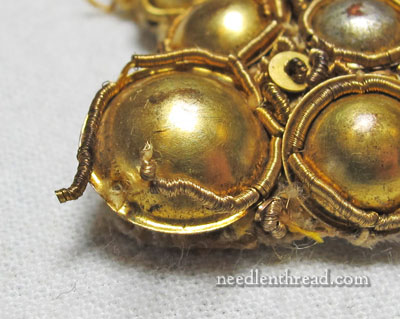
Here, you can see up close what happens when you snip the thread right under the crimp in the purl. The purl comes loose, and so does the dome.
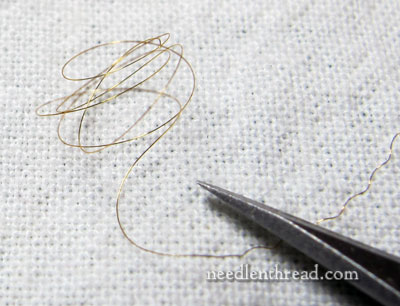
Incidentally, the purl itself is extremely fine. In the photo above, you can see the wire the purl is made from. I simply stretched the purl out of its coil. My tiny embroidery scissors are in the photo as well, to give you a little perspective on how fine the wire is.
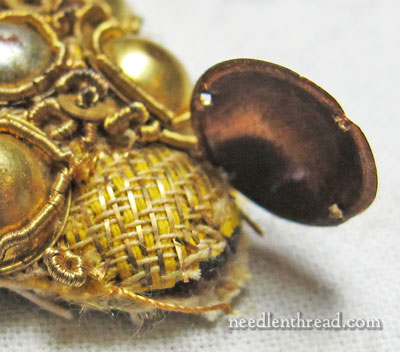
Here’s the first dome, lifted away from the foundation. The fabric immediately beneath the dome is a herringbone-weave yellow fabric shot with gold.

Notice that there’s a turned-up lip all around the dome, making the whole metal dome piece look something like a shallow bowler hat… or maybe an old army helmet?
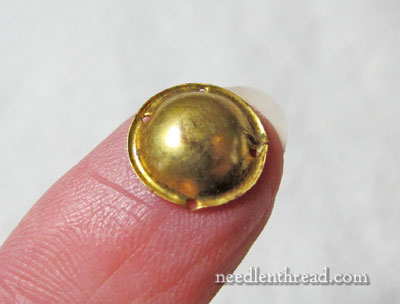
This is the largest size grape in the bunch, and to give you a sense of size, here it is, resting on my finger tip.
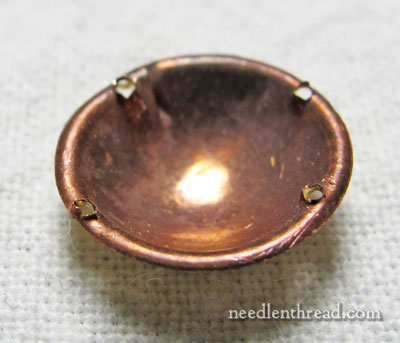
If you turn the dome over, you can see that it is hollow like a bowl, that it is a copper color underneath, and that the edge is pierced in four places so that it can be sewn to fabric.
In the photo above, you can easily see one of the stitches that passes through the pierced hole in the lip of the dome. It is also crimping the purl along the lip of the dome. The purls are sewn on this way:
The needle and and a fine thread were brought up through one pierced hole in the lip of the dome piece, the purl was strung onto the thread like a long bead, and then the needle was taken back down into the same hole, leaving a loop in the purl that fit around the dome.
Then, at each pierced hole in the lip of the dome, a slightly thicker thread was used to stitch from the outside of the lip into the hole in the dome, over the purl and down into the hole. This stitch crimps the purl slightly, and it holds the dome and purl in place. This was done in all four holes, all around the dome.
I snipped these threads just under the lip of each dome (and the finer thread on which the purl is strung) to remove each dome and its purl ring.
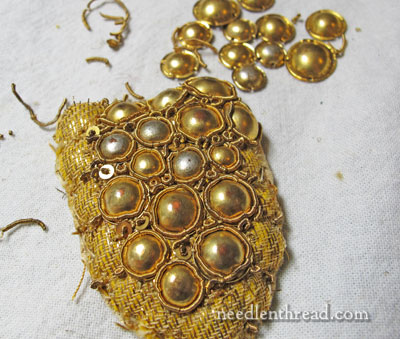
Here is forty five minutes of progress in deconstructing the grapes. The outside perimeter is almost finished, and you can see the herringbone-weave yellow fabric on the foundation fairly well.
Next up, we’ll look at all the grapes and metal threads removed, and we’ll take apart the foundation and see what’s under it!
Any questions or comments? I’m all ears – feel free to leave a comment below!
This is fascinating – there’s so much to learn from taking things apart to see how they are made. Would you think, as I do, that we are now looking at the original fabric of the piece the grapes came from, before re-mounting? The partly-desconstructed bunch looks far less thick, heavy and ugly against the textured yellow backing than it foes on the red.
Well, we will discuss that possibility, that’s for sure! I agree with you that the grapes don’t look as heavy and ungainly against the yellow and gold. Once we take apart the layers, we’ll learn a little more…
Well done you!! This is just so fascinating and I know William Morris would be so proud of you!! Thankyou for sharing it all with the world Mary,
love Michele
Thanks, Michele! 🙂 I just couldn’t help adding the William Morris quote!
G’day Mary,
Brrrrrr, this thing gives me the shivers! Literally. I am actually goose-bumpy too. Why? I don’t know. I did look at the piece yesterday and overall it was quite fascinating, especially with your explanations and info. I didn’t like the grapes though, but that was all I felt, just found them very unappealing. This today though is positively creepy. Each time I go back for another look it happens again. I’ve managed to read a bit here and there and appreciate your insight and interest but I think I’m going to have to pass on this subject. I’m sorry but there it is.
Thank you though Mary. Cheers, Kath.
Believe it or not, I know what you mean, Kath – especially when it comes to getting down to the felt layers, which are dark brownish black. It’s surprisingly dirty work, too. But all in all, enticingly interesting to me.
Very interesting how these were made. This is how we learn and improve on our stitching. Thanks for taking us on this fantastic learning journey!!
Glad you’re enjoying it, Linda!
I find this process fascinating. I would love to learn goldwork but there are no classes available in my area – North Bucks UK.
Hi, Carol – A good book can always be a good instructor, too. It’s not quite the same as having someone on hand to answer questions, I know! But there are some really good ones out there that can help you through the process of learning goldwork. There are several listed in the “Books” section here on Needle ‘n Thread that I highly recommend if you’re going to try it out.
Also, you might consider contacting the Royal School of Needlework. They have some satellite classes, and maybe one of them is nearby.
~MC
I don’t know what impresses me more – your talent or your generosity in sharing your talent. And I don’t even do embroidery! Every morning I get real pleasure from reading your email. The photographs are an essay in themselves. Thank you and please know how appreciated you are.
Thanks, Kathy! 🙂
Totally fascinating! Thanks so much for the look inside.
I am absolutely loving this lesson on old needlework. Your email doesn’t arrive to me until midnight but I cannot go to bed until I’ve had my dose of Mary.
Thank you so much.
Aw, shucks, Julie! Thanks!
Ok, now go to bed and get some sleep! 🙂
Fascinating! I wonder if those domes were made for that, or if they were “recycled” If so, how modern! I’m amazed at the backing material…would never have guessed it would be like that. Thanks for sharing!
Hi, Jackie – I think they were definitely made for goldwork applications. I’ve seen them (and other “hammered” goldwork elements like them) on many, many old vestments. I don’t think they’re made anymore, though, unless by individual request to a metalsmith…
MC
This is so interesting, Mary, and I just appreciate your sharing the adventure with us. Absolutely fascinating the way this is constructed. Do you have any idea of the age of the piece or its origin?
Hi, Jo Ellen – No, no provenance-type information on it, whatsoever. I suspect the goldwork is older than the red ground fabric. I think the goldwork pieces were salvaged from another piece (or pieces) and added to a new (at the time) ground fabric. I suspect the red ground fabric is old as well – well, at least pre-1950’s, though not sure how old it is, either.
Hi Mary,
Your apologia brings up some good points, specifically how there are other better examples of this type of embroidery available and how taking it apart will garner more knowledge then leaving it intact. While it’s sad to loose even one specimen of embroidery, I think you’re going to unearth some techniques that the general embroidery public didn’t already know.
To that end, how many types of purl are used on the grapes? Is it normal purl purl and can you see how it was manufactured? Also it looks like yellow thread was used across the bunch. Is that true? Are you finding any evidence that the slips had been used before on another vestment and moved to this piece? Finally what is the providence of this vestment? Inquiring minds!
Thank you for sharing your explorations with us!
Alex
Hi, Alex –
The purl on top of the grape bunch is normal smooth purl, and very fine in size. There’s only one type of regular, smooth purl on the grape bunch itself. I’m not sure what you mean about “across the bunch” with the yellow thread. If you mean for padding the bunch (underneath the goldwork), no. The padding is not thread. What you’re seeing there is a woven bright gold-yellow fabric shot with gold. Yes, I think the slips came from another vestment (or from several different vestments) and were salvaged and applied to this vestment. Absolutely no provenance on the piece or the slips, I’m afraid…..
~MC
Mary, Fascinating! I love this idea of deconstructing a piece to learn. I have a habit of undoing something for learn. C’est un plaisir de lire votre message tous les matins.
Thanks Louise Québec
I like the grapes! I think that they are only creepy in this context because they aren’t so realistic looking and everything else is. I think they are pretty fun though.
But I have questions! What are the domes made of? Are they typically used in ecclesiastical pieces? Or we’re they something adapted for this specific purpose? Where would someone get them?
I also have a question about the garment. Do you know when it was made and where (even generally)?
This is bringing my museum stu dies classes back into perspective, but it is way more fun then they were!
Hi, Margo – Yes, I’ve seen these little domed “helmets” on many ecclesiastical pieces, for grapes and for “dots” in borders and so forth. I’ll discuss what they are (possibly) made of in the next article, and what I’m sure they’re not made of. I don’t think they’re available today for purchase. I’ve sought them out, but with no luck. A metal smith could probably fulfill a special order for them or something similar, though. No provenance on the vestment at all, I’m afraid! ~MC
When you first started to do this study, I thought what a shame to destroy this beautiful piece of craftsmanship. Then as I read along with it I became so enthused about how it was put together and now this has helped me to understand and appreciate the many hours it took to put this together. It also makes me stop and think how I want my designs to go together. I have learned so much from this deconstruction process. I can’t wait to see what’s next. Thank you for your patience and time its taking to do this series.
Hello Mary,
Thanks al lot, first, for the apology. I needed. After I read it, and I understood what your plan was, I couldn’t wait to read more. This project is fascinating, to say the least. More than ten years ago I tried to embroider a bunch of grapes on a canopy for the church. Lack of time and knowledge led me to do a flat work that everybody praise and that I hated.
Now, I will learn how-to-do this type of work. Looking forward to it.
Sal
How exciting to see the detailed work that you do!
Thanks!
I think this is fascinating — and I’m excited to see what you might do with all these little domes… they’d be pretty in another context. You’re not destroying, you’re recycling!
Thanks for such an interesting work!
Oh my gosh! You have turned this into something as interesting as a really great mystery book. I can hard wait to, so to sneaky, turn the page to find out what will happen next.
My questions: do you have any idea what the grapes are coated with to give them their gold color. Secondly, can you noe, or in the future, discuss how you would construct a similar piece?
Thanks
Hi, Sally – I think the process of construction will become clear as we take the rest of this apart, and I’ll sort of “reconstruct” the foundation in the next article. I’ll talk about the grapes and what they are (possibly) made of in the next article, too. ~MC
RE my previous comment…I would like to add a comment. I’m not sure predictive spelling is that much of a good thing. Mt apologies, I should have reread my comment
Really facinating, Mary! I’ve never done anything like this before, so your pictures and descriptions are very interesting.
Really wonderful. Thank you so much for sharing.
Totally fascinating! Your photography is superb. Thank you for such an educational series.
Glad the grapes are going first. I see from the comments that the domes are no longer available. Are they worth keeping for another project?
Some of them are, Irene. Some are not… As is always….
Gives one a good perspective on how things were done….to help us relearn the past in another way Thank You It is so interesting
Will any of the purl, spangles, or dots that you’re recovering be in good enough condition to reuse? I know gold does tarnish a little over time, so would these little bits and pieces be useful to replace bits missing or damaged on other old vestments, where new materials would stand out?
I was a child that loved to take things apart to see what made something work. I still have that inquisitive nature so this is fascinating. I didn’t care for the “grapes” much but think the domes would be attractive in a border or as a sun with embroidered rays coming from it. If the domes had been elongated like grapes I might have liked it more. They look gold plated as some have the gold rubbed off and some silver showing, then the copper color below that. I guess it was quicker than using satin stitch or some other filler stitch. Thank you again for sharing.
Thanks so much for doing these projects, I love learning about how the pieces are put together. Also, those grapes…they are just ugly.
I don’t read all the previous comments, so I’m nor aware of anyone making the same one as I am.
Is anyone going to learn from this experience going to reproduce it? Is there a need for doing something similar for a clerical vestment?
Hi, Velia – Whether reproducing the same exact thing, or working up something else using the same concepts, I think the techniques used for this type of high-relief goldwork can be translated into all kinds of embroidery projects, aside from clerical vestments. But yes, the same techniques can definitely be used on clerical vestments today, for those who do ecclesiastical embroidery and are trying to figure out how this type of stuff is done. ~MC
This post/series is better than a box of chocolates! Thankyou.
Dear Mary
I’m late today researching embroidering eggs, Anyway enough about me.
Wonderful article Mary fascinating It’s so interesting to see how garments of old were embroidered. The gold domes would make a lovely design shame they don’t make them anymore. It’s interesting to view the padding used in antique embroidery and why it was used. I wonder what discoveries you will unfold next, can’t wait! it’s like a good mystery. I’m sure William Morris would be proud of you!
Thanks for the time and effort you put into informing us of the various techniques used in embroidery.
Regards Anita Simmance
Well, if you wait a couple weeks on that first item, Anita, I should have something to share with you on that point. I like the gold domes, too, and wish I could get my hands on a few more of them. ~MC
I can’t wait embroidered eggs fascinating! I thinking of giving them a try, got to buy the Dremel drill and hardener. Annie Garcin eggs are so beautiful.
So that is how they did the metallic type grapes. I have always wondered. Thanks so much.
Hi Mary, Thanks for sharing this fascinating investigation. You said, “The fabric immediately beneath the dome is a herringbone-weave yellow fabric shot with gold.” Was that hand stitched? If so, why take so much time & then cover it all up? Looking forward to more progress reports. Melita
Hi, Melita – No, it’s a woven fabric. “Shot with gold” means that it has occasional gold threads woven into it. ~MC
Mary,
You mention that some of the grape domes are not worth saving. Have considered having them striped, polished and re-plated? There are still some Platers around and most Jewelers if they don’t plate know someone who does.
Hi, Suzanne – It’s not so much the gold that’s the problem, though some could use re-plating. The holes cut through to the edge. It’s just a couple of them, though.
Hi Mary,
I must say you are a true needlework detective. It is fascinating to see your work and explanations in this series. Thank you so much. Your website has so much variety, it s like a good book – can’t put it down.
Hi Mary,
Thankyou for this fantastically interesting excercise.I am enthralled. Keep up the good work of keeping history alive.
Well done.
Helen.
I’m interested in the glue backing—is it similar to the glue used in rozachi– a rice type glue I think. Apparently using this glue didn’t damage the piece at all–either the stitching or the fabric.
Re the paste, in Japanese embroidery we use a wheat paste that we make from wheat starch, thinly spread on the back of the embroidery. Since we make it ourselves it isn’t wet, or should not be.
When Mary did a big ecclesiastical commission a couple of years ago she talked about that. Apparently she said it wasn’t necessary. Since then, I’ve quit using the paste except on JE and so far has worked great. When I’ve taken embroideries apart for repair or reuse, the glue really is a mess and nuisance, didn’t seem to protect threads that well and made the repair harder.
My biggest hang-ups about wheat paste: 1. If you do have to do some repair for any reason, it’s a pain in the neck to work against; 2. in certain climates, bugs (such as silverfish and the like) can find it and eat it, and this can cause damage to the embroidery. I’ve only come across major bug damage once on an ecclesiastical piece that was carelessly stored. Most ecclesiastical pieces, if they are in use, are carefully stored, aired, and taken care of.
I am doing a little gold and silk and I am amazed by this piece. Those little gold hats are fantastic! I cannot imagine stitching this piece.
Hello again Mary,
Thank you for you answer! Speaking about the holes, they appear to be inconsistence with the rest of the construction of these metal pieces. The shape and the edge of these pieces seems well made (no sharp edges) where as the holes appear to be punched instead of drilled, with no attempt to de-burr?
Now to the flange, it seems odd as well. Like it’s a hindrance not a help, by making the Purl ride on top of it and not laying flat on the fabric. Not to mention only allowing it to be couched in four places.
I think I agree with you about those holes. I wonder if these weren’t originally intended to be sandwiched between fabric with the dome peeking through a hole? The flange would allow room for the reinforcement stitches or *very tiny* hem around the hole so the upper fabric would lay flatter. Or used more like shisha mirrors.
As to the construction, for some reason I’m thinking they were made by layering copper sheet with thin gold sheet and then pounding the bejeebers out of it until they hold together. Then, as earlier suggested, cut out and pounded or pressed into shape.
Hello Mary,
This is a magical journey, thanks for the insights…
Thank you Mary for de-constructing the grape cluster. There’s all sorts of vintage stuff out there if only we know what it is & how to use it! The little domes are easily recognizable. BTW–for your readers, RSN is running some classes around Easter, two of which include metal threads. They also publish a free monthly email newsletter. This month’s issue has several items on goldwork/metal thread that might be of interest. They do not use their email list for solicitation! Usual disclaimers, satisfied student etc. etc.
Mary,
This series is very interesting. Even though I like goldwork, on first look I found the piece overall unappealing. After reading the suggestions that the slips had been removed from something(s) else and reused, it made more sense to me why things didn’t seem to fit together so well. Have to agree with the comment above that the grapes would have been more attractive if they were oval rather than round. Have you thought of reusing the slips rather than pulling them apart?
Mary that is absolutely fantastic to be able to do what you are doing I haven’t tackled gold work yet it’s on my to do list. You are a real inspiration.
Fantastic detective work, Mary. What a surprise finding the yellow herringbone material. You’ve got me hooked on the next instalment.
Wow.
Hi, Mary, looking at the fabrics: the ground, red looks like a nice damask weave and looks to be good quality.
But, the herringbone gold fabric where the grapes were used looks a lot like cloth of gold. I have a piece that looks a lot like that from M. Perkins & co and is a new piece of fabric. Would you like a picture to compare? I have a piece I’ve been wondering if I could embroider on.
Love the deconstruction. Thanks, Anne
Hi, Anne – yes, would love to see it, to compare! This is a very “loose” weave of fabric, with larger threads. The cloth of gold that I’m familiar with is a much tighter weave, and the gold is more prevalent. But yes, send a photo, and we can compare! Curious – puts me in mind of a different theory…. ~MC
I so enjoy watching the deconstruction of these old pieces. It gives a window into the time of the stitcher. What he/she had to do to create this piece, what was available, etc. Now, I wonder why use the herringbone weave fabric shot with gold if it’s going to be covered with the domes, spangles and purl? I’d guess that fabric shot with gold in that day (as in this) would be somewhat expensive. Would it be any stronger than another fabric? Did the stitcher use it because they could? Because whoever commissioned it wanted “the finest of everything”? Also, I wonder if the gold thread used to stitch down the purl was thread or metal? I’m guessing thread because you said so, Mary, but I wonder at the rough edge of the pierced hole in the dome..wouldn’t the thread be cut by it? Of course, it could be that the dome and bunch of grapes it was attached to wouldn’t move, so no need to worry about that-I may have answered my own question 🙂
Hi mary, I have to tell you, I love when you do deconstructions like this (and I can absolutely understand why some find it creepy, its kind of got a weird vibe) I haveto ask, and this may be a dumb question, but are you sure those dome things are intended to be grapes? I only ask because when I fist saw the piece I assumed that the grapes were in fact some sort of seed pod, and then I was subsequently quite confused for a moment when you referred to grapes because I had not seen any! Also, what an interesting choice for ground fabric, any reason one would use a fabric shot through with gold? Considering it was not going to be seen it seems like a waste. Thanks for the fascinating read!
very interesting,
found a wonderful web site I want to share
http://heritageshoppe.com
embroidery stitche
sk
Hi Mary,
First, I just wanted to let you know how much I enjoy reading your daily notes and using your site. I am learning so much!
Secondly, about those little gold ‘helmets’ for the grape bunches. Having recently completed some metal classes in college, I’m betting the underlying metal is a thin copper sheet (jewelry grade). This is then ‘tempered’ w heat, cooled and placed over a mold, hammered with a jewelry hammer to shape. My bet is that the gold is added as gilding or heat applied like an enamel. The final process would be to snip the ‘helmets’ into individual pieces, file rough edges and pierce it with the needle holes.
Perhaps it is presumptuous of me, but I would keep the pieces that are not usable. If a project ever comes up where you want those sizes, someone at a college metal/jewelry studio could recreate them from the original piece. (This being probably the least expensive method of reproduction.) And that would be my suggestion to your readers for metal parts that are wanted for projects and the parts are no longer in fabrication. College art professors are pleased when students get ‘real world’ work and the project can usually be completed for the price of supplies and a per-determined labor fee. Final cost is much less that say, a jeweler or master metal worker, and everyone learns something.
Hope this is useful!
Cindy
Gracias es algo,maravilloso ver como esta construido el bordado,como personas de una epoca anterior sin tanta tecnologia han podido hacer cosas tan hermosas y poder entrar al fondo de su construcion.
This is so interesting! I keep wondering if you will find some religious relic hidden somewhere in the garment! 🙂
Thank you for this very informative blog. I was wondering if this was something done by some cloistered nuns hidden away in some convent, it must have taken a very long time to construct. 🙂
Hi Mary
I´m really enjoying your “dissection”- something I would otherwise never have the opportunity of viewing. So, thank you.
Those cups are fairly traditional here in Denmark on the gold and silverworked bonnet backs of traditional folk costume. Here is a picture of a traditional bonnet. http://www.broderibloggen.dk/2012/10/15/trine-sondergaard-udstiller-fantastiske-fotografier-af-huenakker-pa-martin-asbaek-gallery/
I have 1 of these little domes, and you have to pierce them yourself. As far as I know, they are not made any more. I tried contacting Benton and Johnson a couple of years ago, but they had no idea of what I was talking about
Thanks, Tania! Hmmmm…. Maybe I should send them some…
Mary, I just want to comment on how interesting and informative your website is! It definately feeds the soul of this lover of not only needlework, but the stories and history behind it. Thank you so much for sharing!
Question – Is there a logical reason why the maker used a herringbone with gold thread fabric as the foundation of the grapes just to have it hidden?? Would it be better to use a plain fabric and save the nice stuff for somewhere else???
Thanks Daniece Clark
Ms. Corbet, Good late morning address to your wonderful deconstructing goldwork??? Have your written this information into a book that we may buy?
No apology needed, this is what keeps the embroidery from this eras work alive and giving instruction to the amateur embroiderer.
My grandmother was a milliner as a bonded employee from 1905 to 1910. She paid off her bonded period and left after being told she must work another twenty years. She knew the law and was well aware of her own sewing, tatting, embroidery, weaving skills before entering the bonding period. Her work after that was with a company in Benton Harbor, MI, where she created hats until 1940. She left a number of hats, quilts, linen created after her death and I have often looked at the embroidery work on top of quilts, handkerchiefs
and baby clothes (of my mother’s 1922). What to do with them to preserve them so that they may be used in the future?
Thanks for my long and boring blog. Yet your work is beyond my expectation… Since receiving my eye sight reconstructed through surgery the sight of art is to me a wonder of wonders January 22, 2015. Respectfully, Mrs. ATK III
Truly fascinating. Wish I could get my hands on some domes like that!
Nice !
Sono molto curiosa per scoprirne il suo metodo antico .
Grazie sempre per la condivisioni !
I have some fabric used to make Royal evening wear I’ve had it for 30 years or more given to me by a couture dressmaker who worked for a Royal couture house, she told me that she couldn’t tell me which royal it was made for but within the fabrics is real gold threads on one, and real silver on another.
It’s probably worth a lot per metre I don’t know what to do with it, she gave it to me because I was a dollmaker . Not sure if you can help or if I m able to remove the gold and silver from fabrics?
Many thanks.
Hazel
Hi, Hazel – not sure if I can help, but I do know that if the gold and silver threads are part of the woven fabric, removing them will weaken the fabric’s structure.