


When I first started playing with lattice stitches as part of the Stitch Fun series of embroidery stitch tutorials, I was moving towards laced lattice stitches, because they’re a little more difficult to figure out than regular lattice work.
So, we mixed up the lattice stitch tutorials with a few tutorials on lacing regular stitches, remember?
Now, we’re going to combine the concept of lattice stitches and lacing stitches to produce a raised, detached filling that can be lacy, light, and lovely.

Laced lattice stitches offer a lot of leeway for experimentation – you can mix up thread types, colors, and lacing techniques to produce a variety of different effects with lattice fillings. You are limited only by your imagination here, so feel free to play about with laced lattice stitches and have a bit of Stitch Fun!
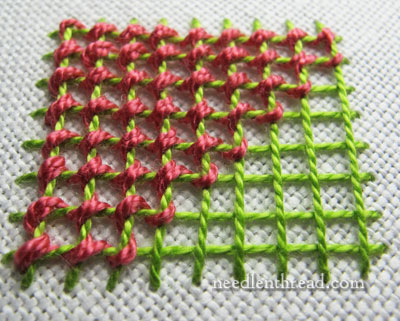
We’re going to look at two or three different laced lattice stitches, and this first one is the simplest. In the photo above, the pink stitches are laced in and out of the intersections formed by the laid stitches in the lattice. So let’s see how it’s done…
1. The Lattice Grid
First, you have to work up your lattice grid. We’ve already covered how to do this with other lattice stitches we’ve explored, so you’re already familiar with how easy this step is!
If you’re unsure of how to work the laid stitches for the grid, refer to the Stitch Fun article on Griffin Stitch, where you’ll find a photo tutorial on laying stitches for the initial lattice grid.

Stitch a lattice grid either on the diagonal or square – it doesn’t really matter. For practice, you’ll want a square grid, but you’ll be turning it on the diagonal to work the lacing.
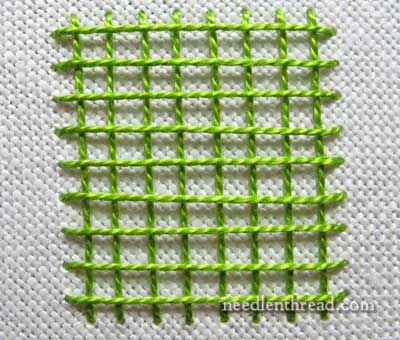
I stitched a more-or-less square grid on the diagonal of the fabric, but you can stitch yours with horizontal and vertical laid stitches that are parallel and perpendicular to the weave of your fabric, if you wish. Like I said, it doesn’t really matter.
What you want to end up with, no matter how you do it, is a grid of lines that are perpendicular to each other.
2. Understanding Lacing Rows
Once your grid is stitched, it’s time to start lacing! Before we move ahead, though, let’s look at what is meant by “row” when lacing in this particular manner.
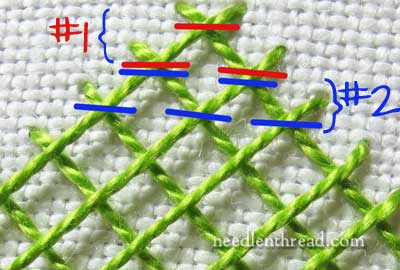
A “row” of lacing comprises all the intersections that line up with the side intersection where you begin stitching, plus all the intersections immediately above that line of intersections.
In the photo above, row #1 is in red, and it begins on the first red line farthest to the left, which is lower than the second red line. As the row progresses across to the right, you move up an intersection and then back down.
Row #2 in blue begins on the right, on the lowest stitch on the right, and progresses left, stepping up an intersection (shared with row #1) and then back down to the base of row #2.
So, each “row” is really made of up two rows of intersections, and you can see that row #1 in the photo above shares some intersections with row #2.
Sounds confusing? Never fear! Let’s work through it together.
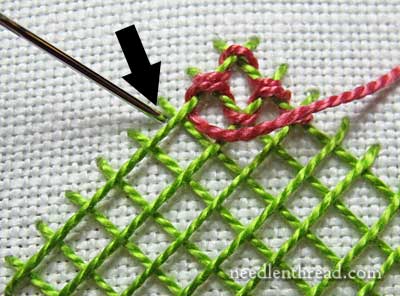
3. Lacing – 1st Row, Left to Right
We’ll work step by step through two rows, so you can see how the stitch works out.
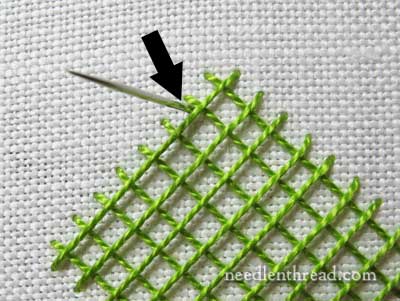
Turn your lattice so that you are working with the lattice lines running diagonally. It’s easier to work each row this way.
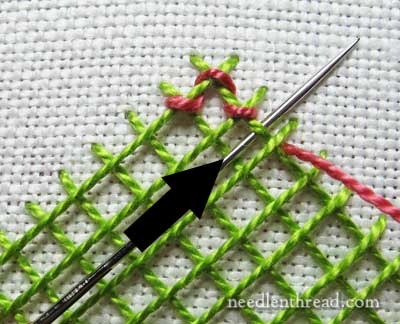
Bring your needle up in the fabric, just to the left of the second intersection down from the top, on the left side of the lattice. The arrow points to the place your needle should emerge for the first row.
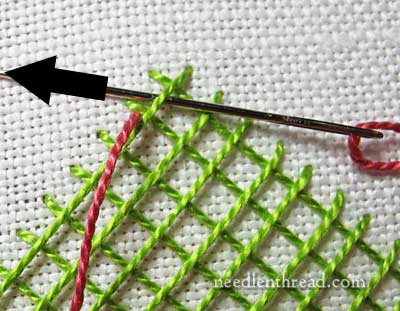
Crossing over the first intersection to the right of where you emerged, take the needle under the lattice as shown, without picking up any fabric.
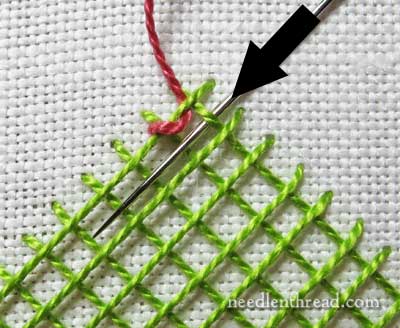
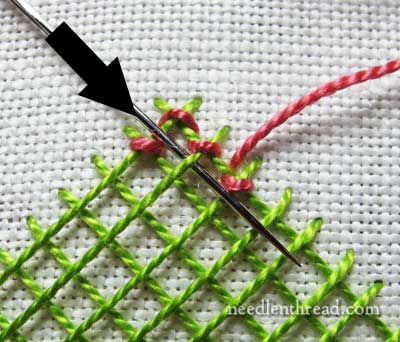
Now cross over the very top intersection on the grid, and bring the needle under the lattice as shown, without picking up any fabric.
Note: when passing under a lattice line, make sure you are only passing under one lattice line. If you pass under two, you’ll end up in the wrong place!
Now pass your needle over the last intersection in the row, over on the right, and go down into the fabric.
This ends row one! That was easy, right?
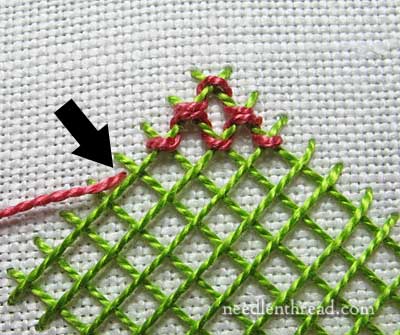
4. Lacing – 2nd Row, Right to Left
For row 2, we’re going to work back in the other direction, moving from right to left.
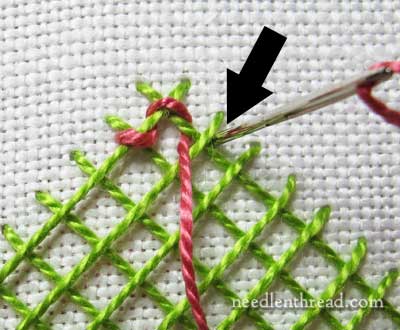
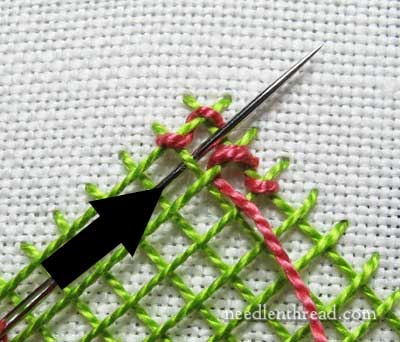
After completing row 1 and taking your needle to the back of the fabric, move down one intersection, and bring your needle up to the right of the intersection on the right side of the lattice, as shown in the photo above.
Cross over the intersection and pass the needle under the lattice line, as shown above, without taking up any fabric.
Now, pass over the next intersection to the left (which is shared with row 1), and take the needle underneath the lattice line, as shown in the photo above.
Tip: You’ll find that the stitch is worked the same, whether you are right or left handed. One direction of lacing will always be easier, though, depending on your dominant hand. If it helps, you can rotate your hoop in one direction or the other, to make it easier to pass the needle under the lattice lines.
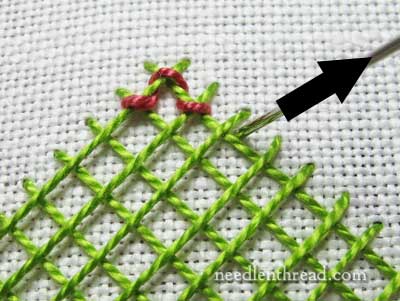
Now, move down to the next intersection on the left of your last pass, cross over it, and pass the needle up and under the lattice line, as shown. This step will take you back up to the intersection shared with row 1.
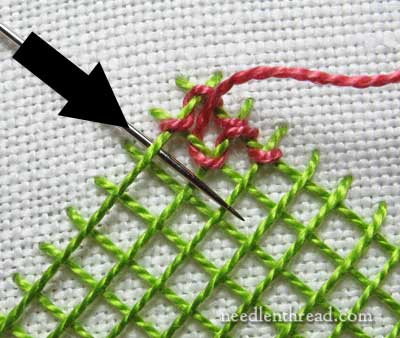
Cross over the intersection shared with row 1, and take the needle down and under the lattice line as shown. You’re now ready to cross over the last intersection in row 2, on the far left.
Cross over the last intersection in row 2 (which is beyond the last intersection on row 1, because the grid widens with each row), and take the needle down into the fabric right next to the intersection, to end row 2.
5. Beginning Row 3 & Repeats
Now, we’ll begin row 3, and then – the rest is easy!
To begin row 3, step down to the next intersection on the left, below the end of row 2.
And guess what happens now?
Right! Repeat!
The rest of the lacing is done by repeating the same movements in either row 1 or row 2, depending on which side of the grid you’re on. Each row will get a little longer as the grid widens out, but it matters not – just follow the same movements across the row, and you’ll end up with this:
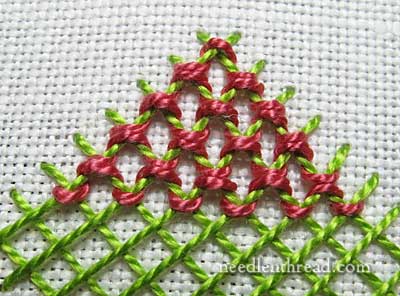
And eventually, that will turn into this:
And eventually, you’ll fill the whole grid.
Applications
This laced lattice stitch can be used anywhere you want to add a detached filling to your surface embroidery projects. It doesn’t have to be worked in a square shape, either, so if you want to add it to a lattice sampler, feel free!

Here, I’ve worked it in one of the little scrolls on this sampler – it’s the one on the right in the photo above. Instead of using a highly contrasting thread color, I used a slightly lighter shade of salmony-red, so the effect is subtle.
First and foremost, the job of the lacing is to hold the lattice stitches in place. You can use the same color thread as the lattice thread, if you don’t want any contrast. But if you want, you can mix up your colors all around – and your thread types – and really have fun with lacing your lattices!
Lattice Sampler Layout Guide
If you’d like to work up your own lattice sampler, you’ll love my Lattice Sampler Layout Guide, which will take you step-by-step through the Lattice Jumble Sampler, with tips and techniques along the way. Have some stitch fun, and mix up your favorite colors to create a unique sampler of your own!
Questions? Comments? Suggestions? Have your say below!
Stitch Fun is a series of embroidery stitch tutorials here on Needle ‘n Thread, where we explore different stitches just for the fun of it. If you’d like to participate in the series and work up your own sampler of stitches or learn how to apply some fun stitches to your current embroidery project, you’re most welcome to visit the Stitch Fun Index, where you can find links to all the tutorials in the series!
This is so clear, Mary!!!
Thanks so much. 😉
Dear Mary
Thanks for this tutorial on the laced Lattice stitch I love it, it’s such a pretty stitch and so diverse you could use it in various forms in needlework and I love the sampler and the scroll on the left with the French knots in the intersection is so pretty. I will definitely try this stitch on future projects. The photos and directions are lovely.
Regards Anita Simmance
Mary,
You have done it again, making a difficult looking stitch doable. Thanks for your tutorials and stories, nothing beats what you’re doing for the stitch world. I’m here every morning to see what adventure you’re on.
thanks, Janie
Love your website and daily lesson.
I wonder if I missed something? What size needle do you use in today’s lesson? I cannot find it listed in the directions. Perhaps is just something I should already know. Your needle seems longer than a #1 Milliners needle.
Another question: do you know what a Stole needle is and do you use it in any of your applications?
thank you, Rosemary
Hi Mary!! I know you’re very busy and I greatly appreciate all the work you do here, but I was just wondering if you still look at the “Ask and Share” section of this site, or if it’s not really used any more?
Did you increase the size of your pattern? If so by how much. I am just getting ready to trace and start the project. Thank you so much for your excellent instructions.
Hi Mary,
This looks lovely and very achieveable with your instructions, The only thing I can’t figure out from your photos is how you start the thread to lay the lattice in the first place. I can only see the thread coming up from behind, but no sign of how it is secured. I know you’ve shown various methods of securing a thread before, but I can’t work out how you do it with laying a lattice as there is no small anchoring stitch visible on the front anywhere.
Ah, you caught me on this one, Alison! I used a waste knot on top of the fabric, about 3″ away from where I started – it isn’t visible in the photos – and then, when finished, I clipped the knot, and threaded the resulting tail, and wrapped it under the threads on the back! Good question! Wish I had mentioned it in the post! 🙂 ~MC
Hi Mary, what a lovely post!
I’ve only done a teeny bit of embroidery before but I really appreciate how you explained everything so simply and clearly with photos and drawings.
I absolutely hate it when you are trying to follow directions of any kind and they jump around from here to there without any explanation of where they are or what’s coming next, but I digress…
I’m going to bookmark your site. I think I might have just found myself a new hobby to take up. 🙂
OMG this is beautiful! I can’t wait to try it out!
Lindo trabalho!!!! Perfeito tutorial!!!
Obrigada por ensinar estes trabalhos maravilhosos!!!
Com carinho,
Jane Lopes
Muchas gracias por su publicacion en g+
I have noticed on pininterest that there is a series of the books above. Where can I buy them and what is the cost of them in Australian dollars.
Thank you Linda
Hi, Linda – the book on the lattice stitches from the Stitch Fun series is this one: http://shop.needlenthread.com/product/lattice-jumble-sampler-guide it’s basically a layout and sampler guide for playing around with lattice fillings and other stitches. It’s an ebook. You can find the rest of the Stitch Fun tutorials here: https://needlenthread.wpengine.com/2012/05/stitch-play-index.html That’s a list of stitch tutorials here on Needle ‘n Thread that are free, and that take you step by step through a variety of different, fun embroidery stitches. Most of the lattice stitches are there, too.
Esta precioso y muy explicado el bordado! ¡Felicidades!
Son muy hermosas las imágenes de los artesanias que ustedes realizan felicitaciones y si me interesa por que tengo un grupos muy bueno para poder intentar hacerlo.
Thank you so much for sharing your accumulated knowledge. I first learned to embroider when I was about 4 yrs old but it fell to the wayside as many things do. Fast forward to the year 2016. I am now almost 62 yrs old and about a month ago, I decided that I wanted to once again pick up needle and threads, oh those beautiful threads!, to start stitching. Your clear, concise and yes, fun instructions are a pleasure to learn from. Once again, thank you.
muy hermoso pero que uso se le da
excelente explicación. Muchas gracias
El trabajo está divino