


Continuing with this series on deconstructing goldwork embroidery, today we’re looking at the wheat!
I love little heads of golden wheat in embroidery. For some reason (maybe because I live in Kansas?), I’m always drawn to them. It’s amazing how many ways wheat can be rendered in embroidery!
Wheat is a prevalent element in ecclesiastical embroidery, so it isn’t surprising to find it featured on a vestment like the one we’re studying these days.
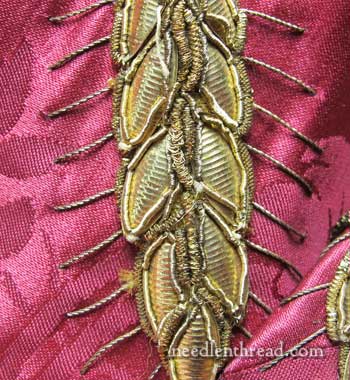
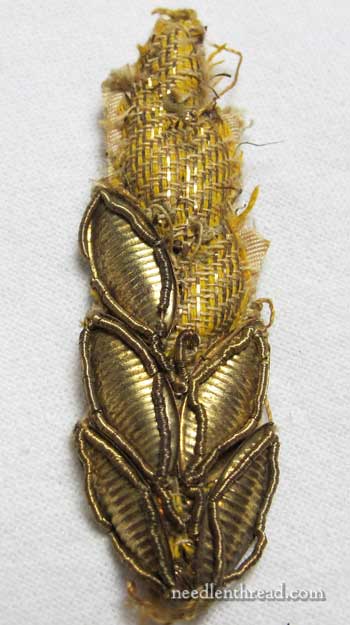
This particular head of wheat is worked in padded goldwork, with the wheat berries made of hard shells of gold, much like the goldwork grapes that we deconstructed a while back.
The whole wheat head is just short of 3 inches long and at its widest, just short of an inch wide.
I have to admit, as far as wheat in embroidery is concerned, this probably isn’t my favorite rendition. There’s something about the beard (those spiky hairs) and the hard ribbed shells that bring to mind bugs and bug-related things.
From far away, which is how ecclesiastical embroidery is meant to be viewed, they’re fine. But up close, the shells remind me of beetles and the hairy spikelets remind me of bugs’ legs. Like a centipede, for example. Eeew.
That being said (and if you’re bug-o-phobic, and I’ve ruined your morning, I do apologize!), I find the actual goldwork elements themselves and the way they were put together, interesting.
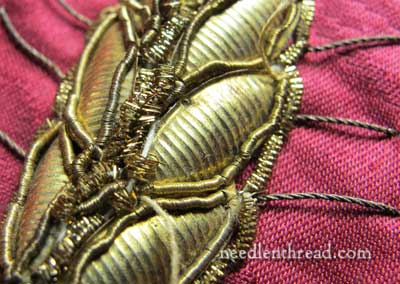
You can see the goldwork plates that make up the wheat berries very close here. They are lightly ribbed (though a few are smooth), with a turned up lip, and are sewn onto the foundation through pierced holes in the very edge of the plate.
To cover the edge of the individual goldwork wheat berries, all around that turned up lip, we can see smooth purl encircling each. Then, filling in all the spaces between the wheat berries, we have that bright check bullion that outlines the piece as well.
Shooting out from the wheat head, forming the “beard” of the wheat, are little spikelets of stiff gold twist.
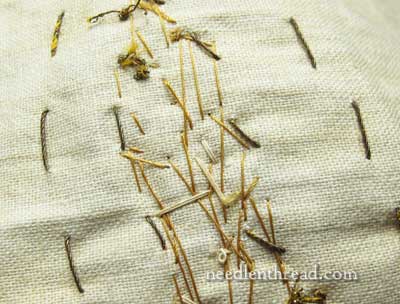
On the back of the whole piece, you can see that the wheat head is appliquéd to the ground, just as all the other elements have been.
The spikelets made from the stiff gold twist pass through the layers of fabric and are stitched on like a regular thread.
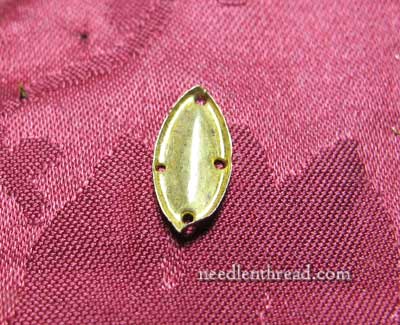
Here, we have one shell. The reason this particular shell caught my eye is because it is smooth. Most of the shells are ribbed, but on some of the heads of wheat – not all! – the wheat berry at the very tip of the head of wheat is made with a smooth shell.
Once I began removing the goldwork elements on the wheat head, things started looking very familiar. In fact, this is constructed just like the bunch of goldwork grapes we already explored.
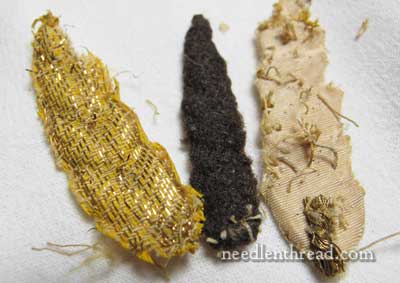
There are four layers to the whole wheat head foundation. From right to left, you have the yellow fabric shot with gold, the thick felt padding that feels like boiled wool, and the ground fabric (which is backed by a piece of very fine linen).
Note again the stub of twist that is cut at the base of the ground fabric on the right. As we discussed when examining the goldwork rose, this points to the goldwork elements being salvaged from another (older) vestment and applied to this (not as old) vestment.
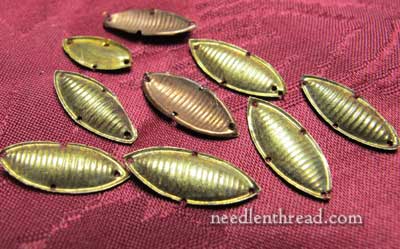
And here we have all the shells! You can see the copper on the backside of the shells (the two upside-down ones), and in the back there, the smooth shell stands out a bit, too.
The holes on these plates are uneven and very rough. If I were to pierce the plates with a stiletto, the resulting holes would probably look about the same.
So that’s the head of wheat! Up next, we will begin deconstructing the large focal element on the vestment, the lamb on the book. It will be interesting to study the construction of the goldwork lamb, because it is built up in so many layers with the book underneath. We’ll look at that soon!
Questions? Any thoughts or ideas strike you as we move through these different elements? Feel free to share them below!
If you’d like to read the backstory on this project of Deconstructing Goldwork, check out the Deconstructing Goldwork Index, where you’ll find all the articles related to this listed chronologically.
Fascinating, thanks. With all the media coverage of the papacy recently, I looked at the robes with new eyes!
Hmm, I see what you mean by beetles and bugs, but to me they look like pasta shells!
Yes!! I agree – I didn’t see that until you mentioned it! Funny!!
in the first photo I see bugs, in the second photo, pasta shells.
Dear Mary
Eeew! it certainly looks like a beetle or some bug related insect especially with the spiked legs. I notice there isn’t a card foundation is it lifted like the other elements? I like the shells, shined up they could be used in other embroidery projects. Similar to the other pieces it is very interesting how this was put together and transferred onto the vestment from a previous piece. Thanks for de constructing the piece and sharing this with us.
Regards Anita Simmance
Hi, Mary, Do you think you will reuse those gold shells in another project sometime? And do you think you will ever be able to figure out the age and geographic origin of the elements that were reused here? I’m really curious.
Hi, Phyllis – At this time, I don’t have any plans for the goldwork pieces that are salvaged from the vestment. As for the date and age of the original goldwork embroidery, I don’t know, really. I’ve seen pieces that have similar elements on them that were made in the 1800’s, and even some that were made earlier, though I doubt the original goldwork on this piece would be any older than mid to late 1800’s, and perhaps even early 1900’s. But I don’t really know and have no real way to find out anything about the provenance of the piece I have now, or the goldwork elements on it. ~MC
What I find interesting about this slip is the way gold work behaves on a garment over the years. It proves no matter how carefully you sew down and support it – like the hard metal shells – smooth purl is very prone to “breaking” if attached anywhere in it’s middle. Also, where the check purl is on top of the wheat head it has completely lost it’s shape. But, where protected, by the metal shells on the side, it has retained all the little angles that give it such shine.
Seeing how goldwork on a garment has behaved over the years is vary valuable when planning layout for wearable goldwork.
Mary, when I see these beautiful works of art I just have to sigh! Why don’t I have the energy to make these things? I love to sew and have been for well over 40 years. I just dream of being able to make something like this.
Thank you for sharing these things with us. 🙂 “sigh!”
I was really amused by the comments about the bugs. I don’t remember where; however, on a website that sold embroidery things they had beetle shells for sale. Some were covered in gold, some were left unpainted and naturally iridescent. They were really beautiful and reported to be very hard. The site showed an embroidery piece where they had been used and it was gorgeous.
Like you, I like wheat in goldwork. I saw a picture of some marvelous wheat from a RNS presentation. I would like to see that picture again.