


Did you know you can completely change the look and the function of an embroidery stitch by either lacing it or whipping around it with another thread? Well, you can! There are all kinds of embroidery stitches that can either laced or whipped, and the effects you can achieve with the stitches vary, depending on what type of thread you use, what colors you choose, and so forth.
So let’s play with some stitches and have a bit of fun with lacing and whipping. Then, next time you’re dabbling about with your embroidery stitches, try these techniques out to see what new combinations you can come up with!
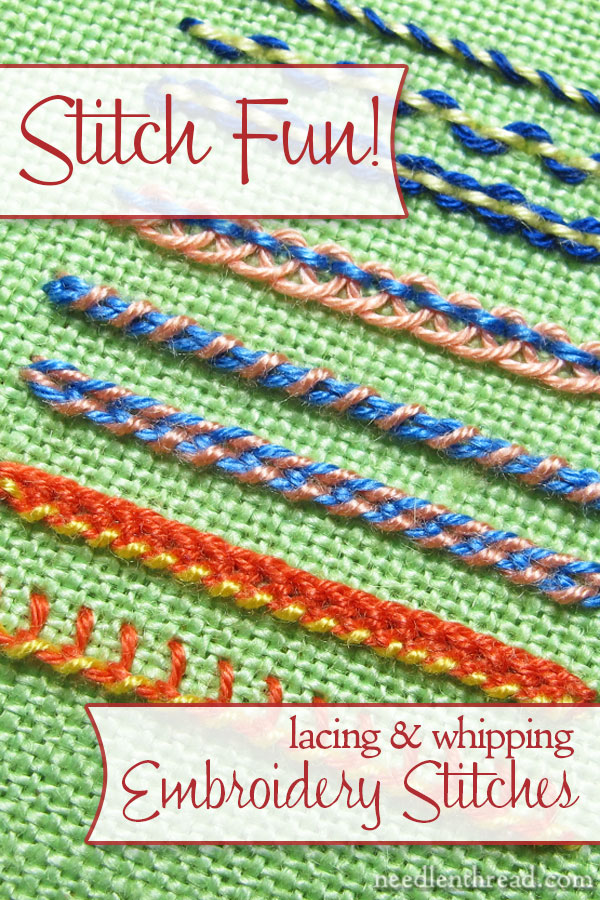
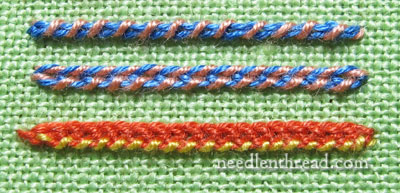
Here’s a tiny little sampler of lines of laced and whipped stitches.
The difference between lacing a stitch and whipping a stitch can probably best be explained by directing you to two different videos: one for the laced backstitch and one for the whipped backstitch.
When you lace a stitch, you’re alternating the direction from which you pass under the foundation stitch, but when you whip a line of stitches, you always pass under the stitches from the same direction.
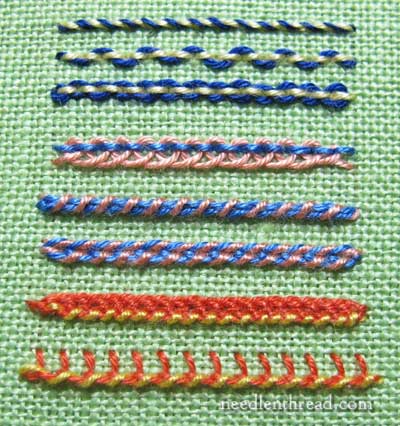
The little sampler above is worked with DMC coton a broder 25 on 36 count linen.
When stitching the foundation stitches in a line of stitches that will be laced or whipped – whether it be backstitch, chain stitch, running stitch, stem stitch, buttonhole stitch (really, any stitch you want to whip or lace) – you can use a regular crewel or embroidery needle with a sharp point. When it comes to actually lacing or whipping the line of stitches, though, you should switch to a tapestry needle that has a blunt tip, so that you don’t snag the foundation stitches.
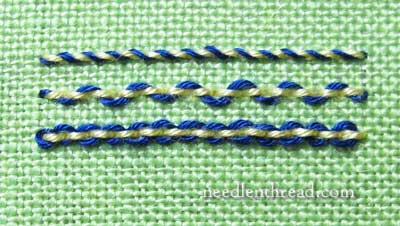
The first three rows in the wee sampler are pretty basic. They all have a backstitch foundation (in yellow). The top line is whipped (the needle passes under each backstitch from the same direction).
The second line is laced in one pass, from left to right, going down under the first backstitch, up under the second, down under the third, and so forth.
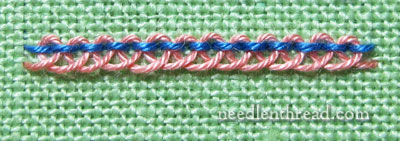
The third row is laced in two passes – the first, traveling from left to right, and the second pass returns along the line from right to left. This double lacing in the last line of stitches forms a little line of “rings” around the backstitch.
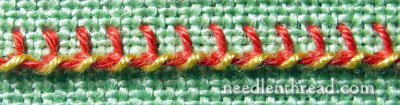
This line of stitches is the Pekinese stitch, which is essentially backstitch, laced in a forward-two-back-one movement. The Pekinese stitch video will show you how this is done.
The purpose of including the Pekinese stitch here is to show you how lacing morphs a stitch into a completely new stitch.
Following the Pekinese stitch, we have three lines that involve chain stitch and variations. We’re going to talk about those a little more in-depth later, to focus on the different effects you can achieve lacing and whipping chain stitches, chain stitch variations, and braid-type stitches. You can do so much with these types of stitches, that it’s worth looking at them more in-depth.
The last line of stitches on the little sampler is the buttonhole stitch. Whipping the buttonhole stitch adds more dimension to its already rope-like edge.
And there you have some basic stitches that you can either whip or lace, and, in doing so, end up with a completely different look to the stitch. There are plenty of other embroidery stitches that can be whipped and laced – it’s just a matter of playing around with them, to see what you can come up with.
Don’t be shy about using these types of stitches in your embroidery projects! Though they might seem simple and Not Quite Sophisticated, the fact is, whipped and laced stitches are a great way to add variety and texture to your embroidery. You can use the techniques in crewel work, in whitework, and pretty much any surface embroidery endeavor.
I hope you’ll take some time to play around with whipped and laced stitches, and that next time you’re looking for a stitch for a project, you’ll consider adding a laced or whipped variety, just for the fun of it!
More on the topic, specifically with chain stitch, chain stitch variations, and braid stitches later.
Enjoy your day! Hope you can squeeze in a little time for some stitch fun!
Stitch Fun is a series of stitching tutorials here on Needle ‘n Thread, where we explore different types of embroidery stitches just for the fun of it. If you’d like the peruse some of the other tutorials in the Stitch Fun series, feel free to stop by and visit the Stitch Fun index, where you’ll find links to all the tutorials!
G’day there Mary,
Well, I didn’t realise there was an definite difference between whipping and lacing. That’s so interesting. Thank you.
You might be on your way to the wedding now, although we’re ahead of you so maybe tomorrow. Anyway, safe and happy travels.
Cheers, Kath.
Dear Mary
What a pretty sampler, I love it when you show different techniques on simple stitches, it changes the whole look of the stitch. At the moment the project I’m working is all split stitch which can become tedious, but on my next project I want to change and use a variety of stitches and your sampler has given me ideas.
Thanks
Regards Anita Simmance
Love seeing the stitches on the sampler. I just prepared linen to begin my very first stitch sampler the other day. I ironed it, sewed a zigzag stitch around it, then drew on fine lines(with what I thought was water-disappearing ink) and set it aside for after work. When I went to get started–the lines were gone. I must’ve used the wrong type pen! 🙂 So I’m going for the no. 2 lead pencil this time (after rereading transfer methods here). Had to pass along this URL for anyone who might be interested. A Ukraine iconographer who embroiders her icons–amazing!! Best, C.
http://www.orthodoxartsjournal.org/the-unusual-glass-bead-icons-of-angelika-artemenko/
So, so beautiful. Angelika’s ‘work’ is precious. Am pleased you shared. Kath.
hi..i’ve just discovered your site and just have to compliment and thank you for your generousity! i haven’t stitched for about 30 years and have returned. your videos are so clear and easy to follow that i now stitich in front of the computer!
i’m thrilled to have your help! thank you again and again..lucia
Great column! Love it.