


Dang! Sometimes, stitching is frustrating!
It’s true! But I figure if everything we did with a needle and thread were easy, if every stitch we took and every project we tackled turned out perfect at the first go, would we really love needlework as much? Would we really love the satisfactory finish as much? Would we really relish the triumph of finishing well something that was challenging?
Probably not. It’d be a lot like living on vacation the rest of your life. Sounds great, but if you never have to work, where’s the fun in a vacation? Where’s the anticipation? Where’s the blissful regret at the conclusion?
I’m saying all this to convince myself, and to console myself over my recent fight with Hungarian braided chain stitch. It was a beautiful brawl! I’m not sure yet who won.
Last week’s Stitch Glitch explored how to start and stop the Hungarian braided chain stitch when switching threads; this week, we’re exploring at how to join a circle invisibly.
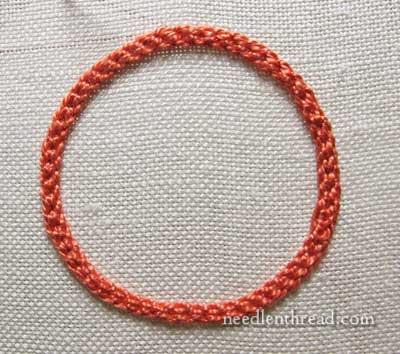
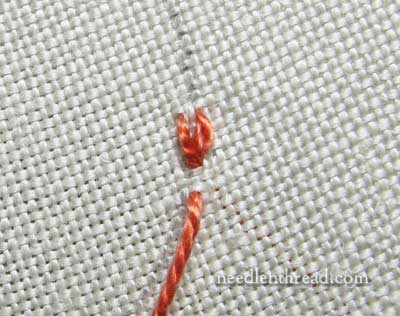
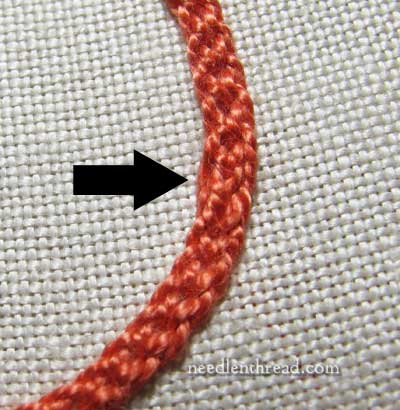
This really should not have been as complicated as it was. And chances are, if you sit down and concentrate on creating a circle with Hungarian braided chain stitch, you will probably come up with a better way to make the join invisible. In fact, in the photo above, the join isn’t quite invisible – but more on that later. It looks like I chewed on part of the circle, doesn’t it? Well, I almost did!
The concept here works, but you have to be careful with your stitch gauge as you come close to the join.
So, what we’re going to look at today is how to match up the beginning of a line of Hungarian braided chain stitch with the end of the line, whether it’s on a circle or any other shape where the front end and the back end of the line run into each other.
After 9 attempts, I came up with two ways to make the join. This is one of them – and I thought it was the easier one until I saw the photos.
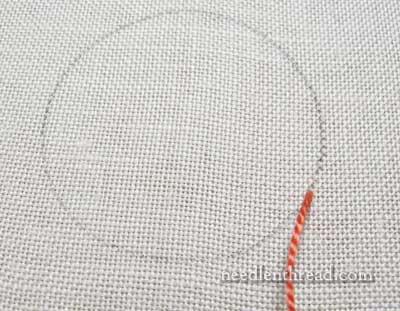
It’s always better to start stitching a circle away from the apex of it, as far as the design is concerned. I know you’re thinking that there’s no “apex” on a circle. And by golly, you’re right! But if you see how the circle is situated in your design, don’t start at the top of the circle, as far as the rest of the design is concerned. Start on the lower left or the lower right.
Why? Because the eye will naturally go to the “top” of a shape. Think of a circular frame hanging on your wall. Or think of a round clock face hanging on your wall. If there’s a small chink in the frame or the edge of the face of the clock, it will be a lot less noticeable if it’s located down around 4 o’clock or 7 o’clock on the circle, than if it were located at High Noon. At High Noon, it will glare at you and become a crater. At 4 or 7, it will just look like a small chink in the frame.
So, bring your thread up at 4:00 o’clock or 7:00 o’clock on your circle, and start there.
Normally, with Hungarian braided chain stitch, we start with a small straight stitch and a reversed chain stitch. But for this whole lovely Join-a-Circle thing, we’re going to start by making a small “v” in the fabric, which represents our first chain stitch. Think of it as a broken chain stitch.
So, pick up just a tiny bit of the fabric at the design line, as shown above.
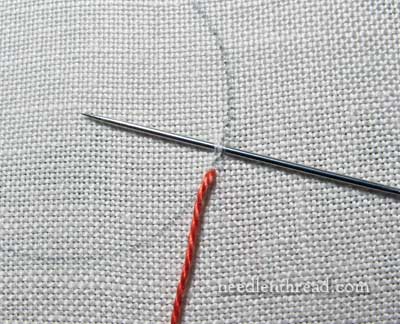
Pull the thread through and take the needle back down where you came up the first time in the fabric.
There’s the little “v.” Bring your thread up a little ways below this stitch, to start your second chain stitch.
Make the second (broken) chain stitch just like you made the first one, picking up just a little bit of the fabric right above the top of the first (broken) chain stitch.
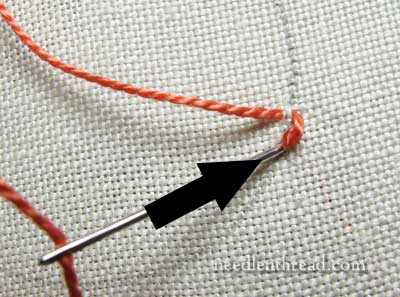
And then go back down into the fabric where this second broken chain stitch began.
(Saying “broken chain stitch” sounds so sad. It’s like a broken heart! Don’t worry, little stitch! We’ll make you whole again!)
And now – whew! – just start the whole Hungarian braided chain stitch sequence as normal, using those two incomplete not-quite-whole chain stitches as the first two chains in the line.
When you get to this point, feel free to flub up the join as many times as you wish and start over again, just so that we can form a sympathetic bond.
No, but seriously, when you come nigh the beginning of the line, slow down a bit. If you’re off on your stitch gauge (that is, you’re going too long or too short with your stitches), things get weird.
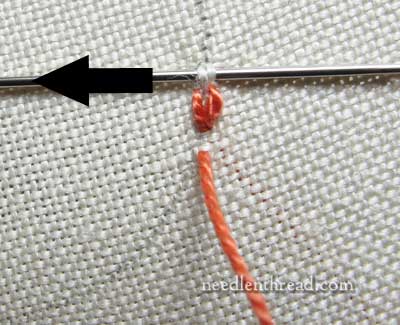
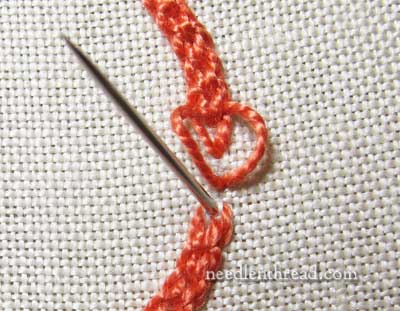
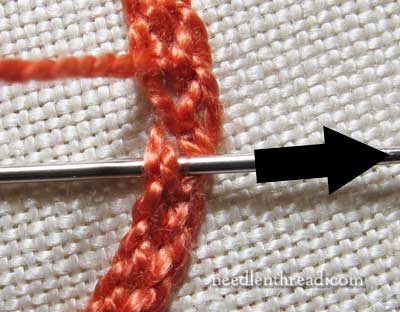
The stitch in the photo above looks like it should be the second to the last stitch, but it’s actually not. I’m getting ready to take the second to the second to the last stitch. That is, once I take this stitch that I’m positioned for, where I thought I had only one more stitch to take, I actually had two more.
Notice that I’m bringing my needle up inside the top of the “v” formed by the second broken chain stitch we made at the beginning of the circle. Note: The stitch would work out better (and of course it would make more sense) if you brought your needle up further into that open “v” – but without going into the inside open “v”. Get it? In other words, I should’ve been at least another fabric thread into that whole stitch area when I came up.
And I think that is the problem in this whole sequence, but I didn’t actually see what the problem was until I saw the pictures and studied them.
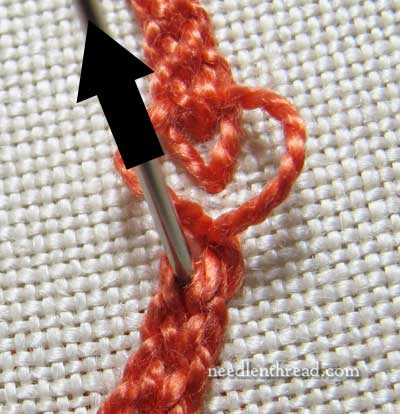
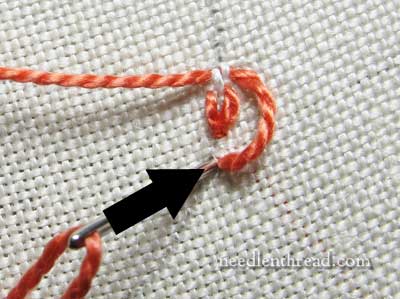
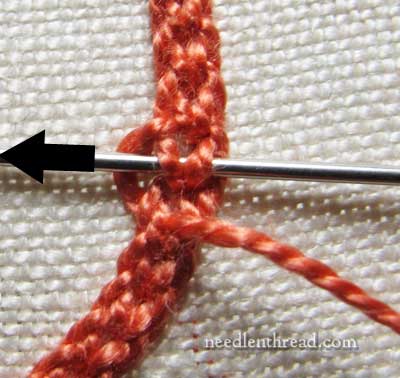
Now, bring your needle up inside the inside little “v” (the very first broken chain stitch we made in this whole fiasco). You want to be really inside that area, right in the middle of the two arms of the “v.”
And don’t do anything else until you read ahead! This is where things get tricky.
Pull your thread through, so that it has come up right in the middle of that little inside “v”.
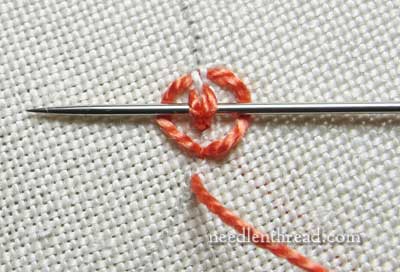
Now, take your needle down underneath the sides of the two broken chain stitches, without picking up any fabric, passing out from under them towards the right.
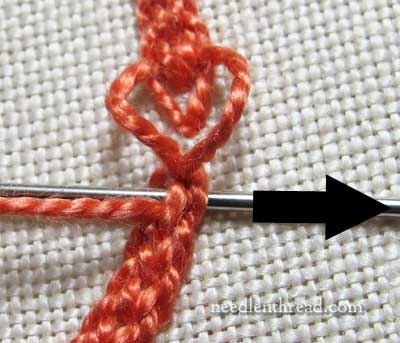
Then take the next stitch forward, going underneath the inside chain on the previous stitch, just as you normally would.
Then bring the needle from the left, up underneath the left sides of the two broken chain stitches and back up in the middle of that inside broken chain stitch. Don’t pick up any fabric here.
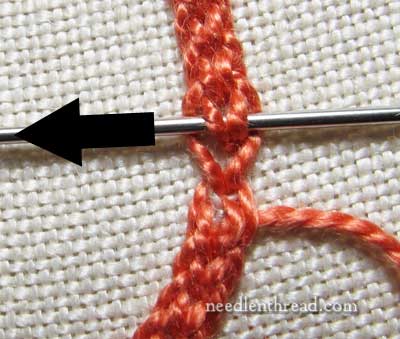
And now, from your position in the middle of that open chain stitch, take one more “normal” stitch forward, over the outside arms and under the inside chain stitch in the stitch above.
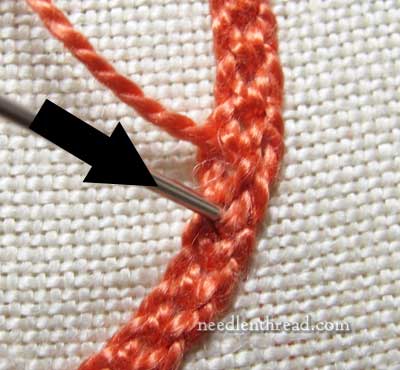
And take the needle back down into the middle of that very first open chain stitch that we ever made (which is where your thread is coming out still, anyway.
It got a little hairy in here, and you can see that the outside twisted “arm” on the left is somewhat elongated and flattened, as if it were steamrolled.
But it’s the right movement, and the threads are interlocking the correct way. I think what happened is that the thread got a little muddled from working with it, and lost some of its twist, and that’s why those outside stitches look smooth and flattened.
In any case, that’s one way of joining the threads.
I’m thinking that if the second to the second to the last stitch were moved further into the first stitches, you could actually eliminate that last stitch. I’ll test it.
Another option is to leave a good five or six inch “tail” at the beginning of your circle – with the first thread – and try to make the join by unstitching the first little straight stitch in the line, and stitching with the beginning thread for those last couple stitches. I did try that, but I muddled it. I’ll try it again and photograph it this time. Maybe it will turn out an easier, clearer option.
This option, though, isn’t that difficult – you just have to make sure that you go over and under the right stitches right at the end.
Here’s your challenge: if you’re playing about with stitches this weekend, try this! Maybe you can find an even easier way to make an invisible join with the Hungarian braided chain stitch. And then let me know if you did it – if you have a blog, maybe you could blog it! Or you could send me a photo and explain how you did it.
In any case, I’m going to tackle it again, just for kicks. I love a good fight with a stitch.
Enjoy your weekend!
Stitch Glitch is a series here on Needle ‘n Thread where we explore difficulties with particular stitches and try to solve the problems we run into with them. You can find other articles in the Stitch Glitch series listed here.
Dear Mary
Thanks for this I often get into a right stitch glitch with my embroidery and I’m always striving for perfection even though I very rarely achieve it. I haven’t tried the Hungarian Chain Stitch yet and the join looks quite complicated, but than I like a challenge in fact I find needlework tests me to the limit but I carry on in the hope that I will achieve greatness one day perhaps!
Regards Anita Simmance
Hi, Mary. I have been reading your blog for several years now, and always enjoy learning new things from you. I love the new things that you added, Stitch Play, and Stitch Glitch being two of them. I wonder if it is possible to have these posts incorporated into an ebook that could be downloaded as a PDF file. I would like to have them available in one spot that I could access easily, and print out when needed. I am not very good at remembering where I saw something, and rarely take the time to go back and try to find it again. But I want to be able to go back and refer to the things you have posted. They are wonderful!!
Thanks for the time and effort you put into your blog. It is very much appreciated, and inspires me to continue on. Sandi
Thanks, Sandi – it’s a thought! I’d like to build up the collection of tutorials a bit before venturing into an e-book. Fact is, it takes a lot of time to write a good e-book, and it’s not always worth the effort, I’m afraid. Most folks tend towards the “If I can get it for free, why would I pay for it?” mentality. But to put the time into preparing it, there would have to be at least some kind of financial return, because – well, it’s a lot of time and effort! So it’s a tricky balance – but we shall see! I’ll definitely keep the suggestion in mind! Thanks again! ~Mary
When I first saw the photo, I thought, “What a beautiful circle, so perfect.” Then I read your text about the join looking chewed on. I had to go back and look for it. Hmm, wait, maybe that little fuzzy spot is what she means. I think you did a great job. And my rule is: stand back 3 feet. If you can’t see it from there, it’s fine. My work generally won’t even hold up to the 3 foot rule if someone has good eyesight but that’s OK. Most of my friends are old now. LOL
Whew, you weren’t kidding. That is complicated — and yet, I can see that the over/unders are correct. THANK YOU so much for sweating through that! I feel a lot more confident about trying it again.
Thanks for these! Very, very helpful.
It’s lovely!!! I wish you a very nice weekend.
Mary que buena pelea pero muy dulce,un desafio…
quien gano? usted,,con tanta practica resuelve mejor estos retos ,,un buen acabado es fundamental
buen fin de semana,, aun me queda un poco de verano
gracias
¡Gané! 🙂 Pero voy a trabajar un poco más para que se vea mejor!
Hummm…hummmm…hummm… Muito obrigada!
Um abraço!
Egléa
I couldn’t resist having a go at making a seamless join in HBC for myself – at least in theory. I’ve just put the results on Flickr here:
http://www.flickr.com/photos/suetortoise/8520618981/in/photostream
(And also posted the diagram on my Stitching Fingers page.)
It needs a little bit of sewing cotton or similar to make a couple of starting stitches, which are pulled out when the joining begins. That way, there are no starting or finishing stitches left in the circle afterwards – each stitch is an identical loop.
Hi, Sue – Thanks for that! I did the same thing – worked it out on paper first! I didn’t think of using an extra thread to start it. That’s a good idea. The “split” in the broken chain is the same concept, but I like the idea of having the whole stitch there. I’ll try it this way! ~MC
Oh, Sue Jones, that is too funny. I also took up the challenge — and the solution I tried is the same! See my diagram (not as good as yours) on my flickr page: http://www.flickr.com/photos/93768486@N08/8521131921/
I haven’t tried it in real life yet…
Hi, Sarah – your photo is set to private! I’d love to see your diagram! ~MC
Ack! Sorry. Here’s an updated link. http://www.flickr.com/photos/93768486@N08/8521422961/in/photostream
Thank you for your tutorials, Mary. What you say about the eBook of tutorials is correct – your time and expertise has a value and you diminish these by not charging. And as you say, it will take you a lot of time to prepare the book.
Another option is to have the book digitally printed – so you only print off a few copies at a time. The unit cost is higher but you are not left with boxes of unsold stock.
My personal preference is to order a printed book rather than having to print off pages of an eBook.
However, you could offer both options at 2 different prices.
Thank you so much for this very clear tutorial. Twelve years after you wrote it, your instructions have rescued my project from growing a very unsightly bulge.
Yay!! I’m so glad to hear that!!