


Last time we looked at the Mission Rose project, the two large leaves were finished. Though still suffering a little bit of an internal debate over them, I decided to move on to the little leaves on the rest of the design.
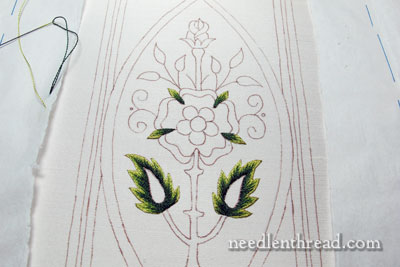
The small leaves that are inset around the center rose are worked in long & short stitch in the same colors as the two large leaves, so there’s nothing too new there.
Those little leaves inset in the rose are irregular in shape, and the best way to attack them is to start on the outside of the leaf shape with a split stitch line (worked only along the exposed part of the little leaves, outside the rose shape), and then work the long & short stitch from light to dark into the center. You can see all four of them completed in the photo above. They’re really quite small and only take a few minutes to stitch.
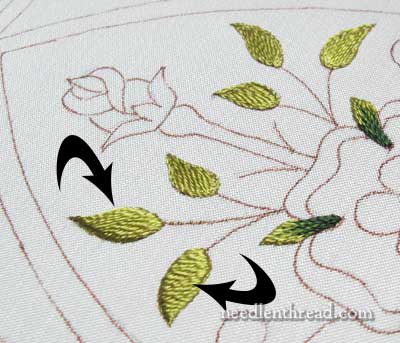
More problematic in my mind were the little leaves above the rose, arranged in two groups of three.
These, I wanted a single color of green (the lightest green of the three I’ve used so far). Instead of working them in long & short stitch, I opted for padded satin stitch. Slightly lifting the satin stitch, I mused, would give a little sense of dimension to the leaves due to the shadow created by the height, without actually shading them with another color of green.
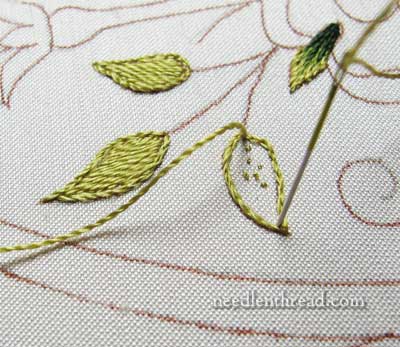
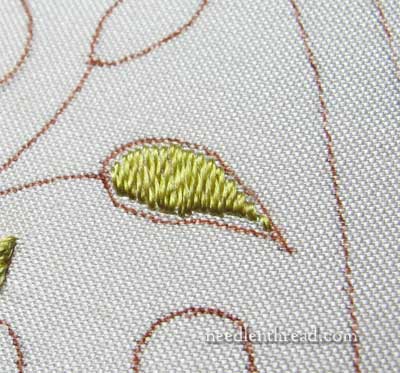
To pad the satin stitch on these leaves, I started with an outline of split stitch, and then worked long straight stitches inside the outline, down the length of the leaves.
To conserve thread and to minimize build-up on the back of the leaves, I didn’t use satin stitch proper for these filling stitches. Instead, I used a “laid thread” stitch, working a long stitch and then jumping sideways to start the next long stitch right next to where the first one ended.
In this manner, you can get a good coverage with the filling, but on the back of the leaf, you don’t have another layer of thread as you would if using a regular satin stitch for the filling.
So here are all the leaves, outlined and filled with straight stitches.
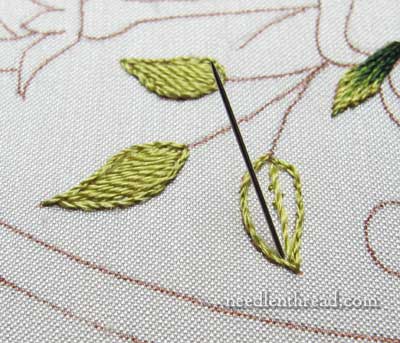
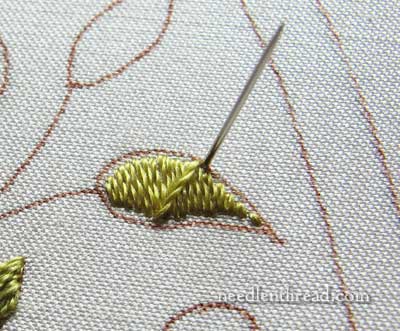
And it seems that all should go fine from here, right? Just a matter of working the satin stitch over the outline, right?
But ….
You can see in the photo above two of the leaves, satin stitched. They’re “ok” – the satin stitching worked out fine enough, but I wasn’t really satisfied with the height of the leaves.
The outline and filling created a raised satin stitch, certainly, but I wanted a little more roundness to the leaves – a little more height to create more of a shadow and a sense of dimension.
And so, out came all the outlining and padding, and I started over, this time foregoing an outline altogether, and beginning the filling stitches well within the perimeter of the leaf.
I worked the padding in one direction, and then over it again at a slight angle, until I had two layers of padding build up inside the drawn leaf.
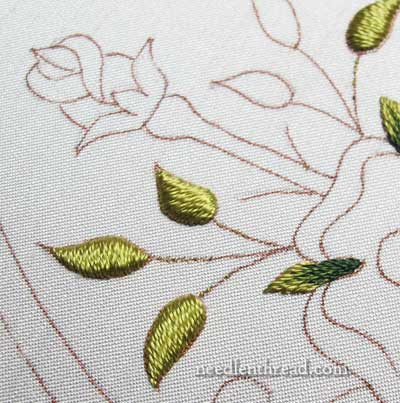
Finally, I worked a third layer – the satin stitch proper – at an angle over these two built-up layers of padding, and I was much happier with the results.
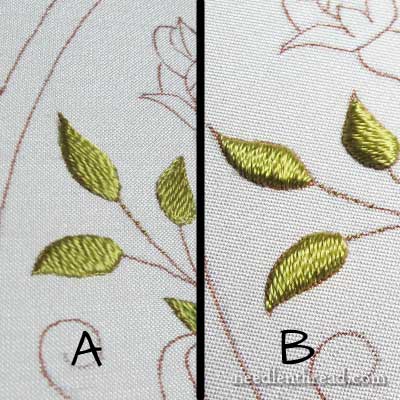
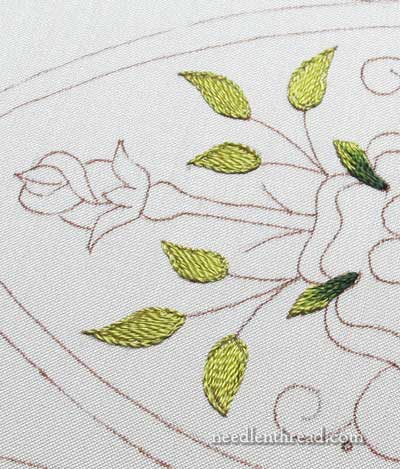
Here, you can see the difference between the two approaches to padding the leaves. The rounded height of the padding (B) produced more “lift” than the outline and single layer of padding stitches (A), resulting in more of a shadow on the edges of the finished leaves.
Two more little leaves to finish, and then I’ll show you the whole piece with all the green in place next time we look at the project.
…. Assuming, of course, I don’t make change my mind again. Who knows? The leaves could be purple by then!
If you’d like to read the backstory on the Mission Rose project and follow it along step-by-step as it develops, please visit the Mission Rose Project Index, where you’ll find all the articles relating to this project listed in chronological order.
Good Morning Mary,
Thank you so much for today’s workshop. The difference in technique is stunning. Seeing them next to each other is a great tool for comparing them thanks again. The shadow and highlights of your second work make the leaves come to life, and they still maintain a graceful position.
Both versions are very nice but I am particial to the plump, rounded style of padding and love the way the silk appears to be different shades due to the reflected light. I’m enjoying this project already and you haven’t even got to the fun bits yet!
In your deconstructing goldwork articles, you discovered many layers of padding under the final stitching. Why did you choose in this project to pad with stitches other than the felt layers in the goldwork piece. Is time the deciding factor and it is quicker to stitch the padding? What goes into the decision of what type of padding to use?
Thanks,
Deb
Whoops – just answered a similar question from Jennifer. With goldwork, the gold thread is heavy enough to work over felt padding – fuzzies are not an issue, and neither are tacking stitches. With satin stitch, especially with finer threads but pretty much with any thread, felt would be problematic because of the fuzzier nature of felt, because the tacking stitches make dents in the felt, and so forth. Plus, felt in these smaller spaces would be fiddly to work with. -MC
Mary,
What a difference with your second choice of stitching! The rounded height really does lend a special dimension to the leaves. Thanks for sharing photos on the steps for both A to B and why you changed your mind on technique. And, giggle giggle, thanks also for giving me encouragement to pull out all of the stitches to “start over” and “make it better”!
Hi Mary,
Interesting comparison! Would you get an even more pronounced effect if you padded with felt? Or would felt just be a different way to get the same effect?
Normally, when you pad under satin stitch and similar stitches, you use thread or string of some sort. Felt has fuzzies, and they would interfere with the satin stitch. Plus, on a tiny space like this, it would be extremely fiddly to cut and tack pieces of felt. Plus, the tacking stitches would interfere with the smooth finish you want to see with a satin stitch. -MC
Very interesting, Mary. You can really see the difference between the two styles. Thanks for sharing!
Question: On the second leaves, second attempt, did you do the first 2 padding satin stitches like you did before, as laid stitches? or complete satin stitch? That would be 3 layers of satin stitch (3 top, 3 back)?
You could do them either way, Kay. You’ll keep the bulk off the back if you work them as laid threads. ~MC
Hi Mary, hope you’re well.
What makes you decide on when to use the “laid thread stitch” instead of the proper satin stitch? Is it only for the economy of thread? Can we always use the first one?
Hi, Seraphima – laying the threads rather than doing satin stitch proper (which crosses over the space on the back) keeps the bulk off the back of the fabric, which is normally what you want when padding stitches. However, when doing the final layer, the satin stitch is preferred, because when laying threads (coming up for the next stitch right next to where you went down), you don’t get the same angle of entry into the fabric, and it’s more difficult to keep the stitches perfectly situated right next to each other, as happens with satin stitch. That small space acts as a separator, because the thread isn’t pulling down the length of the stitch, but rather across from the last stitch. ~MC
Hi Mary,
A question today. Are you going to be outlining these leaves? (This is the reason I can never have anyone look at my WIP’s; they inevitably will ask these questions when I am mid-process and then look at me with that half-pitying, half apologetic look as though they’ve noticed something I’ve missed! Sorry.) Today, you may sign me,
That person!
Denise in Palm Desert
Hi, Denise! Of course!! That’s why the outlines are still visible hither and yon. They will be covered completely with a gold thread. ~MC
Question: why did you eliminate the split stitch outline around the second, more padded leaf??
Hi, Bobbi – because I wanted a “heap” (for lack of a better word) in the middle, rather than a sharp edge. So it goes from pretty much flat on the edge to rounded in the middle, if that makes sense. -MC
Dear Mary,
Thank you very much for showing us the way you have padded and stitched these leaves as it really shows the silk thread’s sheen beautifully.
G’day there Mary,
Coming in late has its advantages. I get the questions I didn’t know I wanted to know, answered before I thought of them! Thanks peoples for your insight and attentiveness to the blackboard.
The first attempt is really lovely, but, the final is way beautifuller. The light play on them is fabulous. Don’t you dare change your mind…whoops, sorry, forgot I was talking to the one who…well, just who IS! Cheers, Kath