


“Reverse stitching” – i.e. ripping out previously stitched areas – is ever a part of the embroidery process.
Mentally, I prepare myself for the frustrations of picking out stitches by convincing myself that it really is just part of the process. Looking at it that way, I can then convince myself to actually enjoy it as part of the whole Embroidery Journey.
Yep. Sometimes, we just have to play mind games!
In any case, after my first escapade with the second leaf on the Mission Rose project, I decided to take the leaf out and start over. And this is how it went:
The first step – removing the first attempt. This is the back of the project, which you can see is lined with linen. I always find it much easier to pick solidly stitched areas out from the back of the fabric, rather than from the front.
To pick out this type of stitching, it’s practically impossible to go thread by thread, so I snip the back of the stitches, sliding a sharp, tiny scissor blade underneath them, working in a small area at a time, getting out the bulk of the thread. I also occasionally use a tiny seam ripper, if I can’t get the right angle with scissor blades.
When going through this part of the process of snipping, it’s really important not to send the scissor blade or the seam ripper straight through the fabric (for obvious reasons!).
Still snipping and picking….
At the beginning of the whole snipping & picking process, I use my fingers to pull out the initial threads, which usually release pretty easily.
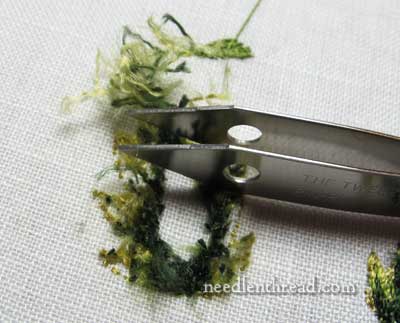
Then, as the stitches become a bit more stubborn, I break out the Big Tools. Tweezers are the tool of choice at this point. I love this little pair – they’re about 2″ long and they fit right between my finger and thumb. They come to a point, but they aren’t sharp.

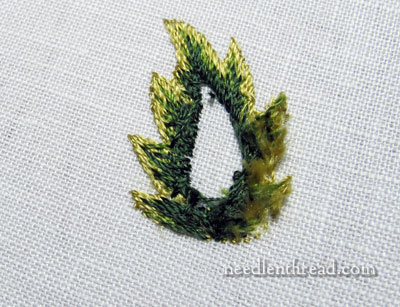
Here’s the front of the fabric, with the leaf removed. It held up pretty well!
When you start picking out this type of silk thread, it’s not unusual for fuzzies to develop. To remove any fuzzy residue, I tap the sticky side of Scotch tape over the surface the fabric, front and back.
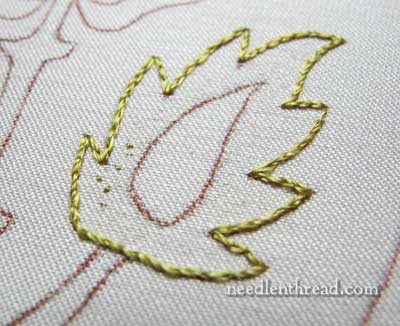
And now, back in with the split stitch outline in the lightest green. This is the same process I used when embroidering the first leaf on the Mission Rose.
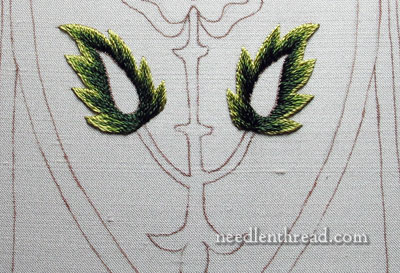
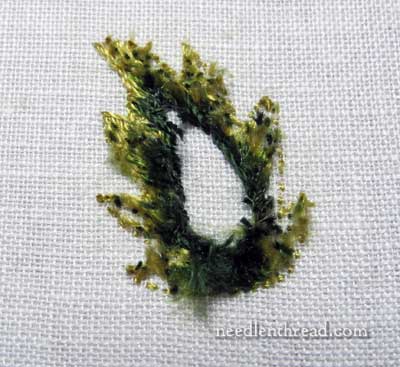
And then the second leaf is in again. I like it better this time.
I’ve been mulling over the leaves all weekend. Are they too dark? My “vision” for them was that they are dark green leaves over all. But now I’m second guessing that, and I’m also second guessing my plans for the interior of the leaves. Hmmmmm….
Well, there’s nothing for it, really. I’ll move forward, and as I go, we’ll see if Inspiration strikes. Sometimes, that’s just the way these things happen.
Next time we look at the Mission Rose, we’ll check out the little leaves inset in the rose, and the small leaves at the top of the design. Look for that discussion on Friday!
If you’d like to read the backstory on the Mission Rose project and follow it along step-by-step as it develops, please visit the Mission Rose Project Index, where you’ll find all the articles relating to this project listed in chronological order.
Hi Mary. Just a quick note of reassurance about your lraves. I, too, thought the green might be a little dark but after seeing the second balancing leaf go in, I think you’re right on track. I believe when you put the goldwork in the center the dark green will make the leaf appear very dimensional as you intended. Also, since the leaves are at the base they would be more shaded as well. Remember, we’re looking over your shoulder and are privy to your process but, in the end, the product is always spectacular!
I think you’ll have to stitch the inside of the leaves before you decide whether it looks good or not. It looks pretty strange with the hole in the middle, so it will be difficult to decide without finishing the leaves.
Mary
Your leaves are beautiful. Love the colour choices, can’t wait to see what you do in the middles.
Dear Mary
I think the leaves are lovely and I like the contrast of light and dark. I think once the goldwork is in the centre of the leaves this will compliment the light and dark of the leaves. I looke forward to your prsi progress on this project.
Regards Anita Simmance
con su permiso voy a tomar la flor tudor para hacer un accesorio…
Hi Mary,
I love the look of your re-stitched leaves. Thing 1 and Thing 2 have been put back in the box. I don’t think they are too dark, but I must confess that they remind me of very dramatic eyes. I’m sure that once the rest of the design fills they will just look like beautiful leaves because the goldwork will act as a balancer. I’m not sure why they look like eyes, maybe it’s because the dark green is so very dramatic. I can’t wait to see what they look like with the addition of the goldwork and then against the other colors in the design.
Hi Mary,
I love the symmetry of the leaves. I think the dark grenn gives the lighter contrasting shade a lustrous look. I am curious about your tweezer tool have you discussed this one? I like how it angles.
I am getting to be quite a plucker and am interested in the types of tools that are gentle on the ground fabric. Thanks for showing your process.
Mary,
Could you tell me/us the brand/type of those tweezers? I need some small bluntish ones for ‘frogging’ – I’ve gone through the ground when doing it one too many times.
Mary, your website continues to amaze me. I just finished taking stitches out of my leaf. I am now consoled to know I am not the only one. I also just read this on your first attempt page.
“On some types of embroidery, interruptions don’t matter, but for me, on this type of embroidery, I need time to concentrate, to get a good stitching rhythm going, and to work towards a smooth, coherent image. I never do well with long and short stitch when I’m starting and stopping and starting and stopping.”
That’s exactly what happened to me. Interruptions. Well,it’s Friday night and all is quiet, so I will start again. Thanks for the encouragement. 🙂