


Last time we looked at the Mission Rose project, I was musing over threads and colors for the stem, which really should be called more of a branch. Perhaps even a trunk…
Keep in mind that this is a stylized rose. That is, it’s not a natural representation of a rose. It does not look like a rose that we would find in nature, and yet, there are characteristics of it that correspond to the rose, and so, it is a rose, but it is a stylized rose.
My job job here is not really to make it look like a real rose. If that were the case, the rose itself would be vastly different, and – oh! – those Dr. Seuss “mitts” that are supposed to be leaves would have been eliminated from the start.
All that, by way of making excuses for the brown branch.
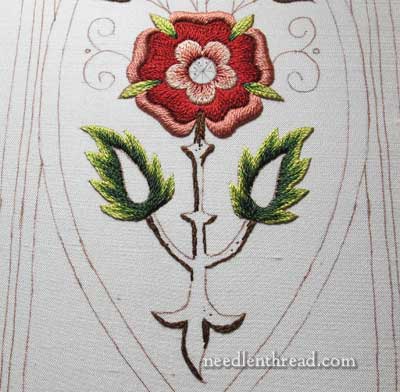
I mused over the color the branch. I thought about green. I laid out green threads on the fabric and did some coloring on paper. But I knew green wouldn’t do it for me. Greens made the piece look somewhat frosty, especially against the pale pink background. Brown-greens looked muddy and made the leaves look garish. And so, I determined to use browns as planned.
Now, the branch is technically worked in long and short stitch, but I fudged a bit on the approach, and used a combination of regular split stitch lines with long and short stitch for the bulk of the filling.
I started by taking the darkest brown and working with split stitch in the areas that I wanted dark-dark.
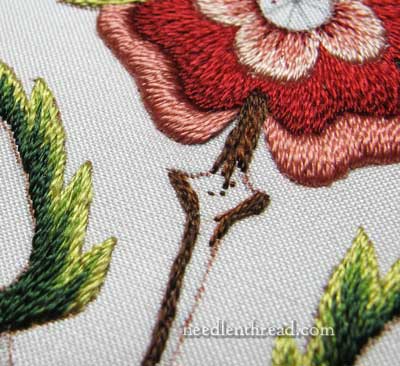
Then, I went back with a medium-dark brown and started filling in here and there with that, working down the branch from the rose.
Then I cut in some of the medium brown and lighter brown as I progressed down the branch, working all the shades alternately, here and there, in a kind of sketchy manner.
When doing something like this, it’s helpful to have all the colors you’re working with threaded up in individual needles, all of which can be parked and taken up whenever you want to switch shades.
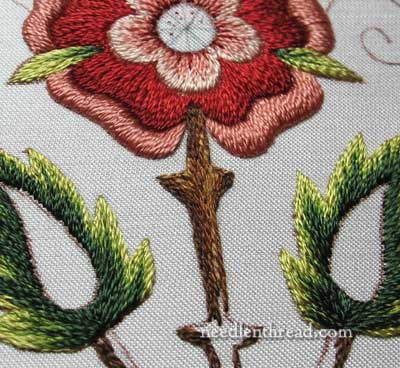
Altogether, I used four shades of brown – a very dark brown, a medium-dark brown, a medium brown, and a medium-light brown. The color numbers in Soie d’Alger are 4123, 4546, 4545, and 4516.
I’m glad I used the Soie d’Alger (which is a spun stranded silk with a soft sheen) as opposed to the Soie de Paris (a filament silk with a higher sheen). The difference between the two silks not only adds a slightly different texture, but it adds a little more life to the piece. If the entire piece were worked in the same silk (the Soie de Paris), I think it would have looked a little “flat.” Additionally, I’m happy with the brown stem. Brown calms the piece down and makes it warm. I think it works well on the soft pink background, too.
Once the stem is finished, on to the bud, which will be the last bit of silk embroidery on the piece. And then…. well, we’ll just have to wait and see!
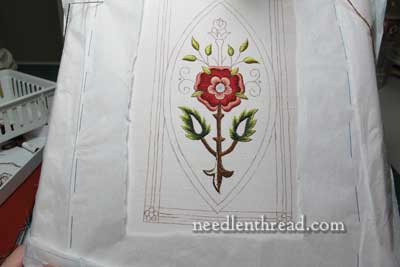
If you’d like to read the backstory and follow along with the development of the Mission Rose project, you’ll find all the articles in this series listed in chronological order in the Mission Rose Project Index.
I know I have no color sense when it comes to choosing but I agree with all your reasoning for choosing the brown. It fits in without overpowering it. If you had used green, it would have looked like too much green. And the brown seems to “center” it. It has a dark anchor in the center, brightens out to the green leaves and then voila – the star of the show, the rose. I do like it. I’m waiting to see what you do with the rosebud. I realized one day that the shape reminds me of that old comic strip “The Little King.” Probably before your time. But I will be glad when you turn it into a rose.
LOL! Well, I’m not sure it’ll get any better, Irene! I was thinking about ermine on the “turn overs”! 🙂
Dear Mary
I do like the brown it really blends in with the reds and the pinks and I think more green would have been to much and as you say it’s a stylised rose not a real representation of a rose. I can’t wait to see what you do with the bud and the centre in the rose and the leaves. I do like the embroidery so far and thanks for showing us the step by step techniques on this project.
Regards Anita Simmance
Thanks, Anita! The bud is not too far away! -MC
I think it looks wonderful. I like your choices of colour. have a great one.
The brown turned out to be a great choice, Mary. It’s a nice foil to all the green, and it definitely brings your eye up the composition and brings it around in a circle. And you make a great point about stylistic design. Plus you’ve picked some great shades of brown. There’s one shade especially that looks like it has a lot of red in the brown dye, that at least on the screen monitor, and it really complements the pink and red rose. It’s really looking great!
May I ask you a technical question about “parking your threads”? I first heard this term in the Vintage Garden Strawberries Class with Margaret Cobleigh, but I was unsuccessful in adopting it. I tended to accidentally get a thread tangled up in my stitching and then having to go back and rip out a section to get rid of a mass of threads. I’ve been starting and ending threads as usual instead of parking them as suggested, because of this. How do you do this so you don’t end up with a mess? It does seem handy to know how, as evidenced by your stem…
Well, Sheila, that is a very good question. I’ve never actually gone into the whole thread parking thing in detail, but I will! I’ll see if I can take some photos and explain how I do it. I’m sure stitchers who do park several threads at a time have their favorite ways, and I’ve never really thought about it too deeply, but I’ll work something up for you! ~MC
Oh! I would be so grateful if you were to do a lesson on this. I can be a regular klutz sometimes when it comes to tangling my threads. There must be a trick to it. Working from the top down? Bottom, up? Do you leave your thread on the top? The thread seems like it’s always in the way.
I’ve only done parking with cross stitch. So easy since you complete each cross as you go across a neat row. As you switch off colors, you just park the needle/thread till you come to it again. I’ve never done any huge patterns though this way. I’ve seen pictures of loads of threads hanging there. That scares me too much.
I’d love to see how parking the needle works with embroidery.
I LIKE it! Lookin’ good, Mary!
Mary! I’m sure you meant Mission Rose – not Misson Rose! Pointing it out only because I plan to later look it up again. The project is really pulling together with the stem/twig! taking shape and color. What do you have planned for the outside diamond border? It is very stylized, really in step with the overall design. It looks so beautiful. Did you call them Dr. Seuss Mitts? Ha! Well, that’s a bit of a stretch! What will go into their centers?
Rrrrgh. Whoops! Thanks for pointing it out, Laura – I will fix it!
The outside border is coming……. The inset areas are the next step, once all the silk is done. And the mitts (they really do remind me of hands on a Dr. Seuss character!) – I have some ideas brewing, but will have to test a few options before getting to that point. They’ll most likely be gold of some sort. ~MC
Like the browns you chose.
I meant to add, what are you going to do with the Dr. Suess leaves? They bother me every time I check on this project. Sorry but honest.
Ut oh! Would have made a difference if I had never mentioned Dr. Seuss? 🙂 The center of the leaves will be filled – I haven’t actually decided how, yet. I have some ideas I want to test. -MC
its beautiful.
Hi Mary,
Thank you for the information. I will try to contact the EGA in regards to this matter.
Thank You
Ann Hilliard
Un logro maravilloso,cada puntada perfecta,la armonia de color es muy hermoso su trabajo ,gracias