


Last week, we delved into the fun of creating fluffy stitches by examining Victorian Tufting, a technique involving layers of herringbone stitch which are cut and then fluffed up to create a dimensional pile on the embroidery surface.
Today, just for the fun of it, let’s look at another fluffy stitch. This one is called velvet stitch, and although it’s more often seen in canvas work, it can also be used in surface embroidery.
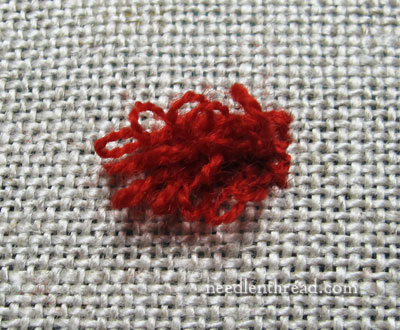
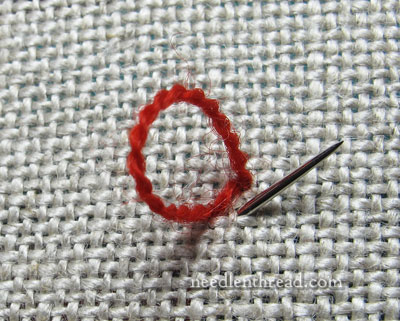
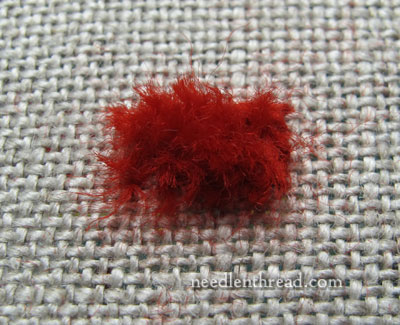
This is the velvet stitch, before the resulting loops of thread are cut. When comparing velvet stitch to Turkey work and Victorian tufting, the velvet stitch is more complex. And although velvet stitch isn’t really my go-to stitch when I want something fluffy on my embroidery surface, it’s still worth knowing.
So, let’s look at how it’s done…
For this tutorial, I’m using 32 count linen and one strand of Fine d’Aubusson wool thread, with a tapestry needle. Velvet stitch is easier to work on an even-weave fabric, although it can also be worked on plain weave. It just takes a little more concentration on plain weave.
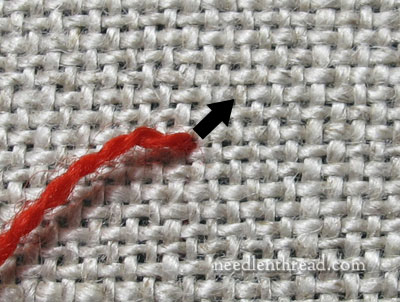
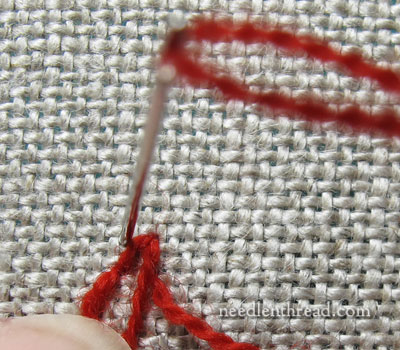
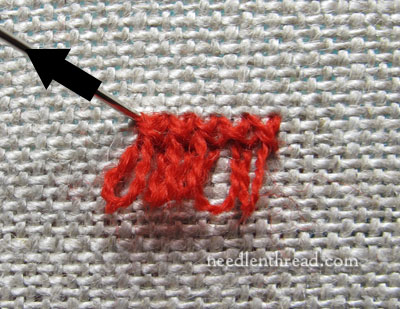
Bring the thread to the surface in the lower left of the area you want to fill. Velvet stitch involves a kind of cross stitch, so we’ll begin the stitch by taking the first part of the stitch from lower left to upper right, in the direction of the arrow indicated in the photo above.
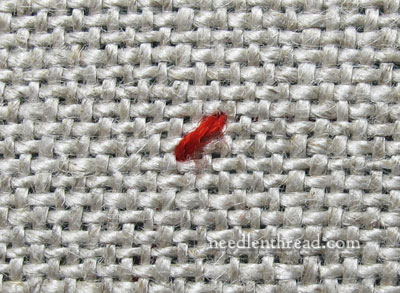
And there’s the first part of the stitch – a straight diagonal stitch taken from lower left to upper right. Not too complex so far! As with any stitch, if you take it one step at a time, you’ll overcome any complexities!

The next step of the stitch is to bring the needle to the front again in the same hole where the stitch began, so you’ll have to nudge the thread aside to come up right next to it in the same hole.
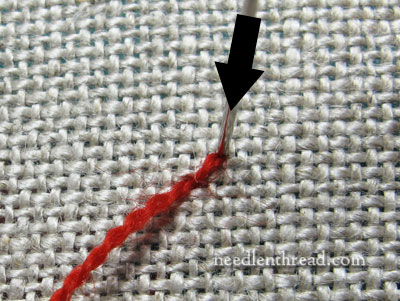
Now, head back down into the same hole, upper right, where the first diagonal part of the stitch ended. Pull the needle and thread through most of the way, but not all the way! Pull through until you’ve left a loop that’s the length of the pile you want to create.
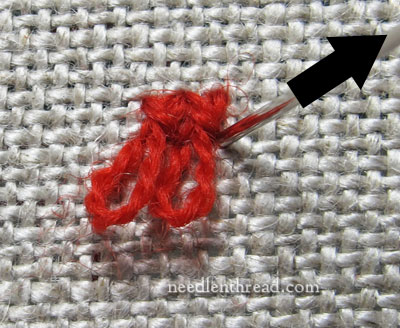
Leaving a loop from this last movement of the stitch on the surface of the fabric, bring the needle to the front of the fabric directly below the end of the previous stitch and across from the beginning of the previous stitch. This would be the lower right corner of an X, if you are thinking in terms of cross stitch.
Now, holding the loop down onto the surface of the fabric, cross over the top part of the loop, moving diagonally from lower right to upper left, and take the needle down into the fabric. At this point, you’re making the crossing stitch in the cross stitch, but you’re crossing over a loop rather than over a straight stitch.
Pull the thread all the way through, so that it secures the loop in place.
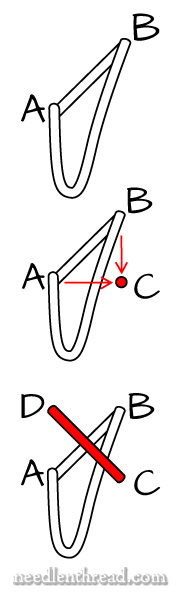
To clarify the whole movement of the stitch, here’s a diagram for you. In a nutshell, the directions:
Come up at A, go down at B to form a diagonal straight stitch.
Come up again at A, go down at B, but leave a loop of the working thread on the fabric surface.
Come up at C, directly below B and across from A, and cross over to D, directly above A and across from B, over the top portion of the loop.
To work subsequent stitches, move down the line to the right, bringing the needle up at the starting point, which is the lower right corner of the previous cross stitch, and continue working across the design area.
Work subsequent rows above previous rows, to fill the shape.
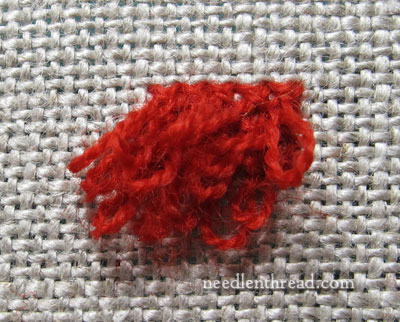
Velvet stitch will form a pile of loops (long or short, depending on how long you want them). You can choose to leave the loops uncut, or….
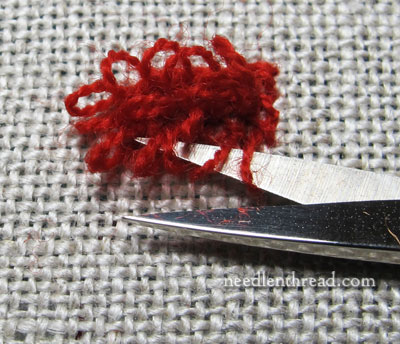
…you can slide the blade of your scissors inside the loops and cut them, and…
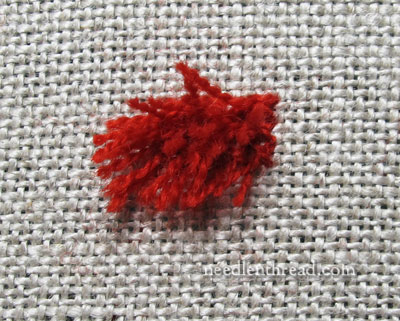
…leave the pile cut but not combed out, or…
…you can use a pile brush or needle and comb the stitch out and make it fluffy-fluffy.
You can see that, comparatively speaking, there’s a lot more work involved in velvet stitch than there is in Victorian tufting or Turkey work. But it does create a very secure surface of loopy or fluffy stitches on your embroidered surface.
Of the three fluffy stitches – Turkey work, Victorian tufting, and velvet stitch – I prefer Turkey work for fluffy surfaces when filling a shape. It’s quicker to work than the other two, and it creates an even, full filling.
What about you? Have you tried any of these fluffy stitches yet? If so, what’s your favorite? Have your say below!
Stitch Fun is a regular series on Needle ‘n Thread, where we explore more obscure embroidery stitches, embroidery stitch combinations, or fun techniques just for the fun of it. If you’d like to view the other stitch tutorials in this series, feel free to check out the Stitch Fun Index, where you’ll find them all listed for your convenience.
Eu já trabalhei com o ponto turco e gostei muito do resultado final, mas ainda quero fazer esses dois novos que vi por aqui, sempre é bom conhecer pontos novos para aplicar em nossos trabalhos, obrigado. Bjs
I am so thankful for GoogleTranslate. I enjoy being able to read ALL the comments, learning from each one.
Sou muito grato por GoogleTranslate. Eu gosto de ser capaz de ler todos os comentários, de aprendizagem de cada um.
Mary,
Have you ever used Edmar threads in your work?
I used it first for Bullion embroidery but the company suggest trying it on surface and crewel embroidery.
Really enjoy your news letters.
Nelda Wagner
Dear Mary
Thanks for the stitch fun tutorial on the velvet stitch I do like a bit of fluff! it certainly seems more complicated then the turkey stitch. Again this would be good for animals, insects and perhaps hair you can embroider so many things with these stitches thanks for showing us the three different types of fluffy stitches.
Regards Anita Simmance
You are such an inspiration!
Hello Mary!
I haven’t tried Victorian tufting or velvet stitch, but I certainly like Turkey work. I think I’ll stick with it, as it certainly does look easier than these two new (well, new to me) stitches. Thanks for the Stitch Fun series, it’s very helpful and entertaining.
amei ! muito obrigada
Mary,
I wanted to say how much I love your Stitch Fun instructions. They are very easy to follow with the pictures you provide (and the descriptions) – most are better than many of the books that I have. Also, reading about one stitch seems to cement it better in my mind that cruising through a book where after a bit they all seem to blur together. I also don’t take my books with me when I go away but almost always am able to hook up to the internet to access your site if I have to review a stitch.
So a HUGE thank you for that and please keep them coming.
Heather
I’ve never tried any fluffy stitches, but they do look like so much fun! On such stitch I’ve been meaning to try is bollsöm (which I have no idea what it’s called in english nor can I google up a photo of it — basically it’s a runnig stitch done with a big no of threads, which are cut up and steamed to look like rows of pom poms).
The velvet stitch is just wonderful for stitching hair on those tiny heads of dotie dolls – thank you for showing this wonderful stitch.
I am appliqueing a quilt that has pussy willows. I was thinking I wanted to fluff those little guys and I am not sure which of these stitches would work best for this application….thinking it may get washed in the future. Do you have a recommendation?
Any of them will work, Susan. I like Turkey stitch best, but they’d all work ok and hold up in the wash.
Thank you for responding. l will test with turkey stitch and run it through the wash
This was the only guide I could find for doing this sort of thing. Maybe because I’m searching for the wrong term, not sure. I’m having trouble pulling such thick threads/yarns through my fabric though. Any tips on that?
Ok. 5 stitches … but only 4 for filling an area!
Why yes, I am working my way through Stitch Fun. Why do you ask? Lolol. I’m looking for a briefly mentioned “15 stitches for stems” and maybe one for flowers. The one on leaves was fabulous!
I was looking for a loop stitch – this is perfect! thank you for the clear instructions!!