


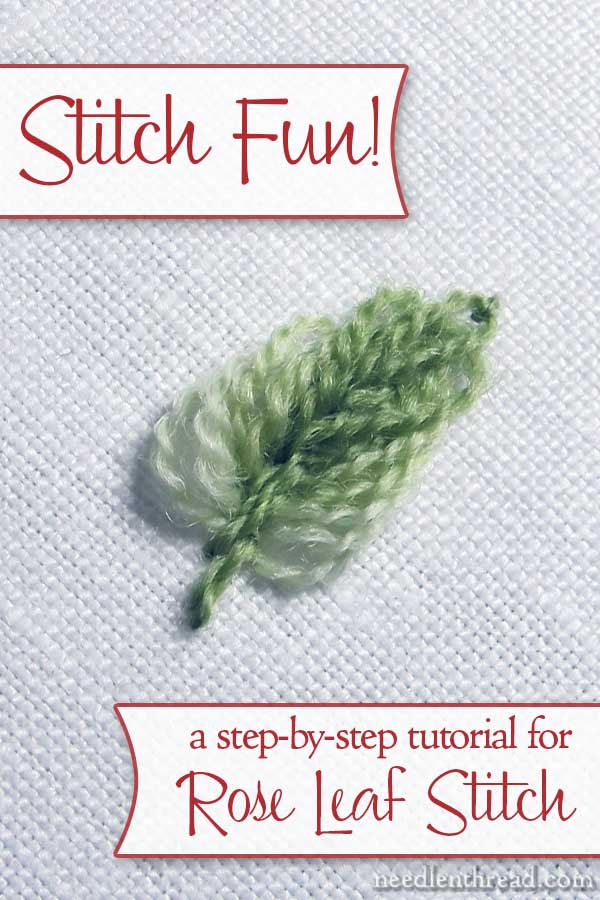
Here’s one more leaf-stitching technique to add to repertoire of hand embroidery stitches for creating various types of leaves.
So far in this mini collection that parts of the Stitch Fun series, we’ve looked at fly stitch leaves, cretan stitch leaves, tiny buttonhole stitch leaves, and today, we’re looking at the rose leaf stitch.
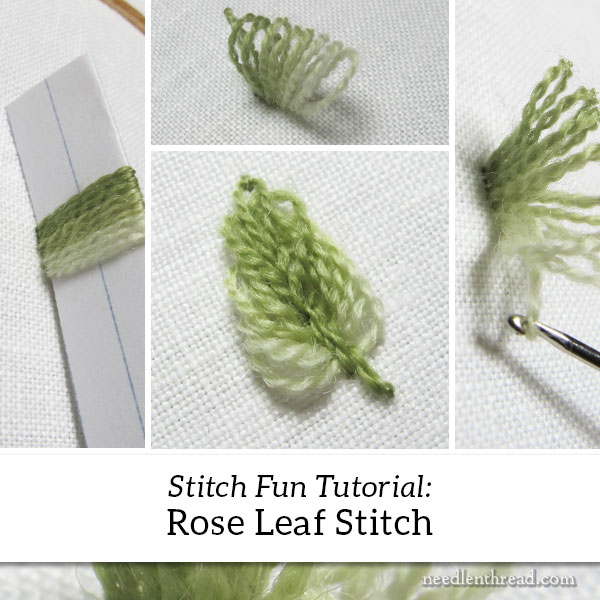
The rose leaf stitch is a rather obscure embroidery stitch. You don’t see it in very many stitch dictionaries, and in the ones I have seen it in, the explanation of turning the stitches inside-out is lacking. They usually just say, “Carefully turn the stitches inside out.”
But what does that mean? And how does one go about doing it in a way that is manageable and makes sense?
Today I’m going to walk you step-by-step through the stitch and demonstrate the key movement of it – turning the stitches inside-out – so you can see how easy it is to create a pretty shaded leaf.
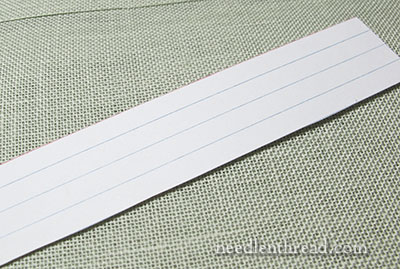
There are a couple “tools” that will help make this stitch easier.
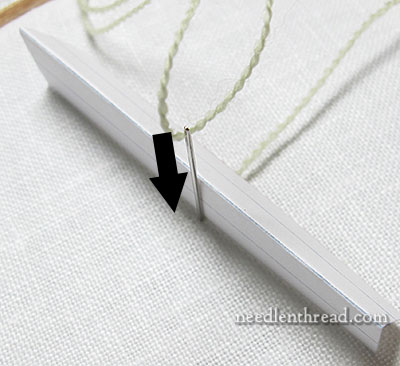
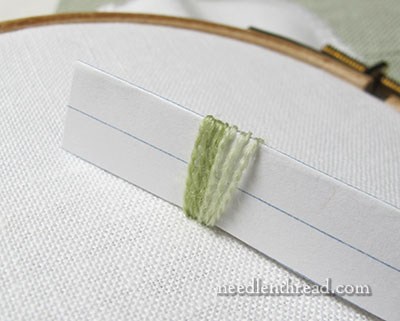
The first one is a strip of card stock about an inch wide and a couple inches long. Since one of my handy helpers in my workroom is my stack of 3×5″ index cards, I just used one of those.
I cut out four of the line areas, which gave me a 1″ wide piece of card.
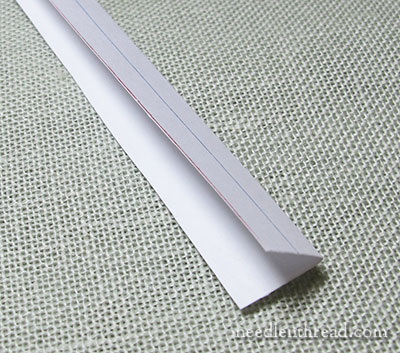
Fold the piece of card in half, so that you now have a 1/2″ wide piece of evenly folded card. With lined index cards, it’s very easy and quick to accomplish a straight fold, because you can fold the card right along the line. However, you can really use anything – an old business card, a used greeting card, whatever you have to make a 1/2″ evenly folded piece of card.
You can make these leaves smaller, by using a smaller folded piece of card (for example, a 1/4″ folded piece of card), but they become a bit more fiddly. If you’re using a smaller piece of card, use a finer thread for your small leaves.
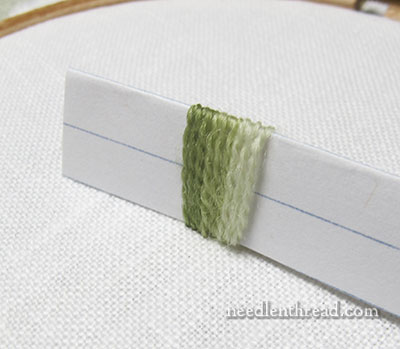
In this demo, I’ll be using one strand of crewel wool in three different shades of green – light, medium, and dark.
I started with the lightest shade of green. If you want your leaf color to be reversed with the lightest shade at the tip of the leaf, start with the darkest shade of green.
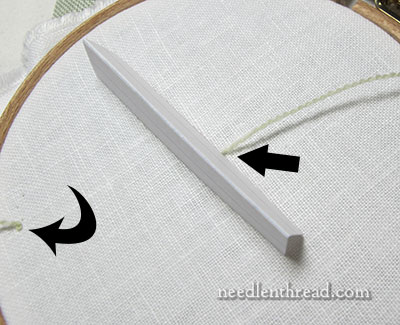
The easiest way to get the thread started for this leaf is to use an “away” waste knot. You can see on the left of the photo above (where the curved arrow is pointing) my waste knot. I knotted the end of the thread, took it down into the fabric on the far edge of my hoop, and left the knot on top to hold the thread.
Then, I brought the needle and thread to the front of the fabric on the far side of my folded card, away from the waste knot.
When I’m finished with the leaf, I’ll clip the waste knot and take the tail underneath the threads on the back of the leaf to secure it.
Now I’m taking the needle and thread to the back of the fabric on the other side of the card, very close to where I originally brought it up. Once I pull through, the “tent” shape of the card will diminish, because the two sides will be held together by the stitch.
You want your starting and ending of each stitch over the card to be as close to each other as possible, without going down in the same hole you came out of when you started the stitch.
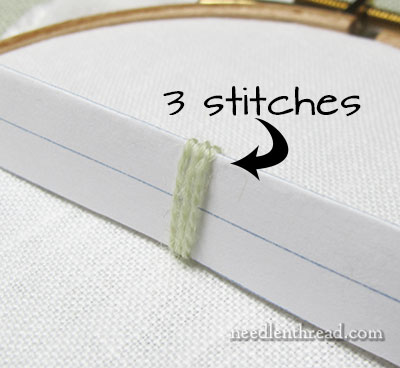
I’ve made three stitches over the card with the lightest green. Each stitch is close to the previous one, without being in the same hole. Just a thread of fabric to separate the stitches is fine. Think of it as satin stitching over the card.
With a bird’s eye view, you can see that the card has been squeezed closed by the stitches.
Once you’ve finished the first three light green stitches, turn your work over to the back and run your needle under the threads on the back a couple times, pulling your thread through each time until it is secure, and then clip the thread.
Leave the waste knot for now – you can end all the waste knots when the leaf is complete.
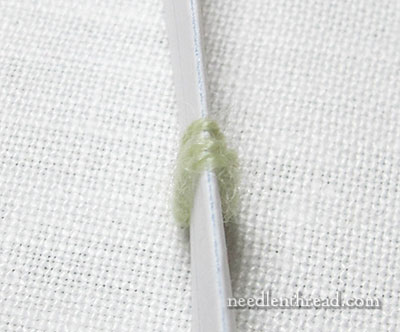
Now, in the same manner, work three more stitches above the light green, this time in medium green, and end the thread on the back again.
Finally, work three stitches above the medium green in the same manner, but this time, in the darkest green.
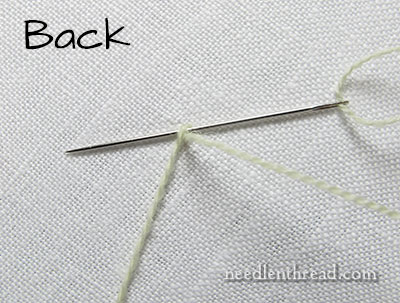
Do not end the dark green thread on the back.
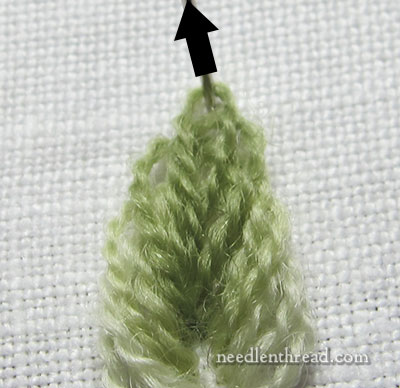
Once you’ve finished the three dark green stitches, your needle and thread will be on the back of your fabric. Take your needle up into the fabric over on the side of your hoop, and pull through, thus “parking” the needle and giving some tension to the working thread so the stitches are held in place.
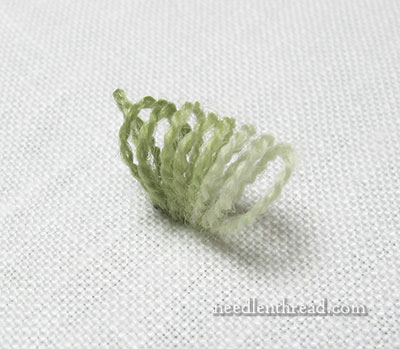
Pull the card out, and you’ll have a little tunnel of tall loops on your fabric.
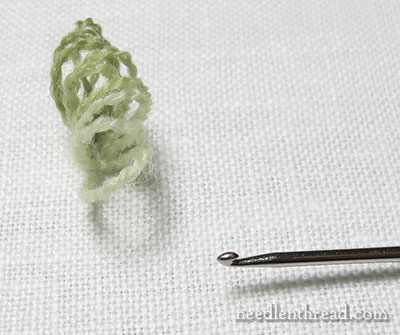
Here, we introduce the second “tool” that makes this stitch easier. It’s a small crochet hook (#9, I believe, though any smaller crochet hook will do). You can accomplish the stitch without one, but the crochet hook makes this part of the stitch So Much Easier, so if you have one, use it!
Any kind of fine, small hook-type-thingy will work, too. In place of a hook, you can use the eye-end of a long needle, but it won’t be as easy!
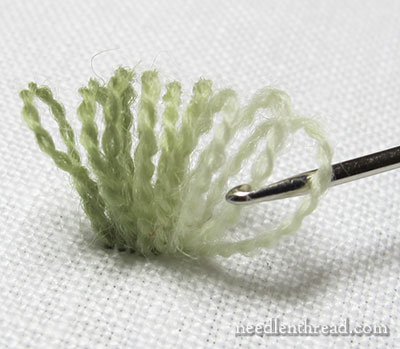
Starting from the lightest end of the tunnel, slide the crochet hook into the tunnel formed by the loops, passing inside the first loop, and then grab the second loop and pull it inside the first loop and out the end of the tunnel.
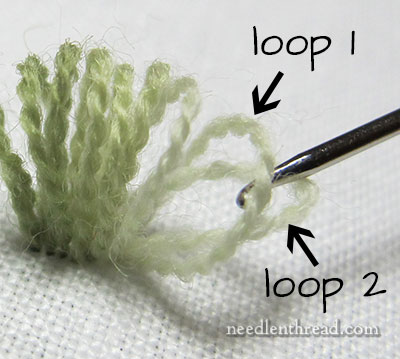
In the photo above, you can see more clearly what you’re supposed to do. Loop 1 is pretty much still in place, but Loop 2 has been pulled through Loop 1 and out.
Pass your crochet hook back into the tunnel, inside loops 1 & 2, and grab loop 3, and pull it through and out the end (passing inside both loops 1 & 2, and out the end).

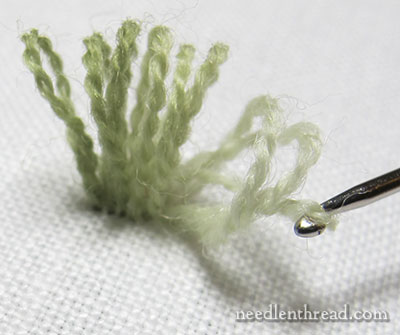
Continue doing this one loop at a time – passing into the tunnel inside all the loops and grabbing the next loop and pulling it through – until you’re at the last loop.
And do the same with the last loop, too – pull it through the tunnel to the other end, so that all the loops are now inside-out.
Then pull that last loop up and over all the loops and lay it back down on the fabric on the dark end of the tunnel. See what’s happening?
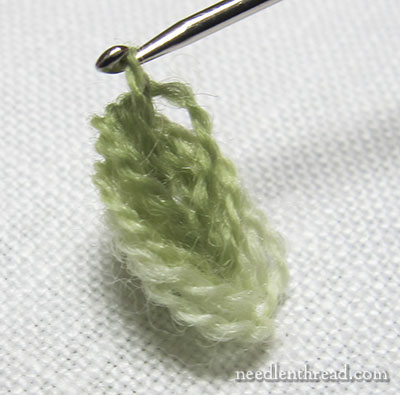
Now, take your regular needle and thread (still threaded with the dark green) and come up inside only that last loop, so that you can anchor that last loop on the fabric, just like you’d anchor a chain stitch. Come up inside the last loop…
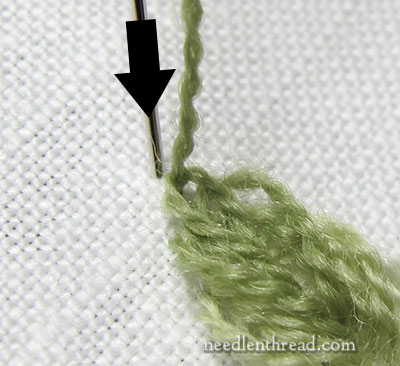
…and take your needle down just on the other side of it.
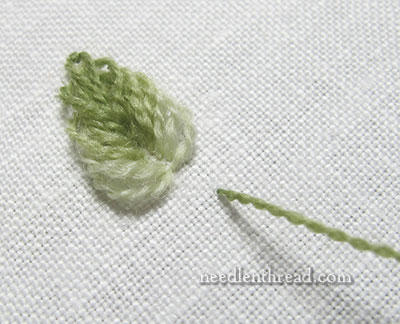
Now, bring your dark green thread to the front of the fabric below the leaf, to work the stem.
Using stem stitch, stitch a stem up the center of the leaf, covering up the split in the lower part of the leaf.
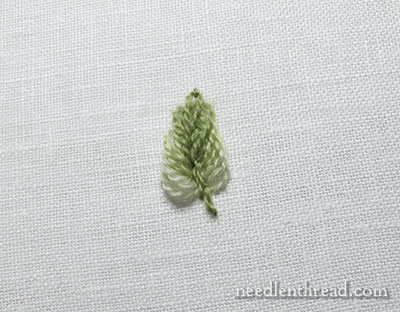
And there’s your inside-out rose leaf stitch! Don’t forget to clip your waste knots and run the tails underneath the stitches on the back of the fabric.
It sounds complicated, but once you work through the stitch one time and see the mechanics of it, you’ll be able to work the stitch pretty quickly and easily, to create shaded, slightly puffy, pretty leaves.
If you’d like to turn the rose leaf stitch into a rosebud, check out this tutorial for a rose leaf stitch rosebud.
Stitch Fun is a series of hand embroidery tutorials here on Needle ‘n Thread that explores obscure stitches, composite stitches, and easy stitches used in various combinations. If you’d like to play with more stitches, drop by the Stitch Fun Index, where you’ll find a linked list of all the Stitch Fun tutorials.
Wow…thats a super stitch… never seen this before
Magic! That’s a totally new one to me. Thank you.
By the way, to fold that narrow strip of card in half easily – don’t! FOLD the card FIRST, then measure and cut through both layers at once at the right distance from the fold. It’s much easier to fold a wider piece than a narrow strip.
Hi Mary,
Looks like a useful stitch, but maybe for items meant only to be displayed? I’m thinking that the stitches would be “catchy” on things if used for clothing, etc. Am I correct?
Hi, Devon – Well, it’s not as “catchy” as it looks – I think the wool helps keep it from being too catchy, because the wool fibers have a tendency to grip each other and hold on. I’ve seen it used on embroidered wool blankets and the like, pillow tops… And it can be made smaller, and you can increase the tension on the stitches a little, to get them to lie flatter. But you’re right, I’m not sure I’d use it on clothing or anything that gets a lot of handling and a lot of movement around it. ~MC
That is so cute, so clever! Thanks for this series and your fun techniques!
That is really a cool leaf! I don’t believe I’ve ever seen this technique. Thanks for the option!
How totally clever!!!! And the leaf looks perfect!! Thank you for demonstrating this… I must, I must try this!
This is so cool, Mary!! Thanks for showing it to us.
Hi Mary,
What a week! First the rude remarks by “those two” followed by an avalanche of support from your readers. Then you start the week with this stitch. Brilliant. I’ve never seen it before and can hardly wait to try it. You are a stitcher’s bright light.
I cannot wait to try this!
Mary, Every morning after I read my email, check out my home page I click on your blog. Your dedication to teaching all kinds of embroidery is so appreciated. I have done embroidery for over 50 years, read many embroidery books, and have never ran across this stitch. Yes, you can teach an old dog new tricks. Thank you! (I did check out that little hint you left us with on yesterday’s blog. That will be fun to watch unfold.)
Well, Mary, I have never come across that stitch before. Thank you for sharing it and your delightfully clear step-by-step instructions.
Fascinating!
Wow – how interesting! Thanks for sharing that Mary. I always love learning new stitches.
Love all the stitches in the Stitch Fun! This one is very unusual and good looking!
You are right about instructions that aren’t instructions. I would have never guessed what they meant by simply saying, “turn the stitches inside out”. Thank you for taking the mystery out of this bit of stitching.
Dear Mary
Thanks for another interesting stitch fun. I love the Rose Leaf stitch I’ve not heard of this stitch before and can’t wait to embroider it I need to invest in a crochet hook before I can sew it. But thanks for sharing this interesting lovely stitch.
Regards Anita Simmance
Amazing post! Thank you so much.
Now that was unique. Who dreams up these things? You’re right that just telling a stitcher to turn the stitches inside out means nothing. Even with the words and photos, I had to pause and think about what you were doing with those first 3 stitches. Now it makes sense. And since I know how to crochet, it’s even simpler. What a great stitch.
Hi Mary, I saw this leaf in artsanddesings website, and couldn’t understand the instructions, so I couldn’t make it.I googled it and I found something similar, raised leaf stitch, which is very similar, whit the loops but in the last loop the needle just go through the loops. I’m happy you explain this,and I just made it, not easy to make it though, need to practice, so thank you.
I would like to share something that I found in a book…maybe you already know this, but just in case…Pebeo Arty’s Easy Fix Fabric Stretcher Frame. When I see things about embroidery you always came to my mind.It looks nice to me, What do you think?
That’s nifty, must try it! Looks very similar to one in a library book I have on loan at the mo, at least as far as wrapping around the card goes. I should compare and contrast the two, no?=)
Mary, that’s one of the neatest stitches I’ve seen. Thank you for your clear description of how to do it. I wonder if/how it would work in silk ribbon? I may have to experiment with it and see!
A fun and adorable new stitch! Thank you so much for sharing.
That’s really cool. One question: Does it have to be worked in crewel wool? It looks like it would be pretty with just about any thread.
Wonderful tutorial, Mary! Thank you, well done! I can’t wait to try this! I’ve never seen this stitch, either!
Very cool. It looks like a lot of work for a stitch that from the photos looks similar to other leaf types stitches, but I bet in person, the stitch looks unique. I want to try it!
Looks like a fun stitch to try. Thanks for the fantastic detailed instructions and photos. It’s so nice to see an obscure stitch like this one being preserved and disseminated.
And FYI, I agree with all the comments re: your work and the ability to skip it if the topic bores the reader. Keep up the good work.
I don’t comment very often, but couldn’t resist today. How innovative! This is just TOO COOL! What a beautiful and fun to make leaf.
Enjoy your blog every day! You are so wonderful to share.
Hi Mary, I have never seen this stitch, but it’s really cute, thanks so much for sharing it! I have to admit, when I started reading about turning stitches ‘inside out’ I did start to wonder whether you were starting to lose it 🙂 but it all makes perfect sense now!!!!
Ooh what an interesting stitch! It looks really satisfying to do. I couldn’t work out how it was all going to come together so the final few photos made for an ‘Aha’ moment. 🙂 Thanks for your clear explanation.
Love the dimension of this leave. I can’t imagine where I would have learned of this if you hadn’t shared. Thanks.
What a wonderful stitch! I have plenty of index cards too.
Wow! That is such a pretty leaf. I have never heard of this stitch, but it seems easy enough to do with a little practice. This is a first for me. Thank you!
What a great tutorial for this stitch. You’ve made it look very easy to accomplish and definitely helped us understand “turn the stitch inside out”.
Mary, that is so fun. Thanks so much for sharing that stitch. I can’t wait to try it.
This stitch looks nice and fiddly, and a lot of fun! I’m not even going to wait to work this into a design, I’m off this minute to dig out a scrap of linen and play with this.
Great detective work, Mary. No wonder the Rose Stitch isn’t mentioned much in stitch dictionaries as their writers perhaps didn’t realise a crochet hook was needed to turn the loops inside out. Well done!
This should be called the magic rose stitch! I can’t wait to try one. Thanks for the tutorial.
Wow, what an interesting and unusual technique! The little leaf is so pretty too 🙂
Hi Mary,
Thanks for your wonderful instructions and photos. I now understand completely what turning the stitches inside out entails.
Best wishes,
Dianne
That stitch is just too cool. Thank you for sharing
Carmen
This is just too cool. I wasn’t going to use this word since so many others have but heck, its really so ingenuous. Goodness, you’re like the patron saint of embroidery, Mary.
Thanks ! You make it so simple !
I can’t wait to try this. What a pretty leaf or flower if clustered.
Brilliant – and isn’t it amazing what a difference that little fly stitch makes?
Mary, I have learned so much from your blog which I came upon quite by accident, a happy one at that. So today I nominated you for a Craftsy Blogger Award. Thank you so much for all of your wonderful tutorials.
Thanks, Julie! I’m so glad you enjoy my “stuff”! 🙂
Wowee! I thought I might have seen just about every stitch ever devised but then along comes Mary with something right out of left field. And what a beautiful leaf. I love it, thank you so much Mary. Does it work with other types of thread, eg, cotton or silk? I guess the easiest way to find out is to try, right?
🙂 RIght! It does work with other threads as well – slippery threads are not as easy to work with, and if you’re using finer threads that don’t fluff, the leaves look better if they’re a little smaller.
That is such a cool stitch. I’ve never see that before. How creative!
coolest trick ever
Quel bonheur de parcourir votre magnifique site. Est ce quelques Francaises ou Suisses consultent également ce site. Vos explications sont très claires, mais j’ai du mal a exécuter la Rose leaf Stitch. Grâce à tous vos tutoriels je suis parvenue à faire un tableau à l’aiguille. J’attends tous les jours vos news. Amitiés Huguette
Hullo Mary, I’m a recent subscriber and look forward to your emails. I love that I am able to go back on older posts to ‘catch up ‘. This is a stitch I’ve never seen before but it has a delicacy about it that I envisage using in multiple projects. Thank you for sharing your amazing ability with the family of stitchers.
Awesome! I can’t wait to go home and try it! Looks easy…… 🙂
I haven’t come across this stitch before either but I will certainly use it as it is so effective. Thank you Mary.xx
I came to your site looking for some free patterns (I’m a noob), but I would like to say I found this tutorial very very intesting. Thank you for sharing your knowledge and experience.
Tonight’s educational e-journey muted, but I suspect there is much to learn on your site.
Thanks for sharing,!
I had to try this, even though I don’t have a crochet hook. Nothing I thought might work hook-wise did and my leaves are a bit … they leave something to be desired. However, I found that a threaded needle worked OK. For the first leaf, I drew the thread around the loop where you’d use the hook and then pulled it through. This wasn’t easy, but it more-or-less worked. For the second leaf, I did two things differently. First, I put a couple of stitches on the back before ‘parking’ the third colour – not as much as to finish the thread, but just enough to help stop the loops loosening. Second, I turned the loops inside-out from the other direction, starting with the last loop rather than the first. I knotted thread around the last loop loosely, drew it through the penultimate loop, took the thread back over and through, pulled the two loops through the next and so on. Then I cut the extra thread out and secured the loop with the anchor stitch. This didn’t come out as well as yours by any means, but it came out better than the first one. The only disadvantage really was that I almost gave up as it looked like An Unholy Mess for much of the time I was working it and nothing like it was supposed to until I cut the thread away. But it was, if not easier, at least more easily controlled and the result was a bit tidier.