


Cretan Stitch is one of those hand embroidery stitches that’s pretty versatile. It can be used for a filling. It can be used as a line decoration.
But it can also be a source of confusion, especially when worked inside a shape.
As part of the Stitch Fun series here on Needle ‘n Thread, we’re currently looking at different hand embroidery stitches that work well for embroidering leaves. We started with fly stitch leaves last week, and today we’re going to look at Cretan stitch leaves.
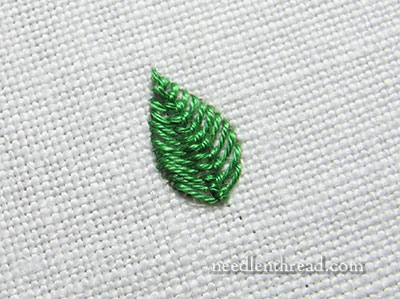
Cretan stitch works best for hand embroidered leaves that are not teeny tiny. The leaf in the photo above is about 1/2″ long, for example, and I’m using coton a broder #25 for the thread. Leaf shapes that are too small lose that defining braided line down the middle of the leaf that is is a result of working the closed Cretan stitch.
If you’ve not worked Cretan stitch before, I recommend taking a look at two videos before starting – the Cretan stitch video and the feather stitch video. The Cretan stitch video is pretty old (I produced that just as video was coming of age on the internet – and I’ll replace it some day soon!), but the feather stitch video is much newer and clearer.
Why the feather stitch? you may very well ask! Well – the movement for the Cretan stitch, especially when worked inside a leaf shape like this, is the same exact movement as a feather stitch. This is why the Cretan stitch is also sometimes called the Cretan feather stitch.
The difference is that the “spine” down the middle is doubled for the Cretan stitch, and, with the Cretan stitch, you don’t move quite as far down when catching the working thread. But other than that, if you are already familiar with the feather stitch, and you think of the closed Cretan stitch worked in a shape as just an off-set or wonky feather stitch, it’ll be a lot easier to conquer it when filling a shape.
Here we go…
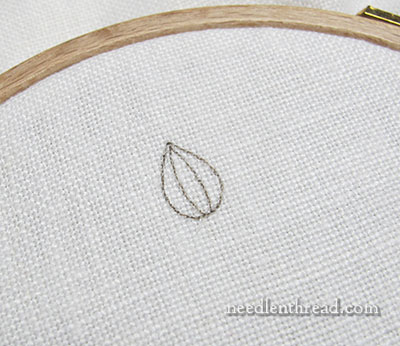
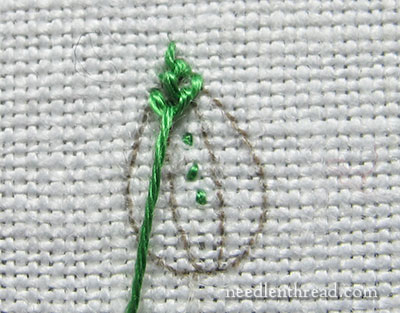
I’m using a basic tear-drop leaf shape here, that’s 1/2″ long from tip to base. Down the middle of the leaf, I’ve drawn a double spine that bows out with the tear-drop shape. Once you get the hang of working the Cretan stitch this way, you probably won’t need to draw the double lines down the middle, but at first they are a good guide for creating an even spine.
I’m working with coton a broder here, but you can just as easily work with two or three strands of regular stranded cotton embroidery floss.
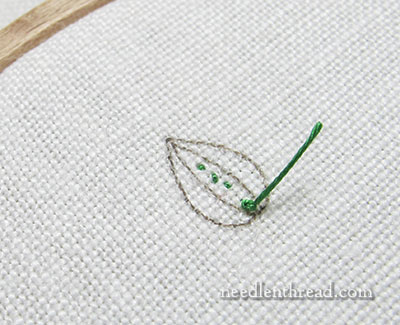
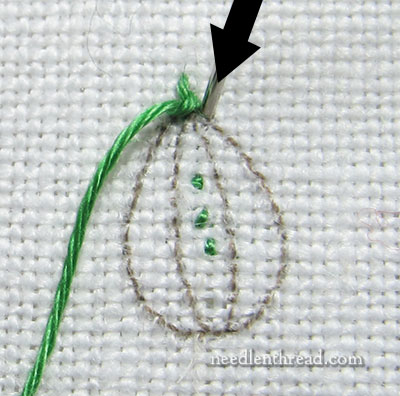
To begin the thread, I’m starting with a waste knot and some tacking stitches down the middle of that spine area. This is an easy way to start a thread securely and invisibly. These little stitches (three tiny backstitches) will be covered completely by the embroidery, and once the tacking stitches are worked, the waste knot can be cut away.
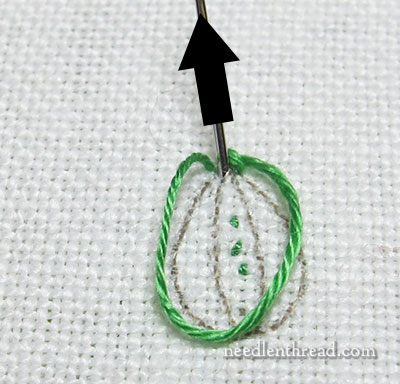
Bring the needle and thread to the front of the fabric just above the tip of the leaf. I like to start just above the tip, to ensure a nicely defined tip. So you can see in the photo above that my needle is coming up in the fabric just above the tip, not directly on the tip.
Take the needle down into the fabric along the outside design line on the right, just below the tip. Do not pull all the way through – you want to leave a loop of working thread on the front surface of the fabric.
Then, bring the needle up just at the tip of the leaf, with the working thread loop below the needle. The needle will be about half way between the ends of your working thread on the front of the fabric.
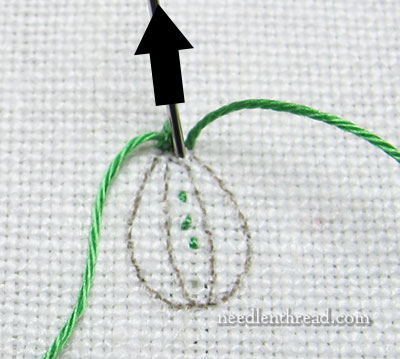
Pull the thread all the way through and tighten up the stitch. You can see that the working thread comes out above the stitch here – kind of like a very shallow feather stitch or fly stitch.
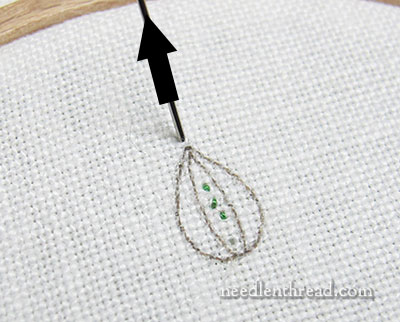
Now, we’ll move over to the other side of the leaf, just below the tip on the outside design line, and take the needle down into the fabric, and pulling through only enough to leave a loop in the working thread on the front of the fabric again.
There’s the loop in the working thread.
The needle is going to come up inside the loop on the inside left design line, just below the tip, moving barely down the shape of the leaf.
Pull the stitch through and tighten it up, and you can see again that whole feather stitch thing going on.
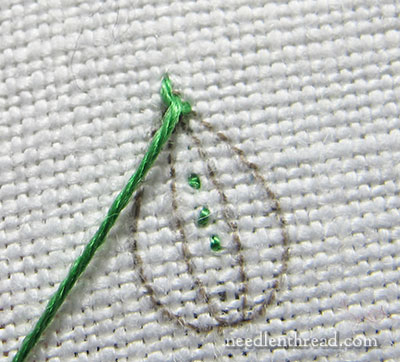
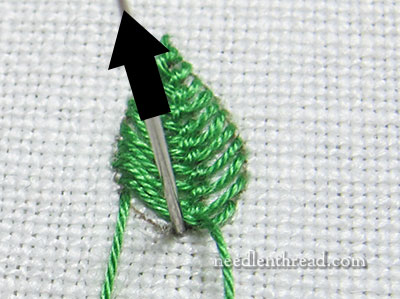
As the shape broadens out, we’ll lose the feather stitch look and settle into the Cretan stitch look.
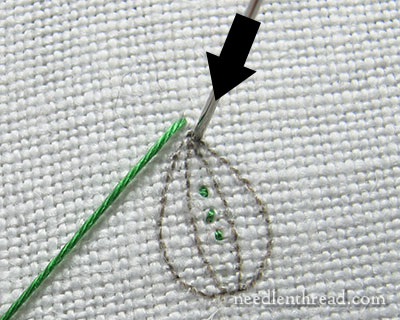
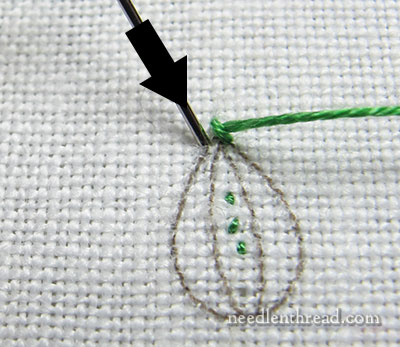
Now, move back over to the outside design line on the right, just below the end of the last stitch on the right, and take the needle down into the fabric, leaving a loop of working thread on the front again.
Come up inside the loop of the working thread, on the inside design line on the right, slightly below the previous stitch.
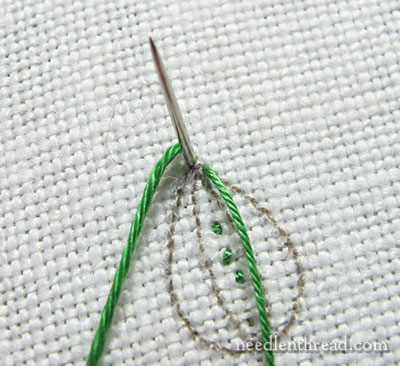
After pulling the stitch through, move over the left again, and work the left side the same way as before, always moving slightly down the leaf shape.
When you come up on the two “spine” lines in the middle of the leaf, you’re always going to be a little lower down the leaf, so that the stitches slant down the spine. The stitches will be higher on the outside of the leaf, and slant in and down towards the spine on the inside of the leaf.
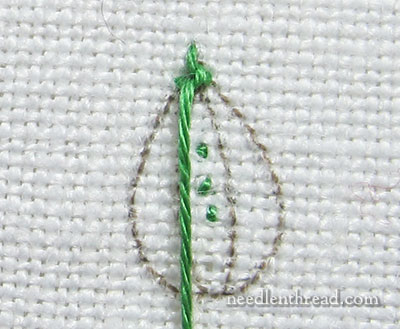
Keep moving from side to side down the leaf, until it is full.
Here, we’re coming to the end of the leaf. One more stitch should fill it in nicely.
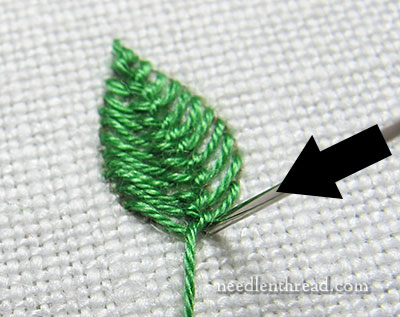
To end that last stitch, after pulling through, I’m taking my needle down into the fabric just over the stitch, to anchor it.
This is the resulting leaf, with a braided spine down the center.
This technique works pretty well with any kind of hand embroidery thread. If you like crewel work, you’ll find that Cretan stitch leaves look terrific in wool!
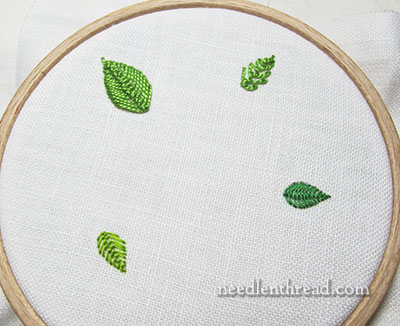
From top left, around the circle clockwise:
Top left is a leaf filled with closed Cretan stitch, worked with perle cotton #5. Notice the wobbly spine – I didn’t draw the spine lines! Perle cotton creates a chunky, bold leaf.
Next, to the top right, is a leaf shape worked with open Cretan stitch in perle cotton #5. If you want a sketchy, chunky leaf, it works ok. But the smaller the leaf shape, the more difficult it is to work a closely-worked Cretan stitch with a heavier thread like perle cotton.
Lower right: Cretan stitch leaf with coton a broder #25.
Lower left: Cretan stitch leaf with cotton floche, worked with a little more space between the stitches to give an open, sketchy look.
For more Stitch Fun articles, feel free to visit the Stitch Fun Index, where you’ll find all the articles in the series conveniently listed for your perusal.
I must give this a try. Than you for easy to follow directions.
Dear Mary
I like the different shaped leaves worked with the Cretan stitch although it’s the same stitch they show different styles and shapes of leaves, lovely. I used the fly stitch leaves on one of my Little things and it turned out quite nice so I will now try these on my next little things. Thanks for sharing with us the technique for Cretan stitch leaves.
Regards Anita Simmance
Thanks, Anita! It’s a fun stitch for leaves – I especially like the way the center vein turns out. I’m glad you’re making little things! They’re so much fun! ~MC
Good morning, Mary,
What wonderful instructions and photos! I look forward every day to your postings. I’m glad someone in my Yahoo Group mentioned one of your postings and I actually cheked you out!
Today, I have a question. Once you bring the needle up inside the loop and you pull the thread loop tight, do you have more control and get a better looking stitch if you pull the thread parralel to the fabric,and in the direct tion you are traveling from one stitch to the next (in this case, down the leaf)? I have been told and found that my Fly/Daisy/Chain stitches look better when the thread is pulled in this manner, instead of pulling up and away from the fabric.
Fondly, Rosalie
Absolutely, Rosalie! If you pull upwards or away from the leaf, the stitch will pull over the working thread that you just pulled through the fabric. So it’s best to pull downwards, down the leaf, when you pull the thread through. ~MC
That is a very pretty leaf. Grabbing my thread and practicing now. Catch ya later. Smiles to you. Linda
I love this series Mary, it’s such fun. I don’t know about you, but when I am embroidering very small leaves I tend to use finer thread, eg, perle 8 or even 12. I find it gives a flatter more even result, unlike (sorry) your upper right leaf. Do you ever use finer threads?
Hi, Christina – I usually just use perle cotton to demonstrate stitches on the website, or show differences in threads. I don’t actually embroider with it too often on my own projects, unless it’s something like a felt piece, or something like that requires bold stitches. I like to use it to teach kids, as well. Mostly, when I’m working leaves on anything, they’re either in fine threads or wools for crewel work. – MC
I just love your blog. I’m getting so much out of it. As an experienced stitcher, I usually gloss over the stitch instructions, but with yours, they are integrated into the piece along with the color choices and thread weights. And they are so detailed with the tips and tricks right there. I look forward to your blog entry each day!
Thanks!
Suzanne
Dear madam
I am frm Kerala India.i am really a fan of you now.studied alot frm tha site.mam wanna knw tht frm whr shld I get the threads whch r used n tha illustrations?
Regards
Rekha T
Mary you are the best… I was struggling to get this stitch right, and there you taught me the right way, thank you very much.
Hi, I’m looking for advice on how to stitch leaves that are layered. Where Part of a leaf is covered with another leaf, so that they aren’t perfect leaf shapes. I hope that makes sense!