


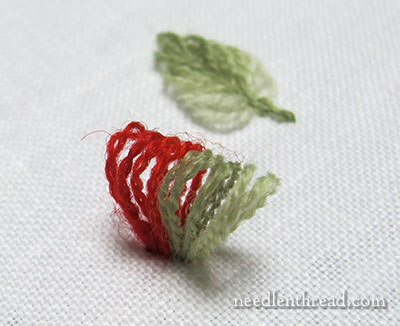
Yesterday, we looked at this nifty way to hand embroider a shaded leaf, using the rose leaf stitch.
Today, I want to show you a fun variation – a little bud, using the same stitch.
Following the same instructions for the rose leaf stitch, make your tunnel of loops.
For the rose bud, I used one strand of crewel weight wool. (Fine d’Aubusson, in this case.) I made two loops in medium green, followed by three loops in a slightly darker green. Then I worked three loops in bright red, followed by two loops in a slightly darker red.
Of course, you can mix the colors up any way you wish. You might switch to pinks instead of reds, or you might work your darker green first so that it falls on the outside-most edge of the bud, and the lighter green next. This is up to you. Normally, though, you do want the darkest color for the actual bud itself to be the last color you stitch at the “top” of your tunnel of loops.
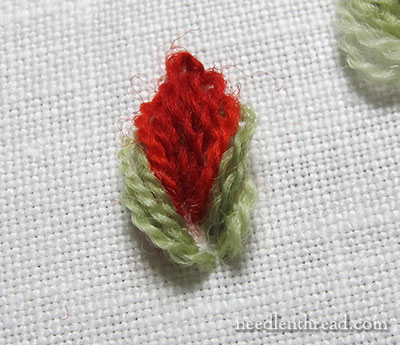
Turn the stitched loops inside-out, as instructed in yesterday’s article on the rose leaf stitch, and anchor the last stitch to secure the bud.
You can see that it doesn’t look extremely bud-like right now, because the base is open. So let’s remedy that.
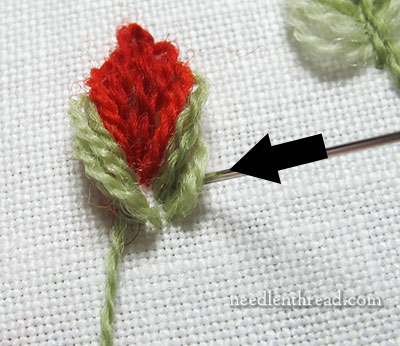
Thread up your darkest green and anchor the thread in the back of the stitches on the back of your fabric.
Make a fly stitch at the end of the bud, starting and ending the fly stitch just under the lower edge of the bud on each side, as shown…
…then anchor the fly stitch just at the lower tip of the bud, pulling the fly stitch so that it scrunches the bud together at the base.
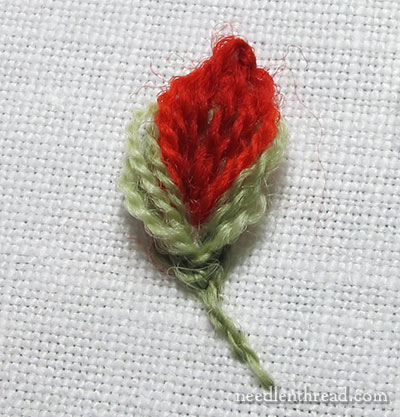
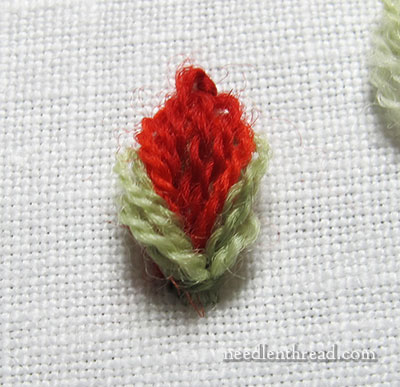
Work one or two more fly stitches at the base of the bud, and then finish with a stem stitch stem.
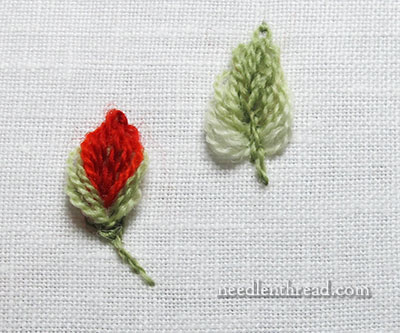
And there you have two different effects with the same stitch!
Fun, aren’t they?
Stitch Fun is a series of hand embroidery tutorials here on Needle ‘n Thread that explores obscure stitches, composite stitches, and easy stitches used in various combinations. If you’d like to play with more stitches, drop by the Stitch Fun Index, where you’ll find a linked list of all the Stitch Fun tutorials.
This is an adorable little stitch, and one that is entirely new to me!
I’m going to try it on some Brazilian embroidery. I bet it would look great in rayon.
Thanks for the new ideas, Mary.
Carol S.
I’m really liking this different stitching! And thanks for the reply to my question about the leaf yesterday. You’re a treasure, Mary!
I love the ease of making these leaves an buds. I’ve been thinking about the construction, as something seemed incredibly familiar to me. This morning it finally hit. Working through the loops is like doing a single crochet with the loops pre-made. At least if I understand properly. I am in the midst of cleaning after a massive project,which includes packing away my stitching materials and haven’t had the time to try it for myself.
Dear Mary
What a lovely combination with the red thread I can’t wait to try this Bud a Bud Rose Leaf stitch, I’m always surprised the way you use a stitch to different effects from leaf to bud wonderful, I must invest in a crochet hook so I can practice the stitch. Thanks for showing us the different techniques in needlework.
Regards Anita Simmance
Yes, those are FUN!
Thanks Mary. These look really super and will definitely be tried in my next project.
What a sweetie of a bud!
I love the stitch tutorials, I’m learning so many stitches I didn’t know about.
I just wish there was a print option that would eliminate all of the adds , since 9 times out of 10 I don’t stitch in front of my computer.
Thanks for sharing all these wonderful stitches.
Take Care and Happy Stitching… Sandy in Montana
Very nice, does it work as well with regular floss or with silks?
I just love learning to make flowers. Thank you for the tutorials. I look forward to trying them out on a doodle cloth. Maybe some day I will try a bigger piece of some sort with flowers. Thank you!
Thank you, Mary, for the very, very good tutorial about the rose leaves.
Mary you are simply amazing artist and a wonderful being who shares her knowledge with an open heart. May your tribe increare.
Mary, thank you so very much for sharing your treasure trove of experience!
In the 70’s I taught myself counted cross stitch and managed to deconstruct a few embroidery stitches – fun! and I do love color. Lately, I’ve been trying to find embroiders/teachers here where Tom and I have retired (Washington state). Today I discovered you and am so excited.
Thanks again and all the very best of 2016 to you and yours …
Sincerely,
Janis