


After I finished Gertie, my first filling experiment with tambour embroidery, I immediately set up another project to keep me going through my practice regime.
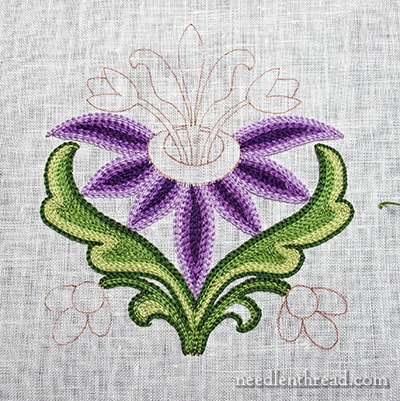
With the next project, I wanted to work with shades of color and filling odd shapes. I picked another one of the free hand embroidery patterns here on Needle ‘n Thread – this sprouting floral drawing – and selected colors of coton a broder 25 to use for the embroidery.
While working through this practice piece a little bit each day, I’ve learned a few more bits about tambour embroidery, which I thought I’d share with you.
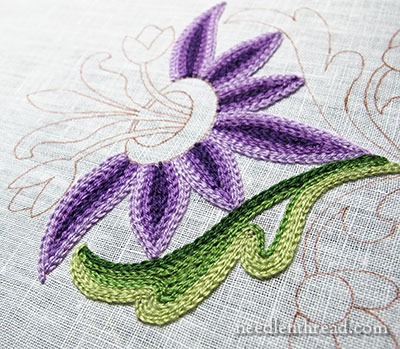
I found out that DMC’s coton a broder 25 (also known as “cutwork thread” or Art. 107, and not to be confused with regular 6-stranded floss) is a terrific thread for tambour embroidery.
It’s really easy to use, once you’ve determined you’ve got the right end of the pull skein. I didn’t wind the skeins onto spools first – I just didn’t want to take the time, and the pull skeins work fine if you’re pulling from the correct end.
Thread for Tambour Embroidery
Pretty much any decent hand embroidery thread can be used for tambour work. I’ve tried it with silk; I’ve tried it with tightly twisted cottons (like the Sulky Petites I used on Gertie); I’ve now tried it with non-strandable, more loosely twisted cottons; I’ve tried it with gold tambour thread; and on my next practice piece, I’m working with wool.
I haven’t tried rayons and the like, because I don’t really have a supply of rayons (I prefer working with natural fibers), but I’m sure it would work. There’s no reason why it wouldn’t.
In any case, I found working with the coton a broder 25 quite delightful.
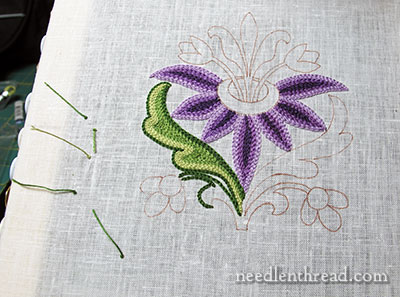
Starting Threads in Tambour Embroidery
In the photo above, off to the left side, you can see some hairy little bits sticking up from the linen. These are waste knots.
I’ve been trying several different ways to start and end threads with tambour embroidery. The fact is, there is no “absolute way” that it must be done. Each expert writing his or her book has a different way of starting and ending the threads.
I’ve found the waste knot a very quick way to get started. The only disadvantage to it is that, eventually, you do have to finish off all those little knots and secure the threads on the back. Personally, this is a process I love – there’s something very satisfying about finally removing all the last waste knots and securing the threads.
But there are other ways to start and end threads – really, it’s just common sense. You can start and end threads in tambour work pretty much the same ways you start and end threads for any kind of embroidery.
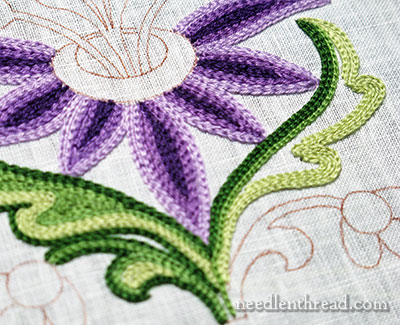
Working Mirror Elements
Good lesson for future reference: when working mirror elements (the two large leaves on this pattern are mirror elements), it’s better to work individual colors and areas on each side of the mirrored image consecutively.
Work the right side, then the left, in one color or area. Or the left side and then the right. Otherwise, you may very well forget exactly what you did in a given area, if you work one side completely first and then move on to the other side. And sometimes, it’s hard to go back and count exactly how many rows of tambour stitches you have in a given area, or see clearly what path your tambour needle took (although you can always turn the work over to easily see your stitching paths).
Case in point, concerning mirror elements: the left leaf was worked first in its entirety, then the right. You can especially see a difference in the light green at the “turning” where the leaves scallop inwards. I couldn’t remember exactly what I did on the left leaf when working the right leaf, and I saw, once I was finished, that I didn’t quite get it right.
Spirals & Circles with a Tambour Needle
Working complete circles with a tambour needle is just like working complete circles in chain stitch.
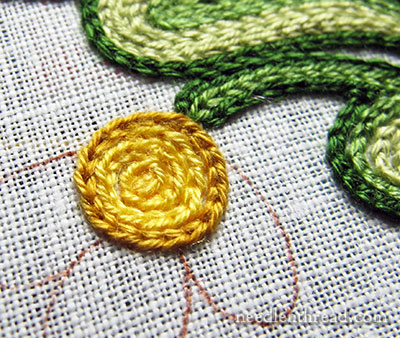
If you want the circle join to be invisible, you have to thread up a regular needle and complete the circle exactly as we did it in this tutorial for perfect chain stitch circles.
Spirals are fun to work with a tambour needle! They should start from the outside of the spiral and work in to the middle. It’s important to keep the stitches small, so that they take the spiral well (just as you would with regular chain stitch). Work each circle of the spiral as close as possible to the one previous, if your intention is to create a filled dot.
Tambour Tutorial – Coming Up!
I have a little tutorial of the basic tambour stitch coming up for you.
Really, once you “get” the basic stitch, the rest is pretty easy. If you want to improve with a tambour hook, it just takes regular practice, and before you know it, you’ll be wielding that hook swiftly and surely!
I have been enjoying the tambour embroidery articles very much but I read them sitting on my hands to keep from ordering all the various supplies because I just don’t need any more projects. Then last week while going thru my box of needles searching for a simple tapestry needle, I saw something and it turned out to be a tambour handle with 3 needles. I have no idea how long I have had it but for quite awhile. I bought the tambour book when it was first published so probably bought the needle set at the same time and forgot I had it. I never really noticed it whenever I went to get out other needles. Amazing! My question which you probably talked about earlier is simply what kind of linen are you stitching on. JoyceAnne
I’m very excited about your upcoming Tambour tutorial! I would like to learn more about how to do tambour work. thanks! 🙂
Dear Mary
I’ve been looking forward to more Tambour posts and I can’t wait for the Tambour tutorial as I’m really keen to learn the techniques of Tambour. I love the pattern you’ve chosen above it’s really pretty and I love how you used the three shades of thread on the green leaves and purple flowers, I hardly noticed the difference in the light green leaves I really had to look several times to spot the difference it hardly notices it’s beautiful. Thanks for showing us more Tambour.
Regards Anita Simmance
That flower is so beautiful, the colors are perfect. after seen this I want to buy a tambour hook and do something. Thank you Mary.
The flower looks lovely!
You make Tambour work look like fun.
me gusta esta forma de bordar como se llama estas agujas, yo creo que puedo aprender este tejido gracias Dios te bendiga
I’m looking forward to your tutorial! 🙂
Hi Mary,
Wow – that is really a nice design worked up in the colors you chose!
Would you share how long it took to stitch the design with a tambour needle? It looks like it would stitch very fast (relative to doing it all by chain stitch) once one got the hang of it.
I’m curious how this would look mixed with other hand embroidery stitches – using tambour stitching to fill large areas rather fast, and adding detail or contrast with other stitching…..outline stitching or stem stitch outline, etc…
One other question – since this is in essence a “running” type of chain stitch, are there any concerns/tips about properly anchoring stitches so that it doesn’t accidentally pull and all come unraveled?
Thanks for sharing with all of us!
I wouldn’t have tried coton à broder, because I thought it was not twisted enough. But it seems to work perfectly (at least with you…) I will just have to order a larger needle to use my large box of coton à broder !
I tried DMC Fil à dentelles and it works perfectly too. As it is strongly twisted, the needle isn’t caught in the middle of the thread.
I’m waiting for your tutorials and the Tambour work book I ordered to improve my technique.
Where is it possible to buy some more time in order to achieve all the projects I have in mind ? Retirement is so far away…
In France, you can find various handles and needles (5 sizes) at Brodély : http://www.brodely.com/ They are the less expensive I know.
You work is stunning craftsmanship! I strive to stitch as evenly and smoothly as you.
I just start and have the the just hanging on the back whether I’m working from the top or bottom. I usually start with a tiny stitch which sort of locks it in. When a piece is done I use a touch of white glue on the hanging thread clipped to about 1/2 inch. I learned this from Robert Haven.
Hi Mary,
Thank you for your series of articles on tambour embroidery. I eagerly await each one and have a tambour set on my wish list for this Christmas. Your little sprouting flower is lovely. I’m such a sucker for purples!
I am making a crazy quilt on foundation (muslin) I wondered if this technique would work with cotton fabric with muslin back. I love the technique and really want to encorporate it with my quilting addition.
Hi Elsie – Yes, it will. You just have to remember to exert a little pressure on the back of the hook as you pull each stitch through, and will travel through both layers of fabric. It helps to practice first on scrap fabric in a hoop, though, just to get the hang of the stitch.
I’m a beginner. And at times I find myself frustrated and intimated regarding information about where to go for supplies. Your videos are very helpful and easy to understand. But I’m lost sometimes when it comes to what materials to buy not to mention a small budget to work with. Where can I purchase this Tambour needle?
hola.. donde consigo la aguja tambor. aca en argentina se consigue??con que nombre?? gracias
Hello Mary, I have just started with tambour embroidery. I want to use wool to embroider a linen/cotton fabric to use to upholster a settee. The needle that I have is too small for using wool, I think. Could you point me to the right size, please? And where to order it from.
Thanks, Elria
Hi, Elria – you might check at lacis.com to see what they have. I have the three pack of needles from them, and I’ve used the largest one with Crewel weight wool. Hope that helps!
Hi Mary , your video is helpful but i have two issues.
I read your article but i’m still confused on how to do the knots (im suppose to use a regular needle for that t?)
secondly everytime i push through the fabric its like the hook flips open am i suppose to hold it with my finger or something? My first experience yesterday didn’t go too well because the hook went trough my finger..lol
I really want to be able to practice it over the weekend !
Hi, Sandrine – A typical tambour needle doesn’t have a latchet on it. It’s just an open hook. So that’s probably the main problem you’re having. If you’re using the kind of hook that has a latchet on it, that’s actually supposed to be used from the bottom up rather than the top down, if I recall correctly. I don’t use that kind – I just use the traditional open hook tambour needle. So if you don’t have a regular tambour needle, you might try the concept reversed – come UP into the fabric from down below with your hook. It might solve the latchet problem! And then, if you want to get into regular tambour work, you can always invest in a relatively inexpensive set of regular tambour needles – they have them at http://www.lacis.com (just search “tambour” in their catalog).
Thanks Mary! I’m going to try that! I was wondering because I follow __heidra__ on instagram and she does it from top down with such ease and it doesn’t even look like she turning the needle( maybe no need with the latch?) and I realize my needle is not the same as yours! Will def look into getting the other ones without a latch! Gotta take advantage of the strong Canadian dollar while it lasts lol
Actually rayon IS a natural thread, it’s processed from trees.
Hi, I just bought a tambour needle set.
How do I determine which needle hook to use?
How do I determine which needle is what size?
Hi, Carla – When I was learning, I just tried different threads with different sized hooks, until I found the right size hook for the thread. You can tell by looking which needle is which size, or at least, which needles are smaller or larger. It’s really just a matter of trial and error.
met hoeveel afgesplitste draden werkje als je de gewone splijt zeiden gebruikt.
I use a thread that can’t be taken apart. I do not think tambour would work well with any kind of thread that is taken apart, like 6-stranded cotton or anything similar.