


Yesterday, we talked about some hints to increase stitching efficiency.
We discussed how starting threads from the front of the fabric and traveling threads along a stitched path on the back of the fabric can help save a little time during embroidery sessions.
Today, we’re going to look at one more habit that helps increase stitching efficiency. It’s called “parking” your embroidery threads.
Parking a thread is simply bringing the thread to the front of your work where you can see it, but away from your stitching area, and leaving it there until you either need it again or are going to end it.
Especially if you’re working with multiple colors or shades and you’re planning to return to a thread you’ve already used (but not used up), parking your threads can save you time. You can pick up a parked thread and use it in the same area later, if you need that color again. You don’t have to end the color and then later, start it all over again.
Parking can also save you time because you aren’t ending threads every few minutes. Instead, you’ll end them all at once, when you’re finished with the section you’re working on.
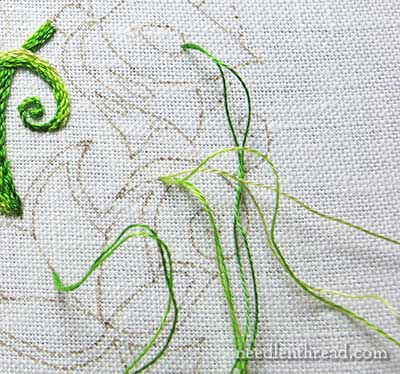
If you’re working on a small project and your thread will reach outside the perimeter of the design, you can park your threads there.
If you’re stitching on a larger project and your threads won’t reach to the design perimeter, it’s best to bring parked threads to the front of the fabric in an area where you’ll later be stitching so that you don’t make random holes that won’t be covered in your ground fabric. Just make sure that you bring the parked thread to the surface away from your present stitching direction.
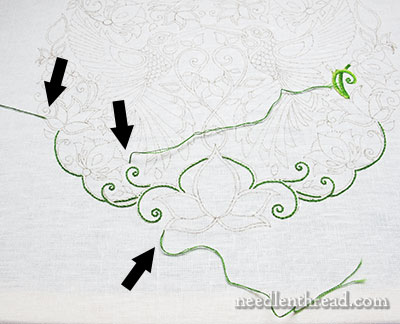
In the photo above, the arrows point to various parked threads off the sides of the path I was stitching.
The Important Point
I was working with a gal once and we were shading with several colors. I explained to her that she didn’t have to end each thread right away – she could park them and end them later, and that way, she could continue to use them.
She was adamantly against the practice. Why? Because she had learned it before, and it caused entanglements and a huge mess on the back of her fabric every time she did it.
So I asked her to show me how she learned to park her threads.
She agreed. She took her last stitch with a particular thread.
With her thread still at the back of her fabric, she brought it around to the front edge of the top of her frame, and stuck the needle in the fabric, leaving the majority of the thread hanging on the back of the fabric and also leaving her last stitch rather loose, because the thread was never pulled taut anywhere.
Do you see the problem?
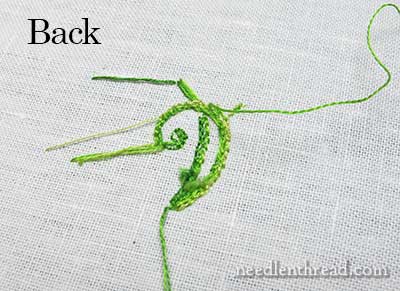
It’s very important that the parked threads are brought completely to the front of the fabric and pulled taut, so that there are no stray, sagging threads on the back of the fabric. With the parked threads on the front of the fabric, you can see easily where the threads are and you don’t have to worry that they’re hanging free on the back somewhere, waiting to entangle themselves with your working thread. Also, by pulling the thread taut to the front, your last stitch will be locked in, not just floating in place.
Some folks like to use a magnetic needle minder on their projects, and park their threads – still threaded in the needle – by bringing them to the front and resting the needle on the magnet. That way, if the thread can be used again in that area, you don’t even have to thread the needle.
While it can sometimes look like a confusing array of annoying threads on the front of the fabric, as long as you’re parking them out of your immediate stitching area, you can smooth them down to the surface of your work to keep them from flying about. Most threads will stick to the ground fabric if you smooth them down on top of it, out of your way.
Once you’ve finished stitching in an area where you’ve parked your threads, you can flip your frame or hoop and end all the threads at once.
In the photo above, you can see several threads coming off the stitched area. These are the parked threads. Now, I’ll pull them to the back and end them off.
You can also end your threads the same way you started them, with a few tiny backstitches in an area that will be covered with stitching, and you can do this entirely from the front of the fabric, saving you from having to flip your frame.
However, in this particular project, the stitched areas are rather narrow, and I don’t want to fill them with a lot of crowded little backstitches for starting and ending threads.
Instead, I’m starting all my threads on the front in the manner we discussed yesterday (the waste knot and backstitches), but I’m ending the majority of them on the back by weaving them or whipping them under the backs of the stitches and trimming them.
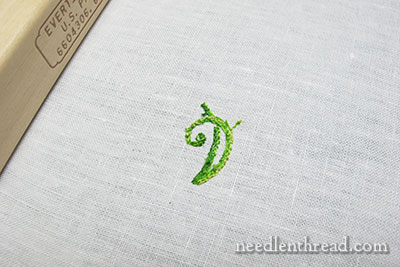
In the photo above, you can see that all those ends are now secured and trimmed away, leaving the back neat and tidy.
So now we’ve seen three ways to increase stitching efficiency: starting threads, traveling threads, and parking threads.
Each of these tips can help increase your actual stitching time during any given session. And anything that can give us a little more time to stitch is a good thing, right?
Questions, comments, suggestions? Have your say below!
This post is part of the series on the Secret Garden Hummingbirds embroidery project. If you’d like to see what that project is all about, or pick up some more needlework tips along the way, you can follow the whole project from its beginnings by visiting the Secret Garden Project Index.
Thanks for another great practical tip – clearly explained. I really like the bit about using a magnet.
Dear Mary
Another great tutorial on parking threads. I have used this method before but I didn’t smooth down the threads on top of the fabric so they were still rather loose that is a tip I will use in future projects. These articles are so useful and informative and a great way of saving time on stitching. Thanks for sharing this and showing us how to use different stitching techniques. Just to digress a little I’ve just completed the little things so I am researching how to make a beaded evening bag/purse because I want to explore tambour stitching.
Regards Anita Simmance
The very best way to park a thread I learned from a very clever person at my embroidery retreat (Nordic Needle). She parked a needle out of the way and then wound the floss in a figure 8 around it, like a cleat on a yacht or to hold venetian blind cords. Awesome–and SO tidy!!
Yes, that works, too! It keeps the tails from flying around. It does take a bit more time, though, to wind the threads around the needle…
Great tutorials – both yesterday and today. I always thought you parked threads because you were going to use them again but now I also see how much more efficient it is to end several all at once. Can’t wait to try it on some stitching this weekend.
Thanks,
Jacquelyn
More curiosity Mary.
How does that work with hoops? I know that as I am working the hoop etc is being flopped around, and the “parked” threads would likely do the same and still get in the way? The photos above appear to be in a framed project, and I have no room for a frame so am stuck with hoops. Thanks!
I use hoops and park my threads all the time. You just smooth them out of the way, or hold them, or tuck them into any covering fabric you might use.
Whatever the case, when I’m working on something whether in a hoop or on a frame, I figure out a way to make these kinds of things work for me, to help use my time more efficiently.
Thanks for the details. Maybe my personal stitching style flops my hoop more than you flop yours, who knows. I do “park” my floss as you call it when (frequently)I need several colors in a small area, but I do it a bit differently with the needles in, which still minimizes the tangles on the back. Maybe I should try a magnet. Thanks again. 🙂
Even though I had a working idea of what you have discussed yesterday and today, your explanations make me want to actually try these time-saving tips. I truly appreciate your talent and the fact that you are able to convey your thoughts in such a teachable way.
The only time I’ve seen parking is in cross stitch. When someone is stitching a HAED (Heaven and Earth Design) they do parking because of all the confetti stitches. But to see 20 or 30 strands of different colors neatly brought down the fabric and rolled scared me half to death. Some keep their threads with needles still on; some take the needle off and rethread every time. No thank you. But it’s impressive to see.
In your case with embroidery you’d have to take off the needle to bring the thread back. In cross stitch, whether Aida or linen, you can easily push the thread back through with the tapestry needle. Plus they tend to bring up their needle in the spot where that color will be placed next anyway. It’s ready to pick up and stitch a few.
I did try parking once. . . . . with only 3 colors. LOL I did it but it still scared me.
I do crewel embroidery on linen. If I am parking threads with the needle left on I carefully go back down the hole I came up in so I don’t have to rethread.
Thanks, Mary! This is exactly the method I’m going to use on the embroidered quilt squares project I’m working on.
Maybe I have not had enough coffee yet this morning but I am not seeing this as a time-saver. I have been ending each thread with whip stitch as I go and cutting the thread but keeping it in the needle for the next section. If all the threads are to the front, don’t you have to pull the thread to the back, then Re-thread the needle and whip stitch to end? This takes more time.
Help please. You have such a knack for addressing the very problem I ran into.
Thanks so much for this beautiful project.
Hi, Robin – It might not work or be the best option for everyone. It’s just a suggestion, if you’re working in circumstances where it would be useful.
With parking, you can pick up threads that are still in use, and use them again without the ending and re-starting of threads, as long as you’re stitching in the same area. You can also put off ending the threads until you’re finished with an area, and at that point, flip your work (and this is especially more helpful when you’re working on a frame) and end them all with only having to go to the back of the work the one time. Taking the thread to the back is just a matter of picking the thread up from the back. Pulling the thread through to the back doesn’t take any time really, unless all your threads have needles on them. Mine generally don’t, if I’m just parking a thread at the end of its use. I suppose it depends on a couple things, whether or not parking would save time: 1. whether or not you’re working in an area with several colors and shades that will be used again in that area; 2. whether you’re working in a hoop or in a frame; and 3. how much time it takes to thread a needle. For people who struggle with threading their needles, I can see why they wouldn’t park their threads at the end of their use, but would immediately end them off, unless they have a heavy frame to flip. If they’re just working on a light frame or a hoop held in the hand, and it takes them time to thread a needle, then parking might not be any more time efficient.
Whenever I’m working on a frame that’s mounted on a stand, I park my threads, because I only like to turn my frame over when I have to. I like to do as much work as possible from the front of the frame, without having to access the back. If I have to access the back, I like to do that only once, at the end of my stitching session.
When I’m working in a hand held hoop, the only time I really park my threads is if I’m doing needlepainting and have several shades going at once.
Hope that helps clarify!
~MC
For the most part I like your 3 tips and have used them all. My major problem with parking threads is when I am working with shades that are only slightly different from each other and then I am trying to figure out which shade each of these threads is, when I wish to go back and use them.
Yep!…What they all said. Thank you so much. Suzie in Idaho
This is such a timesaver when thread painting. Now that it is a habit I tend to park threads on the left if possible and I tuck the needle into my cotton protective layer instead of my linen or whatever fabric I’m stitching on. Thanks again Mary for the reminder to create good habits.
Pink hair tape is my favorite parking method. No residue, either.
Mary – this is great information! Thank you!!
Barbara
Wish I’d known the tip to bring threads to the front when you park them. I worked a bird’s crest with various colored bullion knots packed together. I had to be very careful not to catch parked threads on the back, like you mentioned. That won’t happen again. Thanks!
As usual, totally enjoying your post! One suggestion: can you record them so I can actually ‘sew’ while I read them? No, I thought not,,, but just a moment of levity! I wasn’t really serious, just commending on how much I enjoy learning and what a great teacher and photographer you are!
Lynn in TX
Mary,
I have heard of parking threads, but have never had such a clear tutorial on how to do it so they don’t get all jumbled up. I am going to use this method on a cross stitch I am working, and I believe it will make the whole project much easier and also much neater. Thank you so much!!
While I don’t understand what you are explaining (beginner here) I can flag this post, take it to my monthly embroidery class and after my teacher reads it she can explain it. Love your blog/website.
Catherine
Thanks for some more useful tips, Mary. I had always been wary of ‘parking’ threads as I dreaded getting in a tangle, but now I know how to do it properly!
Do you ever use the ‘ thread through the loop’ starting method? ( don’t know what else to call it, but it does away with the knot!) It can only be used when 2 threads ( or any even number) are needed, so won’t save much time as a rule.
Hi Mary,
Thanks for the great tip! Will try this out my next project 🙂
Mary, I just wanted to say Thank You! I have learned and continue to learn so many fabulous embroidery tips, tricks and techniques from you and your site. I was taught basic line embroidery from my Grandmother many years ago. After a car accident in my early teens, 30 plus years ago, I did very little because of severe memory problems and so forth. Hard to believe that I really thought that line technique was all there really was to hand embroidery. After discovering your site, I am once again totally thrilled and excited about hand embroidery. I recently finished your Crewel Rooster project and am currently working on a Crewel Peacock Quilt top project that I enlarged and traced onto a queen sized sheet. I am using DMC cotton thread instead of wool….but am having a great time. Sorry, I am getting long winded. Once again, Thank You so much for sharing your knowledge and love of embroidery. For the first time ever, I am using the backstitch and not creating knots!!
Have just heard of your website and love it.I am going to join in on the Humming birds project and wondering if 28ct Quaker cloth would be suitable.We don’t have anywhere in New Zealand to obtain the fabric you suggested and don’t really won’t to wait to obtain it from overseas.
Regards Ellie
Hi, Ellie! I wouldn’t go with a blend. I think you’ll find fit a bit springy. Also, so sure the 28 count would be closely woven enough for the detail stitching. I’d look for a higher count (36-40) linen,if you can find it.
If you can’t, I’d advise lining the Quaker cloth with a good high thread count cotton to support the stitches.
I like parking threads and I think it is very efficient–but only works for me when I am not using many shades and blends because I cannot remember which is which. (Was that the light grey and white or was it the pearl grey and white ????)
If I could label the parked threads (or had a better memory)I would be much more successful with this method.
I have always parked my threads using a magnet to hold the needles. I don’t want to take the time to rethread them. I also travel my threads similar to the way you do. But, I had never heard of starting my threads with the three little back stitches. Thanks for the good information.
Hi Mary,
Help!
I have not used a frame before SSG and I am loving it; stem stitches are so fine with the frame. However I am noticing the fabric is not as drum tight as when I started. I am aware of not touching fabric and have been careful with that. Can I tighten the fabric on the frame once I have started stitching?
Jude
Hi, Jude – it depends on the frame. That’s why I like the Evertites – because you can tighten the fabric without taking it off the frame. If you are using regular stretcher bars that don’t have that feature, you have to re stretch and re tack your fabric to tighten it up. Changes in weather can have an effect on fabric in a frame – especially changes in humidity levels.
Slate frames can also be tightened without having to remount your fabric. But with regular stretcher bars, the only option is to re-tack.
Hi Mary, I love these tips! I learn something every time I read one of your postings. Right now life has gotten in the way of my embroidery but I intend to get back to it soon and I know these last few things will really help me be a more efficient embroiderer.
Deonia in Florida
I do seem to have one problem with parking, not being quite sure what colour number I am picking up if I am doing an area with several colours close in shade.
Never heard/thought of a magnet to hold the needle in front instead of having to rethread. I think this would be a great help to me as I do sometimes have a problem rethreading. Great idea. Thanks.
I do love having an email from you every day.
Regards, Margaret (in UK)
Hi Mary. I’ve been working on parking thread techniques. I know that this technique greatly improves efficiencies. I did go to the school of hard knocks in learning it! Tangled threads, dropped needles (I do need that magnet thingamajig!) — and oh my scissors to get it all sorted out. Now, things are going very smoothly. I like the idea of parking before ending and then flipping the evertite to tie off a few at once – especially in shading or needlepainting. That’s a new trick for me to add to the reportoire. Thanks a bunch.
I am so glad I found your site. With each post I learn more about embroidery. Quilting is my passion. Stitching is something I knew very little about. Years ago I began appliquing and choose to use the blanket stitch. Now I continually add new stitches to my projects. Thank you for all your teaching. Just wish I could sit with you for a day. Being left handed just adds to my frustration. Again, thank you.
What a GREAT tip!!!! I use multiple threads in my art quilt work and will apply this same tip to my work!!! Thanks so much!!!
“It’s very important that the parked threads are brought completely to the front of the fabric and pulled taut, ”
Oooooooh! That was the tip that I needed. Have tried to part before and ended with a mess on the back, just like your friend.
Thanks!
Thank you for sharing such wonderful time-saving techniques. Parking the threads worked very well today on my crewel piece…I left the needles on a few threads and had no trouble with tangled threads.
Thanks for sharing yet another great tip Mary! I use your technique, but I end it a little different. I use Scotch Magic Tape to secure the threads onto the fabric. It’s easy on the threads and needles and you can write on the tape what color it is or other info so that you won’t get lost lol!
It’s also great to use on your stumpwork wires. After you have ran them through the back, tape them down. It keeps the wires from catching the thread. I don’t know how many times I had large loops in the back while all along I thought they were taunt and fully pulled through.
Thanks again,
OwlBe
I’m a bit late with this response about sorting threads. My solution is a tension curtain rod for hanging threads, inexpensive and adjustable. I like the pasta dryer stand idea but don’t have the space. I repurposed and repainted an old tv entertainment cabinet, The many open display shelves work just fine for storage, 2 layers of modular shelves purchased at a craft store fit into the open “tv” space and then I have a wide, open space on top of those shelves for display and the tension curtain rod of hanging threads.
I LOVE your videos. Thank you so much for making them. Jan in VA
The thread and needle are both parked on the front of your work. How do you get them to the back again when it is time to use them again? I would normally take the needle off the thread and pull the thread to the back of the fabric, then re-thread the needle. Is it possible to do it without de-threading the needle?
Good eye, Karen! I started to go into detail on that point, but then I got too long winded. I pull a little on the thread to open a slightly larger hole in the linen, and then pass the needle back down the same hole the thread is coking up through. It only takes a split second, and it’s worth not having to re thread the needle… Thanks for asking!
Thank you for such an informative, but quick piece about parking. I had NO IDEA what my fellow stitchers were talking about when they said they “parked their threads,” so I’m really glad your post came up when I googled. I will be back to read more of your posts. 🙂
It’s a funny term, but it works! You can park threads different ways – lots of people use magnet needle minders, but I usually just stick my needle to the side, in the fabric somewhere.
Instead of parking your threads, what do you think of ending the thread, and having multiple needles with the colors you are planning on continuing to use?
Hi, Norleen – I do have multiple needles threaded, but parking your thread allows you to keep using the same thread as long as it’s in a good condition, and in a close area. Otherwise, it would be a waste of thread and time, to change threads every time. So, I do both. But I only end a thread when it needs replacing. Hope that helps!
I appreciate the info on efficiencies in needlework. Well written Mary and filled with hands on experience. Parking threads was a time saver for me to learn. I appreciate the clear way you explained the process!
I have enjoyed your website so very much. I’m self taught embroider and needlepoint which came mostly from books. Now, the web has opened doors to many excellent needle artists. Thank you for your web site, it has been so helpful. I have always parked my threads on the back keeping the needle on, so this post was very helpful and I can’t wait to practice it.
Thank you,
Barbar
What a wonderful article on parking threads. I had tried leaving them at the back and it obviously was not successful. Thank you
I understand your instructions for parking the threads, does that mean every time I need another colour, I need to take the parked thread, unthread it, take it to the back, re thread it and then stitch. That seems very fiddly. If you are doing two stitches colour 1 – 2 stitches colour 2 etc etc this parking method seems complicated. Am working with four colours at the moment on evenweave and yes because of lack of know how – THE UNUSED ONES ARE DANGLING AT THE BACK!!! HELP!!
Hi, Llana – well, you can always keep your needle threaded on the parked threads that you’ve brought to the front, and then, instead of unthreading the needle to move the thread to the back so you can bring it up where you need to start stitching again, just take the needle and thread down into the same hole where you brought the thread to the front (be careful not to split the thread – but it’s usually pretty easy to do this on even weave fabric without splitting the thread). This way, you have a threaded needle ready to go, you don’t have to rethread your needles, and you don’t have threads dangling around on the back and getting in the way of your stitching. Hope that helps!
Gee, Mary. I thought I was so clever, bringing my thread to the front and leaving them until I was ready to move the hoop and follow along. I was working on the two Viking Normandy boats sailing blissfully off to defeat King Harold and the Anglo Saxons. But lo and behold, I was not so original as I thought I was—- I was just parking my thread!
Can this method also be used for cross stitch? I tend to stitch in blocks of one colour and finish it off before going to another.
Yes, of course!
Dear Mary – Thank you so much for your tips and techniques. I find them easy to follow and they are so helpful to someone like me. I have just read your tip about ‘parking’ threads. There have been times when I have ‘parked’ my threads but I seem to catch my working thread in the ‘parked’ thread (they seem to cross over at the back of my work) and this causes problems as you can imagine! Do you have any suggestions for me, or can you please explain what I am doing wrong for my threads to come into contact with each other? Kind regards Christine (Brisbane, Australia)
I always park mine somewhere where the thread carried across the back is not in my stitching path.