


Starting and Traveling. Are we talking about cars here, or embroidery?
My knowledge of cars being somewhat limited (does it start? do I like the color? this is where the gas goes…), I promise we’re talking about hand embroidery.
And not only are we talking about hand embroidery, but we’re talking about ways to make hand embroidery more efficient.
We all know that handwork is not the most time efficient way of decorating fabric. In the past hundred plus years, we’ve developed machines that can adorn fabric a whole lot faster than the hand-wielded needle. Yet there are some things we can do to make our hand embroidery more time efficient.
Today, we’ll talk about two ways that will clip a little bit of time and trouble off your stitching sessions: starting threads and traveling threads.
Starting Embroidery Threads
I’ve covered starting and ending threads before here on Needle ‘n Thread. This is a refresher, with a few extra considerations.
The easiest and most secure way to start a new embroidery thread, especially when you’re working with a hoop or frame mounted on a stand, is to use a waste knot and a few tiny backstitches to secure your thread.
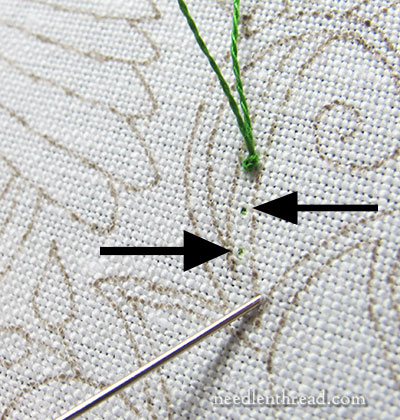
A waste knot is simply a knot at the end of your thread that you’ll clip off later. You take your needle and thread down into the fabric, leaving the knot on top. Then, you stitch a few tiny backstitches to secure the thread and snip the knot. The photo above shows the waste knot on the front of the fabric, and the arrows point to two tiny backstitches or anchor stitches taken towards the direction of my starting point, which is where the needle is sticking out of the fabric.
If you’re working line stitches along your design line as opposed to filling an area with stitching, just make the stitches right on the line, working them towards your starting point where you’ll begin embroidering the line.
If you’re working in an area that will be filled with stitching, you can make the anchoring backstitches within a short distance of your starting point, anywhere within the design lines where your filling will cover them.
Once you have two or three tiny backstitches worked, you can cut the knot right next to the surface of the fabric. I like to pull up on the knot a bit and snip the thread right at the fabric surface, so any excess thread sinks behind the fabric.
How does this save you time?
It saves you time because you don’t have to turn your work over to run the new thread under the stitches on the back of the work. Every start (if possible) is on the top of your work and is covered by other stitching.
This is, in fact, a neater way to start your work, too. It helps minimize bulk areas on the back where the new thread is anchored by whipping it around the backs of stitches.
You can end your threads the same way, with tiny backstitches, bringing the needle eventually to the front after the last tiny backstitch, and clipping the thread next to the fabric. As long as you do this in an area that will be covered with stitching, it will never be noticed.
Sometimes, though, you’ll have to end threads by whipping the backs of the stitches on the back of the fabric, or running the thread under a stitched area on the back, but if only doing this occasionally, it won’t take as much time to start and end your threads.
Traveling Your Threads
“Traveling” a thread on the back of the fabric is taking a still-usable thread along a certain path, in order to get you to a new starting position.
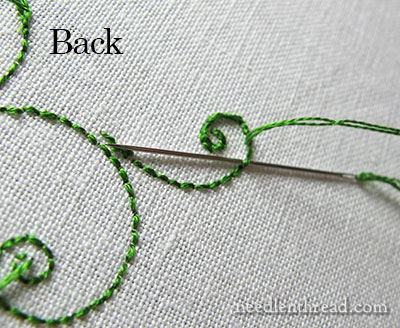
Imagine that you just started a new thread. It’s about 18″ long, and you have a short 1″ line or curl to stitch (like in the photo above).
Below that little curl, a couple inches away from where it ended, you plan to start up another line of stitching.
Instead of carrying your thread across the back of your work for a couple inches to get to your new starting point and leaving the thread in a loose, long stitch on the back, and instead of ending the thread and starting a new one, “travel” the thread by whipping the backs of the stitches on the back of the fabric until you get to your new starting point.
If you get to an area that has no stitches to use as a path, turn the work over…
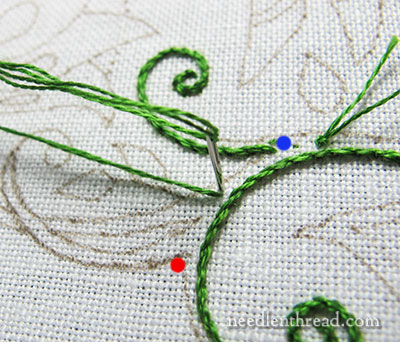
…and work on the front.
In the photo above, the blue dot indicates where I stopped traveling the thread along the back of that curl. I was aiming for the red dot for my new starting point. I could continue traveling the thread underneath that other stem stitch line on the right, or, from the front of the fabric, I can take a couple little backstitches as steps towards the new starting point, as long as I do it in an area that will be covered.
In this way, I avoid leaving long threads crossing the back of my work.
You might be thinking that it’s a waste of thread to “travel” on the back of your fabric this way. If you’re only going a short distance (usually no more than a couple inches, give or take), it’s not! You’d end up using just as much thread or more by ending the thread and then starting it again in a new area.
By “traveling” your thread in one of the two ways mentioned above (whip stitching the backs of stitches or stepping to your new starting point with tiny backstitches), you will save the time it would take to end a thread and start a new one.
You’ll also save time by reducing a possible frustration factor. Long stitches across the back of your work can lead to knotting or tangling that you might not see right away. Eliminating long stitches across the back of your work will reduce this possibility and save you the time of having to fix a mess on the back of your fabric.
Traveling your threads has the added advantage of keeping the back of your work nice and neat. Threads stretched hither and yon across the back of your work can make it messy.
So, those are two tips worth trying the next time you take up your surface embroidery.
There’s another tip that fits into the category of time-efficient stitching, but it’s such an important tip, that I want to devote a whole article to it. So we’ll see that a bit later.
Questions? Comments? Suggestions? Input? Have your say below!
This post is part of the series on the Secret Garden Hummingbirds embroidery project. If you’d like to see what that project is all about, or pick up some more needlework tips along the way, you can follow the whole project from its beginnings by visiting the Secret Garden Project Index.
Ahhhh….thank you for a lightbulb moment! I travel my thread as you describe, however I never thought to have the starting knot on top of the fabric! I have recently started to do some needlework after many years, and I was proud of the neatness on the back of my work…..except for those pesky starting knots! I am currently working on a redwork project ( but using several colors for a Christmas quilt) …..anxious to see if I can make this technique work! Thank you for your lovely blog and your great information!
Thank you, Mary, you are an awesome teacher! 🙂
This question is asked just out of curiosity, not judgment.
Why does what the back of your work look like matter so much? Sometimes I iron my design (iron on pen) on the BACK of my work, especially if I can see it through the fabric, That way if the ink does (has not so far, but I digress) not wash out thoroughly it will not even be noticed on the front. I do not wish to waste thread, so I only “travel” a couple of inches anyway, or I end and start again, but in all honesty, I really don’t care what the back is going to look like, because in most cases no one will ever see it again. I can say though, that in some cases the machine done stuff looks worse on the back than my stuff, but I assume that is because the back is less important, even from an industrial standpoint. I know you mentioned tangling on the back etc, but I have never experienced tangling on the back, except when I had more than one needle full (different colors) of thread going, and the lengths of thread that were “waiting” got tangled with the length I was working with. Is there a specific reason or is that just personal preference?
I was told (by a Spaniard) that there is a type of embroidery (I forgot the name) that they used to use in Spain to make those large heavily fringed square shawls (Mantones). As you stitch, the embroidery looks the same on the back AND on the front so you only need one layer of fabric for your shawl. They no longer use it now, they are mostly all made by machine and you CAN tell the back from the front, but when women were doing them by hand, you were not supposed to be able to tell, so you could wear you shawl from either side, and no fiddling would be required.
Well, tha back can matter greatly. If you’re building up large areas of threads on the back, you increase the density, which can influence the way the front looks. For example, if you have a mound of threads on the back, and you mount your work on a board for framing, that mound can show up. Also, increased density on the back can make it more difficult to stitch through an area. It can also lead to entanglements with other threads on the back, which can interrupt stitching time if you have to fix them. Increased density of areas on the back can also lead to thread wear and tear. Increased density can lead to puckering of the fabric, too. If you’re stitching on a lighter background – even on a medium weight linen – increased density or stray threads or traveled long threads across non-stitched areas can still show through from the front when the piece is finished.
I’m not saying the back has to look as good as the front. But developing a habit of keeping the back at least somewhat neat can save time, it can influence the way the front looks, it can influence the way the finished piece looks, it can save thread, it can save frustration later.
Thanks, I guess my thread mounds are not large enough for me to have noticed. I guess if you are using gold wire or whatever they can get annoyingly high. I only use regular stranded DMC so maybe I have just never experienced that aspect of embroidery.
To be honest, I would likely get more frustrated trying to keep the back tidy than I would from anything else. That is just me though.
I entered a cross stitch competition once in which there was a category for the backs. Yes, folks were judged on the backs of their pieces. These were not pieces that were meant to be two-sided. It was literally the back of the work.
Very helpful! Thank you
Well, you certainly have given me food for thought. I have been stitching for many, many years and had never heard or seen the traveling thread method but it makes so much sense. Duh! Oh well, one can always learn something new, right?
I agree with you Mary, the back should be as neat as possible. One trick I use is to zig-zag my needle through the stitches on the back, going from left to right under the first stitch and right to left under the next stitch and so on for 4 or 5 stitches. Then a gentle tug on the thread and it will snuggle up to the stitches and become almost invisible. This will work very well with any stitch that leaves a line of thread on the back and is less bulky than whipping.
I can attest to threads getting tangled up and caught together so I like doing what Mary says. The waste knot has been working well, except on such tiny vines, occasionally the tiny back stitches distract me from my stitching line.
Question Mary; I’m using a finely woven cotton ( like Kona). I wish I’d used a backing with it, because I can’t get it tight in my new hoop. I did wrap the hoop. Since I’ve already started some vines, is it too late to back my ground fabric?
If you’ve only done a few of the tiny vines, might be worth picking out and backing the fabric. I wouldn’t back it, though, with some of the stitching already on there…
I love the Q & A between you and RMW. I was always told the back should look as good as the front. Being very young I became frustrated because I could never accomplish that until someone said it should just look neat. Awwwww, the relief! I never knew about waste knots until I subscribed to your blogs. Thank you so much.
Yes, unless you are doing reversible embroidery, there’s no reason for it to look the same as the front – and quite impossible with most surface embroidery stitches. But neat is good!
Thanks Sandra. I did not mean to imply that it should look like a landfill after a hurricane. 🙂 I doubt the backs of my stuff are so bad that they would offend people, I was just curious why Mary was more worried about it that I am. I was only given one lesson in 4th grade, and the state that the back should be in was never mentioned. Maybe because we were just kids, who knows. I wonder if Mary (who has given lessons to children) teaches her pupils about the back. (?)
To keep it neat. I’m not obsessive about the back. But why not keep it neat if you can? It doesn’t actually take any more effort to develop that as a good habit.
No problem, I didn’t take it that way RMW. When you’re young (& sometimes older) you tend to take things literally & I was always so disappointed with my backs. Adults should tell children the backs should look neat-not the same as the front. If you frame your project or use it in a pillow, etc I don’t think it’s so important how it looks as much as how it lays. If you X-stitch towels, blankets, etc the back is seen more so I would go the extra mile then.
What to do when you want to travel far and nothing will be stitched nearby? I made a practice piece once and had a lot of open space near the top. I wanted to space french knots about 1″ apart in a row and stagger the next row, etc. They have very little to “catch” onto to knot off or weave in plus they can easily be messed up in trying to do so. I traveled between them but can see the thread if I hold it up. Just wondering if there’s another way in case I do this again. It came out lovely otherwise.
I have a couple tutorials on isolated French knots here on the site:
http://www.needlenthread.com/2012/06/isolated-french-knots-part-1.html
https://needlenthread.wpengine.com/2012/06/isolated-french-knots-part-2.html
Those might help…
VERY HELPFUL indeed. I will be re-doing my French Knots. I used two pieces of material but they still have a bit of a shadow. As usual, thank you-thank you-thank you!!!
Dear Mary
The starting and travelling stitch technique is very helpful, since reading your previous blogs on starting threads I often use the waste knot and find it a useful technique for starting my stitches. Thanks for the tutorial and advice on travelling your thread to your point of stitching which looks like it saves time and thread, I always learn new techniques from you Mary, thanks for sharing this with us I will remember this next time I start a new thread.
Regards Anita Simmance
Bonjour,
Yes, I agree with you. If we are not careful with every son back is a mess after the son may hold the following and it’s a disaster, it happened to me several times, the point is zigzag very useful when you can .. Not always the case ..
Mary can I do the same for canvas work. I usually do the knot thingy but not the little stitches never thought of that.
French knots! I sometimes have trouble with thread shadowing when I have several French knots in an area. But it’s hard to make stand alone French knots.
Any advice?
Hi, Cindy – I provided links to a couple tutorials for isolated French knots in one of the replies above. They may help…
Mary can I do the same for canvas work. I do the knot thingy but never thought about the little stitches. Thanks for the neat updates really gets one thinking a new way of needle working.
I’ve used your starting and ending stitch techniques many times on the last couple of projects. One former home-ec teacher gave me an “A” when she viewed the back of my recently completed embroidered tablecloth! I hadn’t though of whipping stitches — so I will add this to my list. I do hate ending and starting again so close together. Thanks Mary!
Ah, Mary you’ve done it again! Answering a question I had a couple weeks ago about traveling. As I was working on the scrolly design I wondered if traveling was acceptable or not, and told myself you probably wouldn’t recommend it! And low and behold you do!
Thanks for your insightful posts!
Jeanie
Only if you can somehow anchor the thread on the back. Running it under other stitches, or using tiny stitches that will be coveted to get to the next spot – and only within a couple inches… Not traveling with long stitches from place to place! Just to clarify…
Hello Mary,
I recently posted an article online introducing the idea of tatting and coronation cord.
http://www.bellaonline.com/articles/art50888.asp
We have used it in the online tatting class, or rather, we developed tatted substitutes for the coronation cord since none was available at the time. (LACIS does carry now but it is uneven and not white.) In response to my article I have received a couple of questions on how to smoothly join the ends of coronation at the end of a pattern.
Have you any tutorials that might help?
Thanks,
Georgia Seitz
Hi, Georgia – I think with tatting and hand embroidery, there are two different approaches. With embroidery, it’s easy enough to tuck the ends and overstitch them in a similar colored thread to hide them. I am not sure what you’d do with tatting – I’ve only done a minimal amount of needle tatting, and never with coronation cord, so I’m not sure. Perhaps someone else who is adept at tatting and has used coronation cord will chime in! ~MC
Thanks.
I do dishtowels that need to be washed frequently. Do you happen to know if the waste knot and little back stitches will be secure 10 or 20 washes down the road?
I make very tiny ending knots and travel the tails. Makes for an interesting back especially when you bury the tails in another color. It’s the starting knots that look messy on the back of my work. I’ll have to give it a try!
Yes, they’ll hold – three tiny back stitches on the line towards your starting point, and then stitch over them as you embroider the line….
Thanks! Judith
Thank you for today’s post! Well, thank you for every post. You are so generous to share your experience. There is something to be learned every time.
Do you have any tips on beginning and ending isolated detached chains.
If you look at the isolated French knot tutorials linked to in the comments above, you should be able to apply the same concepts.
Mrs. Corbet,
Thanks for the wonderful tip!
I just finished an embroidery project yesterday. A very tiny project all in backstitch. I used the cute little bird from the tree in your Quaker Motif (I think that’s what it was called), and another tiny pattern I had. Both of which I had to enlarge a little. I am making hand warmers. Very simple and easy. Just two small squares of fabric, stuffed with rice. When their done, just pop ’em in the microwave oven and voila! Instant heat perfect for when you’re outside for long periods of time. I can not very much take credit for them, though. It was my older sister’s idea.
Sarah 🙂
Mary Corbet, os seus trabalhos são lindos.
Obrigada por compartilhar tanto conhecimento.
Sou brasileira e venho de uma família de grandes habilidades manuais.(bordado,pintura, tricô crochê, frivolitê.Só me restam agora algumas primas que ainda fazem bordados e
infelizmente eu não aproveitei a oportunidade de aprender.
Atualmente, já aposentada vejo as reliquias que tenho guardadas. Comecei a me aventurar no bordado(auto-didata). Eles são alegres, me ajudaram a controlar a ansiedade mas não domino a s técnicas. Gosto do avesso bem feito e com suas aulas tenho aprendido muito.
Am I wrong in assuming that on all the vines we are using the same thread combination, and that we’re using 3 rows of stitching on all of them also?
Apologies on being off topic on this post. I have a lot more to do, and watching your stem stitch tutorial was so helpful. I’m learning so much , but I’m a very slow stitcher. Thanks, hope I’m not jumping ahead.
Hi, Jackie – If you can go back and read the previous articles from the start of the stem stitching, and also read the comments below the articles, I think you’ll find your questions answered. There are several comments devoted to the filling and shades that will help explain…
Thank you, Mary, for taking the time to show this again. I use the waste knot start, but usually I don’t do the traveling…and yeah, I get the knots and ugly etc’s. I had not seen this presented so coherently.
Dear Mrs. Corbet,
Here’s a tapestry about a modern saga:
http://www.dailymail.co.uk/news/article-2561923/Stars-Wars-story-hand-stitched-30ft-Bayeux-style-TAPESTRY-obsessed-fan-6-month-project-nearly-epic-film.html
Hello Mary
I have been very slowly working on a hand painted canvas of a fox in its burrow purchased from the Royal School many many years ago. I completed its mate – a badger-before it. While fussing (the kind that colours the air blue!) over wool blends and the rigours of these painted canvases I learned the art of parking colours; since to complete these canvases to my satisfaction I am blending at least 50% of the work – hence the glacial pace of progess and the need for an OTT lamp. It is a most valuable skill and the back of my work is quite tidy despite the enormity of the blending and traveling of fibers. Actually, the projects just reinforced the skill I learned at my grandmother’s knee as she taught me embroidery. There were two rules. Do not waste an inch of thread and the back should be as beautiful as the front!
I usually travel a thread if it will take about as much thread to knot and cut and weave the ends.
I have produced at least a few pillowcases in my day where it was difficult to distinguish back from front. If one is making household linens or any items where both surfaces could be seen, it matters that the back be as neat as the front. For my fox, it keeps the back and the front a consistent thickness and this matters for wear and comfort as these two canvases will eventually be “library nook” chairs. The traveling threads are hidden securely behind the basketweave stitch I am using for the project since it will be subjected to use and wear.
At any rate… this note is meant to ask if you could find a needlework shop/site or two in Canada that you might include in your stable of favorites. It is so much simpler to avoid the cross border inspections and tariffs when purchasing goods, not to mention faster and cheaper delivery too. Two favorites are Gitta’s in Mississauga and The Sampler 248 Brown’s Line M8W 3T4 416-255-4410 which is near enough to my home that I can shop in person. Tatyana does not have a website but she is reasonably famous amongst any Toronto stitchers that I have met. In addition both shops have knowledgeable staff and a broad range of threads, kits, patterns, tools etc. Not just the conplete range of “Precious Moments” which I find entirely too precious. At any rate thanks again for all of your hard work and dedication to this site and all of us.
Regards
M
Hi, Maggie – thanks for the Canadian resources. I’m not too familiar with shops in Canada, beyond Traditional Stitches and Berlin Embroidery. Always good to know what’s available! -MC
This is great timing for me. I always use a waste knot when stitiching decorative items. But I recently made a redwork quilt, and since it will be used and washed, I used knots. I tried to make them small but worried that without them the embroidery may not be secure. I am starting another embroidery crib quilt and was wondering what you do if you are embroidering on tea towels or quilt blocks. Do you think a knot is the only way to make sure it is secure? Or can I use a waste knot even on serviceable items?
Hi, Joyce – I always use a waste knot and tiny back stitches along the line to anchor the thread, and then stitch over the back stitches. I do this on washable items like towels all the time, and have never had a problem with threads coming out. I think it’s the best way – it’s very discrete and very secure. -MC
Thanks so much for that reply. I will do this next quilt that way then!
Mrs. Corbet, do you think you might make some videos on Starting, Stopping, and Traveling threads? I love your lessons, but I’m not sure I entirely understand how you cover the stitches used to anchor the thread.
You just pretend they aren’t even there, Kristina, and stitch right over them. There’s no trick to it at all. Just make the anchor stitches as tiny as you can (over, for example, just one fabric thread). And then you stitch right over them (and sometimes even into them) as if they aren’t even there. ~MC
Thank you, Mrs. Corbet. I’m sorry for being such a bother.
No bother! Embroidery is always a lot easier and a lot more fun if you stay calm and don’t fret over little things. Really, what’s the Worst that can Happen? You might have to take out some stitches? Not a big deal! But with the little things like starting and ending threads and so forth, not even that. Just keep the anchoring stitches tiny, and pretend they aren’t there while you’re stitching.
Unfortunately, I’m an uber-perfectionist and worry is my default setting. But, I will endeavor to relax.
What’s the worst that can happen, yes maybe pulling out a few stitches, but having to do it over because your project does not come with enough floss and you cannot find the same dye lot is worse. I gave up kits because of that, not a single kit in four years ever had enough floss, and that was when even DMC had dye lots.
Traveling your thread also prevents show through when your piece is framed! Eeks! Even one inch of traveling with a dark thread can be seen depending on your fabric once the piece is finished.
thanks for the guidance as I’ve had a long hiatus from hand embroidery and I was having trouble remembering how to keep my threads hidden.