


You will find small leaves in great abundance on the Secret Garden Hummingbirds project!
And while stitching too many of one shape in an embroidery design can become tedious after a while, the nice thing about leaves is that there are So Many Options for embroidering them.
Today, since some of you have expressed interest in starting the leaves, I thought I’d give a brief overview and some pointers, so you can plow full speed ahead.
For the small leaves on the project (these are the scattered, smaller leaves without the double line around them), I plan to use a few techniques to fill them.
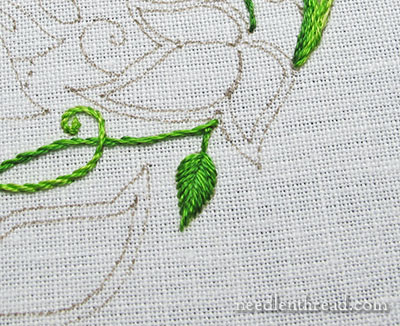
The photo above shows a leaf worked in fishbone stitch, which is a perfect stitch for the small and medium-small leaves on the project.
I’m still working with two shades of green in the needle. You don’t have to use two shades, but I like the additional twist of a different shade here and there.
The darker leaf in the photo above is worked with fly stitch. You can find instructions for fly stitch leaves here. I started the tip of the leave with a twisted chain stitch, to give it a curled tip. That’s covered in the tutorial for fly stitch leaves, too.
In fact, you can find a whole list of 16 different tutorials for embroidering leaves right here.
Many of these tutorials are suitable either for the small leaves or the medium-small leaves. There aren’t too many, though, that are suitable for the very large leaves in the design, which we’ll discuss later.
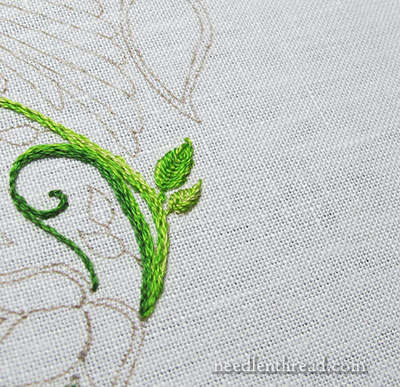
When two or more of the small leaves are grouped together, work them in different shades of green. Otherwise, things will look a bit too flat. With the leaves in the photo above, I’m not too keen on the light green stem working straight into the light green leaf, so I’ll probably touch up the stem and the base of that leave with a little darker green.
For the smaller leaves, I’ll be using primarily fishbone stitch and fly stitch leaves, though I might throw in some satin stitch or other techniques here and there, just for variety. We’ll see as we go. I have a couple experiments I want to play with, too, so we’ll go into more detail on those farther down the road.
So, if you’re itching to get started on the leaves, feel free to peruse the various tutorials for embroidered leaves to see which techniques you’d like to use on your project!
If you’d like to follow along with the Secret Garden Hummingbirds project, which features a design from “Secret Garden: an Inky Treasure Hunt & Coloring Book” by Johanna Basford, you can find all the articles relating to this project arranged in chronological order in the Secret Garden Project Index. Among the articles, you’ll find plenty of tips and techniques that will help you with your own embroidery projects.
Typo from above”
touch up the stem and the base of that leave with a little darker green.
I think you mean leaf. Obviously your brain was in multiplication mode. 🙂
Lovely leaves.:-)
Dear Mary
I like the leaves and the different techniques used to create them. I’ve looked at the 16 different tutorials for leaves and I’ve applied some of the them in my embroidery projects. Your tutorials are always clear and detailed and easy to follow, so thanks for the reminder of the various stitches used for embroidered leaves.
Regards Anita Simmance
As a 60 something year old, I’ve been sewing in one way or another for quite a while, but I never imagined just how much there still was to learn, and what a lovely place this is to learn it! Thank you Mary! I’ve mostly done Xstitch and Tapestry, so I’m finding all sorts of fabulous new stitches to try out, and tips and hints that are making it so much easier. Your photos make everything really clear.
I’m addicted all over again!
At one time you mentioned doing a split stitch around the outside of the leaf before doing a filling stitch. Looks like you gave up that idea?
I would do that with satin stitch, but not these other stitches, and with satin stitch, I’d also use only one strand of floss. -MC
Hi, Mary. The project is looking good. I just wanted to write in support of the bright green stem of the little leaf. It actually looks pretty good; almost like a new little budding extension of the stem. Of course, it may (probably) looks different in real life, so just ignore this!
Your fan,
Denise in Palm Desert
tres joli ce que vous faites
magnifique
bravo
Dear Mary,
Thank you so much for your website–I love it! And I’m learning so much from you.
I would like to do the Secret Garden project as crewel work, using linen twill. I think that will work. What do you advise?
Lois
Hi, Lois – yes, I think that would work. You’d just use one strand of crewel wool, not two, since it’s heavier than cotton. -MC
I just found this project and am interested in getting started on it. I’m currently on vacation tho, so it will be a couple weeks before I can get started. I’ve done embroidery off & on thru the years so I can get caught up quickly enough once I get on it. I see that you haven’t posted any new lessons since March 5, tho. Are you going to continue with this project?
Mary, tus bordados y creatividad son maravillosos estoy feliz de haberte encontrado y poder aprender y disfrutarlos.
Soy de Santiago de Chile. Te felicito de todo corazón y que Dios te bendiga.
María Antonieta.