


I’ve been working on the two larger, single leaves that hang above the hummingbirds on the Secret Garden embroidery project. It seems as if I’ve been working on those two leaves, in fact, forever!
In fact, I only worked on them in one late afternoon, up to a point where a little mishap stalled me in my tracks.
These are the leaves:
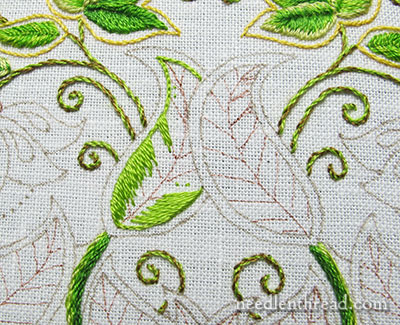
Like all the other large leaves on the project, these two are getting the long & short stitch treatment. But they posed an interesting problem, in the way that they curve – not only in accommodating the curves on the leaves, but also because they felt so different while stitching them.
They curve in opposite directions, and after stitching the back leaf, I found myself having to re-think while I was stitching the front leaf. I felt as if I were stitching backwards altogether by the time I started the front leaf. It was an odd sensation!
In any case, I started by outlining the back leaf in split stitch, except where it is overlapped by the front leaf, and then I worked the long and short stitch in 901, which is the second lightest green.
I tend to work my long & short stitch in chunks, as you can see in the photo above. This helps me keep the stitch direction, and it also imparts a sense of accomplishment – think of it as dividing and conquering. If you divide up small sections and fill them, the whole does not seem altogether as large!
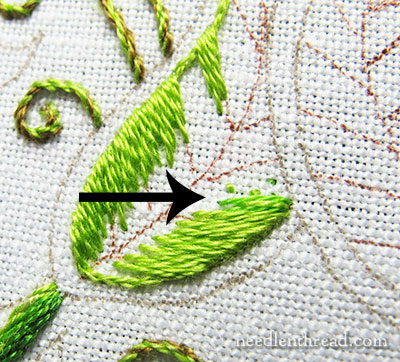
Starting towards the area of the underlap on the leaves, I switched to the next darkest green, which is 906.
I started working in the 906 before I got to the actual underlap.
Or overlap. But since it’s under the overlap, I call it an underlap. Is underlap even a word?
In any case, on the approach to the underlap, I alternated with the two greens. This is a good opportunity to practice parking your embroidery threads, because you’re taking one stitch in the first color, the next in the second color, and then going back to the first color. There’s no point in ending the threads, but to keep them out of each other’s way while alternating, it’s a good idea to park the threads in an unobtrusive way.
On the underlapping leaf, where the arrow is pointing, I got a little extreme in my stitch slant, in order to work the color down that narrow passage.
It worked out ok. Much better to take a single long stitch or so down at an extreme slant through a passage like this, than to try to work tiny satin stitches in there at a more graduate slant. The tiny satin stitches would hug next to the fabric and look tight compared to the other stitches in the leaf.
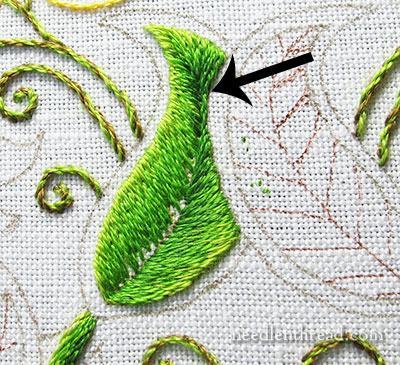
I ended in the middle of the leaf with the second-to-the-darkest green, 905.
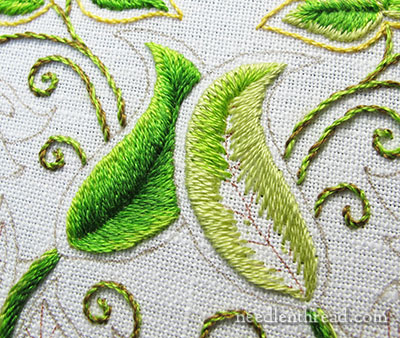
The overlapping leaf began with the lightest green, 472, and I only used three shades on this leaf – 472, 907 and 906.
This is the leaf I found difficult to stitch. While the underlapping leaf seemed more natural in its curve, this one did not. The right side of the overlapping leaf bothered me the whole time.
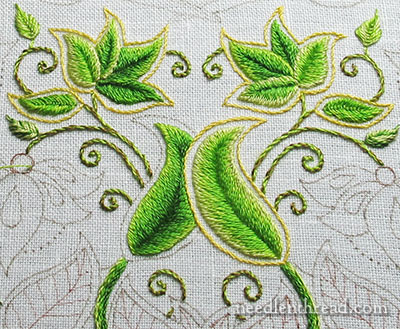
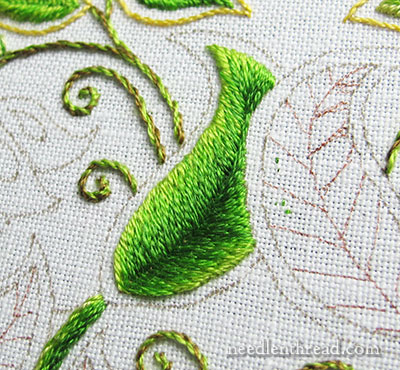
Still, it came off ok, though the lower edge on the left side of the overlapping leaf needs a touch more blending in there. I may go back and add one more shade of darker green into that leaf.
At this point, I was ready to finish the yellow outlines, eager to see how they would look, and excited to move on to a different clump of leaves!
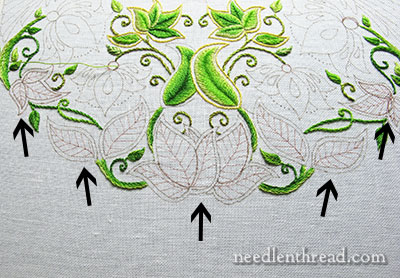
in fact, these five are the remaining leaf areas on the project. Although it was 9:00 pm and the distant call of my pillow was beginning to lure me elsewhere, I was sure I could get all the outlines on the rest of the leaf clumps finished before I quit!
I was all geared up to do get at it when…
When….
I snipped my working thread right close to the fabric, and ….
and…
…whew! No. I didn’t snip my fabric! What a relief! I would’ve died!
It wasn’t that bad!
Instead, I just snipped a little chunk off the end of my thumb.
And that seemed as good a sign as any that it was definitely quitting time!
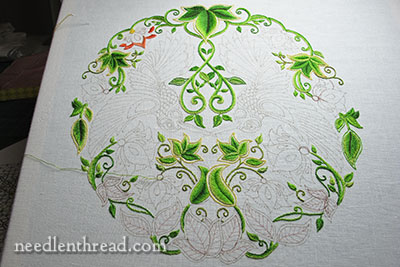
And here we are, thus far. I’ll be stitching on this off and on all week, so that, when we meet again on the Secret Garden project, I hope to show you all the leaves, complete.
And then…color!!
If you’d like to follow along with the Secret Garden Hummingbirds project, which features a design from “Secret Garden: an Inky Treasure Hunt & Coloring Book” by Johanna Basford, you can find all the articles relating to this project arranged in chronological order in the Secret Garden Project Index. Among the articles, you’ll find plenty of tips and techniques that will help you with your own embroidery projects.
Mrs. Corbet,
Yay! The leaves are coming towards the finish line and they’re looking great! Just out of curiosity, do you know what stitches and colours and things you’ll be using on the humming birds? Thanks for sharing 🙂
Postscript:
Sorry about your thumb!
-Sarah
The hummingbirds…the hummingbirds…. the question is, have I thought that far ahead? 🙂 I have ideas brewing, but they must be tested first.
As for the thumb, it’s healed up pretty well. I’m using it and it doesn’t seem to mind.
Ah, I see 🙂 Well, the project is coming along nicely.
You are so funny. You’d rather cut off a chunk of your finger than snip your fabric. A truly dedicated stitcher. 🙂 The stitching is coming along nicely. You must be tired of green by now. Anxious to see some other colors pop in. Also anxious to see which colors go where. Have fun with that.
Oh, My Dear Mrs. Corbet! I hope your poor finger is okay. I’m taking it as a sign that such dedication will mean the end results will be splendid! I’ve missed this project so very much, and it continues to astound me. I also can’t wait for COLOR! I adore all the greens and the yellows but I’m dying to see what you plan for the rest!
You know you’re a dedicated needleworker when you are actually happy to have snipped your thumb rather than your canvas! 🙂
True, true! LOL!
In my defense, the one heals rather easily – a little pressure, some cleaning and some ointment and a bandaid (taking all of one or two minutes), and I was good to go. Imagine if I had snipped a hole in the fabric?! It would have taken a lot of time to put things in order so I could go forward again! It was almost with relief that I saw the wound – well, I might have let a word or two slip at first, but then I put it in perspective! 🙂
I always fear snipping my fabric, but never thought it through. What do you do to “fix” it when it does happen?
Ouch! Oh man , now the challenge to keep the bandaid stickiness and ointment off the fabric and still enjoy stitching. I got to the end of a page in my cloth book and I had pricked my finger but didn’t know it was bleeding. Yup, made a mess I was able to clean it off but so scared for a while that I’ have to do the whole page again. Blessings
Ouch ! Poor thumb .. I hope it feels better soon !
Dear Mary
You poor thing I hope it wasn’t to painful Ouch. The project is coming along nicely so pretty even if it is all green at the moment. The overall photo of the whole design and the different shapes and shades of green is very relaxing on the eyes and you can’t help looking at the different twists and turns of the stitching it’s so beautiful. Thanks for sharing this with us.
Regards Anita Simmance
I really like the shading/colors you are doing on the leaves, Mary. Lookin’ mighty good so far!
Ouch! My sympathies. Sorry to hear you snipped your thumb and not your thread. I hope it isn’t too much of a pain while it heals, skin catching on everything and so forth. You were talking about adding more colour to the project, but perhaps blood red wasn’t quite what you had in mind!
Simplesmente maravilhosa a combinação das cores verdes!
Seu Bordado esta Lindo!
Following this project is quickly becoming the highlight of my reading week. How gorgeous it is, and seeing your immaculate technique and explanation is very inspiring…Love it.
Thanks, Leslie! I’m glad you’re enjoying it!
Oh my! at least you didn’t bleed on the embroidery. And the thumb can heal all by itself, the fabric can’t. It will be nice to see some colors come in.
Sorry about the thumb, but I can imagine the relief when it was your thumb and not the fabric! One is fixed MUCH quicker than the other
Sometimes only half my comment posts!
The rest was to say how much I love this project and to thank you for your wonderful posts. I hope your thumb heals quickly so you can enjoy your stitching.
Ouch! And men think embroidery is not a blood sport! I’m glad you didn’t get blood on your beautiful work. I know you must be getting really tired of green but this project will show that perseverance is as important as any other “ingredient” in a masterpiece. Take care of that thumb, Mary, we value every digit on your talented hands!
Denise in Palm Desert
Can you make A crossstich pattern from the secret Garden?