


The largest flower on the Secret Garden embroidery project is giving me some concern.
In short, I’m doing the Miss Clavel thing again: Something is not right.
It’s not the satin stitching…it’s not the seed stitching…so what is it?
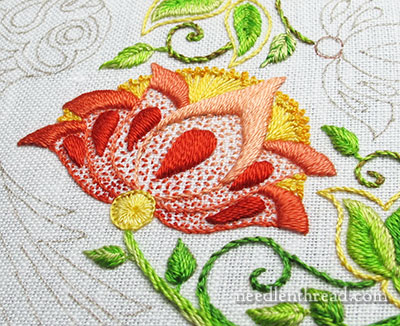
Here’s the flower in question at an angle. From here, it’s not too bad. But let’s look at it upright, shall we?
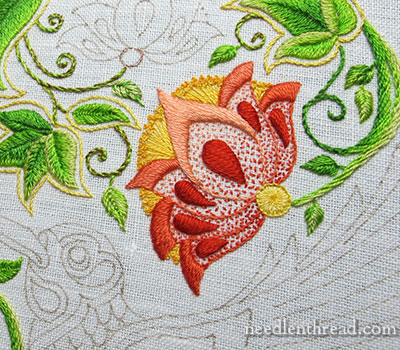
Do you know what it is, now that you can see it upright?
The pistil stitches are slanting in the wrong directions between each petal! I’m not sure what I was thinking as I stitched those – or whether or not the fact that I was working with the frame sideways on the frame clamp skewed my perspective. But whatever the case, I’ll be picking those out.
This is a good lesson on how stitch direction can make a huge difference in embroidery. Overall, true, this probably wouldn’t be noticed in the scheme of the whole piece. But when you look individually at that flower, you can see that something isn’t quite right, even if you can’t quite pick up on what it is.
But – it’s not a big deal to fix it. That area, worked in a combination of pistil stitch and straight stitches and French knots, works up very quickly. It’ll take longer for me to pick the area clean than it will to put the stitches back in.
One point to note about this particular flower is that the flower itself is not symmetrical. One side of the center sports three petals and the other, two.
It makes a difference in the way the flower looks stitched, especially if you’ve been working with a certain Symmetricality (yes, I made that word up) on your mind. Don’t be taken by surprise by it when you get to that point, if you’re stitching along on the project.
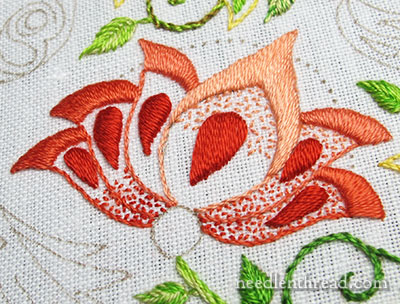
Since this flower is quite a bit larger than all the others, I did something a little different with the seed stitching, too.
Can you see what it is? It’s a subtle difference, maybe not that noticeable, but I like the effect.
Here it is again. See it? I changed the shades within each petal on the flower, graduating from lighter seed stitches towards the top of the petals and darker towards the base.
One other thing I might adjust while I’m adjusting the pistil stitches is the stem stitch outline on the center petal. Right now, it’s stem stitched in the lightest shade on the flower, but I think the separation between the petals could use some better definition there.
Finally, to put it all in perspective:
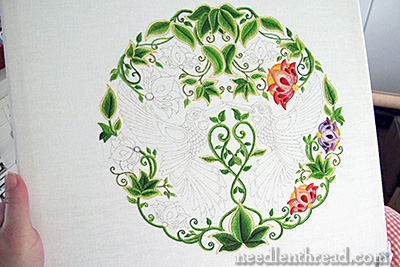
There’s the whole piece, up to this point.
When you put the piece in perspective from a little farther back, the flowers don’t look quite as large! They balance nicely in the green, adding a touch of color, but not a lot of dominating color. The hummingbirds are going to make the bigger splash, which is as it should be!
Questions? Comments? Suggestions? I’m all ears! Feel free to have your say below!
If you’d like to follow along with the Secret Garden Hummingbirds project, you can find all the articles relating to this project arranged in chronological order in the Secret Garden Project Index.
Beautiful so far. Could you show us a close up of the purple/blue flower. You do beautiful work.
I think it looks very nice, but I think the problem is too much seed stitching for the amount of satin stitching. Seed stitches should complement and enhance, not constitute 50% or almost 50% of the motif. Nevertheless, I still think it looks beautiful as it is.
Don’t think it is skewed. Pattern has 3 petals on one side and 2 petals on other side. That’s the reason it looks slanted. But when you look at the entire piece, it is beautiful.
Mary,
when I saw the first photo, the knotted stitches looked too crowded. I think if you back off the number, it will sort itself out.
dianne
Mary, Your work is so beautiful. When you look at the flower from a distance, it looks good but close up the seed stitches don’t seem to be enough for the area. It’s like there is no support for the rest of the flower. I think it depends on how you will see the flower-close up or from a far. At least, that’s my opinion.
Thanks for all the tips and tricks here, Mary.
I am itching to start my own version.
I am also thinking about doing a smaller something just with the birds alone, using silk-shading and gold work, but combining it with something I haven’t seen being used to date – PORCUPINE QUILLS.
Maybe someone else has bumped into this being used together? I really would love to get more info on this. Have you used them at all?
I have a whole selection ranging from tiny inch-length and very thin, to very long ones of almost 60cm, as well as shorter very thick and very sharp ones I use like a laying tool or stiletto – it works like a dream, by the way.
I always wanted to learn how the Indigenous tribes of the US and Canada used them in embroidery, but apart from an article in Piecework, I can’t find anything else on it. Certainly not combined with gold work.
Do you think it will work, couching the smaller bendable quills, and then using the other ones as they suggest which I haven’t tried yet, soaking and flattening them?
Any tips will be very welcome!
Ahhhh – maybe someone else out there has used the quills in embroidery, and can help with some tips. I haven’t used them, but I’ve been curious about them. Can’t wait to see what you do with them!
I will send you a picture when I have managed to decide what to do with it – the hummingbirds might have to become LBJ Bushveld birds – (Little Brown Jobs – lots of those here in the South African bush) but combined with goldwork – which I am unfortunately NOT yet skilled in, and that’s what’s keeping me back – I see the golds and browns and blacks in my minds eye, I see the texture, satin, shiny metal, lovely soft padded pigskin, the rigid lines of the tiniest quills to outline the edge of the wing feathers, offset with brown and black needle lace, but I just don’t have your eyes and skills and more important, touch for putting it together – but working on it:-)
You’ll be the first to see if I manage to get it off!
Go to Google and type in: Native American Art
Porcupine Quill Embroidery
There were several articles. I’ve seen quills used in Jewelry in New Mexico and Arizona. They are quite beautiful.
Thanks for the tip, Robin, I have just checked and will be spending the morning browsing some more:-)
JUST TO LET YOU KNOW YOOU HAVE HELP ME I HAVE BEEN GOING OVER MY MOTHER UNFINESHED EMBRODEY AND WHAT DO YOU THINK I MADE THE WRONG MISTAKE BY MOVING MY HOOP BY THE WAY MY MOM WENT TO HAVEN 18 YEARS AGO AND I HAVE ONLY IN THE LAST MONTH BEEN GOING THROUGH HER BOXES AND WHAT BEUTIFUL CLOTHS I FOUND WIL WRITE AGAIN SOON
The practiced eye can always tell.
This is going to be a sumptuous piece when it’s finished.
The first thing I do when a open my e-mail is to see where you are at on you masterpiece. Love the colors. Cannot wait to see the hummingbirds. They will really make this piece pop out. Been doing B.E. for four years. Love it. What size is this pattern? This would be beautiful as a pillow for that very special person. Keep those hands healthy. Sharon
Funny you should mention that, Sharon – I burnt my left hand pretty badly last week while cooking (grabbed a falling pan out of a 400 degree oven without a hot pad – lesson learned! Let it hit the floor!), so that has slowed down my stitching this week, that’s for sure!
The design is about 10″ or 10.5″ round…..
Ouch! I hope it’s feeling better.
-Sarah
It is! Just some lovely blistering….:-)
Yeahhhh. . . Hope that heals up soon 🙂
And I thought it is about extra petal and therefore extra red dot… Hmmm I can’t see anything wrong with yellow, hmmm interesting
Mary, this piece is just going to be the MOST stunning piece. I think it just may be my very favorite yet of anything you’ve done. I am so enjoying your journey. Thank you so much for sharing with us.
It’s looking beautiful!
Dear Mary
I have to say I didn’t notice the skewed stitches I thought the piece looked lovely as it was but I haven’t seen it up close so maybe from your perspective it wasn’t right. I can’t wait to see what technique you will use for the humming birds and the other flowers, I look forward to seeing your progress on this piece and learning new tips and techniques from you.
Regards Anita Simmance
I have a question … how on earth do you keep the design on the fabric? Your pattern on the fabric looks as good today as it did when you started. I cannot keep the pencil/pen design on my fabric when I stitch. I keep having to redo it over and over again. Is there a trick that I haven’t mastered?
I used a very fine micron pen to trace mine. The ink is permanent. Sakura makes a micron pen in brown and in sepia and also in black that work well. I usually iron the fabric once again on the opposite side before mounting the fabric on the frame. The lines are covered anyway, so for this type of embroidery, the finest micron pen (05 on the cap – or .20mm) are great.
Hi Mary, : )
You get hundreds of people leaving you little notes of thanks and encouragement . Within that sea of hundreds I am a grateful kindred spirit who appreciates all the love, time and dedication you selflessly pour into sharing your craft with all of us who are connected by a ” needle & thread ” ; ).
Love your work !!!!
Happy Stitching Mary : )
xo
My question is, why is the petal a different color? Also, when I was painting, we always used an odd number in a subject. In this there are six in the overall object. I don’t know if this will help, but good luck. This will be gorgeous when you are finished.
i dont know what your complaining about. i think its absolutely georgeous. i follow your site and love each and every piece you put out. i embroider a little. a very little nothing compared to you. doesnt look like anything is wrong to me. but you know you’re not satisfied so…..get that ripper and take out the flower however you think is necessary. i should have that problem.
Mary, You do beautiful work. It is nice to know I am not the only perfectionistic stitcher. I get teased whenever I do remove stitches, because “they just don’t look right” to me. It isn’t very often, but annoying when it happens. Love the results though. Thank you for sharing. Your transparency will encourage and inspire new yes as well as accomplished stitchers. Barbara (Bobbie) Clinton
It is beautiful! I can’t wait to see it with the hummingbirds done.
Well, I think it’s lovely, and I like the seed stitch. If I was going to be nitpicking, I’d leave the pistils alone and change the direction of the satin stitching on the teardrop shapes in the petals. The directions of those stitches are what throw things off for me — they’re not consistent with each other. But I also don’t believe in being perfectionist with my hobbies, so if it were me, I’d probably let it go.
The colors are beautiful, IMHO.
Mary,
Your daily writings are always my favorite. I have been following along with you and haven’t quite started the flowers. I too, think the seed stitch is too light for the heavy satin stitch. Can you suggest an alternative for the petals?
Thank you.
It is beautiful – not even sure the pistil stitches are problematic as they would move around on the flower naturally. I see the center top of the flower fading into the gold – I think the darker color of the end flower tops would better define the gold pistil stitches. Can’t wait to see your hummingbirds.
it just so happens that my hummingbirds are back on their feeders here in Massachusetts.
I think the pistols are correct and it is the satin stitches that are wrong. The pistols look to be growing out of the flower not growing sideways. In nature they move with the wind and as insects crawl on them too. You don’t want them to be too perfectly straight. It is going to be just lovely when finished.
Okay, I admit it, I didn’t even see the pistil stich problem until you pointed it out. As a fellow perfectionist I applaud your dedication and take the lessons to heart.
Maybe fewer pistil stitches would be better.
I do not care for those pistils, way too many.
The current flower in question looks to me as though you changed direction on two of the satin stitched petals. Two seem to have the stitches graduated to a point while the others have their stitches in parallel to the end of the area. Was that on purpose?
Hmmm… not sure what you mean. The stitches are parallel on the center petal, straight up and down (vertical on the petal). On the outer petals, the fan slightly from the center to the outside edge, but are straight up and down with the inside edge, from the center to the inside edge.
Mary, maybe it’s just the photograph — but on some of the teardrop shapes, e.g., leftmost petal, the satin stitch appears to run along the long axis of the teardrop,, while on some (e.g., second petal from left) it appears to run along the short axis of the teardrop. It is a stylized flower of course but I wouldn’t expect that difference even in a stylized flower. But maybe in real life they all go the same way, and it’s just the picture.
Hi, Claire – probably the photo. The stitches are not running on either axis in any of the tear drops. They’re all slanted on the diagonal across the teardrop. The slant depends on the shape of the tear drop – some of them curl slightly. ~MC
Just goes to show — the camera can lie! Looking forward to seeing what’s next. As I said before, I think it’s lovely.
Hi Mary, you are a little bit obsessive, but that’s what makes you so fun. Your work is lovely.
The yellow is still wrong to me. If you think about the center of a flower and tilt it the way the flower tilts, you would not see the yellow on both corners of the flower. The right hand side of the flower looks odd because the yellow is shown and I do not think it should be there at all.
It really looks like the seed stitches should be more and darker at the base. Right now they seem to look like where you put your stitches when you start.
It’s beautiful.
Hi, Mary. Did you use the 8 or 9 inch version? Also, when are your 26 different stitches in each letter going to become available? You inspire me on many levels. Thank you. Sue
I used the exact size of the original drawing. I think it’s 10″…will have to measure again…
I’m slowly working on that e-book for the letters. The stitch instructions are taking some time. But it WILL be out this year during the summer. It’s moved to the top of my priority list.
If we could only stitch as beautifully as you 🙂
It is difficult to see anything wrong with the stitching but a photo seldom does the piece justice. A few things I would look at that have been mentioned already:
* The outline of center petal could be darker to accentuate the separation
* The pistals are quite dense where this is supposed to be the more delicate and airy part of the flower. I quite liked the dots in the drawing and think you could simply use French knots without the pistals and additional stem stitches
Your work is stunning Mary! But I really want to say you are a wonderful teacher!!!! You are so willing to share and teach by what you see as a possible mistake AND give options to correct them-that’s just amazing!! Thanks for sharing your gift. You make us SMILE as well as learn-and that’s a gift too.
Bonnie
Hi Mary,
if you look at the picture from farther away, the big flower has more the shape of a circle or sphere, while the other two finished flowers are a bit more trapezoid.
But in all cases you stiched the little yellow pistills in shape of a circle (along a virtual circle line).
It looks to me, that if you differ the stitching line from a circle-form to an elliptic “outline” on the large flower, it would maybe look more suitable.
Greetings and happy stitching. Your work is so fascinating, I love to read your Blog.
Next week I will be having foot fusion surgery and am trying to get as much as I can for the project. My fabric is in the mail to me, I have my frame pieces and needles. I have the thread numbers of the greens, yellows, and brown. Have any more color numbers been released? I will be wheel chair bound for 3 months. Thank you, Sue
Hi, Sue – Sorry to hear about the foot, but I hope it helps you in the long run! This post has the colors for the flowers listed in it: https://needlenthread.wpengine.com/2014/05/secret-garden-flowers-thread-colors-stitch-details.html Best wishes for a speedy, comfortable recovery!
Hi Mary,
After reading all 30 comments on the flower I thought I’d add my suggestions. On the pistil stitch elements, I think they might be less ‘distracting’ if you used a few fewer stitches so there was a little background fabric showing between the stitch in some areas and perhaps don’t make them all the same height. That will allow the eye to travel throughout the design.(When viewed from a distance the pistils look more like a solid yellow area.) I also wonder how that central petal would appear if instead of working the stem stitch over with the darker thread, you took one strand of the medium color and ‘laced’ it into the existing steam stitch then the eye would blend the colors similar to the way you handled the seed stitching. Just suggestions . . . I agree with one of the other readers, I think this is one of my favorites of the projects you have created.
Thank you also for all the planning, work and details that you attend to daily. I derived a great deal of ‘mental’ pleasure viewing your site daily. Whether I’m working on a project or not, I always get my little ‘fix’ of needlework daily, by visiting your site.
Sincerely,
Cindy
Dear Mary
Painful! So sorry your burnt yourself I hope the blisters aren’t to severe, so annoying for you that you can’t stitch.
Regards Anita Simmance
Thanks, Anita! They’re healing up well! Just kind of crusty, but since they’re on my left hand, they don’t get in the way too much. Occasionally, right now, they snag on threads, but in a few days, the fingers’ll be back to normal!
I love this. It has a really extravagant and lush feeling to it, which I think you were intending. From my humble position of being mostly a cross-stitcher but wanting to learn more, I am filled with awe.
J’adore!!
bravo!
I look your site every day.
Exquisite stitching – but for me the stitch directions in the petal turnovers are often wrong. Visualize the direction of the veins in each petal as they rise from the centre of the flower to the petal rims. You will see that some of the beautiful satin stitches on the rims need to come out and be re-directed up and over towards the base of the flower.
This will produce a much more realistic flower immediately.
We must remind ourselves that this work of art is “stylized”
So it won’t look realistic. I wonder if the artist ever dreamed that so many people would be paying so much attention to every single part of her illustration! Just wait till we get to the hummingbirds!
I’m a super perfectionist with my own art work but I’m learning so much from stitching this beautiful project with all you wonderfully artistic people. At first, every stitch of the first rows of green stem stitch gave me anxiety. Then I progressed to the harder parts, and the long and short stitch. And went back to finish up some vines in the stem stitch it was EASY and I was relaxed!
Surprise surprise! We are all learning so much thanks to a wonderful teacher!
Many thanks to you Mary. Robin in NM
The work beautiful as always. As soon as you are finished I will send my address so you can mail it to me!
Yes, the pistils are skewed. Just remember, EVERYYHING radiates out from the top of the stem. That’s where a flower starts. So if you think of the top of the stem as a point, then just draw your fan points out from there.
The seed stitch was too light a touch to me, up close, but overall, I see how you used it. Thanks for the big picture.
HI Mary,
I think the seed stitch, although a great stitch choice, it needs to be applied more. The heaviness of the padded satin stitch is too weighty for the lightness of the seed stitch. Just add more seed stitching and it should balance out. Of course, this is just my opinion and what I would try first.
margaret
Dear Mary, I would be so proud if I’d worked this flower myself. I’m sure the myriad ways you could have opted to go with its embroidery could stretch into eternity so just fix what troubles you and delight us with your next idea.
Best wishes for your speedy recovery too.
Oh your poor burnt hand! The curve of the stem takes the eye along the lower edge of the large petal, so perhaps the pistils on that lower (3-petal) side do need to be rotated slightly clockwise? In its current incomplete form the pistils do look dense and heavy in relation to the rest of the flower but I imagine that effect will be diminished when the surrounding flowers are worked. I love the seed-stitching – that less densely stitched area has the same effect as the space between the yellow border and the larger leaves by lifting and brightening the solidly stitched shapes.
Well, it is just gorgeous! The more I look at it, the more I think it is just stunning, and the picture that includes all the stitching really is amazing. I think I will love everything BUT the hummingbirds. I have been wishing I had not traced them and put a monogram on each side instead. They look mean to me. 🙂 I’m anxious to see what you do with them, and hope it changes my mind.
As I slowly and terribly start on my second ever long & short stitch leaf (a practice from the Trish Burr book)I’m not sure whether to be heartened or discouraged by this post. Yey, even the pros make mistakes! …except they’re so slight I can’t see them. The flowers came out beautiful, though. I love all your color pictures!
This is gonna be drop dead gorgous I can’t wait to see it finished!!!!
Robin marks
Sometimes I think, Mary you are being too hard on yourself. But when I had another look at this, I have to agree with you. In the overall scheme of things it probably wouldn’t have mattered if the pistils were facing a little the wrong way – perhaps the wind was blowing them or something. But. You. Would. Know. And therein lies the rub, once you know something isn’t quite right, it has to be fixed.
BTW, you lost me with Miss Clavel, who is she – please let me know or I will die of shame at not knowing.
Miss Clavel is the matron in the Madeleine books, which are children’s books set in an orphanage in France. On the night that Madeleine wakes up sick with an appendix problem, she flies around worried, saying, “Something is not right, something is quite wrong!” even though she doesn’t quite know what’s wrong yet. Sorry about vague reference! 🙂
Im sorry but I didnt see anything wrong with the first picture! you surely are a perfectionist, beautiful work, I wish my work were half as good! but I’ll keep on trying.x
It’s beautiful!
Hi Mary
Just to say it´s looking BEAUTIFUL! Perfect work as is to be expected…. can´t wait for the finished piece!
Mary, thank you so much for reminding me who Miss Clavel is. I really am dying of shame now, as I did read Madeline to my daughter. Although perhaps I can be forgiven since said daughter is now 40!
It is beautiful and I really had a hard time finding what was not right. However, that is not why I am writing. I bought 2 copies of Secret Garden; one for me and one for my very artistic 7 year old granddaughter. After meticulously going through the book for her first coloring project, imagine my surprise that she picked the page that you selected for this embroidery. She is doing an excellent job of selecting colors. She has suggested that I embroider the page with her colors. We are both excited about this project. Thank you so much. I love your site and read it every day