


The other day, I showed you the finished embroidery on the wing and central feathers on the Secret Garden Hummingbirds.
There was one spot in particular that still bugged me – right where the last feather rested above the already embroidered tail section.
Today, I want to show you how just a few stitches can make a subtle difference, transforming a bothersome area to something better.
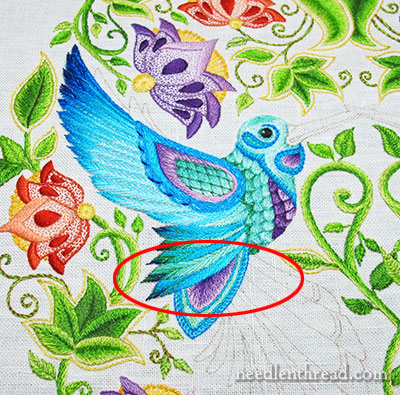
Here’s the area that I thought still needed some improving touches. I needed to add just a little stitching that would lift the upper feather over that tail section a little. Right now, the line between them is too stark, too flat.
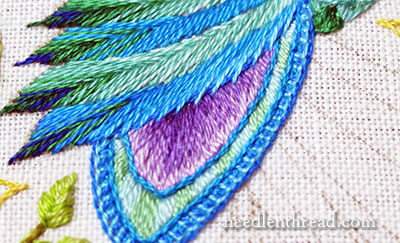
So, to lift the feather, I started with the dark blue (820) and split stitched a thin line between the feather and the tail section. You can’t see a solid dark line here, but if you look between the lighter, sketchier stitches, you can see where the edge is a darker blue.
Then, I added some sketchy stitches in lighter shades of blue. I used split stitch, coming up in the previously stitched feather, following the slant of those previous stitches, taking the stitches over the dark blue line and down into the tail section.
This created a kind of “hairy” or spiked edge to the feather, when looking at it close up:

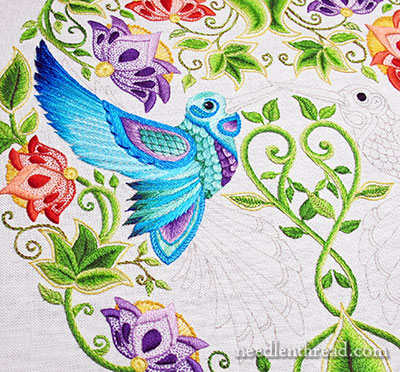
But when looking at it farther away, that spikiness is not as noticeable:
So, why a dark line and the light stitches?
In embroidery, it’s easy to create the illusion of a shadow with a dark line. A dark line stitched on the edge of an embroidered element can make it pop out, even if it’s fairly two-dimensional and flat. This trick of using dark lines to create the illusion that one element is above another is seen often in ecclesiastical embroidery.
But, it’s still somewhat two-dimensional. And in this case, a plain dark line along the lower feather would only serve as a divider – kind of like a dark line in a coloring book picture. It would just separate the two elements, instead of lifting that feather up and placing it noticeably above the tail section.
So what I needed to do was something that would not only lift the feather, but also join the two elements by extending that feather over the tail. It’s the extension of the lighter stitches over that shadow created by the dark line and into the tail area that joins the two elements and makes the feather look like it is over the tail.
Here’s the before and after, side-by-side. If you click on the photo below, you’ll get a larger version:
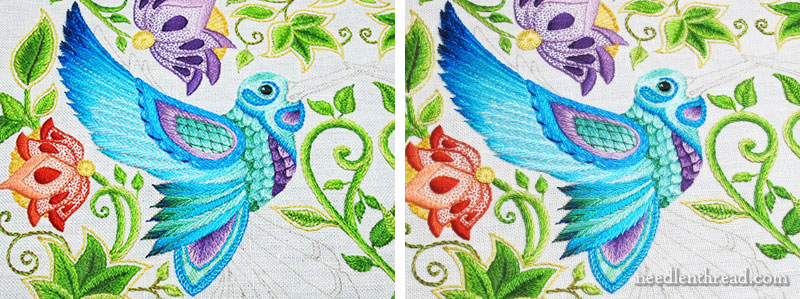
It’s not a huge difference, admittedly, but I think it’s just enough of a subtle difference, to improve that area.
And now, I’m abandoning the wings. Later on, I may go back and touch up a few other areas that might benefit from some accent stitching, but for now, it’s time to move on to the main tail feathers!
Questions, comments, suggestions – I’m all ears! Have your say below!
If you’d like to follow along with the Secret Garden Hummingbirds project, you can find all the articles relating to this project arranged in chronological order in the Secret Garden Project Index.
That attention to detail is so important and spot on! Gorgeous! I needed a reminder that the devil is in the details! LOL I can’t wait to see the finished project! I have to say this site has me going through my old stitch patterns with new eyes! And since most of them are twenty to forty years old I am really looking for new twist to infuse in them. Thanks for all the inspiration!
It is amazing what a few stitches make such a difference. I am not sure my eye would have thought it needed anything. Thank you for sharing your expertise.
Good Morning, Mrs. Corbet! I have to say I am awestruck by your passion for getting each small detail of your vision in place on your projects! That’s how I am, and I’m always getting teased for being “too uptight.” But, this is what turns a hobby, or a craft, into ART! That subtle detail adds life into the feather and more personality into the little guy! I also love the blues you chose!
I do have a big, huge, question though… What about the feathers at the very top behind the wing? I wonder how they’ll fit in. Also I still think this poor little guy needs a beak! Thanks for the update! Can’t wait to see what you do with the tail!
Dear Mary
I can see the changes although it is very subtle but does make a difference. I must remember this technique next time I want to lift over a section of embroidery it does blends nicely over the lower tail. I can’t wait of you to start on the main tail feathers and see what you decide to stitch there. Thanks for the tips and technique of lifting a section of embroidery which will be useful in future projects. I hope you have a great weekend.
Regards Anita Simmance
I really like what you have done with the bottom feather. Thanks for showing us the before and after photos alongside each other; it is so surprising what a few subtle changes can do to a piece of embroidery.
As they say, it’s all in the detail. Very, very nice!
The throat spot has “bothered me ever since it first appeared. To me, it “sticks out like a sore thumb”, and my first thought is “That’s not what it should look like”. I have done embroidery for many years, with the Embroidery Guild, by myself, and for several years with a wonderfully creative artist and creative stitcher named Barbara Sparr, who intoduced me to many techniques including one of my favorites, stumpwork. I am pushing 93, but still work to keep my hands busy with stitchery, applique, quilting and in short, anything with a needle.
For a few years before I came to assisted living a couple of years ago,I had well used hummingbird feeders outside the window near my computer and over my kitchen sink. The time I spent watching the hummingbirds well compensated me for the time they kept me from my work. I don’t think of the throat spot as so strongly separated from the rest of the plumage as you have stitched it. Perhaps after the bill is stitched it won’t bother me as much.
I have been reluctant to submit a comment, but I just felt compelled to this morning.
Thank you for your newsletter. I do so look forward to it each morning.
What a difference those few stitches make! Makes me think I need to go back to same projects and give them a 2nd thought – or a 3rd.
I admit to being surprised how much difference that small detail makes. I learn something new from you every day. Thank you.
So clever you are! I really learn a lot from you and your patient ways to make your work really stand out from the rest.
A similar trick to that used in stage and screen makeup to sculpt effects on a face – highlights and lowlights!
Exactly, Mary! I was thinking stage make up when I did it – wrinkles, especially!
A few stitches can make a huge difference! I recently blogged on the same topic of small stitches and subtle changes. I had a spot in my needlepainting that I didn’t like, too much of a jump between shades, so I went back and added a few stitches of another shade between them and to me, it make a huge difference.
What a difference a few stiches make! Thank you for the wonderful lesson!
Jackie
Small change, subtle difference, big impact. And the Hummingbirds keep moving right along! The S. G. looks great 🙂
Do you have any plans for the feathers on the Very Top of the wing?
Sarah
As a Graphic Designer, I know how to use the dark blue line, but would have struggled a long time before discovering how to add the lighter blue to “lift” the feathers. So, thank you very much for your article.
Hi Mary,
Thank you for making this concept clearer. I have been working on some needle painting by Trish Burr and this is exactly what I have been doing. However, you simplified the idea for me and know I get it.
Thanks,
Barbara La Belle
Trish Burr has some wonderful needle painting designs. I’m working on my third one now.
What a difference small details make – the spikey feathers truly elevate the wing- –
Mary, thanks for the before and after photos. This really helps me understand the changes and how the changes make a difference.
Wow, you have a treasure trove of knowledge, experience and skills to draw from to fix a seemingly intractable problem. Deeply envious!!
Mary, you made a fantastic choice these last few updates. Just wanted to give you a thumbs up!!!
I am making this my next choice to attempt I like it so much! Thanks you are my inspiration!
I wanted to try gold work too but know my limitations. I saw the need for dark tips on the wings and hoped you would see it too. I might have known you would most definitely see it.
Keep up the wonderful newsletters. I look forward to each one to watch your progress.
Thanks
That subtle little addition makes a huge difference. All of the bottom feathers now appear more airy and feathery along the edges and the tail looks a wee bit shorter in width. Plus the green seems to show up more and it looks more concave. So you were right to mend that area.
I had looked at that spot and thought there needed to be something, but couldn’t figure out what. I would have probably defaulted to the dark line, but the little spiky stitches are a stroke of genius.
The Modification is perfect. In this situation the optical illusion is critical. Brava!!
What an amazing difference and what a fantastic lesson this is! Thank you so much for a detailed explanation.
Hello Mary
Well done the edge of the wing looks amazing.
Michael
To a needleworker, I think it’s a huge difference since it’s all about the finished piece and the process to get there. I am so in love with this piece. It is beyond gorgeous!
Very nice effect. Looking forward to the tail feathers.
Amazing! Absolutely beautiful.
I totally agree with what you did. It really did add the dimensional element that was needed. I always learn things from you. I love that you share it with all of us.
Wow! Fabulous result! I never would have thought of extending the stitched area and I love the effect, so I’ll need to remember that sometimes it IS okay to color outside of the lines!
Ah, this is great … showing use of light/dark spikes to lift the edge of the feathering. I am able to do Red Poll design (Tanja Berlin) a second time. It’s long/short stitches and though I greatly enjoy looking at my first finished worked piece of Ms. Berlin’s Red Poll design I’m doing a second to try and do better feathering.
You article today will greatly help me.
Noelle
What a difference. Fantastic. This is why we all follow your projects. I for one sure learn a lot. I would have left the wing as is not knowing that with a little extra it would be so much better. Thanks for all your hours of labor for all of us out here.
I didn’t quite get what you were saying until I saw the side by side images, and then it became very clear what you mean by “lifting” that feather over the tail element.
Amazing work, and something many of us with so much less experience would have never thought of.
Thank you, always, for sharing your knowledge so generously, Mary.
I don’t think I have seen such detail and patience! Even in painting the strokes are generally broader and not as meticulous. This really is creating a work of art. Well done, I admire your work and enjoy reading your blog daily. Thank you.
Super job looks fantastic making me think more about how I want to embroider in the future such detail .thankyou for taking the time to share. Diana.
Amazing what a difference a shadow line makes.
I was lucky enough to do a workshop with the English embroiderer Helen Stevens and this what she emphasises.She drills it into you look at where the light is coming from and put your shadow line in. I am still trying!!!!!
Really enjoying this journey with you Mary many thanks Chris M
I think it is the blue demarking line that is stark. Elsewhere in the bird, the blue line blends with the blue onwards. The purple is an improvement. Subtle beautiful and So very Mary.
Now that’s clever, Mary:) Just when I think you’re being too hard on yourself in your deliberations, you’ve gone even further and come up with a brilliant bit of design. Thank you.
Just a little question, how did you get the blue and green tailfeathers to look variegated? was the thread variegated? or did you stitch the blue first, and then add some green on top? or vice-versa? thank you very much in advance. God Bless!
I started with one color in the center (say, dark blue) as a straight stitch. Then I worked the fishbone stitch in the normal order, switching colors to get the shading I wanted. So, in the blue / green areas, I started with dark blue, switched to dark green, switched back to dark blue, switched to bright green, switched to bright blue, switched to bright green, then bright blue, then a lighter bright blue, then alternated between the “middle range” colors to the end of the feather.
You are right — those few small stitches do make a difference. I will have to contemplate how to use this technique, as my next big project is going to incorporate needle painting, bead work, and some fancier embroidery than I’ve done before. And I am pretty sure I can use this technique. As always — thanks for sharing Mary.
It’s just beautiful, but how in the world are you going to match the other one to the one you have done? All that subtle stitching! Did you plan on making them the same color or are you going to make it different on the other side?
Hi, Pat – well, I don’t want to do completely different colors, because although the design isn’t a perfect mirror, it would look somewhat unbalanced, I think, if the colors were completely different. I might play around with some color placement, though, just for the fun of it. But I suspect they won’t be too different from each other.
Agree, the stitches made a big difference. Great job!
You are darn good, Mary Corbet!! I totally agree on the difference!
Thanks for this lesson! Very helpful, not just in embroidery, but in other applications, as well as appreciating stitched art and other media.
Dear Mary, I think I’m finally getting what you are talking about. I will have to start reading from the very beginning again. So my slow brain really understand what you are talking about and refer back to your pictures so to see the visual effect. I am hoping that I can implement it into my current peice of embroidery. Thank you for sharing your wonderful skills with me/us! Julie Beard.