


The last time we visited my current hand embroidery project, the Secret Garden Hummingbirds, we talked about the subtle and positive difference a few well placed embroidery stitches can make on a project.
At that point, I was working on the wings, and I was sorely looking forward to moving onto the tail feathers of the hummingbird.
Today, I’m going to share with you what not to do when embroidering the tail feathers on these hummingbirds.
To put it frankly, this isn’t a pretty tale.
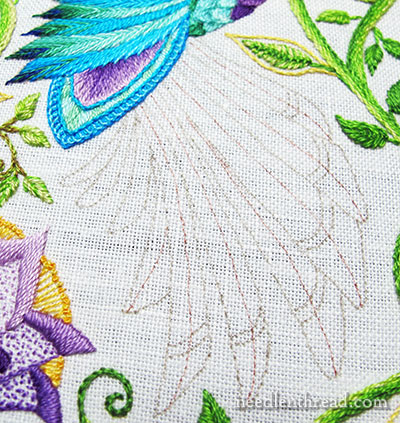
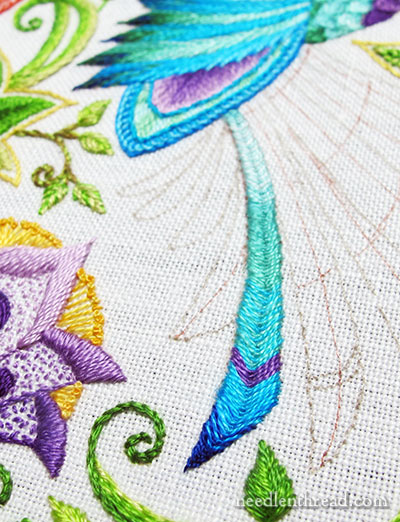
Here are the tail feathers on the hummingbird, just waiting for some exquisite hand embroidery stitches to bring them to life!
Alas and alack, the poor things are still waiting.
First, I want to draw your attention to the lines of the feathers. You can see that some look grey and some look brown. The brown ones, I drew in right before my first stitching session on this area. Because I planned on using the fly stitch to embroider the tail feathers, I drew spine lines down the middle of each feather.
The grayish lines are the original design transfer.
The Importance of a Clear Embroidery Design Transfer
Let this be a lesson! Your design transfer often dictates a goodly percentage of the success of your stitching outcome. If your design transfer is wobbly, there’s a good chance that your stitched edges will be wobbly, too, instead of nice and crisp and straight.
My transfer lines here are wobbly, sketchy, and a bit unclear. I should have taken care of that before I started stitching this area.
How do you take care of this kind of situation? You re-draw your lines, carefully.
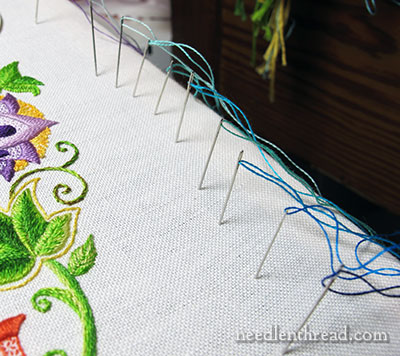
Before I started stitching the first feather, I lined up all the colors I planned to use, and I threaded them all up in individual needles, which I parked on the site of my work, ready for use.
DMC Thread Color Numbers
There are 11 shades in the tail feathers, and I arranged from from darkest to lightest, with one shade of purple separate.
These are the DMC thread color numbers that I intend to use in the tail feathers, in order, from dark to light: 820, 995, 3843, 3844, 3851, 3845, 958, 959, 964, 747, and 3837 (purple).
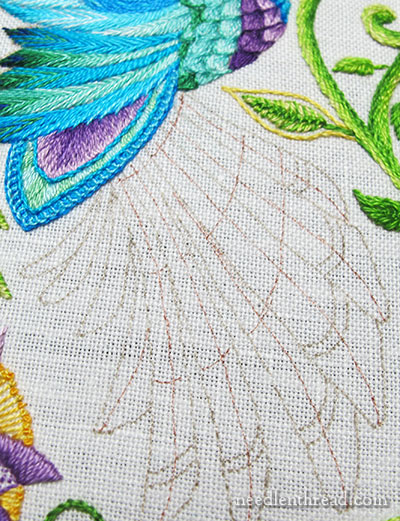
I was ready to start stitching, when I decided to go back to feathers with a brown micron pen and draw in some horizontal lines that would guide me when switching shades, just in case I needed them.
Now, ready…
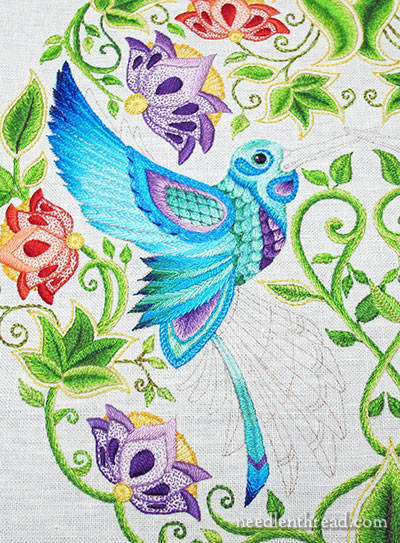
Using the fly stitch worked vertically, I stitched the first feather, switching shades down the piece to try to get them to blend without looking too blocky.
Although you can’t always tell how something like the whole tail is going to look, by stitching just a tiny sliver of it, I was immediately not too pleased with this feather. There are a number of flaws, not least of which is that I don’t like the harsh transition between the light and medium shades of greenish-blues.
The purple stripe in the chevron shape was intentional. There are little stripes in the original design at the base of each tail feather, but they are horizontal, and I wanted them to match the flow of the feather better.
Still, I’m not sure if I’m sold on this particular approach to the little stripe.
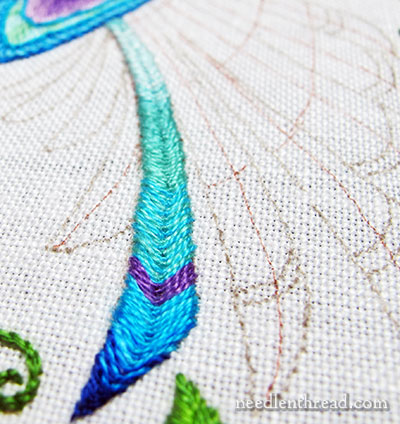
Although I do want the feather to turn slightly toward the tip, I wasn’t pleased with the way the tip worked out, either.
Ok, ok. It’s sloppy stitching! I hurried towards the end, just to get a general idea of what this approach would look like. I already knew, half-way through this feather, that I’d be taking the whole thing out.
This shot gives you a better idea of the wiggly edges. Yuck. And the abrupt shade change, from the light to the medium green. Double yuck.
Yuck, yuck.
So, why the mess?
The stitches are too “tight” – I need to loosen up the spacing a bit so the feathers look slightly more airy. These stitches are packed really close together and the overall effect ends up looking crammed.
To alleviate this tightness, I’ll definitely embroider the feathers with a larger needle. When working with one strand of floss, I generally use a #10 crewel needle. Switching to a #8 will force me to space the stitches a bit. The larger needle will also create a bigger hole, so that the thread will retain its body a bit better.
So there’s a tip for you: when you’re working a stitch like this – or satin stitch or any stitch where the individual stitches should be lying right next to each other but not cramming each other, and you can’t seem to keep from cramming them, try a larger needle. It helps!
I’m also debating about the fly stitch. Should I switch it to the fishbone stitch, like the wing feathers? Decisions, decisions.
This feather was my first stitching experiment for the tail feathers. I’d say it was a flop. But I did learn from it, and that’s always important. More experiments – and final decisions – to come!
Questions? Comments? Suggestions? Feel free to have your say below!
If you’d like to follow along with the Secret Garden hand embroidery project, you can find all the articles relating to this project arranged in chronological order in the Secret Garden Project Index.
Hi Mary
Are the feather spines going in the right direction? Birds feathers angle down toward the end of the feather. Love your blog, love your work, Roma
Brilliant, Roma! I was wondering if anyone would catch that. You’ll see that brought up in my next experimental feather!
I was going to comment on the direction of the stitches, but Roma beat me to it. Also, it seems to me that the darker colors should be right under the wing; in the shade, so to speak. The color would be brighter/lighter where the light strikes the tail. And the fishbone stitch does look so much more feathery!
I was thinking this too.
I look forward to seeing what you do next Mary. I like your colour choices but, as you say, the feather came out pretty yucky.
Good morning Mary
Well, I too have learned from this.
Yes, I sometimes get sloppy transferring the design and boy, that error can create a mess throughout. Thank you for letting us in on this.
Using a larger needle in some instances – never thought of that. I am going to find that needle, the appropriate doodle cloth and try it now.
Thank you, Mary. It is so very good of you to share your errors that help make our work better.
Sharon Gray,
Winnipeg, Canada
The problem with the abrupt shade change will probably lessen when the other feathers are stitched in alongside. If you take a black and white picture (my iPad has this ability) you can alter which color has the same saturation. Also, you can see that the wing tips at the top are shaded more gradually from dark to light which may make the contrast less harsh.
I agree you have to redo the feather (sighhhhhh), and I would switch to fishbone.
Love the picture of parked threads! I keep an index card closeby with snips of my threads taped down in a row with the maker & number written beneath. It’s a focus thing I guess. Just like the row of parked threads keeps the palette in mind with a glance.
Mary, Use a larger needle? Howcome I have never thought of that! Yes, go back to fishbone stitch. It worked really well for the other feathers. The whole piece is going to be gorgeous.
By larger needle, I don’t mean one that is too large. Just one size up, more or less. I noticed when I was teaching that my students would cram their satin stitches and the like, and instead of getting nice, smooth parallel lines with a crisp clean edge, the edges were messy and too tight. Switching to one size larger on the needle made a huge difference. They were able to space their stitches more easily. Ever since then, when I find I’m tending to cram, I switch needles. It helps!
I think i like he fishbone sich beter. zi seems more “flowing” (?).
I do like the purple chevron band and how the tip is a lot darker than the rest, but I agree with where the light hits the medium. Something doesn’t jive there real well.
I think the fishbone stitch would work better, and maybe make it look like all the feathers are pointing toward the body (with the chevron points) instead of the tail feathers drawing the eye away by essentially pointing down and toward the edge of the picture? Just an idea. 🙂
Hi Mary
The colours look beautiful but I wondered if they would look good done in long and short stitch so that the shades would blend into each other.
Hi, Jacqui – I thought about long and short stitch. You can do so much more with it, as far as shading goes. But the project already has so much L&S stitch on it, that I wanted to add a little variety in stitches here. Still, I may resort to it yet! We shall see!
Hi Mary. I really appreciate you publishing the flops and the tips for fixing them. I am very new to Embroidery and your comments make it seem much more possible to do this. Also I love what you are doing with the Hummingbird. Thank you.
Hello Mary…….. I do not embroider many years ago I made and embroidered denim shirts for my sons but that is it. I find your newsletter fascinating and look forward to seeing your work and reading about it. Your work is exquisite and am loving learning about the art and the history. I could really understand why you found your tail feather unacceptable. I hope you show this tail feather side by side with the soon to be perfect one. Love your work and your blog.:)
What about a slanted satin stitch at the top section, feathering down to split stitching, elongating the angle and stitch? Also, to keep it stylized, and since you are taking suggestions, I’d like it with tiny purple or dark navy knots outlining the tips!
I think you should try using fishbone stitch. It might help with a cleaner outcome.
Thanks for the tips on design transfers and larger needles. I shall heed your advise.
Can’t wait to see how you will go about fixing! But whatever you do, I know it’ll look great!
Sarah 🙂
Dear Mary
I’ve just returned from a holiday in Turkey which was nice, but it’s oh so nice to be home. I never thought to use a larger needle to even out the stitches good idea. Like you say the Fishbone stitch might be better but then I prefer the Fishbone stitch. I like the way you park your threads ready for use another good tip and for the tip on transferring patterns. Thanks for the technique on spreading stitches using a larger needle very helpful.
Regards Anita Simmance
Welcome home, Anita! We missed you! I hope your holiday in Turkey was fantastic!
Dear Mary
Thanks Mary I missed Needle & Thread must buy an iPad. Yes it was hot and interesting place Dalayan lots of sightseeing and lovely scenery/good food/Turkish Bath (interesting) and lots of yoga and pilates.
Regards Anita Simmance
Hope you’re fit and ready for…winter! Sounds like a great way to relax before colder weather settles in!
I like the stitch just turn it around and as you change the colors blend the two different colors together. Just a thought. God bless you you are very patient.
I’m a novice embroiderer and have just recently discovered your blog. I really appreciate your detailed breakdown of the process. It’s very helpful. I’m terrible at satin stitching, and am looking forward to trying your “larger needle” tip.
Mary does give some wonderful tutorials and breakdowns doesn’t she? I’ve had stitches that gave me trouble then I looked up the video or tutorial here and let her walk me through it, then it makes sense. 🙂
Thanks, Shell!! Glad to hear it!
Mary – I think the stitches on the tail feathers are pointing in the wrong direction – should angle toward the tip (as you have done on all other feathers)and not upward into the body. Changing stitch direction will help.
Fly stitch has one inherent problem. The stitches tend to open up and flatten out if one is not careful. It looks like that might have happened here. Do you think you might like it better if you had a sharper angle with the stitch?
Hi, Cecelia – Yes, that’s part of the problem. I started at too shallow an angle. But… that’s only a smidgeon of the difficulties with this bit of stitching. More soon!
A larger needle! Another one of those lessons that you don’t see in books. I always have trouble making my satin stitched lie next to each other.
As for the tail feathers, I think the slant might be upside down?
Thanks, Mary!
Mary, I think it’s already been brought up, but part of what “rubs me the wrong way” is that the feather barbs are going the wrong way. 🙂 So it just makes that feather feel, well, like it’s all… wrong. LOL. And I was shocked, I tell you, SHOCKED!!! at your sloppy stitching. LOL. You ARE a human being with flaws and faux pas!!! I am so relieved.
Well, in so much shock I forgot to mention the rest… 😛 I rather like the purple chevron, but I think I would like to see a bit more subtle blending into the very dark blue at the tip too. More like you have on the wing.
I say you should go back to the fishbone. It would also increase the unity of the piece.
I agree that the consistency of the stitches will help. I would also start a little darker at the body knowing that the light hits the feathers more as they grow out from the body. The mix of colors will blend as the tail feathers grow together, but colors don’t graduate like multicolored thread, but should blend until you add spots or shadings that make for the multicolors of the bird. I am also aware that no 2 feathers are exactly alike and you can mix your colors to make stripes or markings on the bird’s tail as you like.
Good Afternoon, Mrs. Corbet! Well, this is the perfect remedy for the day I’ve had thus far… First up at 5am to get to a 7 ‘o clock appointment at UVA, then, eat radioactive eggs and lie under the CAT Scan for two hours, in the freezing cold!
THANK GOODNESS FOR THE HUMMER! My mother loves the shading there is, but I agree with you it doesn’t flow. As for the stitch itself I think if you change the direction it should work beautifully. One thing I love about this project is the variety of texture. As for the colors… FANTABULOUS!
Ps. I got my secret garden book! YAY1 I’m going to use the ring of flowers for my scripture project!
Oh Mrs Corbett I am relieved to see
that you are stuck, just like me.
I know, I thought, I will wait for Mary
(perhaps then it will not be so scary).
I have done the wings,the head and breast….
But oh the tail, what would be best?
I have thought of feather and of fish,
This thread or that, but oh I wish
I could find a way to do this thing
To make it look more like a wing.
I put some in, but out it came,
(You and me have done the same).
In my head there are feathers sleek
But I haven’t stitched a thing this week.
I am waiting, with my fingers itching,
To get it right and do some stitching !!
Liz
There on some pictures on the flicker site of the birds so far so any help and suggestions please
LOL! Thanks for the chuckle, Lizzie! I think I have a solution. I’m working on it!!
I have been tuning into your web site for a while now, watching the hummingbirds become more beautiful. I am not professional but some how the tail feathers don’t look as beautiful as the wing feathers. I think you should change to the fishbone style. I want thank you for sharing your talent. I am working on a crane and was wondering what I could do with his wing feathers when I saw what you did and now I can finish him. thank you
Definitely think fishbone stitch would be better. Also, although this is not a realistic rendering of a bird, you might consider reversing the direction of the threads in the feather. The strands of a feather sweep out toward the tip, rather than back toward the base. You have it that way on the wings. That might also help the increase the “airiness” feel. Just a thought….
I always glean so much embroidery knowledge from you. It is nice to know even you tear out stitches to try again!! When I was eight I embroidered a stamped “Little Miss Muffet”; my very first embroidery attempt. It needs to be redone, but in this case I haven’t the heart to do that! Thank you for your help and website Mary.
Oops, should have read the other comments first!
Thanks, Mary, for sharing your “oops” moments, and the subsequent fixes. I don’t have time for much embroidery in my life right now, but I love experiencing your projects vicariously.
I personally love fly stitch, but I agree with everyone else, that the Herringbone will look better. It will also take away the need for a sharp edge since it kind of looks good flying away a bit. I also love the purple band, but if you do as people suggest and reverse the stitch, will you need to reverse the band too? Pain in the neck–but not as much of a pain as re stitching the entire feather! I admire your perseverance, but then with millions watching, it is probably a good idea!
And what a good idea about needle size. I just tried a larger needle with some bullions and what a difference! I am going to have to remember that trick for satin stitching.
Maybe it’s the near red-moon phase — maybe it’s your master elements coming to the forefront to knock out what you consider amateur.
Those of us watching your progress on this project so appreciate your wins and your losses as we are all learning so much with each stitch.
Thank you for sharing your master skills.
j
Hi Mary, thanks again for allowing us to see the process, it is so helpful in so many ways. Especially in motivation to change what ever doesn’t seem right. I would say to change to the fishbone stitch to match the wings, and to change the direction as well. The overall look is not looking it’s best, it seems a bit too color blocked instead of the smooth grading that I see in the upper wing. Plus, in a whole new direction, I have to say I was envisioning a large amount of the purple colors going on at the tail tips with more of blackish worked in as well. The chevron line could be the medium greens. Coming off the purples moving in would be the royal blues turning to the greens. In fact I see the whole range of all your colors being worked into the length of the tail feathers. The potential flaw with this would be the fact that the tail is already placed next to a purple flower, that’s why I think the blacks would counteract that visually. Usually when you look a bird the tail feathers are often darker version of the rest of the bird. I just think it would be a dramatic. Way of pulling those purple accents of the rest of the bird into a cohesive whole. I await with baited breath to see what transpires.
Hi Mary,
I have waited until now to begin to gather my threads for this project. Since I’m new to this type of project I intend to use all the colors you did—plus I like the way yours turned out.
However, I’m having a problem with figuring out if you used the same colors for the leaves as you did the vines and tendrils. I’ve gone back to the list online and reviewed your color choices but only saw a list for the colors you used in the vines and twigs—I’m assuming those are also the leaf colors. Am I correct?
I love the way you show your mistakes and then the changes. This is such a help for those of us who are used to buying “kits.”
I excited to begin work. Love your blog and encouragement,
Maureen
Yes, they’re the same colors for all the greenery, Maureen! Sorry I didn’t clarify that! I may have used one shade darker on the leaves than I did on the vines, but all the greens are listed – I just didn’t use all of them on the vines. Hope you enjoy working on it!
Dear, Mrs. Corbet! I’m so sorry for going wildly off topic, but I’m curious as to whether you’ve heard of these people… http://www.pipers-silks.com/index.htm
The prices are perfect for my budget! So if you know anything about them I’d be so happy for information. Thanks so much!
Yep! I have some of their threads. Their floss that’s used most for surface embroidery is a flat silk, very shiny and quite fine. Unfortunately, it’s not distributed in the US, so you have to buy it from overseas, which makes it difficult to order just a spool and try it out. because it’s flat silk, it can be difficult to work with. They do have different weights, though, of twisted silks, but whether or not those are helpful depends on the type of embroidery you plan to do.
Thanks, so much! I suppose if I just ordered the starter kit I could play around a bit. I wouldn’t know how to figure out what weight of threads I’d need for anything. I’m just a almost-medium-level novice at surface embroidery. I know most of the very basic stiches, and I’m slowly trying to learn more as I go.
Mary, your work is magnificent & thanks for sharing. However, for the bird’s tail I’d fancy a strong burst of purples with little or no blue. Tails often stand out as different. Thanks for invitation to join in to comment. You are appreciated.
Love the colors. I think changing the direction of the stitching as previously mentioned would be great. I would also like to see some subtle loft or even a different stitch to the purple at the end of the feathers. Maybe a chain stitch with loose buttonhole like that used on the upper feathers.
When you are taking your stitches out, do you clip along the length of the feather, then pull out the short threads? Or, do you pull out each color from the last stitch to the first, so you have a long piece of thread? Do you reuse that piece of thread?
I snip it and use tweezers to pull out the little threads. It’s never really a good idea to re use a long piece of thread that’s been stitched in and then pulled out again one stitch at a time. It’s usually pretty worn by then. If it’s a laid thread that’s been couched over and hasn’t passed through the fabric, then I could see reusing it. But for a regular stitch, the thread is usually a mess by the time a lot of stitching is taken out.
This is one of the problems I find with kits, particularly those with unidentified threads. One often has to pull out stitch by stitch because there is not enough thread to retry. This is one of my excuses for acquiring shade cards and stash and why I want to move towards doing my own designs.
I think the stitch is against the strike of the feathers. the one you already used is going along with the feather. I hope you understand me, sorry for may English
Hi Mary, I’m a newcomer to your blog and following your beautiful embroidery with great interest. I am incredibly envious of your beautiful stitching and wonderful designs.
I also agree with the previous comments that the feather barb lines should be angled down in a chevron rather than a v. May I suggest another thing that makes feathers seem more feathery is the occasional gap where the individual barbs of the feather have come ‘unzipped’, especially on the outside of a curve. My personal preference would be for a stitch that leaves a pronounced spine. Finally, I personally wouldn’t get too hung up on perfect graduation – if you look at real tail feathers, the graduations between colours, even interference colours, are often quite abrupt if not actually stripy – you could turn it into a feature?
My final comment is not actually connected to this post; I wonder about the beaks. One of the defining points of a humming bird is the incredibly dainty beak, usually with the merest hint of a downward curve. I worry that yours are going to look a bit heavy? It’s not that they are not lovely, quite the contrary (I love the Quetzalcoatl scowl), but they just don’t say ‘hummingbird’ to me. On the other hand, as I trained as a biologist and taxonomist, details like this matter matter to me in a way that other people find irritating and inexplicable (I’m very big on putting the correct style of antennae on insects) so I’m sure you’ll ignore me if you think I’m just being a hopeless pedant.
Hi. I’m new to all the needlework, but this site has me hooked. The work here is exquisite. The detailed info and directions for stitches is fantastic. I will be here many many times! The little hummer is wonderful, and your attention to detail in stitch and color/shadowing is great. I am a realist in my art and love nature. The barbs of the tail feathers would be pointing down. I think no matter how you stitch them, point them down. I have chickens with amazing feathers, so I am very familiar with the makeup. Thanks for your wonderful work and sharing.
My 8 year old niece and I were looking at your website and she wanted to leave a comment on this post-here is what she wanted to type and tell you:
“you are so good at embroidery i know you do your best every day. i hope you have a great life every day”
🙂 Tell your niece thank you for me, Gloria! I hope she has a great life every day, too!