


Remember the hummingbird beak from the last update on the Secret Garden embroidery project?
Well, here’s the second one, embroidered in the same colors, with long & short stitch and some long split stitches.
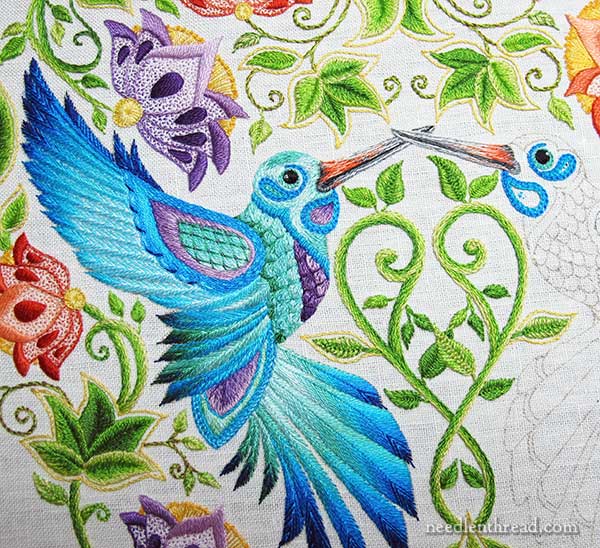
On the first hummingbird, I embroidered the whole bird before I tackled the beak, but on the second one, I figured I better embroidery the beak right now, while it was still in my head!
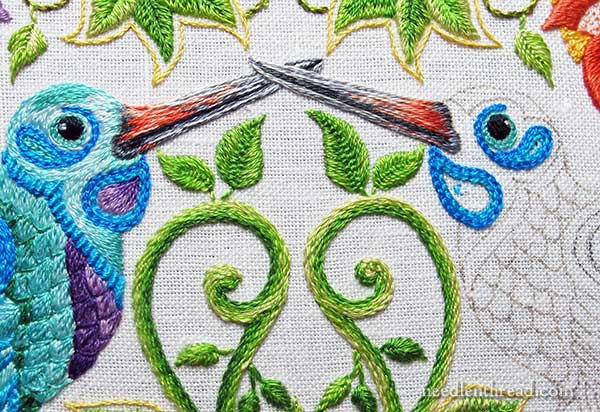
You can click on the photos above for a larger version.
You might notice I didn’t do much different on the second beak – perhaps a little more of the lighter gray, compared to the first beak, and no black along the opening. I may touch in a tiny line of black yet.
For right now, though, I’m fine with them, and will leave them for a bit.
DMC Thread Colors for the Beaks
For those who are following along with the project and embroidering with the color schemes, these are the DMC thread colors I used for the beaks:
310 – black
3799 – dark gray
414 – medium gray
3024 – light whitish-gray
350 – dark coral
3341 – light coral
When I sat down to write this article, I was sad that I wasn’t showing you the finished second hummingbird! I’m very eager to finish this project, but with Thanksgiving coming up in a couple days, and a deadline to meet on another project next week, I suspect I won’t get back to the hummingbirds for a couple weeks. I want it to be a 2014 finish, though, so keep your fingers crossed for me!
If you have any questions, comments, or suggestions, feel free to leave them below – I’m all ears!
If you’ve like to follow this project from start to finish, you’ll find all articles relating to the Secret Garden Hummingbirds – including information on where you can find the design, what threads and stitches are used, setting up the embroidery project, and all the stitching – arranged chronologically in the Secret Garden Project Index. We also have a Secret Garden Embroidery Flickr group, where folks are posting photos of their own Secret Garden embroidery projects. Feel free to drop in!
Looks good. I like that the beaks will not draw too much attention, detracting from the design as a whole. This will look really fine when all is finished. Very complicated making all of this work, but puzzle solving can be fun. Do you have thoughts about how you will frame this one?
Mary,
I really love how the two beaks turned out now! All your trial and error really resulted in something great!
The colors you picked for the beaks are perfect and a great improvement to those you had initially used earlier this month – i really like how this project is progressing.
Dear Ms. Corbet,
Thanks for You and all your hard work to give so much inspiration.
The beaks are wonderful-your work is simply amazing!
I love the beaks now – you did an excellent job making them come alive and looking like part of the birds and not just something stuck on. Susan
So much better! This beak stands out and stands up to the flamboyant bird and flowers.
The beaks look great!
Ah, deadlines. So much fun, aren’t they?
Have a Happy Thanksgiving and best of luck getting what you need done so you can make this project a 2014 finish!
Two beaks ARE better than one. I wasn’t quite sure about the colours when you just had the first one done, but now that you have both beaks embroidered I’m totally 100%. I think you chose the colours wisely. The beaks don’t draw too much attention to themselves but they don’t get completely lost, either. And they do a nice job of complimenting the flowers. Stupendous!
I’ve got my hopes up for your pre-new-year finish! At least you’ve got more time than me; I have to finish my non-Crewel Rooster before Christmas!
Good Luck!
Sarah 😉
Hi Mary. Love the beaks, don’t stress about not finishing, there’s always next year! Holidaying in Borneo at the moment so no stitching being done at all. Anyway I plan to live forever……so far so good!
Good Morning!
Lovely work, the color combination is perfect. I agree that the beaks do not draw attention but are perfectly incorporated in the embroidery.
Happy Thanksgiving to you and your dearest ones!
Regards,
Jakica
Amazing embroidery!
I think your final colour choices for the beaks are exactly right for those birds.
You have, again, proven you are the true artist and I couldn’t have asked for a truer, more realistic, rendition of a hummingbird’s beak. Your expertise is amazing! Each time I see a piece of your work I think it’s the most beautiful piece you have done only to be amazed that the next one is even more beautiful. I always know my eyes are in for a treat when I see what you are working on. Thank you again for giving me the pleasure of enjoying your gift. And your needlework truly IS a gift! Deonia
Thanks, Deonia, for your kind comment!
Mary, your embroidery is amazing and very inspiring ! This entire composition is a class apart.
I have a question about the long and short stitch you’ve used for the beak — what was the longest stitch used without tacking it down ? The stitches are so neat, that even a close-up does not reveal where a long stitch has been tacked !
Thanks 🙂
Hi, there’s no tacking stitches on the long and short stitches. They look really long in the close ups, but they’re not that long. They’re just regular stitches. Hope that helps!
Dear Mary,
Think your beaks are perfect. Just right in color and emphasis and it fits in beautifully.
After a 30yr. break from embroidery your work gives me something to aspire to
Your website was instrumental in my return to embroidery.
Happy Thanksgiving and God bless. Susan Coates
Glad to hear it, Susan! Happy Thanksgiving to you and yours, too – although it hasn’t quite sunk in yet that Thanksgiving is day after tomorrow. I’m pretty sure I have a list of things I need to be thinking about doing!
Thanks for showing us the ripped out beak. I didn’t like the look of a stitch I used on a very basic/simple project (think fourth grade beginner level). The thought of ripping out something finished just galled me. But I thought if Mary can rip out something so artistic, then I can rip out my little doo-dad and I’m glad I did.
Hi, Lori – I always think of ripping out as part of the process. That way, I don’t fear it as much! 🙂
I’m primarily a cross stitcher (please don’t hold that against me since I love this blog). As you know, a favorite phrase is ripit, ripit. I have a major rip job because I wasn’t happy with some outlining on 4 panda bears. I have to take out all the black outline because I think I would not have enough of a tail to weave under other threads. So I am planning to rip out all the black and start over. My question is what is the best tool for ripping? I have a pair of scissors with one curved blade and one straight. It is good for getting underneath two threads. I fear it will not be effective for the one strand that is the outline. I don’t want to use a seam ripper for fear of slicing the Aida cloth. Any suggestions? Thank you very much.
Hello, Now the beaks are perfect. What were you thinking brown beaks (HAHA) I am amazed how you blend thread as if it were paint.
Hi Mary,
I must admit that your colour choices for the beak seemed strange to me; but now that I see both beaks they look just right.
The ability to see ahead to how the final piece will look is something I’m still developing. I’ve done a fair bit of painting in acrylic and watercolour, but I still need to develop my ability to picture the complete piece using threads. It’s a challenge I’m enjoying (although I have pulled out my rose petals four times now. They just don’t look right, but I’m getting there. It sure is different than paint. To me anyway!
Also, thanks for the tip on the sit-on embroidery hoop; I’ve been using it with great success. What a good idea! My husband tried to adapt a floor stand for me but it has never been quite comfortable. I showed him the lap hoop and he said “oh, for goodness sake, that’s so simple!”. Analogy for living I guess, simple is workable and, well, easier.
Thanks for your daily writings, I do look forward to them so much.
Cynthia, Vancouver Island, BC, Canada
The beaks are absolutely perfect, colour combinations are excellent. I am looking forward to seeing the completed project. Well done.
Love the beaks! The stitching looks perfect.
Yes, my fingers are crossed for you, Mary, because it looks like there is a heck of a lot still to do!
I am feeling end-of-year pressures too, even though logically, it’s just an arbitrary deadline. But maybe a little push is a good thing!
He is so handsome and she will be beautiful! He and she because in my head they are Romeo and Juliette! LOL
Mary, the beaks are wonderful!
Hmmm, I seem to be in a more critical mood today, and I like to write my thoughts before I read others so that you get my honest reaction. First, I prefer the second beak over the first. But I see little corrections for both. On the first beak it needs that extra bit of dark on the upper base of the beak. There is also a visual break point where the coral leaves off and the gray begins where it is so light it disappears and looks like a mistake. If you can make both these areas look like the second beak that would fix it. There is no question that you’re working with a fat beak design. The second beak seems to resolve this to a slimmer look much more successfully than the first. However, you’ve opted to do an upturned beak which simply doesn’t exist on a hummingbird. Plus the lower beak is longer than the top, it should be the opposite. The tip on the first beak past where the second beak crosses, looks too fat. I can’t tell if you had to do that because of the outline or not. Perhaps simply reangling the black line of beak separation would be the easiest fix for that. Of course in a perfect world, the design would have given enough room to slightly lengthen the beaks. But all these critiques are really splitting a very fine hair. So are any changes it worth it? That, of course, is yours to decide. As it stands now, all of it is breathtaking, and I have to say that you have the most amazing confidence to be willing to have all of us micro analyzers pulling you every which way over the tiniest of things. Talk about nerves of steel! We are all grateful, as it is very fun to actually be able to cast a vote in the progress of a master artist. I don’t know of anybody else that does this! We all wait with baited breath to see how it all unfolds. To see how everyone else thinks is just so enlightening and fun also, I just love it. It’s just the coolest thing ever, thank you for providing this bounty to us all.
Oh wow I’m really sticking my neck out now. One other thing I would change is the beak separation line on the second beak. It should be as dark as the first, as that is one of the details that made the first beak pop. I’m hiding under a chair now, so as to avoid any flying objects headed in my general direction.
Yes, that’s the one area that still needs a skinny black line….I agree!
The beaks look absolutely wonderful. Always keep in mind that no two animals are exactly identical so I would leave it as it is.
Happy Thanksgiving
Tanis
The beaks are lovely. Of course I KNEW you would do just the right thing, as you are so good at. Please don’t stress about when you finish this, it is so very lovely, just do what you an when you can! It will turn out just right, whenever it gets done.
the beaks look real !
I really love this project, it is colourful and cheerful. Very nice..
I wish you a happy thanksgiving Mary.
Thanks, Elena! I’m glad you enjoy the project!
I LOVE how the beaks have come together. I also love that you teach us to NEVER be afraid to have things not come out perfectly, to not fear pulling anything out and doing it over. You are a wonderful teacher, thank you.
This looks good! I was struggling to think how you might best tackle the beaks, but I think you’ve made the right choice. I think it was the outlined edges on the previous version that didn’t work and this softer approach is much prettier.
Now seeing both birds with eyes and beaks, my brain went this way when looking at them….. I saw a face with the eye, beak (as nose) and the medium blue paisley shaped area as the “mouth”. It looks like two birds in conversation Maybe some different type of stitching in the paisley area? Thanks for allowing our comments as part of this project. Cindy R.
Absolutely stunning, a total WOW factor. And the beak colors blend beautifully with the completed Hummingbird design. Thank-you for sharing your work and projects.
Second beak is awsome. Hope you keep it as is.