


“Do as I say, not as I do.”
When I was a professional teacher, I held this maxim to be one of the Worst Possible Ways to instruct anyone, especially children.
Children especially learn from example; they absorb what they see other people do (especially people they look up to), and they learn by what we do more than by what we say.
So I’ve always held “do as I say, not as I do” as a pretty shoddy way to instruct.
However…
(Don’t you just love “buts”?)
We’re all adults here, right? (Except for maybe Sarah, but I’m sure she’ll understand!)
When working with an embroidery kit designed by someone else, do as I say:
Read through the instructions carefully first. And I really do mean read through All The Instructions carefully first. If you want to make changes to the instructions or the design or the layout or the colors or the method, go for it! But read what the designer originally intended, first. Then make your decisions.
Don’t do as I did. To illustrate:

The last time we visited Late Harvest, an embroidery project designed by Hazel Blomkamp and featured in her book Crewel Intentions, I was plodding away on some of the leaves.
And I was loving it!
In that last article, I mentioned how I changed the direction of stitching on the particular leaves shown in the photo above and directly below.
The leaves in question came out ok, and I was happy enough with my decision to change my direction of stitching.
Incidentally, either direction would work fine on these types of leaves. For me, it was just a matter of stitching how I’m accustomed to stitch.
Now, I should have done it just as she said to do it, simply to experience embroidering the leaves in a way I wasn’t accustomed to – it’s good now and then to step out of the Comfort Zone and do things differently. It gives you a broader perspective and experience with your embroidery. And it helps you make decisions later on.
Still, the leaves came out ok. It was time to move on to the next bundle of leaves.
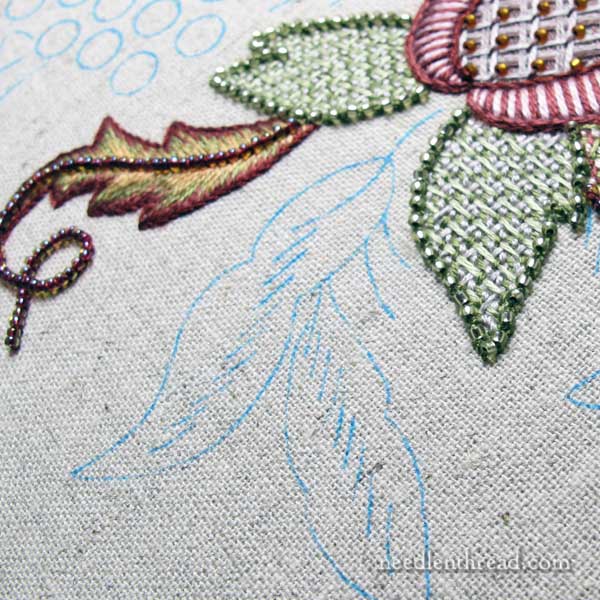
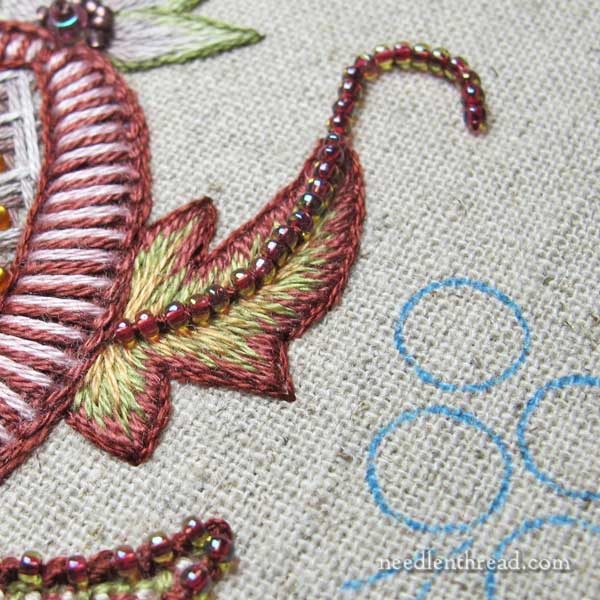
The next group of leaves to tackle include these narrow long leaves in the photo above.
There are actually three leaves in this group that are all stitched pretty much the same way.
I read the instructions.
Ok. Wait. I read the first line of the instructions.
And that’s where I stopped.
The first sentence in the new group of instructions in this section said something along the lines of, These three leaves are stitched the same way.
Having just completed the previous group of leaves, my mind translated this into, These three leaves are stitched the same way as the leaves you just finished.
But there’s a World of Difference in the real statement and in my interpretation.
And I would have realized this if I had read the next line of the instructions.
But I didn’t read any further.
I said to myself, Oh, ok. Same method. Go!
And I went.

As I stitched, I was a little befuddled by the slashy lines down the middle of the design.
But did I stop to inquire?
No.
And going from outside-in, I found it difficult to create a smooth join in the center of the leaf.
But I figured that center spine would be covered by a line of beads, anyway, just like the previous leaves. So I didn’t sweat it.
I finished the leaf and, excited to put the beads in place, I finally consulted the instructions.
There are, indeed, beads down the center of this leaf. But they follow the pattern dictated by those slashy lines drawn down the center of the leaf.
And in fact, the beads are supposed to go in first.
“Do as I say, not as I do.”
Embroidery & Cooking
Kit instructions are a little bit like an unfamiliar recipe. When you’re setting out to cook something, generally, it’s a good idea to read through an unfamiliar recipe first, so you know where you’re headed. If you want to make substitutions in the recipe, you normally do that after you’ve read the whole thing, so that you know what substitutes will work.
When you’re working a kit, it’s the same way. Read the instructions first, all the way, so you know where you’re going.
If you want to make changes after you’ve read through the instructions, go for it. But at least read the instructions, so that you know what is going to work with the design and what isn’t.
In this particular case, I can still stitch the slashy lines of beads across the top of this leaf, but it would have been much easier to put them in place right along the design lines, where they were called for and without having to pass through dense stitching. I also used up much more thread than I would have, had I read the instructions first.
“Do as I say, not as I do.”
In this case, I’ve made the mistake for you. (It’s my pleasure!)
Now, go forth and do it right!
Like what you see?
If you enjoyed this article and you’re looking for more inspiration, information, and instruction on hand embroidery, why not sign up for my daily newsletter?
There are all kinds of reasons to have Needle ’n Thread delivered to your inbox – check them out and sign up today!
Kits are problematic for me, too. I took the Sarah Collins sampler with me to India, but I ended up putting it aside. The counted stitching logic wasn’t one I felt comfortable with, demanding that the stitcher set long “stringers” then fill in detail. I tend to work closer to established sections, proofing placement incrementally as I go, because the long leap method has a greater potential for wandering astray. Also, the kit (being historically accurate) duplicated every variant mistake and color change that to my eyes at least were learning spots where the original stitcher wasn’t able to obtain the correct color, or departed from the established repeat. Like you, I could see an end product that didn’t necessarily fit in the kit maker’s vision. I felt like a mettlesome horse, harshly reined in against running. It drove me nuts. I will go back to kit someday. When I have learned patience, for a start.
Dear Mary
I had to smile at this because like you I’m a bit of a “do as I say not as I do” person I often don’t read the full instructions or skim through them because I think I know what the instructions will say and therefore don’t need to read them fully, mistake, mistake you can always learn something by reading through carefully especially if it is instructions on on a project that has stitching that you familiar with and it is good to go outside ones comfort zone to learn something new even if the thought of trying new ideas is scary. Are you now going to follow the instructions carefully for the other leaves, ha, ha. Thanks for sharing your thoughts on the ups and downs of following Carefully embroidery kits instructions.
Regards Anita Simmance
Good Morning Mary and Thank you! I tried a pattern from the book featuring Late Harvest. I am still a novice to the needlework world, so stitch instructions are absolutely necessary for me to do anything other than a backstitch. My attempt was an epic fail in part to not being able to follow the steps as the author intended. I suppose I still need more practice to be able to get to the point of knowing that step 1 to step 5 to step 3 will ultimately get me to the finish. It feels better to know someone with your experience stumbled slightly with this too.
You only need a little help to get you over the line with the stitches and their tensions. I’ve sought help before with Hazels work and I am familiar enough to face it now after only doing it for 3 years.
And we’re all learning right along with you!! thanks!
oh, Mary! I’m really sorry you had to take the time and trouble to do this for us, but I promise: lesson learnt here! 😉
Of course I understand! Lol. I’ve done the same thing before. You live and learn, I guess. 😀
Thank you for your lesson, Teacher Mary!
Sarah
Mary,
I love this ! Thanks.
Hi Mary,
I like what you did and hope you don’t rip it out! My mind didn’t “get” those slashy lines either. Also, I see possible difficulties in stitching around the beads that way. It will be interesting to see what you decide and why. You always have such great insight and teachings. Thanks for sharing all your knowledge and talent! I appreciate all you do and am sure tons of others do as well.
Ha! I just did the same thing in a band of a sampler I am working on. Rice stitch? Got that…Did not read the line about changing colors. Time to rip.
I dislike reading instructions. This applies to all instructions, not just kit instructions. Instructions are boring. They remind me of those word problems in math from high school. Even though I know the designer/author/manufacturer spent a lot of time putting this information together to be clear and helpful, I can’t help it. I look at the first line of the instructions, my eyes cross, and I’m only reading every twelfth word.
Ah yes, the problem with written instructions. It’s so easy to make assumptions and jump right in, and then to keep going even when something niggles at you. Oh well, I’m sure everyone does it.
Thanks for the heads up!
I laughed a great deal at your description as I had done similarly on my first Hazel piece but I have since learned my lesson. The detail in her books is well considered before it goes to print and certainly takes all levels of stitches into account. We all think we know better but recipes are worth following aren’t they?
And reading (or not reading) instructions is why I refer to the picture of the finished project almost as often as I do the instructions. Sometimes it serves to clarify/reinforce my written instruction comprehension.
!! Good point, Gail !!
Thanks for the lesson learned 🙂
My problem is always when there are illustrations with instructions. I look at the pictures, think I know what it what, and start stitching away happily. Inevitably I hit a snag and have to go back and actually read the instructions to find what detail I missed the first time. It just means we are getting valuable practice in how to fix mistakes or work them into the design, right? 🙂
I end up working out which elements come first – this isn’t often adhered to with kits. I end up with a spreadsheet working out which elements of elements come first; from this I write the instructions. It’s rather a pain but so many kits describe elements in a clockwise direction with no consideration of order.
To do this, means reading the instructions in detail.
For a beginner, do you have an opinion on any of these companies for kits as far as quality of floss/fabrics? Bucilla, Dimensions, Jack Dempsey, Fairway, Tobin, JanLynn.
Hi, Georgia – well, if they get a beginner into embroidery, then that’s ok. I think as a person progresses in experience and range of techniques, learns more about materials and what’s available out there, tries better materials, threads, and the like, they’ll probably find that commercially prepared kits are somewhat lacking when it comes to quality materials and even instruction. But insofar as getting going, if that’s what’s available, then better that than nothing, I suppose.
This question goes back to a subject bring up now and then. It’s this: quality materials make a HUGE difference in the outcome of any embroidery. Often, when an embroidery project comes out so-so or even disappointing in results, it isn’t necessarily the stitcher’s skill that’s the problem. Sometimes, it’s the materials the stitcher is working with. Lower quality materials generally produce lower quality results all around, even if the embroiderer is a fairly good embroiderer. Lower quality materials can cause frustration during stitching, too, and can often turn beginners off needlework altogether – either because the thread was frustrating to use, or the fabric didn’t hold up when something had to be picked out, and so forth. Commercial kits today are notorious for using pretty low quality materials, especially ground fabric, but often thread, too. Craft thread is simply not the same as good embroidery floss, and “crewel” threads that are simply crochet yarns restructured and repackaged for needlework are not the same thing as crewel wool. These threads won’t hold up to embroidery. Commercial kits out there often rely on these ingredients.
But again, if it’s somewhere to start, and that’s what’s available, then there’s nothing wrong with using them. I always hope that folks will discover that there’s more to needlework beyond the commercial kit, though.
Thank you for your comments. Maybe some of your readers have opinions about which companies seem to have better quality. I know buying your own floss is very important. I want to do a set of pillow cases as a wedding gift. I love the idea of buying my own cases because I’m sure pillow case quality is certainly not the same as buying 600 count cases. But I cannot find patterns for a wedding/couples theme, beyond the simple Mr. and Mrs.