


Last week, I asked you all how you organize threads for large needlework projects – because, you see, I’ve gone off the deep end and I’ve set up a pretty ridiculously large project that will probably take me three hundred years to complete.
When I asked the question, I was already hooked into organizing the 200 colors required for this project – there are 95 solid colors in it, and 105 blended colors.
I found that the organizational aspect was actually kind of fun, but it took So Much Time. It was a project in itself! Still, I figure if I’m going to subject myself to a super-duper-long-range project, it makes good sense (based on the Principle of P’s: Prior Proper Planning Prevents Poor Performance) to organize thoroughly in advance.
So many of you offered great suggestions for organizing threads for projects! A couple of you mentioned the system that I’m using, which is called Annie’s Keepers. Today, I’ll show you that system, the parts involved, and how I’m using them for this particular project.
Once I decided to move forward with the project (which is a counted thread project involving an 80-page chart, 200 colors, and 250,000 stitches, in tent stitch), the first thing I did (besides purchasing the chart) was contemplate organizing this many threads in a logical and efficient way.
I don’t often do counted work, so I wasn’t really familiar with what’s available on the counted cross stitch market as far as organizers are concerned. I knew about thread bobbins, LoRan thread cards, floss bags and rings, thread drops, and DMC’s stitch-bow system, so I contemplated each in turn.
I knew wanted to set up my threads pre-cut, in a loop through a hole. I find this the easiest way to set up threads so that one strand can be removed at a time, without having to strip the floss. This requirement eliminated bobbins, floss bags, and the stitch-bow system.
This left the LoRan thread cards and thread drops.
I also wanted the ability to remove specific threads from the main group so that I could stitch with them, without having to carry around the whole thread card or a group of thread cards. This left thread drops.
But I also wanted some kind of system that could be closed in, that would allow the pre-cut threads to be left fairly unruffled. Thread drops didn’t strike me as the solution.
I decided to concoct my own system, using some small plastic rings that I had on hand for making Dorset buttons. I would have to make a number and symbol tag for each ring, and then I’d have to put the rings on something to hold them in a specific order. And that Something should be containable inside Something, to keep the threads clean. What occurred to me was the thin metal hangers on the inside of hanging file folders.
Yes, that seemed like it might work. I could hang all the threads in a portable plastic file box that way. I would have to attach the identification tabs in a way that they could be easily seen, but yes, it might work!
And then I thought about removing some of the rings, and I realized that I’d have to remove all the rings from the file wire and replace them in order, every time I wanted to take a ring off.
Plus, there was a problem with the rings: many of them had a small ridge on the inside or outside of the plastic, which would definitely interfere with the thread (and ruin it, really).
And that’s when I finally got frustrated and said, “Somewhere, someone has already solved this problem.”
I turned to the One Who Knows the Answer to All Great Questions of Life: Google.
I Googled a lot of terms, but it was “floss keeper hanging file folder system” that worked. Annie’s Keepers came up.
And they looked like what I was trying to do, only they made more sense! I noticed they are available at Nordic Needle, and so, forthwith, I placed an order. (Actually, the poor people at Nordic Needle – I ended up placing three orders before I finally got it right…)

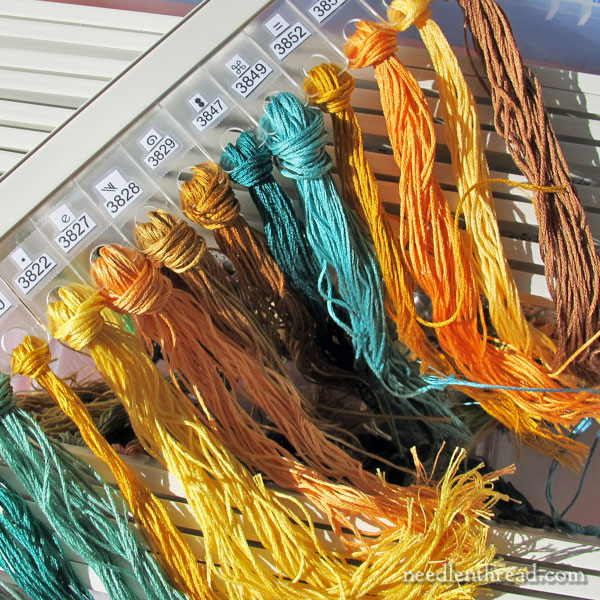
Annie’s Keepers is an embroidery floss organizational system that involves pretty much two main components: slides and keepers. The slides are long, sturdy plastic hangers that hold the keepers, which are basically acrylic tabs with two holes in them.
There are two types of slides available – project slides and storage slides. Storage slides have hooks on the end, so that they can hang in a file cabinet or a file box. Project slides don’t have the hook ends, so I opted for the storage slides.
The keepers can be taken off the slides and put on a ring, and then replaced on the sides, without having to move all the other keepers on the slide. Removing the keepers is easy enough. Getting them back onto the slide in the same place takes a little more work, but it does work.
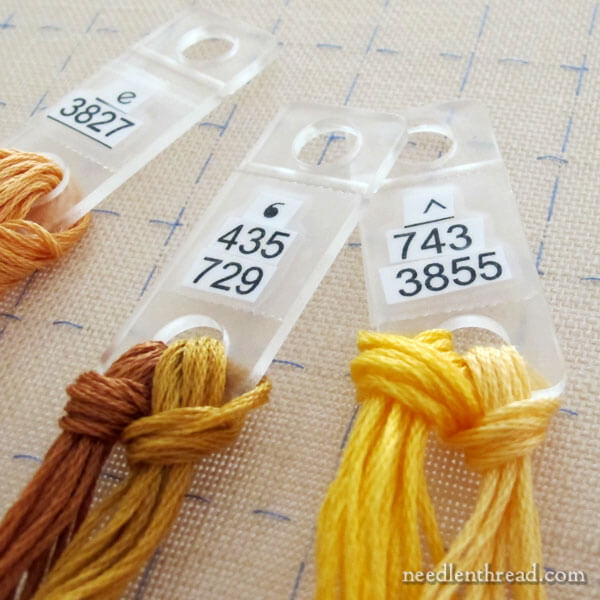
The acrylic keepers come with round labels that you can write symbols and color numbers on, but I opted to label these my own way. I enlarged the symbol / color list from the project and cut out the symbols and corresponding colors and taped them onto the keepers.
Once all the keepers were labeled and ready, I cut my threads and looped them onto the keepers, slid them into the slides, and placed all the slides in a portable plastic hanging file box.
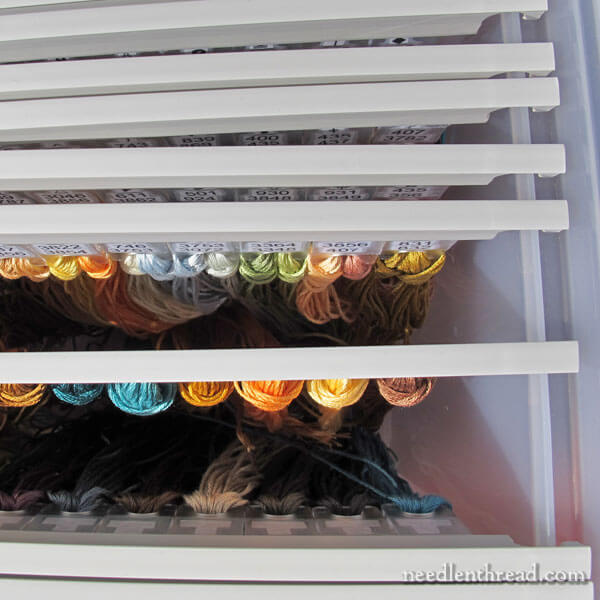
The threads hang straight down, they don’t get too jumbled up together, and the file box can be closed and left undisturbed, keeping the threads safe, clean, and tidy, or the whole thing can be fairly easily toted to one place or another, depending on where I want to work on this project.
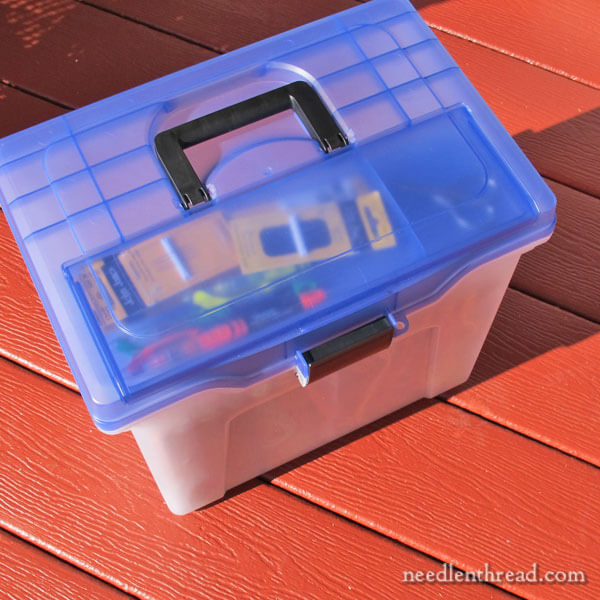
It’s not a big file box. And there’s even room inside, with all the threads, for the chart binder and other requirements (like my CraftOptics).

And this particular file box has a nice little tray in the lid, to hold scissors, extra needles, and highlighters.
So that’s my solution, and it answers every requirement that I set out with. I think it’s a brilliant system!
It’s true that a homemade system would be more economical. The Annie’s Keepers storage solution (for 300 threads – that’s 20 sliders and 300 keepers) is around $79, and I picked up the file box on sale at Staples for about $10. So this whole set-up is just under $100.
But it’s a system I can use again, it keeps everything neat and tidy and ready to go when I need it, and it keeps the threads in good shape.
I’m really happy with it!
Where to Find Annie’s Keepers
You can find Annie’s Keepers through Nordic Needle – that’s where I ordered mine, and they were very good about getting it too me quickly. They have flat rate shipping, which is nice!
You can also find it, I think, through Stitching Shop in Denver, though I can’t find it on their site. You might call them, if you want to order from them.
In Canada, you can find Annie’s Keepers through Traditional Stitches.
Dear Mary
I’m glad you found a system for your project and what a great system for storing a large number of threads, I like that they hang in the storage box and I like the tray to hold accessories great idea for those long projects everything in one place and a dust free solution. I can’t wait for you to show us the design and I look forward to your progress on the project. Thanks for sharing your storage solution with us and for the link to purchase the slides and keepers.
Regards Anita Simmance
My cat would have a field day with these. I just put the skeins in the small plastic bags and put them in numerical order on metal rings.
When are we going to see what this project looks like?
Ah, yes! If you have cats, not the best way to go, probably! I don’t have cats – they’re about the only thing in the world I’m highly allergic to. I’ll show you the project when I actually get stitching on it, which probably won’t be too soon, but I’m counting on some good winter evenings for it!
Mary, Thank you for writing about this. I have been working on a huge, four seasons cross-stitch project for years. I wish I had known about this sooner but there’s still plenty of time left! I think sorting and preparing the thread is one of the most relaxing parts of the project.
This may cause a flurry of “No’s,” but… I think you are making a mountain out of a mole hill. You are probably losing as much stitching time trying to get organized as you would if you just punched holes around a piece of light cardboard (or two or three), looped the fibers into individual holes and marked their numbers above, and got on with it.
I tried this, but found when I wanted to put the project away my threads got snarled / tangled. What do you store your ongoing project thread cards in?
I’ve done the same thing with kits ( not my favorite anyway). I’ve punched holes in cardboard, marked the number and symbol and looped the thread through the holes. I’ve never tried it with 200 colors. Just 20 at the most on a card.
As for Robin’s question: When I’m not stitching, I quickly finger comb the floss 🙂 so they’re all hanging down in one direction, then gently grab the bunch of strands and wrap them around the cardboard. That keeps them neat till I’m ready to stitch again. Then I unwind them and shake them out.
That is a neat idea for a huge project. Not sure it would work for me, but I might try making a kit like that at home when I do the next *huge* project.
FYI on the highlighters…the particular type in your last pic tend to run dry rather quickly. The big fat sharpie highlighters last a *lot* longer, except they fade which is not fun on a huge project. (Even within about 2 months).
For LONG term projects, I recommend investing in sharpies, not highlighters. I’ve got a project I haven’t touched in 9ish months (people have been having babies and getting married), and my chart is still as yellow as the day I highlighted it.
A sharpie seems to last (approx.) 2-5 pages of highlighting.
Hi, Myst – thanks for that recommendation! Actually, I use….Sharpie Highlighters! They’re great!
Prismacolor pencils (in appropriate colors) also work well as highlighters. And they last for years. And can also be used for enjoyment in some of the adult coloring books. Or designing needlework too!
Oh Mary this is perfect! I have already put myself on the waitlist to order one. I didn’t know this system existed or I would have purchased it a long time ago. Thank you for your hard work and research. I now know how I will organize my floss!
Useful info. I keep most of my thread collection, pre-cut- on LoRan cards on 3 ring binders but they do tangle.On the Annie’s Keepers website they appear to have other, and more, components of the system available. hh
Dear Mary,
Duh! Knock me over with a feather. I have never considered cutting all my threads before I started a project! What a wonderful idea.
Thank you,
Mary, i’ve been looking forward to your choice and certainly will consider this. I could send a photo of my current system but i fear you might run screaming from the room!
I have a question about this statement: “…set up threads so that one strand can be removed at a time, without having to strip the floss. ”
Do you mean that the velcro and thread conditioner is not necessary when pullins single strands? And with the loop through the hole, it is still possible to pull one thread?
Thanks for helping this newbie!
Hi, Barbara – when you have your threads hitched through a hole (as shown in the photos above), you can slide the eye of your needle underneath one single strand on the front of the hitch, and pull that single strand out by itself. You don’t have to take the whole 6-strand piece out and separate one strand at a time. Hope that helps!
Thankyou for asking this question, Barbara, I was wondering exactly that. And thank you for your answer, Mary. I’m looking forward to seeing your project.
Yes, that does help, Mary! Makes it seem lots easier to manage!
I’m glad I read the previous posts first because this was the very same question I had. I’ve done floss strands on cardboard with holes but getting the floss I need has been a real pain. I’ve always untied the blob o’ floss from the card, took what I wanted and tied the rest back on. Next time I’ll try Mary’s needle trick.
Hello,
This is so amazing. I have been using the paper thread drops–I didn’t even know they had a real name just used my own.
Can you tell me how you locate the thread you want to use next–I’m trying to understand if you have to take the slider out to get the thread.
Thanks so much. Love your work
Tammy
This system looks really interesting,and the keepers are something new to me. However, I’m puzzled by the 2nd and 3rd pictures which seem to show two colours and two numbers on one tab, headed with one symbol. Do both threads use the same symbol? And how do you keep track of which colour has which number code without time-consuming reference back to a thread colour chart. Did I miss something?
Hi, Jeanette – the symbol represents a blend, or one strand of each color. The colors are left to right and the numbers top to bottom, so the number on the top corresponds with the color on the left. The symbol on the chart represents one strand of each color in the needle at one time, for each stitch corresponding with that symbol. Hmmm…it was clear while I was thinking through it, but I’m not sure if my explanation is clear. If you have any other question, feel free to ask!
Hi Mary, Well done on your organising! I know it’s way to early to be asking this question, and you’ve probably answered a similar question for other projects previously, but what do you do with all the threads when you finish a project with this many colours? Regards Mark (from Down Under).
Hi, Mark – well, if there are any left over of the precut threads, I put those in small floss bags with the number on them and put them in my thread drawers, which are arranged by color groups. Either that, or they end up in my “thread scrap” box, that I use for stitch samples on the website. Depends on how much is left of the skein, really. Hope that helps!
So, then, now, we get to see the project? …since you have thread organization under control… 🙂
Hi, Leanna – I’ll share the project and all the information as soon as I get some stitching done on it, which probably won’t be right away. Since I haven’t worked with the chart yet, I want to get some stitches in before I write about it.
That is brilliant. I especially like the file box so that you can keep all your tools handy and if there is room, your project as well.
I thought you were going to use these, given the comments you made after your last post. They look like a very nice system. A bit expensive for me though + I don’t like to cut all my threads in advance.
Look forward to seeing the project, when you get around to it.
HA!
I Knew it!! I KNEW you’d go with Annie’s!!
Just leaves more Oreos for me… 😉
I am enjoying your new journey. Just got home from Ark. where I could read but not comment. I so wanted to say… perhaps you could start a post on “what’s your – silliest, craziest, most insane moment/choice with needlework – story? LOL. Mine would be deciding when I was in high school that I would embroider a beautiful piece I found in a small town 5 and 10 cent store (remember those?). It was a picture of 2 deer printed in white on a satin black fabric. You chose whatever colors, stitches, etc. Well, that piece was going to be a Christmas gift for my mother. Good idea IF you start working on it in time. So… what did I do? I forget/procrastinate until… Christmas EVE!!! Yup, I had barely begun. Well, believe it or not, I sat all day on the 24th, thru the entire night and I did manage to finish, and actually did a good job. Did I ever learn a lesson! LOL…
I wonder what other stories are out there waiting to be confessed!
Good luck with your latest project, I am so excited to see it in progress.
Wow!
Hi, Mary,
This is sooo cool ! What a brilliant idea for keeping a lot of floss! I went to Annie’s Thread Keeper website and sent the link to my local cross stitch shop hoping that it’s something she might be able to carry. Thanks for the info.
Shelley
Mary,
Thanks for sharing your strategy for organizing your threads. I have a question about how you organize your time and projects. Do you have any “tried and trues” to keep yourself on track with multiple projects? I am struggling with my focus, and how to keep making headway on the backlog in my sewing room.
Any suggestions?
Thanks,
Susan
Hi, Susan –
When it comes to projects that I just do for my own pleasure, I pretty much work on them as the mood strikes. I figure if it’s for my own pleasure, then I’m not going to stress myself out over “getting it done” by any specific time, or even working on it, if I’m not in the mood for that project.
But when it comes to work-work, or those projects that I must do, either for my own website content or for other writing gigs or things like that, that’s a different story. I put them in order of due date, and I make a project list for each of them. I break the project down in stages, and list each stage, and tick it off when that stage is finished. For example, a project list might look like this: design, test threads, photograph supplies, transfer & set-up, stitch, photograph tutorial steps, photograph finish. I can’t usually do all that in one day, but if I have it broken down in doable chunks that I can check off, then even if I’m not finishing something in one day, I can see the progress I’ve made and what I have to do next. It helps to break projects down like that, and to mark off the parts you finish, so that you can see you’re making progress, and so that you know what direction to go in next.
Mary, once again you have come up with a great solution. While I know it won’t work for everyone or every project, I really like this system, and the hanging file to hold it all in. After I made my tongue-in-cheek comment on your post asking for solutions to huge thread projects…… I am ready to start one. A Trish Burr project my wonderful husband bought me last Christmas. I can’t spare $100 right now, so I will muddle through with my own system. But this system is one I will tuck in my back pocket, knowing I can always go back to your site and refresh my memory. I love this site!
I looked on the Annie’s Keepers website and it looks like they sell a starter kit with 50 thread holders for only 20$. I hope that helps.
i didn’t know anything about this system until about 2 weeks ago. But in February I made a very similar system to house my over-dyed collection by company. Works great for me 🙂 http://thetwistedstitcher.blogspot.com/2015/03/diy-organization-and-some-new-starts.html
I can’t wait to see what the project is! And I’m really envious of that thread storage solution. I have the DMC floss-bow things, but I do not love them. I’ll definitely consider this when it’s back in stock.
I’ll stick to my laying them out on my old Edwardian butlers tray “system”..with a sheet of tissue to cover from dust. I,d rather spend my money on more threads and lovely linen .
……. I,m still looking for a butler to carry it around for me and do the dusting ! lol !
Those colours look fab Mary , cant wait to see what you’re doing !
Mary,
Actually, I do have kitties and I think this is brilliant. To be able to lock away my threads in a box away from prying eyes and paws. Just brilliant! Thanks for this. Nordic Needle is going to have to stock up. Thanks ever so much. BJ
Hi Mary
I printed out your pattern to organize my thread and I will punch a whole at the end and put them in a loose leaf binder keeping same shades together I hope it works!
I love getting your emails
marie
Thanks, Marie! I’m glad you enjoy the daily email!
Hi Mary,
I know it’s a few months later, but I’ve just gotten around to saving up for this system (the postage to Australia was $58 so it has been an expensive exercise). I have been enjoying putting all of my Colourstreams, Chameleon and Cascade House threads on to the keepers, but they were easy as the skeins unfolded to a lengthy loop which I could put through the hole easily without pre-cutting the threads. I am wondering how you handle the DMC stranded and Coton-a-Broder skeins though – did you painstakingly unravel the whole skein then cut it into lengths then place them together as a bunch, fold and put through the keeper hole?? I can’t imagine how you could do that easily without a huge tangle. I know there’s a way of easily getting Broder to become a larger bunch of threads and doing a loose plait, and I thought that I could do the plait on the thread once it’s poked into the keeper hole (hope this is making sense) – but I can’t remember how to do this. How have you transferred your DMC threads to the keepers please?
Hi,Michelle – I pre cut my DMC floss into 18-20″ lengths, so that I can pull one usable strand off at a time. Hope that helps!
Thanks. I guess I have a very big task ahead of me, unravelling and cutting many many DMC hanks!
So now that you’ve used this for a year, I have a couple of questions.
First, you said you cut your threads and then hung them. After your project is done, what did you do with the leftover cut threads. Did you leave them hanging off the keepers? After a while I could see ending up with as many keepers as thread colours so over time, all the threads from your bixby storage system would move to Annie’s keepers. Or am I missing something.
Second, what do you do with your non-DMC embroidery threads; how to do handle your silks, crewel wools, and such?
And third, any regrets about this system?
Thanks,
Barn
Hi, Barb – The system works great, so I don’t have any regrets about it. I haven’t used it for this particular project, though, because I handed it off to my nieces, who were interested in turning the thing into a “group project” that the two of them would work on, taking turns.
I use my thread cabinets still for my primary storage area for threads. With a system like Annie’s keepers, I would organize these just for specific project. When the project is over, I’d remove the threads and the numbers, and I’d put the cut skeins into small (tiny) ziplocks, with the numbers on them, and store those either in a cabinet or a box. I have a couple boxes of stray threads like that, and I use them for various tutorials that I show here on the website, or for quick little one-off projects, or, if I’m working on a project that calls for that thread, I’ll use as the cut skein first.
But I prefer my storage cabinets for all long-term thread storage. Everything else – like this keeper system – I use as temporary project organization, and then I re-use the system for other projects.
I store all my threads in my Bisley cabinets – silk, wool, cotton, goldwork, etc. They keep well, and it works for me!
The Annie’s Keepers storage solution (for 300 threads – that’s 20 sliders and 300 keepers) is $89.99 at Nordic Needle. You’re lucky you got it for $79.00. I wanted to purchase Annie’s needle keeper because i like to pre-thread my needles before i start a project but Nordic Needle stopped carrying it. Plus the only carry some of Annie’s products even though they’re her exclusive and only dealer. I didn’t want to dive into the $89.99 system until trying out the system especially the project slides. I wish there was somewhere else to purchase the less expensive products.
How big is the portable plastic hanging file that you got at staples and what brand is it?
Hi, Anna – Not sure about the brand. The size is the width of any standard hanging file box like this. I think you’ll probably have to take a look at them to see what would work for you. This article was written a while ago, so I’m sure that type and style have changed since then.
I’m not able to find Annies Thread Keepers. I have place an order twice in the past month and received no product and no response. I ordered from the original website that is located in North Dakota. I see a few others may carry it but the price is substantially higher than North Dakota. I don’t understand why they don’t remove their product from the internet since apparently they are no longer available. I have sent emails, tried to call. No response. Do you have any information about the website. Thank you if you have any information. I may have to resort to doing what you did.
Sorry, Judith – I don’t know if they are still in business or not. I’ll keep an ear out, though, and see what I can find out.
If just purchased my Annies Keepers. I’m wondering how long you cut your thread length.
Thanks Jane from Australia
I usually stitch with about an 18″ – 20″ length, so that’s how long I’d normally cut my thread. 🙂
Love your setup! I have some of these but haven’t been able to find a box they fit in, may I ask where you got yours?!
Office Depot! 🙂 Any office supply store should have something similar. They’re just hanging file boxes, plastic, with a carrying handle.
I could have dove with this fifteen years ago! Now I’m committed to my homemade system that took hours of preparation: lever arch files with cardstock and holes carefully measured and cut into one edge. Occasionally I gave to replace a car, but I’ve been using this for fifteen years and I have only replaced one card to date. Each hole can hold two or even three skeins of stranded cotton /floss pre-cut into one-metre lengths and I have labelled each hole in numerical order. I make my own thread cards too in a similar fashion, labelling a pair of holes for each thread with the number and the symbol (one small hole for the length in use and one extra large hole for the rest of the skein).