


All this talk about embroidery floss organization lately has raised some good questions from fellow stitchers, from newbies and experienced alike.
One recurring question has to do with the embroidery floss pull skein, and how to pull thread successfully from the pull skein without having to wrestle a knotted clump of embroidery floss to the ground to subdue it.
Let’s address that question today. I’m going to give you the key to unlock the secret of the pull skein! We’ll also discuss the whole notion of the “blooming” end of the embroidery floss.
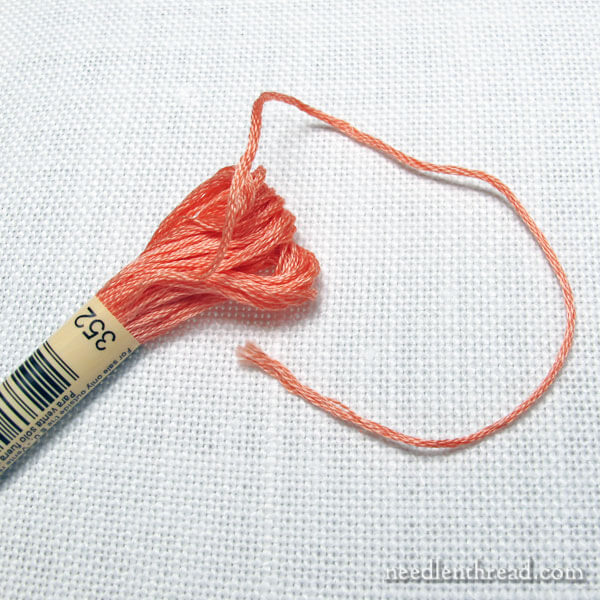
This is a pull skein. It’s a skein of embroidery floss – usually the six-stranded kind – and (according to the concept, anyway), you should be able to pull usable lengths of floss from the skein without having the skein bunch up into an un-pullable knot.
That’s the concept, and it’s a brilliant one! It makes it easy to remove a length of floss, but keep all the information tabs on the floss and keep the floss constrained in a tidy skein.
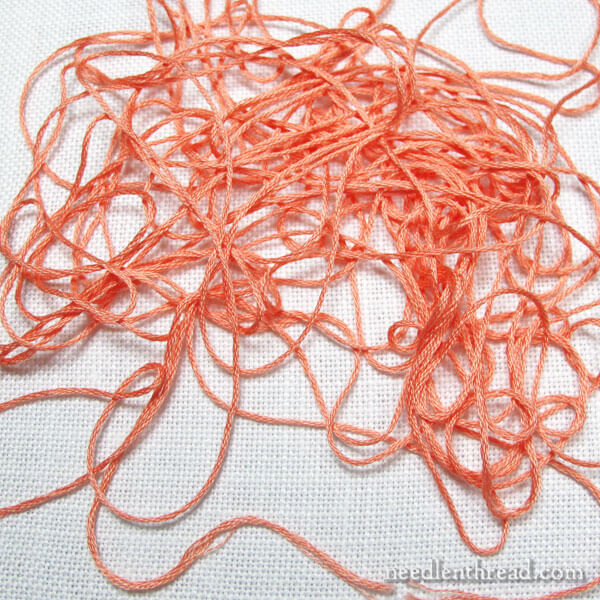
But oh, oh, oh! How many times have we pulled on the floss, only to end up with a burgeoning mass of confused, knotted thread that requires hours and hours of untangling before it can be used again?
If you’ve experienced this – granted, I might be exaggerating just a wee bit – then listen up! I’ll solve your thread woes right here.
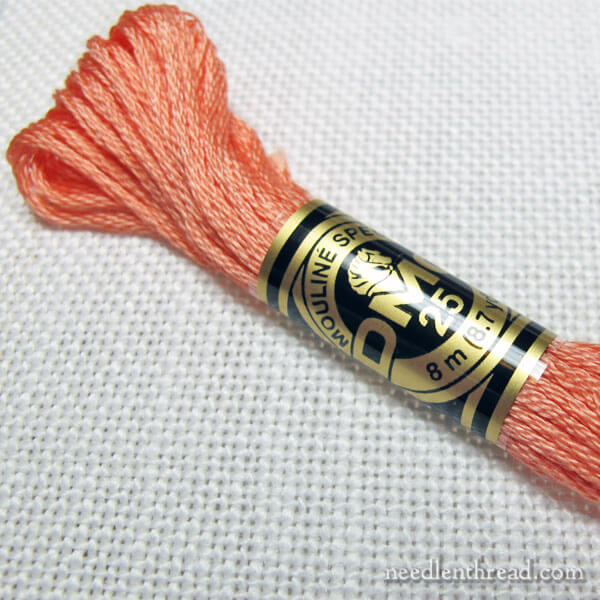
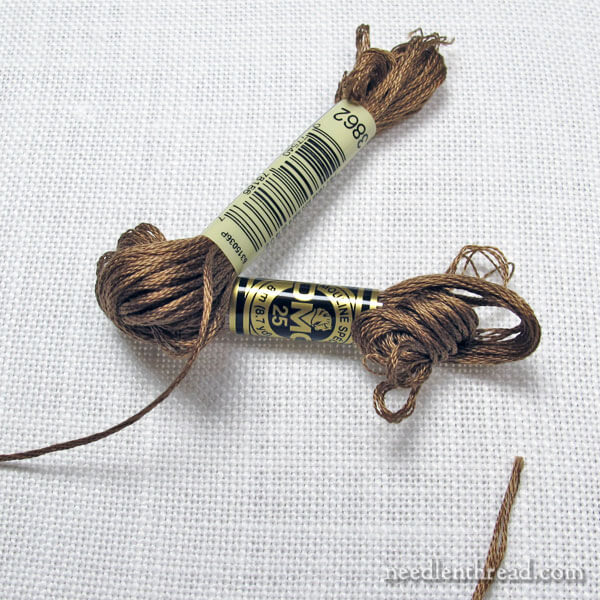
The pull skein for stranded floss generally has two information tabs on it. The short tab, above, is normally the brand and type tag. For this example, it tells you that the skein of floss above is DMC, that it’s “Mouliné Special” 25 (their famous 6-stranded floss), and that there are 8 meters of it.
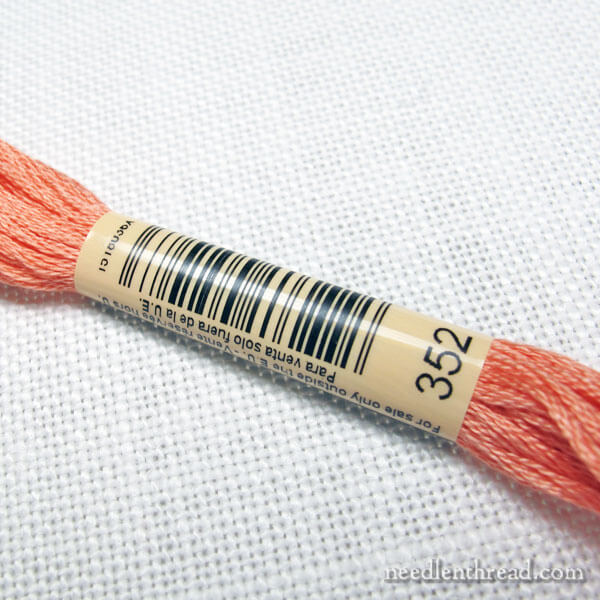
The longer tab on the other end of the skein has the bar code on it (used for inventorying), but more importantly for the stitcher, it has the color number on it.
Of the two tabs, this is the more important tab, for two reasons: the color number and…
…that.
See it?
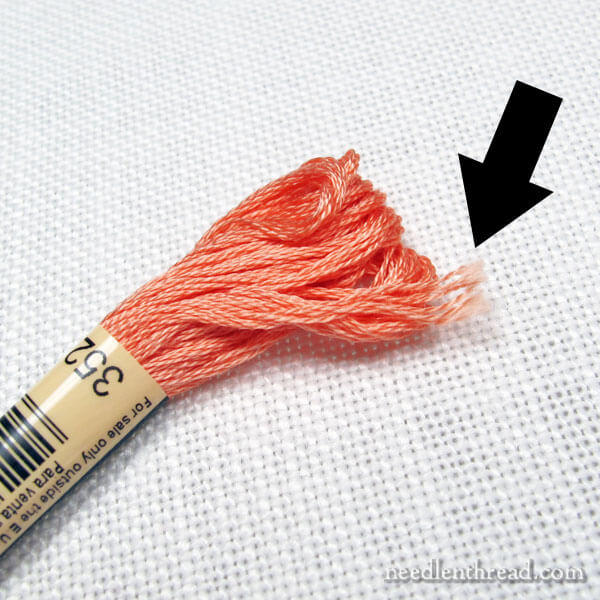
Somewhere on the long-tab-end of the skein, you’ll find an end of floss.
That end of floss is your friend.
99% of the time, it will come through for you.
Always look for the end of the floss down beyond the long tab.
Although it often sticks out from the end of the skein (somewhere beyond the long tab), if you carefully examine that end and follow its path backwards into the skein, it will look like it’s coming from inside the skein.
You can pull that end of the floss, and if you pull it carefully and slowly, you should be able to…

…pull…
…and pull…
…and pull!
And the whole skein should pull out with nary a knot.
Or at least, with nary a massive, time-consuming knot. Occasionally, you might get a slip knot or something similarly simple to remove, but you shouldn’t end up with a huge knotted clump that takes any amount of time to sort out.
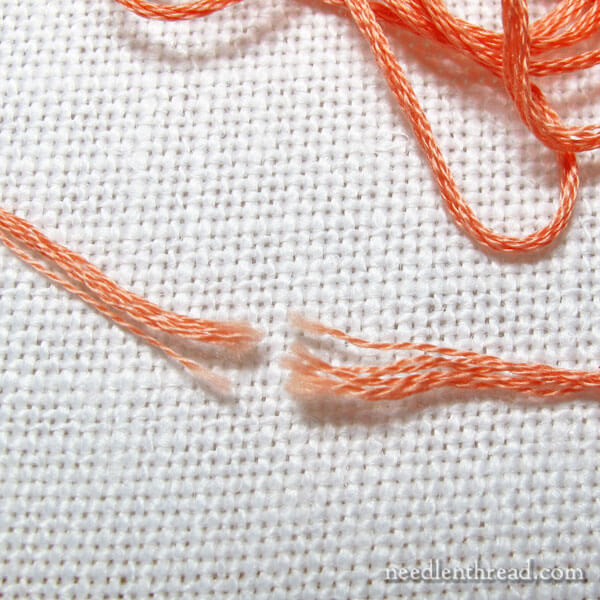
Oh, look! Here, we have the two ends of the skein. Notice that they both have fuzzy tips. One is a bit more separated than the other. Some people call this the “blooming” end of the thread.
We’ll talk about that below.
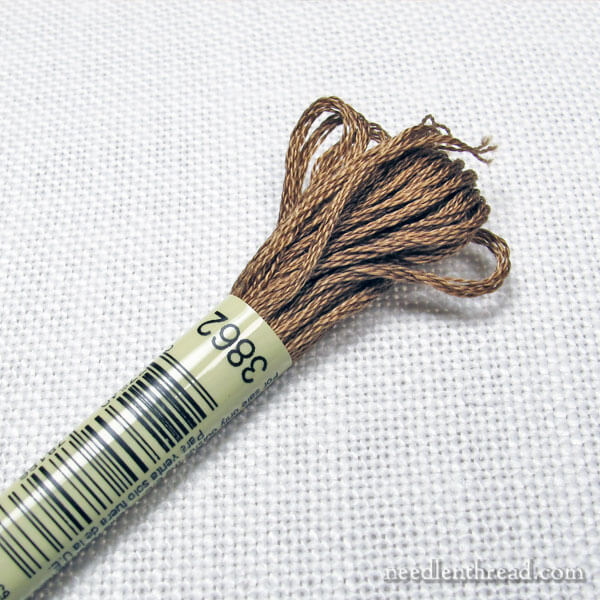
Here’s another pull skein. We’re at the long tab, and you can see an end beyond the long tab. Remember – it’s your friend!

Somewhere, down by the other end of the skein – often underneath the short tab – you’ll find the other end of the floss.
If you’re planning to use the skein as a pull skein, this end is not your friend.
Another thing you’ll notice about this end: if you follow the thread backwards from the end, you’ll see that it is on the outside of the skein.
If you try to treat this end like the pull-able end of a pull skein, you will end up with a mess. And actually, it won’t let you pull much. The skein will knot so much, that you’ll have to remove the tabs completely and spend time sorting the mess out.
If, however, you’re planning to remove both tabs and wind the floss onto bobbins or measure out the whole skein into pre-cut lengths, then this end is your friend, because it’s easy, with the tabs removed, to just unwind the loop of floss – assuming you haven’t pulled on it with the tabs still on.
If you’ve pulled on it, you’ll need to sort out the mess before you can wind the floss on bobbins or measure out lengths to pre-cut.
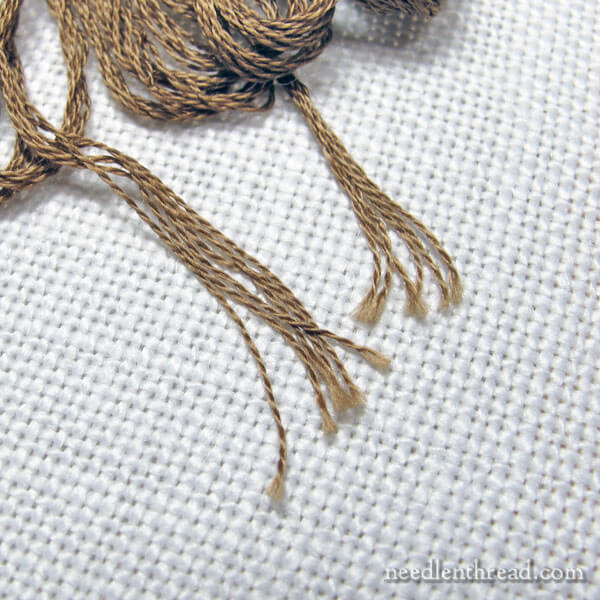
Here are the two ends of the floss on the skein.
Those Bloomin’ Ends
If you’ve learned to seek the “blooming” end of the floss and pull from there, there’s a flaw in that reasoning.
If you saw these two ends above, which would you judge as the blooming end?
Sometimes, folks rely on the “blooming end” theory, because they believe it has to do with exposing the correct direction to cut from, so that you’re stitching with the “grain” of the floss. You can read my article on floss grain and why I don’t subscribe to the whole grain direction idea, if you want to explore that topic further.
On the other hand, if you look for the “blooming” end of the floss because it is the more exposed end, the end that gets more wear and tear during storage and shipping and handling in the store and all that – and therefore, the end looks more bloomed than the less-exposed end that’s usually tucked somewhere under the short tab – then I’ll buy that. The exposed end sticking out will probably be a bit fluffier than the other end.
But it’s not a sure-fire way of knowing which end to pull. If the non-pulling end, after all, has been exposed a lot – maybe it slipped out from under the short tab, or maybe the short tab shifted (these things happen a lot!) – then the non-pulling end could look pretty frayed, too.
The most certain approach to take with a pull skein is to seek the end of the thread that is located somewhere beyond the long tab, that looks like it’s coming from inside the skein, and to pull gently from there.
For those who have asked for tips on how to conquer the pull skein, I hope this helps!
If you have any questions, comments, further suggestions, feel free to join the conversation below.
Like What You See?
If you like what you see on Needle ’n Thread, if you find Needle ‘n Thread useful, and if you want to help keep the website thriving and free of annoying network advertising, why not become a patron on Patreon? Check out my Patreon page here, where I’ll occasionally add special needlework bonuses for patrons.
If you shop on Amazon, you can support Needle ’n Thread without any extra expense to you by visiting my Amazon Recommendations page here, where you’ll find books and sundries for the needleworker available on Amazon.
Thank you! Thank you! Thank you! I always new there was a trick to this but I never could figure it out
Thank you for this, Mary! I’ve been stitching since I was a teenager (I’m 52 now!) and I never knew this! How many knots it could have saved me! But we’re never too old to learn something new, and how helpful it is. Thank you again, I love your articles!
In Jesu et Maria,
Jill
Mary – I read your articles every day; however, I have to say today’s article on pulling the correct end of the floss was one of the most helpful I have seen! Finally I won’t end up with a mess everytime I try to pull the end of the floss. Thanks a million.
Thank you!! In all these years, I’ve never known the reason for the thread messes I get myself into. Never more!!
Thank you for the article about which end of the floss to pull. It was incredibly helpful!
Over 50 years without a clue until now. I just thought it was blind luck. Thank you for taking the time to teach us all the tricks. You are a dear!
🙂 Glad you like it, Stephanie!
Thanks for the information! Only question-is this true for brands other than DMC, or is it an industry wide method of winding thread?
From what I’ve found, it’s true for DMC and Anchor, definitely. It seems to be the case with Cosmo as well, though I haven’t used Cosmo as extensively. With other brands that are not as widespread, I’d say test a skein. You want to find the end that comes from the inside of the skein, if there are two exposed ends. The one that wraps around the outside is not going to work for pulling. But for the more commonly known flosses, that end is normally down by the long color number tab.
It *is* the same for Anchor, but there’s a small difference in that the pull end is usually found at the top if the skein. The non-pull end is also at the top, but a little shorter and it seems that they can get mixed up as I’ve had several skeins that just WON’T pull properly….
I have been stitching for a very, very long time….I never knew this! Thank you.
I suspect many readers will lament the older skeins which had the lovely little image of a hand pulling the floss from the correct end. Sadly replaced by barcode.
Right! Once upon a time….
Hi Mary. Thank you for all the info you gave us regularly. I never miss to read them. I am a beginner and all your savy is so precious.
Could you tell us one day (or maybe you already have) if there is a specific way to match floss and fabric or floss and embroidery stitches. I saw some work done with different kind of floss, cotton perlé, cotton DMC but when I try to mix myself, it never looks very good.
I suppose it is where the artistic talent comes into it, or is there some fondations that I don’t know?
Thank you
Hi, Chantal – I would say it’s mostly trial and error. Eventually, you get the feel of what will work and what won’t work, and what you like and what you don’t like. It’s always helpful to look around for inspiration – Pinterest is great for that!
Chantal, Mary is being modest – she has written a number of very useful posts comparing different types of thread. Click ‘Embroidery tips and tricks’ in Topic Tags at the right of the page: scroll down to February 2014 and January 2014, but there are others. It’s worth rummaging in her archives! You still need to experiment, but these give you some pointers to start.
Thank you! Such a simple way to remember which end is the one to pull. I will definitely remember this!
Thank you!!!! I always wondered why sometimes the pull skeins worked perfectly and other times they made a huge mess. I really appreciate the tip – it will save me hours of frustration – Thank you!!!!
Being really new to some of the lingo I had never heard of this “pull skein” term.
Now I know this term, yah! I am confused about the amount of threads that you pull. Do you pull out all 6 threads out and then from there pull the amount of threads you’ll be using? Or can you pull one thread at a time at the length you want? At this point I unwind and put the skein on a bobbin. I don’t think I have ever found such a great blog. You share your expertise and knowledge in n such a great way. You write about things that help with our stitching but also many different types of stitching that makes a person want to do new and exciting stitching. Thank you.
Julie
Hi, Julie – thanks for your comment! The whole six strand piece is pulled out, and you cut the length you want from it. Then you “strip” the number of threads you want to use from the six skeins – you can find a tutorial on that here: https://needlenthread.wpengine.com/2013/08/embroidery-tip-how-to-separate-floss.html. Don’t try pulling one strand at a time from a whole skein – it will make a big mess! You could pull out the length you want to use, then just cut one strand from that length and separate it from the six, but you’d end up with a five-strand bundle hanging from your skein.
Mary, I appreciate the information and advice that you share for all of us. This information will definitely help me. Thank you for sharing and inspiring and have a wonderful creative day!
Oh, wow! This is fantastic information. I can’t thank you enough! I predict that this post will go viral. Pinning!
The skeins used to have a clue for pulling the thread on one of the labels (don’t remember which one, sorry). If you have an old skein of DMC somewhere check it out. I don’t know why they removed it. It was a little hand holding a skein of floss and another hand pulling a thread. If you held the skein as indicated and pulled on the thread indicated it would almost always come out easily. I guess they had to give over the label space to something else.
Oh Mary….I adore you! I’m so glad you give us useful information every day! I was so excited to know this I ran upstairs….ok, I walked slowly…and snatched 6 brand new skeins of DMC. I DID IT! I found the end to pull and now I have 6 lovely piles of beautiful floss without one knot. Yay me! Yay you!! Can’t wait to see what I learn tomorrow!!
LOL! I’m glad it helped! But I hope you have plans for them, because it’s really hard to put them back into the same configuration…! 🙂
Thank you for unraveling that mystery. I discovered pulling from the end coming from the inside but didn’t relate it to the paper wrapping tag.As they say you are never too old to learn something new.
THANK YOU Mary, for adding ten years to my life.
Mary, such invaluable information! Thanks sincerely for educating long-time stitchers! Your emails and blog……phenomenal!!
Oh wow! I knew the ‘inside’ end was the one to pull, but I often have to hunt for it and can’t tell which it’s supposed to be. Knowing it’s at the long tab end is hugely helpful!
I am 58 and I learned embroidery from my grandma way back when I was 7. Thank you so much! You don’t know the messes I get into! Read your articles every day, you’re a lifesaver, Mary!
Thank you Mary. You always have something new and informative to tell us. In case you ever run out of things to say, please feel free to start all over again as some of us (me) joined late and don’t want to miss a thing.
Deborah
Great information. I have been stitching for 10 years and this is the first time I have known about threads leaving a skein. Thank you. It will make my stitching life easier!
I too have embroidered since I was a little girl. Never did I know about this blooming end. I thought I would just get lucky when pulling out the thread. I also tried separating the threads instead of pulling out two strands at a time. It was So MUCH EASIER. Thank you for all this great info. I love to embroider…..
Something I always do (perhaps I am a bit OCD) is watch carefully the loop sliding down other end of the pull skein as I pull. Sometimes it does not behave itself and I can see the beginning of a knot forming. If I stop pulling and gently encourage the loop to go where it should go, then all is well. If not, then there is a less than edifying string of words coming out of my mouth and a long disentangling episode.
I cannot thank you enough for this post, Mary!!!!
Thanks Mary, this is important information. I hope this is true for Coton a Broder. I really have a mess with some of those skeins. I’m going to be sure I pull the one that’s coming from underneath. It’s also made by DMC I think.
Fantastic once again, I shall have to remember this one!
I actually knew the pulling trick (yay!) but I still thought the grain issue was valid, so that was interesting. I smock and it seems like it makes a difference, but it could possibly be all in my head. LOL
Have you addressed anywhere the method you use for precutting it into lengths before looping it onto your holding tabs?
I’m a smocking sister. Nice to meet you!
It was as if you heard me thinking! Two days of how-to’s that have been on my mind. Thank you for remembering to give us the basics.
I’ve always wondered why sometimes it comes out smoothly and other times I wondered why I even bothered to touch the floss!
Also meant to say thank you for the idea to keep a notebook of colors used on a project. I have been keeping my colors grouped together in a bag but sometimes I lose track.
Thanks for all the great information, I am learning so much from you.
Absolutely wonderful. I have stitched for many years, and just would fluff the end up and hope for the best.
Thank you so much! I wish there was a way to conquer this with skeins of yarn.
Thank you, thank you. Sometimes I get the right end by accident & sometimes I get the wrong end. Wish someone had told me this years ago.
WOW, thank you so much. I never could figure that out. Boy what a relief.
Thank you Mary. That is so clear and should eliminate all those snaggles!
I have been stitching for sixty years and never knew this. Thanks so much. Also, I get tired of the little plastic baggies, so the idea of looping them on card stock and being able to pull one strand at a time is a huge help. I archive all your helpful posts. Blessings.
Great tip. It makes one wonder why floss manufacturers don’t put an arrow at the tab that is easiest to pull from. Thank you for figuring this out and explaining it to all us frustrated floss stitchers.
Hi, Jill – they used to! They had a little pointing finger at that end of the skein once upon a time.
well, now I know why sometimes pulling a thread worked andsometimes it didn’t. how dopey can a person be, or too impatient to start sewing.
At last at last!!!! Thank you, for a beginner like me this info is GOLD!!! Now if I only knew what to do with the twisted skeins…..?
Hi Mary
I have been told when embroidering to get the smooth look is to feel the thread for one side being smooth and the other side rough. Is this correct? I cannot feel the difference.
Hi, Meredith – no, not really. There are folks who subscribe in these theories, and if it works for them, that’s great. But in fact, embroidery floss doesn’t have a grain – as the manufacturers will tell you – and there isn’t a “right side” or “wrong side” of the floss.
Thank heavens for this tip. I have spent many hours dealing with tangled skeins. Thank you so much for this post. 🙂
Thank you Mary, this is so helpful. How simple, yet so frustrating when you don’t know the “deal”. Great post, informative and very easy to understand.
Dear Mary;
I am in Canada and I purchase DMC floss. The floss that I buy has a little arrow on the long wrapper on the opposite side from the number. Do you not have that indicator on the floss that you purchase in the United States? I hope you and your readers have a great weekend.
I’m in Canada too, and I have never noticed an arrow on DMC thread. On the other hand, I never knew to look for one, so there you go! I will now.
Thank you, thank you!
Thank you Mary. I didn’t know this. That is so helpful.
Thank you Mary. This will come in handy!
If only it were so simple for Appleton Wools (I mostly get it correct but not always).
I’m eating apple pie that my mom and I made this afternoon… gotta love some fresh, warm, home-made apple pie, right?
I never really thought about pulling out the thread without taking the tabs off… I always take the tabs off, cut the thread I need, and replace the tabs (either by sliding them back on or cutting them so they lay flat and taping them back around the thread). I’ll try it this way the next time I buy a pull-skein. Thanks for the tip!
Thanks Mary, I knew that sometimes it would work and sometimes not but I couldn’t figure out why. So its great to know the methodology involved. An excellent tip if there ever was one! I’ll be sure to pass this tip on.
Mary, you always explain things in language I understand. Wish that were true of the rest of life!
I have just today been able to read this post, and I felt like a bloomin’ idiot for not knowing how to pull thread from skeins before this. -) I was going to post a “I learned how to do embroidery as a teenager and now I’m 56 and no one ever told me this!” —- but I see quite a few have beaten me to it. Well Mary my dear, you did it again. Shared your wisdom and experience in an easy to understand manner, and made the embroidery experience a little bit better for the rest of us. Thank you!
Glad you find it useful, Maureen! 🙂
Thanks, Mary. That’s brilliant. In all my years of winding floss onto bobbins, and of trying to find the end that will pull smoothly, I have never equated the long tab with the correct end to pull. Now, I will never NOT start at that end.
Thank you for these helpful details!
Laurie
Hi Mary,
That was so helpful! I’ve always just looked for an end sticking out and never noticed it was at the long tab. Now I know where to look!
Thanks so much.
Thank you thank you thank you. I have cursed uphill and down dale for YEARS. I did not know that the long tab with the number on it was the end to pull. Joy oh joy
Wow! I never knew about this. This will make our lives easier. Thank you for sharing this great tip Mary 🙂
Another heart-felt thank you from an embroiderer who’s been clueless for fifty years. The frustration level of starting a new project has now decreased significantly-bless you!
Well blow me over! It’s as easy as that, eh!! Yes, I used to rely on the little hand pulling the thread on the OLD labels and was absolutely lost when they took that off. I also laughed because when I was first taught to embroider by my Hungarian grandmother, we would go to the Five-and-Dime and buy a printed napkin and Coats & Clark floss. Before dinner time every one of my skeins of floss was a knotted mess and very frustrating for a 5-year old. Gram didn’t explain the art of pulling floss out of a skein!
Thank you! This is very informative. I’ve struggled with that issue for a long time and I’m so glad to now understand it.
Wow, this is great!!! I was taught this “pull skien” method in the early 1980’s by my 7th grade Home Ec teacher, who is solely responsible for my stitching addiction!! Glad to know you are out there to help everyone. Like you said, if you pull gently on the correct one, there won’t be a problem at all. And why waste all that time winding thread onto bobbins??? I’d rather be stitching!!! Lol
My friend, you have saved me endless headache and a lot of thread (from those times when I get too frustrated and go all Alexander the Great on my personal floss Gordian Knot). If you’re ever in my neck of the woods, I’ll buy you a beer, shot of tequila, or a glass of wine, whatever your preference! Cheers!
Does this also work for Cosmo thread? I don’t seem to find the loose end on the side with the long tab.
Genius, Mary Corbet! Pure genius!
Thank you so very much!
Karen Olson from Minnesota
Mary I read the floche skein ‘pull’ and just had to read this one….it is a puzzle to me why I have not read this before? Your website is a wonderful fountain of information on embroidery, thanks so very much. A very old stitcher, that has always wondered about gnarly knots!
Hello Mary
Great article as usual. I am stitching for about 30 years and know about this trick since my needlepainting classes only ! My teacher also taught us how to cut only the number of lengths we need in order to protect the thread. I also learned that there are four values of color in one lengh… How incredible this little skein of threat is
Thanks for such a clear post on a very “knotty” (sorry, couldn’t resist) problem I’m sure we’ve all faced from time to time. I’ve never known the solution, but have experienced the problem. I’ll try this out today for sure!
I have always used that end to pull my floss, mainly because I found it was easier after knotting up a couple. Thanks for the explanation though. Now I know why. I agree with you on the notion of “grain” of the floss. I have heard that before and dismissed it. I think it stems from the “stitching police” who are stitchery judges. I have never found a difference at all.
Fabulous information! This helps my unraveling knots nightmare tremendously! Thank you for taking so much time to insert photos and clarify your descriptions.
I have a dilemma. A friend of mine gave me a big box of Embroidery thread. I’m organizing it by number but still have a disorganized mess. Some skeins are single and others I may multiples of. Anyone have any suggestions on how to organize this blessed mess without spending a small fortune?
Thank you!
After a length of floss has been cut to use, which end should be inserted into the needle to use–the end cut from the floss body or the other end? Thanks! ab
Hi, Amanda – it doesn’t matter. Cotton thread does not have a “nap” or grain. Either end can go in the needle. This is an article I wrote about that question: https://needlenthread.wpengine.com/2015/08/thread-talk-the-debate-i-dont-want-to-have.html
Thank you for this information!! I never knew that. It will make life a lot easier!
Thankyou for this info, I remembered that there was a trick to it but couldn’t remember what the trick was!
Does it work the same for the Coton a Broder threads? I’ve got quite a few skeins of the 25 thread and the two ends of that are knotted together around a small section of the skein. Have tried cutting out the knot and gently pulling the “inside” thread but keep getting big knots starting to form – with 32m on the skein it is a bit scary!
Any help most gratefully received 🙂
What kind of material do you use?
Thanks!
Wow – been stitching for YEARS and YEARS (only about 35) and never knew the trick for the floss.
Thank you.
From many years of experience, I agree with you. I appreciate so much all the information you share with us. I always look forwrd to reading what you have to say.
Thanks for info. I have also found that if you hold gentle with thumb and forefinger to the far end from where you are pulling it rarely tangles up. Also, reassuringly you can feel the thread reeling out.
Liz
If you are unwinding the entire skein to put on a bobbin you can remove both tabs and carefully open the skein into a circle. Slip the circle of thread over your right wrist if you are right handed and pull out the centre end. (It is fairly easy to find once you open the skein). Start winding the thread onto your bobbin with the skein on your right forearm or wrist, and just pull your right arm away from the floss when you need to loosen more thread. It should unravel easily if you have the right end, it is easy to loosen from your wrist if you don’t. I’ve just finished unravelling about 35 skeins in this manner.
Thank you so much for that piece of advice. I am 71 years old and have sewn/ embroidered since a child, but never knew that about the best end to pull from a skein. Again, thank you.
PS. I love your emails with lots of handy advice and best buys. I now have some beautiful books and embroidery equipment.
There is also a circle in gold on the long tab, at the same end as the color number but on the back side, with a gold arrow in it pointing to the pull end of the thread. At least, I’ve used that to identify the pull end, but maybe it’s for something else as well. For DMC at least…
Hi, Sheila – if you look at the symbol above, it’s not just a black arrow. It’s a black and a gold arrow, intertwined. Could this be the gold arrow you’re talking about? This symbol is a “Möbius ring” symbol used in Europe to indicate something about the packaging (recycled, recyclable, etc.) I’ve diligently studied a whole slew of DMC labels – there is no other arrow in a circle on the long tab. While it works because you’re pulling from the long tab end, it wasn’t intended as a directional arrow to show us where to pull – otherwise, it could only cause confusion. Some people see the gold arrow, some people see the black more dominantly when they look at it, and both arrows point in opposite directions. It works out if you pull from the long sleeve end, because it’s located on the long sleeve end, which is the end that you normally would pull from on a skein of DMC anyway. But the reason it’s there has nothing to do with the pull skein. This particular symbol, incidentally, is going out of use in 2020.
Thank you Mary for explaining the correct way to avoid the knotty problem of pulling the friendly end of the skein..most helpful!!
Sure thing, Michele! I’m glad you found it useful! It’s funny how such a small thing as a skein of floss can be so frustrating sometimes, isn’t it?
I not only enjoyed reading your article , but also gained important information. I’m once again going back to cross stitch, which I love. I see that DMC now has multicolored strands of thread and I’m anxious to try it.
Thank you for your articles. I will now subscribe.
Sandy
Thanks! I’ve long known that one end is better, but I never remember which one. The fact that it is the inner one is logical, and might help me remember better, since I think I’ll soon forget which end of the skein has my “friend”. 🙂
Hi there
Can you please tell me if you are selling floss of DMC? Many thanks for a reply
No, I don’t sell embroidery floss of any brand. Sorry!
Thank you!!
Finally! All these years of wrestling a skein and end up giving up to get a piece the right length. Thank you so much, will apply this method.
Qu. What’s the best way of cutting 18″ lengths so I can place using cardboard tag to go on a hoop, so I can kit up my next piece. ? Any ideas?
I usually measure out an 18″ piece, and then pull from the skein and cut against the measured piece, until the whole skein is cut.
One method that I use is to pull the skein out, taking care to keep it together. I then lay it on my table top. I carefully maneuver the inside into a circle, making sure I don’t leave a loop out. When this is done I carefully lift that end thread and since there is usually a place pretty close to the beginning where it was looped through another thread, I unloop that. I then lift it and put it on my left wrist (I am right handed). I then proceed winding it onto an empty thread spool. This travels well and nothing gets tangled or loose. The hard part for me is when I cut the length I want and have to separate the threads for the number I want. Sometimes I just get a tangled mess. Any suggestions? Thank you Mary for your knowledge and your projects!